Welcome to No Limit Sound Productions

Company Founded
2005
Overview

Our services include Sound Engineering, Audio Post-Production, System Upgrades and Equipment Consulting.
Mission
Our mission is to provide excellent quality and service to our customers. We do customized service.

Wednesday, June 25, 2025

Cubase: Rendering Multi-channel Instruments To Audio

Groove Agent SE allows you to activate multiple output channels and route each drum sound to a  different output.Groove Agent SE allows you to activate multiple output channels and route each drum sound to a different output.

Want to convert your multi-channel instruments into audio? Here’s how to do it in Cubase.

VST Instruments are wonderful things, but sometimes converting them to good old-fashioned audio is helpful. When using several heavy-duty virtual instruments it’s easy to push your computer beyond its CPU, RAM and disk-streaming comfort zones; converting your virtual instruments’ outputs to audio tracks when you’re ready to mix can free up resources. Alternatively, when porting the project to another system (be it a Cubase one or another DAW) for mixing, you can’t guarantee access to the same instrument plug-ins, and providing the audio files is the next best thing. And when archiving your project, it makes sense to include a version of everything in as future proof a format as possible — at present there’s nothing more future proof than audio files.

Going All Out

When the VSTi has only a single stereo output, the process is fairly straightforward, but if you’ve enabled multiple output channels, things can become more complex. Note that there are a number of different possible approaches, and their availability depends on which version of Cubase you’re using.

To illustrate the different approaches here, I’ll use Steinberg’s Groove Agent SE (GA SE, which is bundled with most versions of Cubase), but the same principles apply to lots of multi-out VSTis, such as NI Kontakt 5, Toontrack EZ Drummer and Steinberg’s Halion Sonic SE. Like most virtual drum instruments, GA SE features its own internal mixing environment, where you can balance and process the individual kit pieces before mixing them and outputting everything on a stereo channel. But many users prefer to do their drum mixing in Cubase’s main MixConsole, where they have access to all their favourite plug-ins and can automate the levels of kit pieces and route them to send effects, just like any other audio source. To make this possible, activate GA SE’s additional audio outputs using a pop-up menu, opened via the small downward arrow icon (located top-right of the VSTi’s window). In the first screenshot, I’ve activated outputs 2 to 9 as well as output pair 1 (the main stereo output).

Output busses can be used to route audio from a VSTi’s output to a  stereo Audio Track, where it can be recorded in real-time. I’ve shown a single example here, but with lots of VSTi output channels the MixConsole can get messy, and you don’t get much control over the track layout.Output busses can be used to route audio from a VSTi’s output to a stereo Audio Track, where it can be recorded in real-time. I’ve shown a single example here, but with lots of VSTi output channels the MixConsole can get messy, and you don’t get much control over the track layout.Once activated, go to the MixConsole, where it’s quick and easy to rename these output channels to something more meaningful (the edited names will then shown in the Activate Outputs pop-up menu). Next, in GA SE’s internal Mixer, set the routing of each drum/mic to the appropriate GA SE output channel. If all goes to plan, when you play back your GA SE MIDI track, the sounds should appear on the appropriate channel in the MixConsole.

Recording Via Groups

So far, so good: our VSTi multi-channel audio is routed to suitably labelled tracks in the MixConsole. But if we want to ‘capture’ each channel as separate audio files, how would we go about it? One thing we can’t do is use Cubase’s Track Freeze. While track freezing is useful in relieving some system resources, it doesn’t allow you to create separate files for each of the VSTi’s output channels. Cubase doesn’t allow you to directly record the audio from a VSTi onto these output channels, either. Indeed, the relevant MixConsole channels don’t feature record-enable buttons — only the default VSTi stereo output channel has one, and that’s to enable MIDI recording.

MixConsole’s Routing panel.MixConsole’s Routing panel.However, you can ‘capture’ the various VSTi output channels to regular Audio tracks. And, while newer versions of Cubase offer more elegant solutions, which I’ll discuss below, there’s a (slightly clunky) routing workaround for older verions. In Devices/VST Connections, create a new Output Bus for each of the additional VSTi outputs you wish to record from. The Device Port setting for each of these should be ‘Not Connected’. Then create the same number of stereo Audio Tracks. With eight GA SE VSTi output ports in use, eight new Output Busses created and eight new stereo Audio Tracks also created, things can get a bit busy in the MixConsole, so some suitable track labels are also useful at this point!

In the MixConsole’s Routing panel, set the output destination of the appropriate VSTi channel to the respective Output Bus. Then set the input of the respective stereo Audio Track to that Output Bus. Enable the Audio Track’s Monitor button and — via the Output Bus — the VSTi’s output gets routed to the Audio Track. Record-enable the Audio Track, and you can capture the VSTi output. Yep, it’s a bit of a faff... but it works!

Rendered Useful

More recent versions of Cubase Pro or Artist offer a more elegant option: Render In Place, which can create audio channels in place of all your VSTi’s active audio outputs. For our GA SE example, you’d simply select the MIDI clip and choose Edit/Render In Place. The Render Settings panel allows you to customise how the rendering is handled, but the default settings should work well enough. With the ‘dry’ render-in-place option, the VSTi’s audio is unprocessed, and any inserts and sends you’ve added to your VSTi’s output channels will be copied to the new audio tracks — so you’ll have an identical set of mixer channels, ready to be mixed or exported/archived.

This process works very well with Steinberg’s GA SE or Halion Sonic SE but, for some third-party plug-ins (and Kontakt is an example) it has a tendency to generate rather more audio tracks than you might expect! That said, such ‘bonus’ tracks will contain only empty audio clips, so they’re easy to spot and remove.
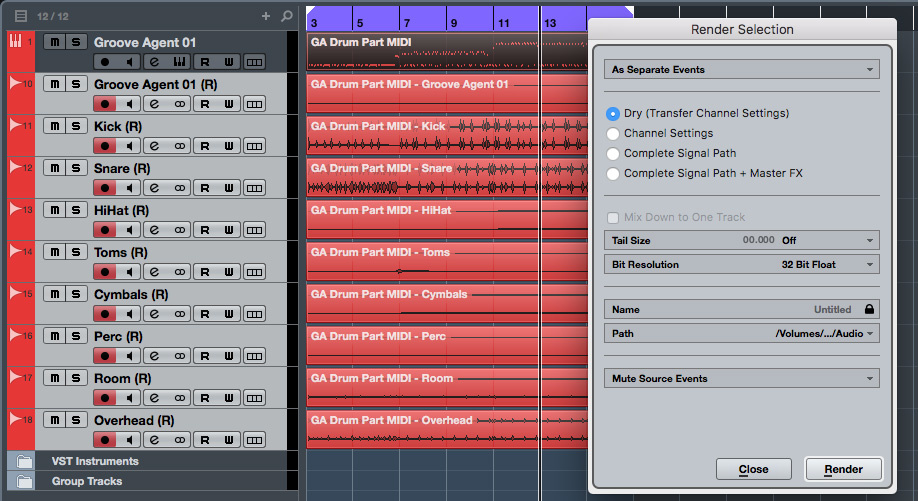
When applied to an Instrument track with multiple outputs, the Render In Place facility creates an audio track for each activated output.When applied to an Instrument track with multiple outputs, the Render In Place facility creates an audio track for each activated output.

Export Business

For Cubase Pro users, the Channel Batch Export feature is another option. Choosing File/Export/Audio Mixdown opens the usual Audio Export Mixdown dialogue box; the Channel Selection Panel hosts most of the options we need. Here, amongst all the other track output options you’ll see a section devoted to VST Instrument Channels, and if you expand this then all the VSTi outputs you activated will be displayed. If you then activate the Channel Batch Export option at the top of the panel, you can select as many of the VSTi output channels as you like, enabling the rendering of all the outputs in a single-pass operation.

The Channel Batch Export options.The Channel Batch Export options.

As when creating your project’s final stereo bounce, before you hit the Export button, you can tweak some settings to define the properties of the audio that’s ‘exported’. One option worth exploring is the Naming Scheme. Via this, you can ensure that the resulting audio files — and any new Audio Tracks created, if you activate the Import Into Project option — are given memorable names. Whether for later audio-only mixing sessions, or for archive purposes, this will make life much easier.

Lessen Obsolesence

As mentioned earlier, transforming your multi-channel VSTi outputs into audio tracks can be useful for both mixing and project portability. But it’s also a sad fact of modern music technology that software instruments inevitably evolve into something new (and can’t be relied upon to play in older projects), lose links to sample long-forgotten libraries, or disappear completely with old, obsolete or broken computers. Rendering audio from your multi-channel VST instruments gives you both flexibility (for mixing) and security (for archiving). Your future self will thank you for being so well prepared! 


Published September 2017

Monday, June 23, 2025

Cubase: Create Arpeggios With Chord Pads

 By John Walden

If you want more than just block chords, you need to go beyond the blue Chord Pads and green chord-variation options.If you want more than just block chords, you need to go beyond the blue Chord Pads and green chord-variation options.

With only the most basic of keyboard skills, you can use Cubase to play convincing piano parts in real time.

In two articles back in SOS May and June 2015 I explored Cubase’s Chord Pads and Chord Assistant. The first piece explained how to use the Chord Assistant as a ‘songwriting assistant’, which suggests potentially more interesting chord sequences, and the second focused on using Chord Pads to embellish less-than-stellar piano skills (such as my own!). As I described in that piece, once you’ve configured the Chord Pads, you can use them to trigger even complex chords with a single finger; I find them incredibly useful for laying down basic chord sequences either for use with virtual instruments or with the Chord Track (explained in SOS June 2013).

Although the Chord Pads offer some very useful performance options (changing the chord voicing or adding chord tensions in real-time, for example), with the exception of the option to trigger a single MIDI pattern, all you get is ‘block’ chords, in which every note plays simultaneously. Sometimes that’s fine but, just as I like to fingerpick chords on my guitar, I’d also like to be able to play arpeggiated chords on a piano or synth. An arpeggiator MIDI plug-in such as Cubase’s Arpache 5 can help a little, but they can sound rather repetitive and for a more human-sounding result, you need to ‘play’ the arpeggios yourself... Or you would if the Chord Pads hadn’t recently been updated with Sections Player options...

One Section At A Time

Sections triggers are a static set of up to five MIDI keys that can trigger certain notes from whatever Chord Pad chord is currently active. Consequently, without having to move your hand to voice a complex chord shape, you can ‘arpeggiate’ whatever chord the current Chord Pad is set to.

If you activate the Sections option in the Players tab, the Sections (brown) and Subsections (pale yellow/green) triggers become active.If you activate the Sections option in the Players tab, the Sections (brown) and Subsections (pale yellow/green) triggers become active.

Easy Piano 101

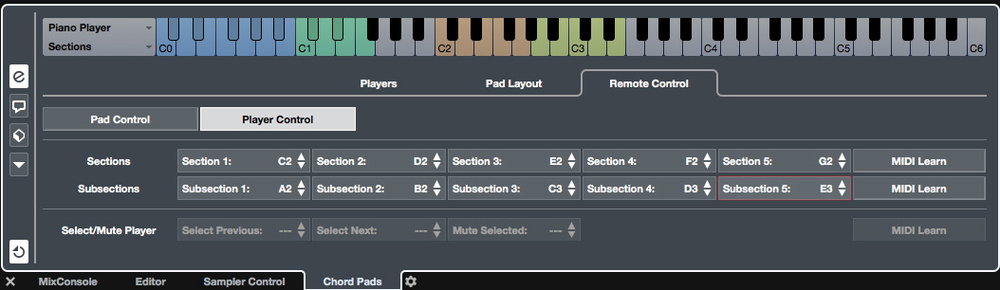
Let’s assume you’ve already configured a series of chords in the Chord Pads zone (the screenshot shows a set of chords in the key of D minor). Open the Chord Pads Editor and select the Sections option. The GUI’s mini-keyboard will include a set of brown Sections triggers keys alongside the existing blue (the MIDI notes for triggering the Chord Pads) and green keys (the various chord modifier triggers).

You can adjust the MIDI notes used for the Sections triggers in the Player Control section of the Remote Control tab. In this example, I’ve set them to the C2-G2 range for Sections 1 to 5. Note that I’ve also defined five further triggers, termed Subsections. These appear in pale yellow/green and I’ve set them to MIDI notes A2 to E3 so they run on directly from the Sections triggers. These make some further options available, and I’ll return to these.

Under the Player Control tab of the Remote Control section, you can adjust the MIDI note numbers assigned to the Sections and Subsections triggers.Under the Player Control tab of the Remote Control section, you can adjust the MIDI note numbers assigned to the Sections and Subsections triggers.

While it’s possible to make a number of adjustments to how the Sections triggers respond, things should already ‘just work’. If you hold down a Chord Pad trigger with a finger on your left hand, you can arpeggiate the chord in any pattern you like using the Sections triggers with your right hand (I’m assuming you’ve set up the MIDI notes as shown in the screenshot, above). When you change chord, again using one finger of the left hand, your right hand can continue to trigger notes (or ‘sections’ in Cubase speak) of the new chord. The Sections triggers can be played individually or in any combination you like — pressing them all together will get you back to those block chords.

Next Steps

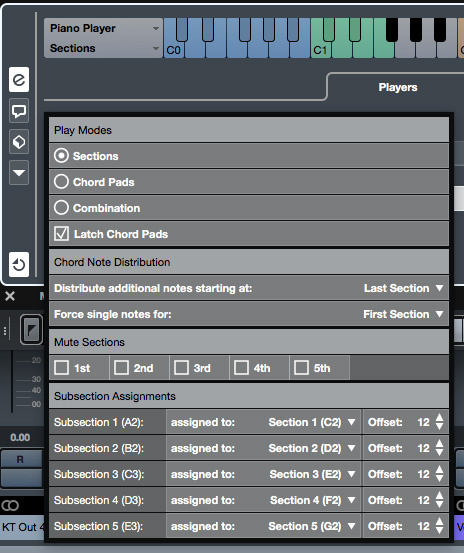
The precise way in which the Chord Pads and Sections triggers interact can be fine-tuned. Under the Players tab of the Chord Pads Editor, once Sections is selected, clicking on the Custom button opens the dialogue box shown in the screenshot. It features four elements, each of which tweaks how the various triggers behave.

You can fine-tune how the Sections and Subsections triggers behave using the Custom options panel.You can fine-tune how the Sections and Subsections triggers behave using the Custom options panel.The Play Modes settings allow you to adjust which trigger should be played first. With Sections selected (as in the screenshot), you trigger the Chord Pad first but it won’t play any MIDI notes until you also press one of the Sections triggers. I tend to find this the most logical arrangement, but check out the Chord Pads setting, which does the opposite, and Combination which does a bit of both. Oh, and if you don’t even want the bother of holding down that single left-hand finger on the Chord Pad trigger, tick the Latch Chord Pads box!

Whether you need to worry about the Chord Note Distribution settings depends on how many individual notes any of the chord voicings of your Chord Pads use. If all your chords have five notes or fewer (generally the case unless you’ve used the MIDI Learn option to build stacked chords), each Sections trigger will have a single note from the chord assigned to it until you run out of notes. So, for example, if the Chord Pad contains a simple three-note triad, only the first three Sections triggers will be active for that chord. But if your chord has six or more notes, these settings establish the rules for distributing the notes across the five Sections triggers. This is where the Sections terminology comes from — some of the triggers can end up with two or more notes assigned to them, and these are, in effect, ‘sections’ of the chord. Anyway, if your chords are fairly complex, these settings are worth exploring. The settings shown in the screenshot are a very simple starting point, and guarantee that the first Sections trigger only has a single note (the lowest note in the chord) assigned to it, while any ‘extra’ notes (notes six and beyond) are triggered along with the fifth note in the chord by the last trigger.

I’ve not yet worked out why the self-explanatory Mute Sections panel might be particularly useful, but if you can conceive of a use for it, it’s there. The final panel, though, is certainly useful. The Subsection Assignments allow you to duplicate your Sections triggers across a further five triggers (the yellow/green keys mentioned earlier). Perhaps the most useful thing about this is that you can apply a pitch offset. In this case I’ve set all of them to +12 semitones, which means my Subsections triggers offer me the same chord arpeggio-made-easy options but with the selected chord played an octave higher. This is great for a bit of variety, and you can mix and match between Sections and Subsections triggers if your fingers are up to the task.

Not Just Piano

As I mentioned, the combination of Chord Pads and the Sections Player makes it much easier for someone with ‘modest’ piano skills to generate more realistic-sounding piano parts. Once you get used to the Sections triggers concept, you may well find your daily five-finger piano exercises feel somewhat less urgent! However, realistic piano parts are not the only thing you can use the Sections Player for. For example, the ability to spread a full chord out into ‘sections’ could be very useful when creating orchestral string parts, and it could work particularly well if you use MIDI Learn to configure ‘stacked’ sets of chord notes spanning multiple octaves for each Chord Pad. Mind you, this would be even better if, at some stage, Steinberg took the Chord Note Distribution options a little further and allowed you to specify precisely which notes belonged to which Section trigger... and I wonder what the ability to send specific notes from a Chord Pad to different combinations of MIDI channels might then offer? This could be a very cool way to control separate orchestral sections (violins, violas, cellos, brass, woodwind, etc.) using the Sections triggers. Go on Steinberg give that one a think through and see what magic you can come up with!


Published October 2017

Friday, June 20, 2025

Cubase: Vocal Timing Correction

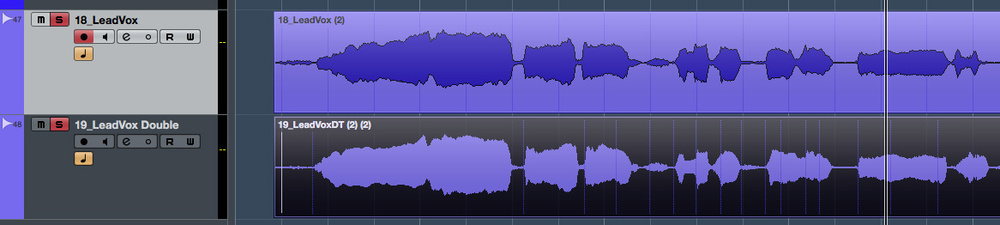
Where the lead vocal and double track have obvious timing differences, the first task it to fix any timing issues in the lead part.Where the lead vocal and double track have obvious timing differences, the first task it to fix any timing issues in the lead part.

Vocal perfection means timing correction — and Cubase’s AudioWarp gives you the tools you need.

Just as some singers can be a little ‘pitchy’, others can find timing troublesome. And while it’s always best to get the performance right, sometimes you need to tweak vocal timing after the recording stage. Cubase’s AudioWarp gives you all the power you need to get things right, and while the process isn’t too difficult there are a few options to explore. We’ll start by getting a lead vocal to sit better with the track’s groove, and then consider how to tighten double-tracked vocals.

Guided By The Groove

There are three main options: quantise to the beat/bar grid; quantise to a groove; or adjust the timing manually. Which of these is most appropriate depends on the project’s style and the nature of the vocal part. Slower phrases may just need small manual edits so that certain words hit the beat accurately. For faster-paced phrases with more words/syllables, you might want to experiment with either or both quantise options, to see if the part can be locked more tightly to the underlying groove.

Before we start, note these few things. First, it’s easy to overdo it, so perform vocal edits with great care — try not to tamper with the ‘human’ feel of the part, unless as a deliberate effect. You’re only looking to reinforce the groove by fine-tuning the timing of those vocal transients that should have hit the rhythm but didn’t quite make it. Second, good results can mean fiddly edits, so it’s best to work on short sections rather than taking on the whole song at once. Third, working on a copy of your vocal (via Render In Place) means you can return to the original if things go pear-shaped. Finally, let your ears guide you more than your eyes — what’s right according to the grid doesn’t always sound best musically.

Lead Vocals

The first screen shows both a lead vocal and a double-track, with obvious timing differences. It’s an up-tempo project (about 190bpm) with a fairly rapid-fire vocal, so it’s worth trying to quantise the lead part. With the clip selected, either in the Lower Zone or the Sample Editor, choose Create Warp Markers via the Hitpoints tab. This will automatically generate Warp Markers that AudioWarp will use, but once you select the AudioWarp tab and can see the markers it’s a good idea to check the results manually. If required, engage the Free Warp button and add additional markers by clicking on the waveform where they’re required. Targeting both the start of words and the ends of words will give you greater control over automatic quantising and manual editing. (Don’t move any Warp Markers using Free Warp yet we’ll come to that later).

Open the Quantize Panel and you can apply some standard quantisation to the musical grid or, if your project contains a key rhythmic element, apply a ‘Groove Quantize’ (which I covered in SOS July/August 2012: http://sosm.ag/cubase-0712 and http://sosm.ag/cubase-0812). My project had a very nice tambourine groove, so I selected this part, generated Hitpoints, and engaged the Create Groove From Hitpoints button in the Hitpoints tab. The rhythmic timing of the tambourine was added as a new option in the Quantize Panel’s drop-down menu. With my lead vocal clip selected, I could choose this groove template and see/hear exactly what this did do to the timing of the vocal.

Cubase: Vocal Timing CorrectionApplied to strongly rhythmic material such as drums/percussion, bass or rhythmic guitar, or keyboards, Groove Quantize can seem like magic, but good results on vocals are not a given — even if you cut the algorithm some slack by exploring the Non-Q, iQ Mode and Randomise settings, to help keep things ‘human’.

The Quantize Panel can be used to apply a  groove quantise, or simply to quantise your Warp markers to the beat/bar grid.The Quantize Panel can be used to apply a groove quantise, or simply to quantise your Warp markers to the beat/bar grid.If you don’t like the results, hit Reset Quantize (bottom-left of the Quantize Panel) and try a bit of gentle tightening to the grid (with or without swing). A 16th note-based quantise, with the Non-Q and Randomize set to around 5 ticks, and the iQ Mode strength to around 10, is a good starting point. With the iQ Mode, if you press the Quantize button repeatedly as you audition the results, your Warp Markers move iteratively tighter to the grid.

Whether or not you feel groove or grid quantisation has helped, some final manual adjustments will probably be necessary. Engage Free Warp mode, and you can manually move a Warp Marker: hover over the marker until it is highlighted, and then just click and drag. When you move a Warp Marker, whether dragging it forwards or backwards, all audio between the Warp Marker and the next one you’re dragging it towards/from gets time-stretched/compressed. If your markers are few and far between, this can throw out the timing of other words — this is why we need the extra Warp Markers at the start and end of words, as discussed at the outset.

Cubase: Vocal Timing CorrectionWarp Markers aren’t only for adjusting the start time of a word — you can also use them to stretch/compress words/syllables and re-position their ending (their ‘note off’ position, as it were). Often overlooked by inexperienced vocal editors, this can really help to lock a vocal to the musical groove.

Double Trouble?

Once happy with the lead vocal timing, it’s time to look at the double-tracks. You could follow the same processes described above. But once you have the lead vocal timing as a guide, I find it’s generally quicker to manually tweak the double. One feature I’d love Steinberg to add to the AudioWarp section of the Sample Editor is the option to overlay the waveforms of multiple clips with transparency between them — rather like you can in VariAudio. If this were possible, you could overlay the waveform of your doubled vocal on top of the time-corrected lead. Adjusting the Warp Markers within the double would then be much easier. You could, I suppose, use VariAudio to make such timing adjustments, but I find that a little more fiddly than using the dedicated AudioWarp tool. As shown in the main screenshot, the workaround is simply to place the lead and double-tracked vocal parts on adjacent tracks in the upper panel of the Project window. If you’ve zoomed in far enough, the alignment between the two waveforms can easily be seen, and this changes in real-time) while you adjust the Warp Markers on the double in the Lower Zone. Manual editing takes a little time but it’s a simple enough task and solid timing between the lead and double can really add the sort of polish to a track that no amount of compression, EQ and reverb can!

Vocal Harmony?

The same basic approach can be applied to stacks of backing vocals — sort the timing of one ‘lead’ backing vocal, so it fits the project’s groove, and then match the timing of the other backing vocals to that ‘master’. Perhaps the only thing to add is that just how closely you chose to match the timing of any multitrack vocal parts is a matter of personal taste and musical style. As with pitch-correction, overdo the time-correction and you’ll lose the ‘humanity’ of the performance. You can always use the Quantize Panel to add back a little random variation if you do decide you have taken things a little too far, but it’s usually better to keep some of the natural variation.


Wednesday, June 18, 2025

Cubase: Transpose Track Tricks

Ready for that classic semitone ‘lift’ for the last chorus? The Transpose Track makes it easy.Ready for that classic semitone ‘lift’ for the last chorus? The Transpose Track makes it easy.

Cubase’s audio transpose features open up some interesting creative possibilities.

The ability to transpose parts after they’ve been recorded can be useful for a number of reasons, and Cubase offers a number of tools that make this possible, for both MIDI and audio. In the article that follows, I’ll run through a few examples to help you get started.

All Change

Tucked away under the Add Track menu option alongside Cubase’s other track types is the Transpose Track. As a broad-brush tool for transposing your entire project or just a specific section of it, the Transpose Track is easy to use and very useful. Once added to your project, the Pencil tool lets you add transpose events (they look a bit like an empty MIDI clip). These extend from the insertion point to the end of your project or, if there is one, the next transpose event. Located bottom-left of each event is the transpose setting; hover the standard cursor over this value, and then click and drag up/down, and you can set the transpose value up/down in semi-tone steps.

An obvious possibility — something of a pop cliché — would be our old friend the key change: place a transpose event at the start of that final chorus and set its transposition value to 1. On playback, every track, whether MIDI or audio, would be transposed up by a half-step. And, providing you don’t have too many sustained notes that span the transition, this kind of modest pitch change will be handled very gracefully, with few unwanted sonic artifacts.

There are a couple of additional things to note, though. First, before you start adding transpose events, it’s a good idea to set the global key for the project. (Do this in the Project window’s Tool Strip, and if the option is not displayed, you can switch it on via the Tool Strip’s Setup dialogue). This ensures the correct handling of any commercial loops you’ve used that have their original key information embedded (you can check whether they have in the Pool).

Second, you’ll probably want to exclude any drum, percussion or sound-effects tracks from the transpose process. This is easily done via the Global Transpose setting in the Info line at the top of the Project window. For each audio or MIDI clip, this can be toggled between Follow (the default) and Independent values. If you select all of the MIDI and audio clips that you want to ignore the Transpose Track, you can toggle them to the Independent setting with a single click.

The rhythmic feel might be OK, but eight bars of Cmaj7 is perhaps not the most interesting dance chord sequence ever created!The rhythmic feel might be OK, but eight bars of Cmaj7 is perhaps not the most interesting dance chord sequence ever created!

The Key To Great Vocals

Another common application for the Transpose track is more corrective than creative; finding the right key for your singer. There are lots of producers who create musical beds and then hire in a singer to add the top line. A single transpose event at the start of the Transpose track can be a great help in finding the ideal key for the singer’s range. If this requires more than a few semi-tone steps in either direction, some re-recording of the backing tracks (particularly audio tracks) is advisable, but at least you have an easy way to find your singer’s comfort zone.

Another practical role for this technology is helping a vocalist hit the high notes: if the key is just a step or two too high for the singer to get the top-most notes, you can drop the whole arrangement down by the step(s) required while tracking the vocals, before simply returning the project to the original key: the vocals will be pitched up accordingly.

Let’s Dance

The colour-coding of notes on the piano roll doesn’t have to relate to velocity — it can also display key/scale/chord information relating to the Chord Track.The colour-coding of notes on the piano roll doesn’t have to relate to velocity — it can also display key/scale/chord information relating to the Chord Track.Not all of us are blessed with great keyboard skills, and while Cubase offers all sorts of ways to assist you in creating MIDI-based chord sequences (for an example, see SOS May 2015: http://sosm.ag/cubase-0515), the transpose features can be a handy alternative — I’ll use the creation of an EDM-style chord sequence to illustrate this. The screenshot shows an eight-bar sequence ‘starting point’, where the rhythmic nature of the part is defined but the part currently comprises just a single chord. If you lack the keyboard skills to spice this up, or an understanding of what chords might work alongside your starting chord, a combination of setting the project’s key/scale (done via the Chord Track) and the MIDI Transpose Setup dialogue can help.

First, insert a Chord Track into your project and, in the Inspector, switch off the Automatic Scales option. Then, in the track’s Track Control panel, set Show Scales to On. An additional lane will appear in the Chord Track, into which you can add events that define the key/scale combination from that point onwards.

Next, with your MIDI clip displayed in the piano roll editor, select Chord Track in the Event Colours drop-down. Instead of the notes being colour-coded according to velocity (the default), the colours indicate whether the notes fit into the current key/scale — red notes lie outside the current key/scale.

If you don’t know what key/scale combination your initial chord belongs to, you can experiment with the key/scale dialogue in the Chord Track until your initial chord contains just pale blue notes (indicating that they all lie within the current key/scale combination). There may be several acceptable combinations, though, so some trial and error will probably be required.

The Transpose Dialogue can help you find new chords, keeping notes in the appropriate scale.The Transpose Dialogue can help you find new chords, keeping notes in the appropriate scale.Now to get experimental with the chord sequence. Imagine we want to find a different chord for the third and fourth bars of the sequence. After selecting just those notes, the Transpose Setup dialogue (from the MIDI menu) can apply a bit of scale-sensitive assistance. For example, the settings shown in the screenshot will transpose the selected notes by a semitone, but because Scale Correction is selected and both the current and new scale are set to the project’s scale (C-major in this example), any note movements created by the dialogue will remain ‘in scale’ (so some may move by more than one semitone). To ensure that transposition doesn’t take any notes too far from their original register, the Use Range parameter can constrain the range of allowable notes.

Clicking OK applies the settings in the dialogue to the selected notes, so just repeat the process until you hear something you like. Whatever you do, you can be sure that all the notes in your new ‘chords’ will be in key/scale. While that doesn’t guarantee a musical miracle, it really doesn’t take long to create a good, dance-friendly sequence.

The downside is that the Transpose Setup dialogue closes every time you hit the OK button — a quick visit to the Key Commands dialogue will allow you to configure shortcuts to open the Transpose Setup dialogue, and to repeatedly execute the current Transpose Dialogue settings without actually opening the dialogue itself.

Colour Me Bad

Of course, you don’t have to use the Transpose Setup approach. Having set the Chord Track key/scale and the Chord Track colour-coding in the piano-roll editor, you can move notes around in the piano-roll editor manually. As you shift all the notes of your chords up/down, if any red notes appear you can simply select these and experiment with shifting just those notes an additional step or two to see what new ‘chord creations’ manifest themselves. Yes, it’s still a case of trial and error, but at least some of the errors are being pointed out to you, and you can let your ears judge whether the occasional ‘out of scale’ note is musically acceptable or requires further tweaking.

If transposing notes by hand, Chord Track-based colour-coding can help you avoid errors.If transposing notes by hand, Chord Track-based colour-coding can help you avoid errors.

Note that while this ‘dance chords’ example has focused on MIDI tracks, the same Chord Track colour-coding is available when editing monophonic audio tracks in VariAudio. If you want to experiment with transposing/re-writing your vocal melodies, for example, Cubase can give you some useful guidance.

Any Other Business

Once you’ve used these transpose tricks to create a killer dance chord vamp, you may be interested to know what the actual chords being played are, and perhaps want other MIDI tracks to follow those chords. Simply right-click the MIDI clip containing your new chord sequence and choose Chord Track/Create Chord Symbols. Based on the settings you choose, this dialogue will place the relevant chord labels on the Chord Track.

Finally, while VariAudio colour-coding support is helpful, wouldn’t it be cool if VariAudio added key/scale-based snapping when moving note segments? Let’s hope that this is on Steinberg’s to-do list! 


Published December 2017