Tuesday, June 17, 2025

Monday, June 16, 2025
Cubase: MixConsole Workflow Wins
 Efficient channel handling and navigation around the MixConsole will speed up your mixing workflow.
Cubase’s MixConsole has all sorts of handy features to help you establish an efficient mix workflow.
I recently reviewed Harrison’s MixBus 4, which offers a very efficient workflow for mixing. While I’m not about to jump ship, the experience got me thinking about how to take advantage of the many features Steinberg have packed into the MixConsole over the years, in an attempt to fine-tune my mixing workflow.
Cubase provides ways to access and manage your plug-ins from within the MixConsole, and unless you have unlimited screen real-estate (especially if you are working on a laptop screen), you can save time and effort by considering how to show/hide different tracks and navigate them. In this month’s column, I’ll focus on the latter; we’ll consider ways to streamline plug-in use and routing in the MixConsole another time.
To get about the MixConsole efficiently, essentially, you need to be able to zoom in/out to see the desired level of detail for the current task, to customise the channels being displayed at different times, and to figure out the most efficient way of navigating the displayed channels. I’ll consider each point in turn.
Now You See It...
The ability to zoom (to see lots of channels at the same time, or a more detailed view of just a few channels) quickly is a clear advantage of software over hardware consoles, but some of Cubase’s most useful commands for this are rather tucked away. So a good first step is reveal them. Open the Setup Toolbar (top-right of the MixConsole), you can toggle on the display of the Zoom Palette. This gives you buttons for zooming in/out horizontally (changing the width of each channel) and zooming in/out vertically. The latter adjusts the zoom of the upper Rack in the MixConsole, but you can change the height of the channel faders too, by adjusting the position of the divider bar between the fader and Rack sections.
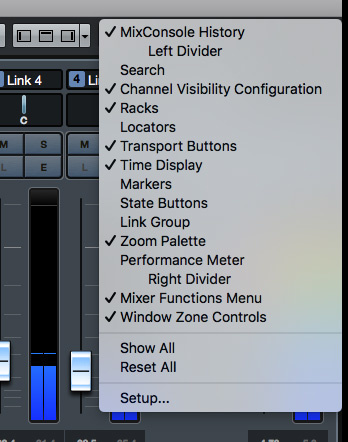 Enabling the Channel Visibility Configuration, Transport Buttons and Zoom Palette in the MixConsole toolbar gives you instant access to some useful options.A faster approach is to use key commands. Commands exist (check the Mixer section of the Key Commands list) for all of the Zoom Palette functions, and you can assign new shortcuts to those that lack default commands. Weaning yourself off the mouse can be difficult at first, but it soon becomes second nature, and the improvement in efficiency is, in my experience, more than worth it.
While you have the Setup Toolbar open, if it’s not already visible, turn on the Transport Buttons display in the MixConsole toolbar. If you use key commands or a control surface for transport duties, this isn’t such a big deal, but it takes up little space and can save some switching between the two main windows. Alternatively, hard-wire the F2 command into your brain: this shows/hides the floating Transport panel, which can display more information, and will save screen real-estate when it’s not required.
Now You Don’t
If you accumulate more channels than can be accommodated on screen, you can obviously free up space by hiding other features. But I find a better strategy is to toggle on/off the visibility of certain tracks or track types, displaying only those you need at any given time. To do this, turn on the MixConsole’s Left Zone — the Visibility tab lists all the tracks in your project. This tab is useful for a couple of reasons. First, click on any channel in the list and the MixConsole will scroll left/right, bringing it into view and selecting it. And if you Shift-click or Cmd-click (Win-click in Windows) in the list, you can view/select multiple channels in the same way. Second, the buttons to the right of each track toggle its presence in the MixConsole on/off, so you can hide tracks you don’t need to see. This is particularly helpful if you make use of Folder Tracks to store your key instrument groups, as you can toggle the visibility of a folder and all its content with a single click.
 For navigation and channel selection, the Visibility tab more than earns its keep.The adjacent Zones tab is also worth a mention; it allows you to ‘lock’ any channel to the left or right ends (somewhat confusingly also known as Zones) of the MixConsole. If the track’s visibility is switched on in the Visibility tab, these channels will always be visible on screen, no matter where your scrolling of the other channels takes you. The obvious candidates are your Master Output (on the right) and Input Channels for your tracking phase (on the left), but you might also choose to ‘pin’, say, your Group busses or effects tracks in this way.
Spec Savers
The Channel Configuration Visibility panel on the MixConsole’s toolbar provides further options for toggling the display of certain channels. On the left, the Filter Channel Types drop-down menu lets you toggle channels on/off by track type (Audio, MIDI, Instrument, Group, VCA and so forth), while on the right, the Channel Visibility Agents menu provides a few useful pre-defined options.
For a big project, though, I consider the Channel Visibility Configurations to be the star of the show. The concept is a bit like the global Workspaces feature, but rather than allow you to flip between different user-defined window layouts, it enables you to set up, save and recall specific combinations of channel visibility. For instance, you might have a configuration that shows only your guitar tracks, another for lead and backing vocals, a third for drums, more still for Group tracks and VCA Faders, and a final one to ‘restore’ all channels.
 Channel Visibility Configuration presets make it easy to switch between different channel layouts.Once created and saved, you can instantly recall that visibility configuration; it’s very neat. Unlike Workspaces, Channel Visibility Configurations are project-specific, but they take seconds to set up and easily repay the time spent, particularly if you create key commands to move between (up to eight of) them.
Quick Tips
I’ll round off with a couple of tips to get you shooting around the MixConsole in double-quick time.
First, the Channel Setup panel (far-right of the MixConsole toolbar) has three buttons to toggle on/off the MixConsole’s Left Zone, the upper Rack section (so you can use the space for longer faders; it’s just a shame that the fader section doesn’t expand to fill the space automatically when the Racks disappear) and the Right Zone (with the master output meter and Control Room tabs).
 There are plenty of navigation, screen-layout and channel visibility options available as Key Commands, including the Channel Visibility Configuration presets shown here.Second, remember that you can use the left and right arrow buttons to scroll left/right across the MixConsole, and to combine them with the Shift key to make channel selections; sometimes it pays to keep things simple!
Irksome Quirks?
There are two very minor quirks that I’d love Steinberg to attend to. First, you should really be able to toggle on/off the Left Zone, Racks and Right Zone using key commands; the allocated Key Commands seem to be associated with the same zones in the Project window and it’s a shame they’re not context sensitive, controlling whichever window is in focus. Second, if you have tracks ‘locked’ on the left or right ends of the MixConsole, scrolling with the arrow keys isn’t very elegant: if you use the right arrow to scroll through the displayed tracks, when you reach the last channel currently displayed before the right zone, a further press of the right arrow jumps you into the right zone itself rather than scrolling through, and revealing, the ‘off-screen’ tracks. It would be nice if this alternative action were available as an option because, in other respects, the left/right key commands are great for speedy channel-hopping!
Saturday, June 14, 2025
Friday, June 13, 2025
 Even with just a few elements open, the MixConsole Rack can become a very busy place!Last month, inspired by my adventures with Harrison MixBus, I looked at ways to improve your mixing workflow in Cubase’s MixConsole, using various channel display and navigation options. This time, still with the aim of making our mixing process as lean and mean as we can, I’ll focus on using the MixConsole’s Rack.
With multiple Rack sections, and lots of controls available in each, you can easily waste precious time scrolling around the MixConsole — but, thankfully, the Rack is highly customisable. A good first step is to use the Select Rack Types tool to switch off the display of any of the Racks you don’t routinely need to see. I tend to leave the Inserts, EQ, Strip and Sends sections visible, and show/hide others as required — assigning a key command to toggle the state of each section is a good idea.
A next useful step is to enable two options in the Rack Settings drop-down menu. Exclusive Expanded Rack will automatically close an open Rack element whenever you open another, and this can reduce the amount of time you spend scrolling vertically. And if you enable the Link Racks To Configurations option, your Rack layouts will be stored with any MixConsole Configurations you create (see last month), including which Racks are visible and their open/closed status. If you find yourself switching between a few Rack layouts during a typical mix, then creating Configuration presets is a massive time saver.
Exceptional View
 While mixing, hiding any Rack elements you don’t need constant access to can help you focus.As MixBus provided the inspiration for this column, how about hiding all the Rack elements other than the Channel Strip? This is a great setup with which to start your routine dynamics and EQ moves, even if you eventually turn to other options for certain channels/tracks. You can keep things particularly compact by enabling ‘Show One Channel Strip Type’ (via the Rack Settings drop-down menu when the Channel Strip Rack is open); only one Channel Strip section will be expanded at a time. Another space-saving option in this menu is Show All Channel Strip Controls. This gives you a more comprehensive control set for each element of the Channel Strip, and you can toggle this setting off to leave you with just the most commonly tweaked controls.
 The Racks Settings drop-down menu can help you keep the Rack display under control.Before we move on, do you remember all the MixConsole zoom options from last month? Provided your eyesight is up to it, the vertical zoom allows you to get more Channel Strip (or, indeed, other Rack) elements onto the screen, and can reduce the time spent on vertical scrolling.
In The Q‑Link
Something I didn’t manage to explore last month was channel linking. In Cubase Pro you can configure sets of channels as permanently Linked Groups (and, if you wish, assign a VCA Fader to them). For Link Groups, as shown in the screenshot, there’s also a dialogue box via which you can specify which parameters are linked. It’s powerful stuff and perhaps deserves a tutorial all of its own, but there’s also a temporary ‘Quick Link’ facility, for Pro and non-Pro users alike. To start work with either system, make sure you have the Link Group section of the MixConsole Toolbar visible — you can set this via the Set Up Toolbar drop-down menu.
 Cubase Pro’s Link Group features are very powerful, but the Q‑Link system that’s in all versions of Cubase can be very handy too.Select a number of MixConsole channels and click the Q‑Link button, and these channels will be linked until you toggle Q‑Link off via the same button. If you can perform a task on one channel it will be applied to all the linked channels. For example, enable the Tube Compressor in the Channel Strip’s Comp section and it will be added to all linked channels. Adjust the Tube Compressor’s controls, and the same settings are applied to the corresponding compressor on the other channels. When configuring initial processing settings on, for example, all your drum channels, this can be a big time saver.
The same linking functions work in other Racks. For example, having selected your channels and enabled Q‑Link, you could quickly add an Insert effect to all the linked channels, and tweak some of the plug-in’s parameters. The same is true of adjustments made in the EQ Rack.
A really useful application of Q‑Link is the quick comparison of plug-ins. For example, you might try two different compressor plug-ins in the Insert Rack across a set of drum channels. Having placed both plug-ins in different slots on each of the Q‑Linked channels, toggling bypass on one compressor will bypass the corresponding compressor on the other channels (you don’t need Q‑Link to be active when inserting the plug-in on the different channels, but they must be in the same number insert slot for Q‑Linking tweaks to apply). This makes it very easy to flip between the two compressor types on multiple tracks to A/B their different sonic results.
 Four Q‑Linked channels (note the light grey shading): changes made in the Rack of one channel are applied to linked channels.It’s also worth noting that the Rack bypass buttons of Q‑Linked channels are linked. You can, for example, toggle the EQ Rack’s bypass on for a selection of channels (globally if you select all channels). In fact, it works across all the Rack sections, including sends and the Routing Rack, where it’s useful for configuring things such as bus routing for channel groups. It’s well worth assigning a keyboard shortcut for toggling Q‑Link on/off!
Rack ‘Em Up
For some reason, when loading a preset into one of the MixConsole Rack sections this isn’t applied across Q‑Linked channels, but there’s a quick way to copy all the settings in a Rack section between channels, without resorting to a Track or Rack section preset. For example, to copy the Channel Strip settings from one channel to another, hover the mouse over the Rack section header (where it says ‘Strip’) on the channel you wish to copy, hold down Cmd (MacOS) or Ctrl (Windows), and click and drag to the destination channel. Any existing settings in the destination channel will be overwritten with the settings from the source channel. The same trick works just as well in the Insert or EQ racks; it’s great if you have settings or plug-in chains you wish to duplicate to other channels.
Now You See Me...
I’ll finish with three handy shortcuts that can speed up your work in the Rack. First, once into the detailed work of mixing, I find myself constantly opening and closing Insert plug-in windows. If you hold down Shift+Alt while clicking on the E channel editor button (just beneath the Solo button), the windows for all Insert plug-ins on the channel will open; you can close them all just as quickly by holding Shift and clicking the E. (Incidentally, this shortcut also works in the Project window’s Inspector.) Second, the Windows: Close All Plugins key command is set to Ctrl-Q by default. If, like me, you eventually end up with a screen full of open plug-ins, this is a very helpful, quick way to declutter!
Finally, if you decide your various Inserts, Sends, EQ and Channel Strip settings are getting you nowhere with your mix, and you wish to wipe the slate clean, select Reset All Channels from the MixConsole’s drop-down Function menu. This strips out all Insert effects, clears all the settings in the Channel Strip, and offers the choice of resetting all channels or those currently selected — so you can reset, say, just your drum channels or you can ‘blank’ your mixer completely, which could be really useful if you often ‘inherit’ mixes from someone else! It’s powerful stuff but it goes without saying that it’s also something to use with care!
Thursday, June 12, 2025
Wednesday, June 11, 2025
Cubase’s Track Versions
 If your tracks are set to follow the Chord Track, their contents will self-adjust as you flip between different Track Versions on the Chord Track.
If you like to explore different versions of a song (or just have difficulty making your mind up!) Cubase’s Track Versions have a lot to offer.
There’s a strong argument for committing to sounds and performances when recording rather than putting off decisions forever, but you won’t always enjoy the clarity of musical thinking this approach requires. And you might, in any case, just wish to explore alternative musical ideas in a project. In such circumstances, you can create multiple projects, of course, but Cubase Pro or Artist (7.5 or newer) offer you the ability to experiment with alternative ideas within a single project: the Track Versions and the related Track Lanes facilities both have their merits for basic comping, but Track Versions also has creative potential. So, whether you can’t make your mind up, or you desperately want to create both Rockabilly and Death Metal variants of the same song, let’s explore how Track Versions can help.
(Not) Making Your Mind Up
Naturally, Track Versions work with audio tracks, but the feature also supports MIDI, Instrument, Chord, Tempo and Signature tracks. In all cases, the basic concept is straightforward: a single track in your project can access multiple ‘virtual tracks’, each with different content — rather like some hardware digital recorders of days gone by. You can easily switch (for example, via the Track Versions tab in audio and MIDI tracks’ Inspector) between the different Versions, as you consider which works best.
One benefit is that you don’t have to create multiple tracks, with resource-draining duplicates of plug-ins, if you want to audition a different performance. And, as shown in SOS December 2014, Track Versions also handle things like multitracked drum recordings neatly, especially if you place all of these tracks in a Folder Track and add the benefit of Group editing.
ReChord It
The Track Versions feature makes Chord Track experimentation easy: rather than manually edit individual Chord Track chords (and edit them back if you dislike the results), you can create your alternate chord sequences on multiple Track Versions and simply switch between these to audition how they sound. If you change the Chord Track contents in this way, your MIDI and monophonic audio tracks’ contents can be set to automatically adjust to follow these changes (or certainly make a good enough stab at it that you can audition how well the alternative chords might work).
A simple example is shown in the first screen. The Chord Track’s Track Versions Inspector shows that two different Track Versions are present. These contain very different chord sequences (the more complex one shown on top, and a much simpler one shown below). Switching between these simply requires you to click on the desired version in the panel’s list. When you do that, the two MIDI tracks (containing bass and piano parts in this simple example), both of which are set to follow the Chord Track, automatically self-adjust to work with the currently selected chord Version.
The Track Versions panel includes options to create a new Track Version, duplicate an existing one or delete one that’s no longer required. In this application, duplication is helpful if you just want to experiment with changing one or two chords, rather than creating a completely different sequence.
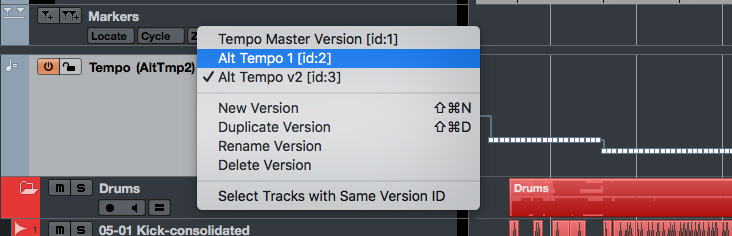 Track Versions are supported in most track types, including the Tempo Track.
Quick, Quick, Slow
Cubase’s Tempo Track can be used either to lock freeform audio recordings to a regular click or to apply tempo variations to recordings performed to a click track (see the SOS January 2013’s workshop for an introduction to this). The latter, for example, might allow you to bump your chorus tempo by a few bpm to add an extra element of excitement to a performance.
Given that Cubase can (within reason!) force audio and MIDI tracks to lock to tempo changes, the Tempo Track makes experimenting with tempo variations relatively easy. And as Track Versions support this Tempo Track, you can get just as experimental with the tempo on a new Track Version as you can with chords — safe in the knowledge that your original Tempo Track will remain instantly accessible.
However, unlike the Chord Track, the Tempo Track’s Inspector doesn’t include a Track Versions panel (no, I’m not sure why either...). Thankfully, with your Tempo Track selected, the Project menu’s Track Versions command lets you create a new Track Version or duplicate the currently selected one. And, once you’ve created one (or more) alternative Tempo Tracks, you can switch between them via the small drop-down menu in the Tempo Track’s header.
Keep It Clean
A more obvious application for Track Versions is recording alternative performances of individual parts. For instance, if your bass player suggests two different approaches to the bass line, each can be recorded on a single audio track as a different Track Version. This has the advantage of avoiding duplication, both of the tracks themselves and of any insert effects (assuming the parts are similar enough to require identical processing!). It also means much less annoying clutter in the Project and Mix windows, given that the additional tracks would spend much of their time muted. In addition, switching between Track Versions (via the Inspector’s Track Versions panel) is quicker than performing the mute/unmute actions that are required to switch between two different tracks.
I find two vocal-based applications particularly useful. First, if you tend to track into Cubase as part of your composition process, you can use Track Versions to record multiple versions of your lead vocal, as the lyrics or performance/melody evolve. Second, once you’ve settled on a vocal performance, if that happens to include a few choice words, Track Versions can be used to record both the ‘original’ version and a ‘clean’ version. You can simply create a duplicate Track Version from the original and use that to drop in where the more choice words need cleaning up for family listening. Providing you record both vocals under the same conditions (so they require similar processing), this makes it very easy to generate both your ‘album’ mix and a suitable radio-friendly one.
 Lanes are supported for each Track Version, giving you tremendous flexibility.
Incidentally, the Lanes system and the Track Versions system can both be used in this kind of situation, and they can be used together. Every Track Version gets its own set of Lanes, and you can therefore use the excellent Lanes-based comping features to optimise each Track Version. That said, you can also do basic copy and paste actions between Track Versions should you wish.
No Mistaken Identity
Of course, the principle described above for a single track such as a vocal or bass can also be applied to a whole project. Two obvious examples can be suggested here. First (and despite my tongue-in-cheek Rockabilly/Death Metal suggestion earlier), you might wish to try alternative versions of a song. Providing the differences are not so extreme that different processing is required on each track (in which case an alternative project might be a better choice), Track Versions can make this kind of experimentation straightforward. Second, if this is a band-based project, and you like to start with an old-school, ‘live’, multitracked, recording, Track Versions can be used to record each live take. You can then easily flip between each multitrack version until you decide which take is the ‘keeper’ to form the basis of any subsequent overdubs.
 Version ID makes it easy to link Track Versions across multiple tracks and switch between them as a single action.
The key element of the Track Versions feature set for these examples that use multiple tracks is the version ID. Whenever a Track Version is created, it is allocated a unique ID but, if you create new Track Versions simultaneously on multiple tracks (simply select all the tracks you wish to do this for and then execute the Project/Track Versions/New Version command), they are all assigned the same ID. Track Versions that share an ID can then all be selected as a single action: from the Track header drop-down menu of any of the tracks, execute the Select Tracks With Same Version ID option, which selects all tracks that have a Track Version that’s the same as that of the currently selected track.
Once the various tracks are selected, you can easily flip between their common Track Version IDs via the same Track Header drop-down; change one and all the other selected tracks follow. Oh, and as you can also select any combination of tracks and then execute the Project/Track Versions/Assign Common Version ID command, you can easily change the default version ID to ‘group’ any combination of tracks/Track Versions to allow instant recall. Very neat!