Welcome to No Limit Sound Productions

Company Founded
2005
Overview

Our services include Sound Engineering, Audio Post-Production, System Upgrades and Equipment Consulting.
Mission
Our mission is to provide excellent quality and service to our customers. We do customized service.

Monday, June 9, 2025

Using Groove Agent SE4

Screen 1: The Beat Agent makes building multi-sample Instrument pads easy — here I’m dragging and dropping a set of velocity-based kick drum samples.Screen 1: The Beat Agent makes building multi-sample Instrument pads easy — here I’m dragging and dropping a set of velocity-based kick drum samples.

Can Cubase’s Groove Agent SE4 take care of all your virtual drummer needs?

Back in SOS October 2017, I reviewed Toontrack’s Superior Drummer 3 (SD3), and diving into that wonderful instrument got me wondering just how capable Cubase’s bundled Groove Agent SE4 (I’ll call it GA SE4) might prove in comparison. In this column, then, I’ll consider how well GA SE4 can do three things that really impressed me about SD3: its ability to stack sounds; options for adding room ambience to a drum mix; and its workflow for generating a complete drum track.

Stack Attack

Amongst the SD3 features is a very neat ‘stacking’ system, which allows you to combine, for example, multiple snare or kick samples. GA SE4 can do this too, albeit with less ease and elegance. Let’s assume we want to layer two kick instruments, a multi-velocity acoustic kick and an electronic sub-kick, over an Acoustic Agent kit. Unfortunately, the Acoustic Agent doesn’t let you drop samples on to an empty Instrument pad (I suspect there’s a technical reason for this, related to the way this Agent handles room/overhead mics). However, the Beat Agent does allow this, so a simple workaround is to run a Beat Agent GA SE4 instance alongside the main Acoustic Agent one.

When you create the second instance, it should default to an empty Beat Agent (if it doesn’t, right-click the Beat Agent icon and select ‘Remove Kit’ from the menu), and you can drag and drop samples from almost anywhere onto the Instrument pads. For Screen 1 above, I dropped a set of seven acoustic kick samples on the C1 Instrument pad. In doing this, be careful exactly where on the pad (top, middle or bottom) you drop the sample, as each position forces Beat Agent to handle the incoming samples in a certain way. Here, I dropped them on the top third of the pad so that Beat Agent would arrange the samples as velocity layers (up to eight layers are allowed per pad). The default order of the velocity layers is determined by the sample file names, but you can reorder the layers for a pad using the Edit page. Right-clicking on each pad allows you to rename them too.

Screen 2: Setting the same trigger note for all your ‘stacked’ sounds makes it easy to layer them on playback.Screen 2: Setting the same trigger note for all your ‘stacked’ sounds makes it easy to layer them on playback.For ease of triggering, ensure the kick samples in both GA SE4 instances are triggered by the same MIDI note (C1 is the Acoustic Agent default for kicks, as shown in Screen 2). In the second instance, activate the Use Hardware Controller mapping switch (the small e-drum icon, bottom-right beneath the bottom row of pads), then right-click a pad to change its MIDI note (multiple pads can be set to the same note). Finally, copy your Acoustic Agent track’s MIDI part to the Beat Agent track. Any C1 notes will trigger all your ‘stacked’ kick drum samples; as the other Beat Agent Instrument pads are empty, other notes will effectively be ignored. The Beat Agent editing options and the channel faders for each GA SE4 instance allow you to control the balance of your stacked sounds.

I Need More Room

Screen 3: The Acoustic Agent’s Mixer includes both overhead and room mic channels.Screen 3: The Acoustic Agent’s Mixer includes both overhead and room mic channels.When mixing acoustic drums, a key decision is how much ‘room’ you blend into the mix, and SD3 offers endless options. Thankfully, GA SE4’s Acoustic Agent is no slouch either! The Mixer tab of the Acoustic Agent shows stereo channels for both overhead and room mics (Screen 3). The rest of the channels in the Acoustic Agent mixer represent the close mics, with a much drier sound. You can adjust the faders, of course, but you actually have more control than when recording a real kit, as you can also adjust the amount of each individual drum/cymbal picked up by the overhead and room mics — via a pair of rotary knobs on the Edit screen for each kit piece (Screen 4).

You can, therefore, reduce the amount of kick appearing in the ambience mics to keep the kick sounding fairly dry relative to the rest of the kit without resorting to high-pass filtering, which can affect the phase relationship between the mics. The only ‘catch’ is that these virtual room mics are only available for the Acoustic Agent; for our ‘stacking’ example, you’d need to add suitable reverb to the Beat Agent drums if you want them to sound like they’re in the same room as the Acoustic Agent kit.
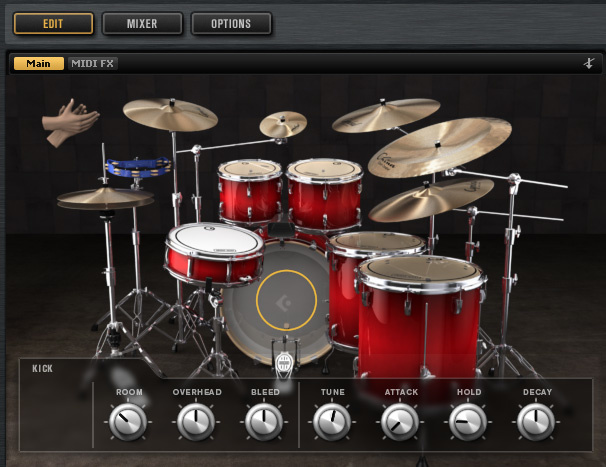
Screen 4: Unlike with a real drum kit, GA SE4 lets you control just how much of each kit piece is picked up in the overhead and room mics.Screen 4: Unlike with a real drum kit, GA SE4 lets you control just how much of each kit piece is picked up in the overhead and room mics.

Go With The Flow

SD3’s options for building a complete drum track, with intro, verse, bridge, chorus, outro and suitable fills, are truly impressive, and GA SE4 can’t match it (to be fair, I don’t think any other VI drummer can!). But as Matt Houghton demonstrated in SOS August 2016, GA SE4 ships with various groups of style-based patterns and, making use of these, some very useful song-construction tools. Once loaded, these patterns can be triggered via the Pattern pads. Each set of patterns includes a main groove, fills, intros and endings, with variations offered for the main pattern via the very clever Intensity/Complexity X-Y pad. This gives you control over performance variation of the underlying pattern, so that it sounds less robotic and more ‘real’. As Matt explained, this makes the construction of full song-style drum performances easy.

But it’s worth exploring this in more detail. The GA SE4 styles (which you can browse and load via the Pattern section of the Edit screen) each contain one main groove plus four intros, four endings and eight fills — a total of 17 individual patterns. When you load a ‘kit + patterns’ preset, you are in fact loading the same basic pattern onto all the Pattern pads, but with the Agent’s settings varying for each one. GA SE4 only offers 16 Performance pads (the full version, GA4, boasts 128) and the ‘kit + patterns’ presets load to give you easy access to four fills, two intros, two endings and perhaps eight variations of the main groove. By default, then, you don’t have all the intros, endings and fills on dedicated pads.

But if you select a pad, the performance dial will adjust to show its current settings (Screen 5), indicating which pattern is being triggered, and you can change these by adjusting the dial. As each main groove variation is created from a single pattern with different Intensity/Complexity settings, then if you’re prepared to automate the Intensity/Complexity slider (as Matt described), it’s well worth tweaking the pad settings so that only one pad triggers the main groove pattern. You can use the other 15 pads to give instant access to almost all the other intro/ending/fill patterns.

Screen 5: The Performance panel provides plenty of options for building a complete song-based drum performance from the included pattern style sets.Screen 5: The Performance panel provides plenty of options for building a complete song-based drum performance from the included pattern style sets.

A few more Performance panel features are worth exploring. For example, if you’re happy to let GA SE4 provide subtle variations for your main groove pads automatically, then engage the AC (Auto Complexity) function for any pads you wish. If you click and hold, you can set different time-bases for this variability (the 1/1 setting, in which the Complexity setting is tweaked automatically every bar, is a good place to start). In addition, the AF (Auto Fill) buttons automatically add a random choice of drum fill pattern, and you can control how often the fills appear. Toggling on the Break button gives you a further alternative to a fill, with the drums just dropping out for a bar — a very dramatic and effective performance ‘trick’.

Secret Agent

So, while Toontrack’s flagship drum instrument can outperform GA SE4 without breaking a sweat, Steinberg’s bundled drummer nonetheless boasts an impressively deep feature set. Used to its full potential it should take quite some time before you run out of drumming inspiration for your personal songwriting and production projects.  


Published April 2018

Friday, June 6, 2025

Cubase: Optimising Electric Bass

Whether you’re going to EQ bracket or not, it’s a good idea to check and possibly correct the phase relationship of multi-tracked bass recordings.Whether you’re going to EQ bracket or not, it’s a good idea to check and possibly correct the phase relationship of multi-tracked bass recordings.

When it comes to mixing bass, sometimes more is more, and Cubase has all the tools you need...

The electric bass guitar often has to provide a mix with both low-end solidity and mid-range aggression, but setting up an instrument/amp to deliver both is tricky: drive the amp for a more mid-range character and you can sacrifice low-end definition and solidity. When playing live, respected players such as Chris Squire, Geddy Lee, Doug Pinnock and Billy Sheehan get around this with dual amp setups; a clean amp provides a well-defined bottom end, while a second is overdriven for more aggression in the mids. In the final part of his Making Modern Metal in SOS March 2018 (http://sosm.ag/modernmetal3), Mark Mynett describes a similar tactic that’s often used in the studio: the bass is multitracked, and high- and low-pass filters are used to ‘bracket’ a specific range of frequencies on each track; you process each range individually and blend them together to create a composite sound.

Phase Two

To attempt this in Cubase, you need a bass part recorded to two audio tracks. This could be a traditional mic-plus-DI recording, or you could use duplicate DIs and treat one with a virtual amp, such as Cubase’s VST Bass Amp. Although the EQ brackets focus each part on a specific range, there’s still some overlap, so start by checking the phase relationship of the two parts. Phase-cancellation issues, in which the blended sound appears ‘hollower’ than either sound on its own, can be tackled most easily by disabling snapping, and then shifting one track’s part along the timeline. If you want to see what’s going on, zoom right in on the waveform, but you must use your ears!

The screenshot above shows an amped track that benefitted from a slight negative shift along the timeline, and polarity inversion via the ‘phase’ switch in the MixConsole’s Pre rack; the hollowness disappeared and my blended bass sounded much more solid.

Freq Out

Let’s explore what EQ bracketing can do. There are many options, but with our DI and amp tracks now in phase a good starting point is to insert Cubase’s Frequency EQ plug-in on each track. In the screenshot example, DI provides only the solid low end, so I’ve rolled off everything above 175Hz (the ideal frequency will vary, but it will usually be in the 150-200Hz area) using a 12dB/octave slope, and everything below 50Hz at a gentler 6dB/octave. As we’re dealing with multiple tracks, I used Frequency’s linear-phase mode. For the amped/driven track, I rolled off everything below the same frequency (175Hz). I also added a little 4kHz boost, which I find often helps to bring out note definition created by the fingers or pick. Finally, I rolled off everything above 8kHz, where the bass contributes nothing particularly useful.

Cubase’s Frequency plug-in provides all the control and visual feedback you need to EQ bracket your bass tracks. Here, the DI and amp recordings are set to crossover at 175Hz.Cubase’s Frequency plug-in provides all the control and visual feedback you need to EQ bracket your bass tracks. Here, the DI and amp recordings are set to crossover at 175Hz.

With the parts restricted to their own range, dynamics control can be applied. I chose Cubase’s Vintage Compressor for the low-frequency DI part, and the Tube Compressor for the more characterful amp track. An amp often compresses the sound a little but DI’d bass can be very dynamic, so don’t be afraid to apply plenty of gain reduction to the DI to nail down the low-end. You can bus the two tracks to a dedicated Group Track, on which you can apply further dynamics processing to and level automation of the composite sound.

Creative Control

Steinberg’s VST Bass Amp plug-in can be a great means of adding character to your lower-mid/mid bass track.Steinberg’s VST Bass Amp plug-in can be a great means of adding character to your lower-mid/mid bass track.With the two tracks operating in different ranges, the faders can be used to create the desired balance. But the fun really starts when you experiment with the amped part, free from concerns of low-end solidity. I selected the Tube Compressor for this track due to this processor’s Drive control, which allows you to push a slightly overdriven amp sound like this one that bit harder — you can be really assertive if you want, without the overall bass sound becoming a fuzzy, blurry mess.

You could use any saturation plug-in in the same way, and if your amp tone is fairly clean you could go the whole hog and use your favourite amp-modelling plug-in. VST Bass Amp is nice, but as we’ve rolled off the low end and focused on the mids, why not try a VST Amp Rack guitar amp model instead?

Three’s A Crowd?

We’ve only used two bass tracks so far, but there’s nothing to stop you using a third. In addition to the low-end DI, you could use two tracks, with a bracketing ‘crossover’ around 1500-2000Hz, to give you separate control of the low-mid/mid region and the upper-mids. (The upper-mids track would be the one with the 4kHz EQ boost for finger/pick noise).

For a flexible rock tone, a good starting point is to keep the low-end track (below about 175Hz) clean, to use VST Bass Amp to apply some moderate overdrive/saturation to the low-mids track (175Hz to 2000kHz), and then get as gnarly as you like on the upper-mids (2000Hz and up). Again, VST Guitar Rack is ideal for this last role, and blending this third track in alongside the others can bring a wonderfully aggressive edge to the sound, while leaving the overall bass sound solid and well-defined.

A third bass track, with a crossover with the second track at around 2kHz and an instance of the VST Amp Rack inserted, can provide useful control of the upper-mids.A third bass track, with a crossover with the second track at around 2kHz and an instance of the VST Amp Rack inserted, can provide useful control of the upper-mids.

In The Blender

EQ bracketing for bass guitar can also bring some benefits to the wider mix process. For example, it can be easier to get the fundamental of your kick drum and bass guitar working together, simply because you can focus on how the kick works with your low-end bass guitar track, without changing anything about the bass’s mid-range qualities. And your low-mid/mid bass track, and upper-mid track if you have one, can be fine-tuned to work better with any guitars in the mix, without affecting the mix’s low-end.

Setting up multiple bass tracks obviously requires a little extra work, but for lots of rock styles it’s one of those rare cases where more actually is more. And, while you can use any third-party EQ, compression or amp sim plug-ins for the task, as shown here, Cubase’s own plug-ins are more than up to the job.   


Published May 2018

Wednesday, June 4, 2025

Cubase: Flux Capacity

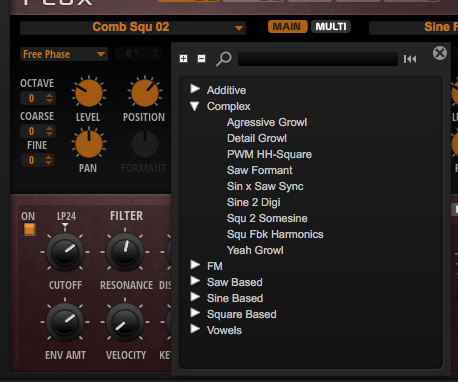
Flux is a wavetable-based synth engine, included in Cubase Pro and Artist 9.5’s Halion Sonic SE3.Flux is a wavetable-based synth engine, included in Cubase Pro and Artist 9.5’s Halion Sonic SE3.

Looking for a new synth? Check out Cubase’s latest bundled one first!

Cubase 9.5 brought Pro and Artist users the Flux wavetable synth engine in Halion Sonic SE 3, and it offers something very different from Cubase’s other synths. It features twin wavetable oscillators, sub and noise sound sources, flexible filter, envelope and LFO options, a very well-featured arpeggiator, and a powerful, yet accessible, modulation matrix. Wavetable synthesis can be quite versatile for sound creation, and a great starting point for ‘other worldy’ pads in particular. In fact, Flux ships with some very cool presets that fall into this category, so to explain how you can make the most of it, I’ll deconstruct one of those presets, called Butterfly Dreams.

Give A Wave

Flux’s control set is spread over five tabbed sections (Osc, Sub, Mod, Voice and Arp) in the upper half of the GUI. The lower half shows options for the filter, the filter envelope, amplitude envelope, a further envelope (E3), and twin LFOs. Components in the Osc, Sub and Arp sections can also be turned on/off via the small LED-style buttons (orange when on). The filter, envelope and LFOs are of decent quality but (initially, at least) they follow pretty standard modes of operation. So we’ll start with a unique element of the engine — the wavetable-based oscillators.

There are over 70 wavetables to explore for the two main oscillators.There are over 70 wavetables to explore for the two main oscillators.In order to hear what these oscillators are doing: (a) turn off the Sub sections (both sub octave and noise generators); (b) turn off the Arp; (c) visit the Mod screen and disable any pre-configured modulation (disable any On buttons; you might have to scroll down the full list of 16 modulation matrix lanes to see them all); (d) disable the Filter; and finally (e) turn off any of the HSSE3 effects that the preset happens to use — you can disable these via the main HSSE3 Effects screen and the Quick Controls located beneath the main Flux display. This should leave you with just the sound of the oscillators plus the amplitude envelope.

Butterfly Dreams uses the Comb Squ 02 and Sine Format Sweep wavetables. Auditioning these in isolation is instructive. Osc1 is somewhat nasal-sounding, while Osc2 is a bland organ-like noise — so there’s nothing to get too excited about yet! A drop-down menu allows you to change the wavetable used in each oscillator, so you can explore some alternatives. You can also change the pitch (octave, coarse, fine) and toggle on/off Multi and Formant modes for each oscillator.

The Osc section has two tabs: Main and Multi. Toggling between these brings up a different set of four knobs, all of which influence the oscillator’s behaviour. In the Main tab, the Level and Pan knobs are self-explanatory, but the Position knob determines the waveform’s playback starting point from within the selected wavetable. Generally, things get more harmonically interesting with higher Position values.

The Formant knob, only available if the Formant option is switched on, allows you to adjust how the resonant frequencies that define the character of the sound are handled as the oscillator is triggered at different pitches. I’ll leave aside the physics, and simply suggest that experimenting with this knob can produce some nice tonal variations with negative values producing darker tones and vice-versa.

The Oscillator Multi tab offers lots of parameters for adding additional harmonic complexity.The Oscillator Multi tab offers lots of parameters for adding additional harmonic complexity.

You can coax further harmonic complexity from these seemingly humble sounds by engaging the Multi options and exploring the associated controls. For example, take the Sine Format Sweep waveform (Osc2), set Spread to 0, a modest (<10) Detune value and then adjust the Number knob from zero through its full range, and you’ll begin to hear a richer (in harmonic terms) sound. The Multi option triggers multiple instances of the waveform, with the Number parameter specifying the number of multiples. If you want to go from ‘harmonically rich’ to ‘weird dissonance’, ramp up the Detune control — it’s great for taking you into more disturbing ‘sound-design’ territory!

Finally, dialing in some Spread adds further interest, as each waveform instance starts playback at a different point in the wavetable. Things get harmonically richer still with higher Spread values, as illustrated in the oscillator waveform displays.

With the Butterfly Dreams preset, the wavetables are at the more complex end of those available. Both oscillators are also used in Multi mode, with Osc1 having a high Position setting and Osc2 applying a little Spread. All these choices make for a good starting point if you are after a harmonically complex pad sound.

Less Is More?

It’s tempting to move swiftly on to the sub, filter, envelope, modulation and effects sections — to ‘fill out’ your sound — but it’s worth spending time with these elements disabled, exploring just how far you can take this neutered version of Butterfly Dreams using only the two main oscillators.

For example, try setting the Amplitude envelope with Attack, Sustain and Release at 0 and the Decay to a slightly negative number (this gives a short, staccato-style volume envelope). Follow that by experimenting with different combinations of wavetables, the Main and Multi controls and the Octave tuning settings, and you can soon generate starting points for some lovely bass or lead sounds.

For sounds (including Butterfly Dreams) whose Amplitude envelope allows a little more sustain, modulating some of Flux’s many sound-shaping parameters over time will yield more engaging pad sounds. The Sub, Filter, Envelope, LFO and effects options could occupy a workshop or two on their own, but as I mentioned earlier, most synth users should find these familiar and easy to use. So let’s focus here on how you might exploit all these sound-shaping features to best advantage for pad sounds via the Mod tab.

Evolution

Flux’s modulation matrix presents lots of options but the logical layout means it’s easy to use. Up to 16 modulation sources (eg. velocity, one of the envelopes or LFOs, or the mod wheel) can be assigned, optionally modified via a second parameter, before sending the modulation signal to a destination — pretty much all of the synth’s parameters are available. You can set the depth of the modulation (subtle or not so subtle) and whether its action is positive or negative.

So far, so normal. But, where appropriate, both Sources and Modifiers can be set as bipolar, allowing both negative and positive values. The system also includes an interesting ‘bus’ system, allowing you to send multiple modulation lanes to a single bus and use that bus as a source in another lane of the matrix. It’s powerful stuff!

Of course, the matrix allows you to do all the usual things — for instance, velocity, the amplitude (or E3) envelope, mod wheel, MIDI note number or one of the two LFOs can all be used as sources to modulate destination parameters in the filter section. Our Butterfly Dreams preset controls the filter cutoff in this way, via a modulation bus.

The Butterfly Dreams preset makes full use of Flux’s modulation matrix, with 15 of the available 16 modulation lanes put to good use to create a complex, evolving pad.The Butterfly Dreams preset makes full use of Flux’s modulation matrix, with 15 of the available 16 modulation lanes put to good use to create a complex, evolving pad.The bulk of the (many) modulation lanes used in this preset, though, actually target destination parameters in the oscillator section, exploiting the wavetable parameters I discussed above; nine lanes have the Position, Spread, Detune, Formant or Pitch parameters for either Osc1 or 2 as destinations, with the filter envelope (plus some modification from the LFOs) being the dominant modulation source. As you hold a note, therefore, while the filter envelope modifies the sound by controlling the filter, it’s also modifying many of the interesting wavetable oscillator parameters.

The result is a more enagaging pad that, until the Filter Envelope runs its course with each note played, is constantly evolving. Whether or not you can think of a musical context for the Butterfly Dreams preset is another question, but it certainly demonstrates the potential of Flux as a source of complex, dynamic, evolving, pad sounds and that targeting the wavetable parameters within the oscillator section has a lot to offer.

But There’s More...

We’ve only really had space to dip our toes in here — you can dive much deeper into the filter (with its 20+ filter types), distortion (five types) and sub/noise elements of Flux’s sound engine. Similarly, I’ve got all this way without saying anything about the arpeggiator, which is really rather good, and offers three ‘controller’ lanes for further sound modulation options. So there’s plenty of scope for a follow-up article... but until then, if you’re thinking of acquiring another soft synth, I’d very much encourage you to delve into Flux!   


Published June 2018

Monday, June 2, 2025

Cubase Vocals: Stacking Different Compressors

 By John Walden

Can two compressors make it easier to fashion a smoother vocal performance before you resort to detailed volume automation?Can two compressors make it easier to fashion a smoother vocal performance before you resort to detailed volume automation?

Compressing dynamic vocal parts can be tricky with one compressor — so why not try using two?

Even a well-trained singer’s voice can be incredibly dynamic, but in most modern musical styles every word must be heard clearly, so those dynamics need controlling. To create a more even average level without making the vocal sound obviously processed, a compressor must generally do two things: tame wayward peaks; and gently massage the level, on a word-by-word basis. If you don’t want a compressor’s action to sound obvious, a good rule of thumb is to aim for a maximum of 3-6 dB of gain reduction — but with really dynamic parts, this won’t be enough. Furthermore, given the varying timescales over which volume variation can occur (by phrase, word, or syllable, for example), finding attack and release values that work for the entire performance can be impossible. To overcome this, we can use two different compressors, each solving a different part of the equation.

Ride On Time

A common tactic is for the first compressor to tame the highest peaks, and the second to apply a gentler dose of level control. Traditionally, the 1176 FET compressor has been a good candidate for the first stage, as its very fast attack and release mean it can ‘grab’ the loudest peaks quickly and get out of the way as soon as the level drops. The LA-2A optical compressor’s relatively slow attack and release make it a popular choice for the second stage. As I discussed in November 2016 (http://sosm.ag/cubase-1116), Cubase’s Vintage Compressor and Tube Compressor plug-ins are inspired by these classic pieces of hardware: the Vintage Compressor, with it’s option for super-fast attack (<1ms) and release (<10ms), mimics the 1176, while the Tube Compressor’s LA-2A origins are perhaps less clear — there are more controls and faster attack/release times available than on the LA-2A. I’ve used both in my examples.

Peak Condition

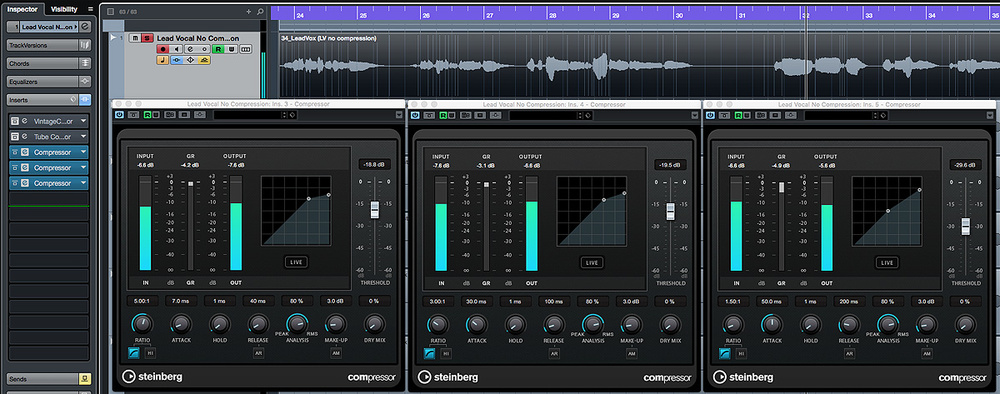
The first screenshot [above] shows some suggestions targeted to suit the vocal used in my examples, but different performances will demand different settings. It’s a good idea to configure the compressors one at a time. For the ‘peak catching’ Vintage Compressor. I set a pretty fast attack (2ms) and an 8:1 ratio, so it clamps down any peaks quickly. The fast release (10ms), should prevent unwanted gain-reduction on the lower-level sections of the vocal. Like the 1176, the Vintage Compressor has no threshold control: the threshold is fixed and you adjust the Input knob to push your signal above it, while paying attention to the amount of gain reduction. When using this compressor with such settings on unprocessed pop/rock vocals, you can safely increase the input until you see the 3-6 dB of gain reduction during peaks; in my example, this meant I occasionally saw about 1dB of gain reduction elsewhere. While not essential, I adjusted the Output knob so the peak output level was similar to the peak input level. With the peaks tamed, this ensured a sensible input level for the second compressor.

Smooth Operator

We want the Tube Compressor plug-in to even out the remaining dynamic variation in the vocal without squashing all the life out of the performance, so choose the Low ratio (around 3:1). Faster attack times tend to result in greater ‘smoothing’ of the levels, so experiment to find the sweet spot. The 20ms attack in my example means this compressor will still grab louder sections fairly quickly but a little more slowly than the first one. The release is slightly trickier to judge, but the meter can guide you: aim to let the compressor release fully and fairly promptly as each word or phrase is completed. I opted for 100ms in this case.

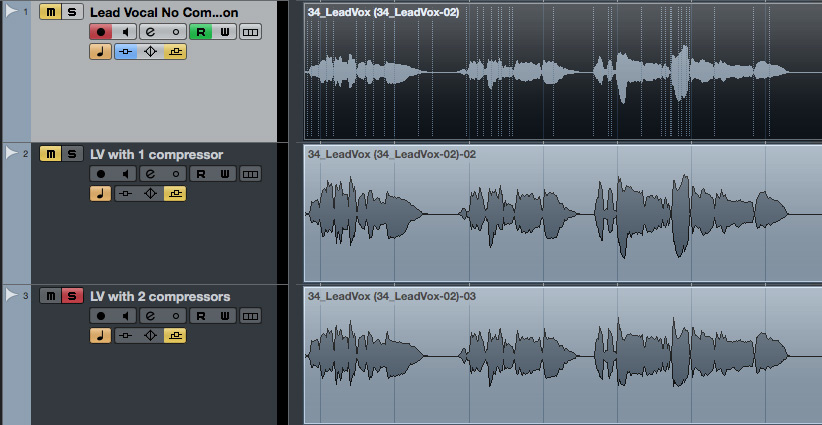
The unprocessed vocal (top), with the first compressor applied (middle), and with both compressors applied (bottom).The unprocessed vocal (top), with the first compressor applied (middle), and with both compressors applied (bottom).

Again, we’re aiming for a moderate maximum of 3-6 dB gain-reduction: adjust the Input level until you see that. As we’ve already attended to the really big peaks, the Tube Compressor will probably be active much of the time, but often applying only 1-3 dB of gain reduction. Again, tweak the Output level control so the input and output peak values match, to ensure a sensible level is passed on to the next stage in your signal chain. After two stages of compression and make-up gain, not only will the dynamic range now be much more manageable, but the average level will be higher too. Having rendered out this short clip with the compression applied, you can see the ‘before’ and ‘after’ results in one of the screenshots.

As a slight aside, there’s some ‘character’ inherent in the 1176 and LA-2A circuitry — feel free to use the Tube Compressor’s Character and Drive controls if you want to try and emulate some of that; the Drive option can work particularly nicely with vocals, though you’ll usually want to use it in moderation.

Three For All

If using two compressors means neither is pushed too hard, then sharing the load across three ought to make achieving a lot of transparent-sounding dynamics control even easier, right? And you’re not restricted to the Vintage and Tube compressors either. To demonstrate this, I processed the same vocal extract using three instances of Cubase’s standard Compressor plug-in. (This lacks the ‘vibe’ of the others, but has a more modern control set, including a dedicated threshold control.)

If two compressors can be good, maybe three compressors could be even better!If two compressors can be good, maybe three compressors could be even better!

I adopted a broadly similar approach, with my first compressor acting fast, to hit the biggest peaks with a high ratio, and then with the second and third set to slower attack/release times, lower ratios and lower thresholds. Experimenting with the attack times in the third compressor can allow you to re-introduce some dynamics in a controlled, consistent way. This helps you to avoid the end result being completely squashed — I chose a slower attack in my example for this reason.

Once again, I aimed for a maximum of 3-6 dB of gain reduction from each compressor and added a small amount of make-up gain before passing the signal on. Three times six is 18 — and 18dB is obviously a hell of a lot of gain reduction to apply to a lead vocal! But at no single point are all three compressors operating flat out. Three gentle stages of compression, with different attack/release times, mean they each do different jobs at different times, and the end result is a very smooth, solid vocal part that should sit very easily in a mix with a minimum of additional volume automation — though it still retains some of the natural volume variation borne of an expressive performance.

Again, the unprocessed vocal is at the top, with each subsequent waveform illustrating the effect of each stage of compression. The slow attack used in the third compressor (bottom) deliberately re-introduces some dynamics in a very controlled way.Again, the unprocessed vocal is at the top, with each subsequent waveform illustrating the effect of each stage of compression. The slow attack used in the third compressor (bottom) deliberately re-introduces some dynamics in a very controlled way.

Stacks Of Stacking?

Modern pop/rock vocals are at their very best when allowed to be expressive, but they usually need assertive dynamics control so the lyrics can be heard clearly. Yes, you can achieve this with detailed volume automation but stacking Cubase’s stock compressors can get you a long way down the same route with far less effort; you’re still free to refine the result with a little automation but you should find it a little easier. And remember, this technique isn’t only applicable to vocals — for any sound source with unruly dynamics, if you need stacks of control, why not try stacking some compressors?


Published July 2018