Wednesday, April 12, 2017

Tuesday, April 11, 2017
Q. Can I combine stereo mic techniques?
Is there any reason not to combine, say, an M/S
stereo mic pair with an additional spaced mic pair when recording things
like acoustic guitar? I've tried it and thought it sounded pretty
sweet. I'm pretty sure other people use this method on acoustic guitar,
even if it's not strictly by the rule book, but am I at risk of
confusing the stereo image?
SOS Forum post

There's no reason why you can't use a spaced pair of mics alongside a coincident pair, such as the Mid/Side arrangement shown here. But when recording a single instrument it can have little effect, unless you are specifically trying to capture a lot of ambience from a reverberant room. Using the Mid/Side approach has advantages over a crossed pair, as you can get a full, on-axis sound from the centre mic, with the sides of the figure-of-eight adding some 'space' to the sound.
SOS contributor Mike Senior replies: The bottom line with this is that your ears should be the guide. As far as stereo imaging is concerned, I'm not sure there's enough width in an acoustic guitar to give away what you're doing unless you get really close with the microphones, and I find that extreme close-mic positions often don't work very well with acoustic guitar.
I certainly don't think you're transgressing against any real rules. For example, the well-known Decca Tree method is quite similar to what you describe, with the exception that you're using an M/S array rather than a single omni mic in the centre. In fact, I understand that the original Decca engineers also experimented with replacing their central mic with a coincident stereo pair, and I can think of a good reason for doing so: although the straight Decca Tree makes a lovely spacious sound with good mono compatibility, its stereo imaging isn't as sharp as you'll get from a coincident pair. Putting a coincident pair at the centre of a Decca Tree adds sharper stereo imaging without impacting mono compatibility.
Your choice of an M&S rig for this purpose has a number of potential advantages over a crossed pair. With a single instrument, a crossed-pair setup is likely to have the instrument off-axis to both mics, and this will compromise the frequency response at the centre of your stereo image, especially if you're using budget mics. With an M&S setup, you can take advantage of the clearer on-axis response of your Middle mic. Another potential advantage of using M&S is that you can experiment with using an omni polar pattern for the middle mic, which will give you a better low-end response and more resistance to proximity effect if you're close-miking. Summing to mono in this case would leave you with the same situation as with a traditional three-mic Decca Tree, because the Sides signal from the figure-of-eight mic completely cancels itself out.
Published February 2008
Monday, April 10, 2017
Saturday, April 8, 2017
Q. Should I buy a Headphone Amp?
I recently purchased some Sennheiser HD600 headphones and have been told that I'll need a good headphone amplifier to make the most of them. Currently, I use the headphones output of my audio interface (a Digidesign M Box 2) to power my cans, but it seems to distort at high levels. Do you think it would be advisable to get myself a headphone amp? If so, how would I get the signal to the headphone amp from my audio interface? I'm thinking of getting either the Presonus HP4, Samson's C Que 8, the CME Matrix Y, or the Behringer AMP800, mainly because the configuration of the inputs and outputs are suitable for my system. It's probably worth mentioning that I use a small Yamaha desktop mixer as a front-end to my DAW.
Michael Fearn
PC music specialist Martin Walker replies: Most audio interfaces provide fairly clean-sounding headphone outputs, although it can be tricky to predict how loud a particular set of phones can go through a particular headphone amp without sounding strained. According to the Digidesign web site, the M Box 2's headphone output can provide six milliwatts into 50Ω, and since most such amps provide less power into higher impedances such as the 300Ω of the Sennheiser HD600s, a dedicated headphone amp might help you gain increased level while helping your new headphones to sound as clean as possible.

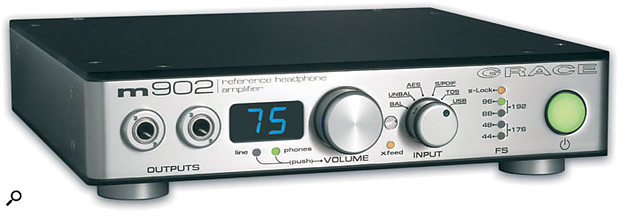
Sennheiser's HD600 (right: reviewed in SOS June 2002) are open-backed, reference-quality headphones. They are renowned for their wide and spacious sound, but are at their best when used with a good headphone amplifier, such as the Grace M902 pictured below.
However, the models you propose all have four headphone outputs, which is fine if you need to plug in four pairs of headphones (so that an entire band can monitor simultaneously, for example), but is not so suitable if you simply want to get higher audio quality for your single pair of Sennheisers. It sounds as though the latter is the case, so you simply need to get hold of a single stereo headphone amp and connect it between the stereo outputs of your audio interface and the inputs of your Yamaha mixing desk. By spending your money on this one headphone output you should be able to get better audio quality than spreading it across four.
I say 'should', but, unfortunately, while there are lots of handy multiple-output headphone amps at budget prices, once you start looking for high-quality, single-output headphone amps the prices tend to shoot up alarmingly. The Sennheiser HD600s are superb headphones, and some people are prepared to spend over £1000 on a headphone amp to get the very best out of them. Take the Grace M902 (www.gracedesign.com), which I mentioned in my January 2007 feature on headphone mixing (www.soundonsound.com/sos/jan07/articles/mixingheadphones.htm). It costs £1400, but is far more than a rudimentary volume control. Another widely recommended amp is Graham Slee's Monitor Class model, which costs £475 (www.gspaudio.co.uk). Of course, you may still consider this 'silly money'.
I've scoured the Internet trying to find a reasonably priced headphone amp to use with my Sennheiser HD650's, since it seems bizarre to end up paying several times more than the cost of your audio interface just to improve slightly on its integral headphone output. But while there are plenty of audiophile products with prices to match, there currently seem to be few products available to suit more modest budgets.
One possibility is Creek's OBH21 (www.creekaudio.co.uk), which retails at £190. I haven't auditioned it myself, but I know of happy HD600/650 owners using this model. Another is the Rega Ear at around £150 (www.rega.co.uk/html/ear_2001.htm), which, again, is used by many HD600/650 owners, while the Pro-Ject Head Box Mk 2 (www.sumikoaudio.net/project/products/headbox2.htm) seems a bargain at £75 (yet still wins awards for its audio quality compared to the average headphone socket found on a hi-fi amp), and will deliver 60 milliwatts into 300Ω phones, or 330 milliwatts into 30Ω models, which is a lot more than the M Box 2! What's more, it has additional line-level outputs that you could connect to your mixer.
The Pro-Ject Head Box Mk 2 is available from local hi-fi shops or can be bought on-line (in the UK) from various retailers, including Noteworthy Audio (www.noteworthyaudio.co.uk), Stone Audio (www.stoneaudio.co.uk), or Superfi (www.superfi.co.uk). Readers in the USA seem to benefit from a much wider selection of indigenous products. Visit Head Room (www.headphone.com), and you'll find a huge range of headphone amps.
Published August 2007
Friday, April 7, 2017
Thursday, April 6, 2017
Q. How do you mic up a Djembe?
The crack team of Paul White and Hugh Robjohns have traveled the world solving readers' problems. Here, they down the Hob
Nobs and answer some of your recording queries in our Q and A
mini-series, Sound Advice.


Hugh: The djembe is a type of African drum, shaped like a goblet, and made from a single piece of wood. Its head, traditionally goatskin, is stretched over the top and tensioned with string. Like the conga, the djembe is played by hand, and has an opening at the bottom of its hollow, tubular shell which acts as a Helmholtz Resonator. Most of the tone and volume of the bass resonance emerges from the bottom of the tube when the drum is struck in the centre of the skin, while the higher-pitched percussive sounds come from the drum skin when played closer to the edge.
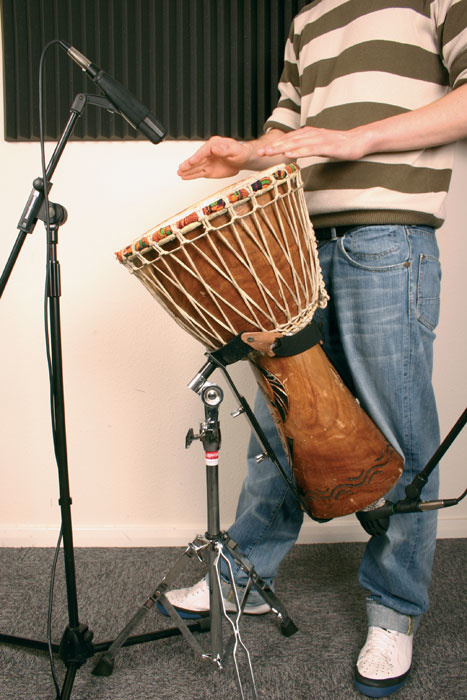
Paul: Because of that large bass tube, the djembe needs to be lifted off the floor to to allow sound to escape from the bottom of the drum. For recording, many players use a metal floor stand or cradle, rather than holding it between their knees, as it keeps the drum still. The pictures, right, show a traditionally made djembe in such a stand.
Hugh: When it comes to miking the drum, I'll always listen carefully to the sound that the drum is making in the room. Only then will I make an informed decision on where to place the mics.
If you have a nice-sounding room, and can afford to mic the drum from a distance, then a single (mono or stereo) mic, positioned in a place where there's optimum balance between bass and percussive sounds, should give good results. However, in any kind of performance situation where there are other instruments playing in the vicinity, or where you specifically want a closer, more intimate sound, or where the room has no worthwhile sound character, you are almost certainly going to have to use two close mics. This is because the traditional approach of a single mic above the drum head simply won't capture the bass energy in the right proportion.
Paul: When tackling the top of the drum, I'd usually start around 12 inches from the drum skin, using a small-diaphragm, cardioid capacitor microphone. If you don't have one of these, a good dynamic will yield good results, but you'll have to get closer to the drum head, maybe within four to six inches.
Hugh: Whatever you use and wherever you place it, try to aim it roughly halfway between the edge and the centre to capture the percussive sound of the hand hitting the head. You can experiment with the exact angle and aiming point of the mic to change and control the tone slightly. The second mic is used to capture the weight and tone of the bass resonance from below, and would usually be placed somewhere close to (or maybe even an inch or two inside) the mouth of the base, as shown in the pictures. Alternatively, you could place a pressure zone (boundary layer) mic on the floor below the mouth of the djembe, or use an omnidirectional mic on a thin sheet of foam directly on the floor. This approach gives a more natural bass sound, to my ears, and is well worth a try if you have suitable mics. Just beware of foot-tapping or other floor vibrations. Of course, experimentation is the key, because the best djembes are hand-made, and every one will be different.
Paul: As is regularly mentioned in the hallowed pages of SOS, if the room is adding unpleasant tonality to the sound of the drum, hanging the ubiquitous duvet around and to the sides of the drum will help damp down the sound. It is possible to over-dampen, so try sticking a tea tray under the drum if you think it's a little dull.
Hugh: Mic selection is much the same as for any percussion or drum kit, hence the use of the AKG D112 inside the base. (Alternatives include Shure's Beta 52, the EV RE20, or Sennheiser's E902 — basically anything suitable for miking bass drums). When miking the skin, good-quality dynamic mics such as the venerable Shure SM57 or Sennheiser MD421 will tend to give a slightly fatter, more flattering sound. A condenser mic such as a Rode NT5 or AKG C451, by contrast, will tend to give more detail and percussive edge, but watch out for overloads if you're close-miking. A mic with a 10dB pad is often a good idea.
Paul: Once you've got your djembe recorded, you may find that the levels vary too much on playback, as the instrument is very dynamic. Compression will help, and using an attack time of around 10ms will allow the drum hits to come through cleanly, while taking around four to five decibels off the very loudest peaks should help to even them out. You may have to be more severe on recordings with excessive dynamic range.
Published August 2007
Wednesday, April 5, 2017
Q. How do I maximise loudness on tracks?
I have been recording music for quite a few years
now, but I always get the same problem when I listen back to my mixes:
mine are far quieter than any commercial releases. Can you give me any
tips on how to get the sound louder without the track distorting? Or are
there any effects I can put on a track to boost the volume?
James Atkins
SOS contributor Mike Senior replies: Maximising the loudness of final mixes is something of a contentious issue, with different professional engineers holding widely divergent views on the matter. Assuming that your mix is already peaking at 0dBFS, increasing loudness beyond this is always a compromise, because you inevitably have to change the recorded waveforms in some way. Whether the compromises of any particular audio process are sufficiently offset by the increase in loudness is a decision you have to make for yourself.

The multi-band tube-compression processor in Drawmer's DC2476 Masterflow unit is simple but very effective.
The best tactic is simply to line up your mix in your DAW alongside a couple of commercial mixes you rate, and process your mix to try to bring it into line. The higher the quality of your monitoring facilities, the better you'll be able to judge what you're doing. (With mediocre monitoring, you'll tend to overdo the loudness because you won't be sufficiently aware of the associated decreases in signal quality.)
So what processing might you try? Well, the least deleterious change I can think of making to increase loudness is to high-pass filter the mix at a very low cut-off frequency (for an example, see the screenshot on page 20). If you have any DC (0Hz) signal on your recorded tracks, this can offset the whole audio waveform such that it clips earlier than it should; high-pass filtering will remove this. You can also use the high-pass filter to cut any low-frequency rumble you don't want, which will give you more headroom to fade up the overall track level.
While we're on the subject of EQ, it's worth mentioning that the human ear isn't as sensitive to high and low frequencies as it is to the mid-range, and people tend to interpret brighter sounds in particular as being louder. If you can detect a tonal difference between your track and your references, I'd recommend trying gentle shelving EQ cuts to match the sounds more closely in the first instance.
You might also want to have a look at plug-ins like Logic 's Match EQ and the TC Works Assimilator, or the stand-alone utility Harbal. These all compare the frequency content of a reference track with that of your own mix, and will suggest an EQ curve to match the two automatically. Just be sure to take the suggested EQ curve with a pinch of salt, as the automatic process is unlikely to be foolproof.
Subtle tape, valve, or transformer distortion processes can be a very nifty way of increasing the subjective loudness with very little increase in metered signal level. There are masses of software options here, such as Silverspike's freeware Rubytube or the Magneto plug-in built into Cubase SX2. Some nice hardware possibilities include the DRG process built into a number of TC Electronic's rack processors, or the lovely multi-band tube processing (shown on the left) in Drawmer's DC2476 Masterflow unit.
Compression can give comparatively transparent increases in loudness, especially with low-ratio (below around 1.3:1) and low-threshold (between maybe -30dBFS and -50dBFS) settings. Full-band compressors will be more tonally transparent in this role, but multi-band models can usually add more loudness without pumping artifacts, albeit with the side-effect of dynamically tampering with the tonality of the mix.
For rock and dance styles, full-band compression can be used with higher threshold and ratio settings to create an illusion of extra loudness through pumping compression effects. If you want to experiment with this, try starting with a 2:1 ratio, a 1ms attack time and about 100ms of release time. If you then set the threshold level so that the compressor reduces the gain mainly on drum hits, you should hear a pumping effect, and you can adjust the ratio and release time to regulate the strength of it.

The zoomed-in waveform of a kick-drum hit from Dr Dre's 'The Watcher', from the album 2001, showing that the track has been clipped to increase its loudness. The highlighted region in this screenshot clips around 140 consecutive samples.
If you find that compression pumping is knocking the bass frequencies out of your kick drums, you may want to increase the compressor's attack time to let more of the sound through before the compressor clamps down. Alternatively, you could high-pass filter the compressor's side-chain to decrease the gain-reduction element's sensitivity to low frequencies.
Limiters are often used to give a loudness increase, and can manage a comparatively loss-free increase of several decibels in the right circumstances. There are now lots of full-band and multi-band models available, but one side-effect I'm not fond of with any of them is that they tend to cause any heavy drum sounds in your track to lose punch and to sink back into the mix. For less percussive material, the trade-offs of processing depend on how you the limiter's release time is set, but the main things to listen for are unwanted pumping effects and bass distortion.
If you've tried all of the above and you're still short, then maybe it's time to zoom in on the waveforms of your reference tracks to see whether they've been clipped. Although clipping is frowned on by many engineers, the practical reality is that clipping is all over commercial releases in many styles, so you need to give the issue of clipping serious consideration in order to decide where you stand. The main sonic disadvantage of clipping is a type of distortion which in itself is pretty unmusical. However, many engineers take the view that a degree of clipping can be well enough disguised under certain circumstances that it becomes a reasonable price to pay for a considerable loudness hike.
The first main situation where it's often used is when the track has a lot of fuzzy sounds, such as distorted electric guitars, into which the clipping artifacts can fairly easily blend. Some stark examples of this are The Darkness' 'Growing On Me', Chemical Brothers 'Block Rockin Beats', and Pink's 'Feel Good Time', to name a few.
The other common use of clipping is in music styles that are very drum-heavy, such as rock and hip-hop, and here the technique is to clip mainly just the drum beats. Unless you drive things too far, the burst of distortion on each hit tends to be perceived mostly as an alteration in the tonality of the drum hits, rather than as distortion per se, so many producers are happy to take advantage of that. To take one example, Dr Dre's 2001 album frequently clips in excess of 100 consecutive samples on its kick-drum hits (see the screenshot on page 22), and that kind of clipping is by no means out of the ordinary in a lot of modern commercial music styles.
The only thing I would say is that no matter what you do, you should always make a habit of retaining a completely unprocessed version of your mix file for safety's sake. Not only will this mean that you don't burn any bridges if you decide at a later date that you mucked up your settings, but it also means that you can always still take your material to a professional mastering house if you want. Their specialist equipment and engineers will be able to get much better (and louder) results from an unprocessed file than from a processed one.
Published May 2007
Subscribe to:
Posts (Atom)