Welcome to No Limit Sound Productions. Where there are no limits! Enjoy your visit!
Welcome to No Limit Sound Productions
| Company Founded | 2005 |
|---|
| Overview | Our services include Sound Engineering, Audio Post-Production, System Upgrades and Equipment Consulting. |
|---|---|
| Mission | Our mission is to provide excellent quality and service to our customers. We do customized service. |
Saturday, May 31, 2025
Friday, May 30, 2025
Q. How can I bypass an External FX plug-in in Cubase?
I’ve not found a way of bypassing an external effect (Boss DD-500) by using automation in Cubase 8.5 Pro. I didn’t want the effect on a particular part of the track and thought that enabling Read/Write and clicking bypass at the right point would do it. I was using the effect as an insert, and did think the easy option would have been a dedicated effects send. But I wanted the whole signal running through the Boss as, rightly or wrongly, I think there is a difference in the result. In the end, I gave up and created another track with the part and without the effect. Can Cubase’s external effects be controlled in this way or have I missed something?
SOS Reviews Editor Matt Houghton replies: For some reason, Steinberg have not given us the ability to automate bypassing of their External FX plug-ins even though it can be done manually — I tested it in both Cubase 8.5 and the latest version, Cubase 9.5 — so don’t worry, you’re not going mad!
As I understand it, you want the whole signal to flow through the Boss unit when the effect is on — which is why you’ve configured it as an insert effect — and all of the signal to flow ‘around’ it to whatever’s in the next insert slot when you’re bypassing the effect. I can think of a few of ways of achieving this.
The first is to disable the effect on the Boss device itself. The signal will always flow through the Boss unit, but you use MIDI to automate the bypassing of the effect. To do that you’ll need to consult the Boss manual, which is free to download from the manufacturer’s web site. (I checked; there does appear to be a way to bypass the effects via MIDI).
Arguably a better approach is to use conventional editing: duplicate the untreated track, and render the Boss processing on the duplicate. Then edit the two parts to give you broadly the sections you want of each. Then edit away — you might want the end of the processed clips to overlap the start of the dry ones to give you an effect tail that decays naturally; pay close attention to the length and shape. The downside of this approach is that you need to commit to any other processing you’ve used up to that point.
You can achieve a similar thing using send effects. Insert your External FX plug-in on an FX Channel, and from the source channel route a pre-fade send to the effect. Automate your send level to set the effect level, and use the source channel’s fader to control the level of the dry sound. If you want one fader to control both parts, route both tracks to a Cubase Group Track (or assign them to a VCA Fader).
Thursday, May 29, 2025
Wednesday, May 28, 2025
Macros: Time-saving Workflow Wins In Cubase
 Screen 1: Macros are built as command sequences in the Key Command window, as shown here for our first example.
As these vocal examples demonstrate, Cubase’s Macros enable you to streamline your workflow significantly and save yourself considerable time.
Most time-saving Cubase features — the Workspace system, Key Commands, the Media Bay and the Project Logical Editor spring to mind — require you to invest a chunk of your time, but it’s worth it because that investment will be returned many times over in your projects. This month, I want to look at another such time-saver: Cubase’s Macro system. To help you get to grips with Macros, I’ll take you through some of the ones I’ve created to save time when recording and editing vocal parts.
The Key To Macros
Macros seem to scare some people, perhaps because it all looks a little too much like ‘programming’, but they’re actually incredibly easy to create and use, because a Macro is really nothing more than a sequence of key commands.
Macros can be viewed, created and edited in the Key Commands window, which is accessed via the File menu: just open that window and click the Show Macros button near the bottom. The panel that pops open will already contain a few built-in Macros, as well as a handful of buttons that are used to create new Macros, add key commands to a Macro or delete commands. All of those key commands (there are hundreds of them) can be found in the upper panel and it’s here, once you’ve created a Macro, that you can assign a key command to trigger it — just open the Macros section of the key command list in the top panel and you’ll find all your custom Macros there. (Macros can also be run directly via the main Edit menu.)
So, what’s a good task to automate with a Macro? While there are lots of cool examples to be found by a quick Internet search, the best approach is to examine your own current workflow: anywhere you find yourself repeating a series of routine tasks time and time again, consider whether you could build a Macro to condense that sequence into a single command. What follows are four vocal-based examples, ranging from the simple to the sophisticated. Hopefully, they’ll inspire you to design some Macros that will help you work faster and smarter.
Get Tracking
Our first example is simple, but useful (see Screen 1 above). Imagine you’re in the middle of a tracking session and need a fresh mono audio track and add a dash of reverb, so the singer can capture a new idea. Done manually, this might take you less than a minute, but our three-command Macro condenses that to mere seconds.
The screenshot shows the three commands in this Macro. The first key command creates a new mono audio track. The second turns on monitoring (your singer will hear any insert/send effects in their headphones). When executed, the third key command (Add Track To Selected: FX Channel) provides you with the usual Add Effects Channel Track dialogue, in which you select the desired effect and name the FX Channel. It will also automatically add a send from the mono audio track the Macro created to that effect. Just run the Macro, choose the reverb and name the track, and you can get on with your recording.
Breathing Easily
 Screen 2: This Macro semi-automates the reduction in level of breath noises. (For this screenshot and the next one I’ve combined two screens so you can see all the commands at once).Breath noises in your recordings often require attention. They can be deleted or, for a more natural sound, simply reduced in level so they sound less prominent, and Macro can speed this process up considerably. Screen 2 shows the sequence of key commands I assembled for this Macro. Before executing it, you must use the Range tool to highlight the section of audio containing a breath sound. The Macro then automates a number of steps. First, it sets the left and right locators around the selected range. Next it splits this section of the audio to create a new event. Then, it switches to the Select tool and moves the cursor so that it lies within the range of the new event. The Decrement Event Volume command is repeated six times (each instance reduces the event volume by 1db). While this will generally be enough to make the breath sound less noticeable, you can adjust the number of repetitions to personal taste.
Finally, the Macro switches back to the Range Tool, so that when you move along the timeline to find the next breath (and repeat the process) you’re ready to run the Macro again. Yes, you still have to step through the whole performance finding each breath, but they’re pretty easy to identify visually on the waveform and you should listen to them anyway — and at least you can then tackle each instance very quickly.
Into Reverse
Our next example is more of a creative option — it automates the process of applying a reverse reverb effect to a selected range of our vocal (although it could be applied to any audio track and, by changing the last three steps of the Macro, you could instead apply a different effect).
 Screen 3: This Reverse Reverb Macro could easily be modified to apply different spot effects.Again, prior to executing the Macro, you need to use the Range Tool to select the phrase within the vocal track that you wish to apply the effect to. Then, as shown in the Screen 3, the Macro places the left and right locators around the selection, duplicates the audio track, converts that to a ‘real’ copy (so the duplicated audio is independent of the original audio), splits this duplicated copy so the selection becomes an individual event, mutes all the audio on the duplicate track, except the required event, selects just that event, and finally applies the effect by reversing, adding reverb, and then reversing again.
Despite this being a long list of commands, the only point in which you are asked for input is to confirm that you want a ‘new version’ when the reverb is applied. The end result is a second version of your vocal track where just the selected ‘reverse reverb’ range is audible, and you can simply blend the processed and unprocessed versions to taste. You could, of course, replace the final three lines of the Macro with alternative effects options to create other sorts of spot effect.
Double Up
One common vocal-orientated task is the creation of a ‘fake’ double-tracked vocal when you have only a single vocal part to work with. Screen 4 shows a single Macro for Cubase Pro users (because VariAudio is required for this) which, once you select the lead vocal track to be doubled, can make a pretty good stab at the whole process.
 Screen 4: Cubase Pro users (who have VariAudio) can use a Macro to create a fake double track at the press of a key.The first few key commands will be familiar from the previous example: all the events on the track are selected, the track is duplicated and then the events on the duplicate are converted into a real copy. The next key command bounces (renders) all the selected events into a single new event. This bounced single event is then selected and opened within the Sample Editor in Cubase’s Lower Zone. The Reanalyse Audio command is then executed on this event, thus creating VariAudio pitch ‘blobs’ for the entire event.
Next, the Edit Pitch/Warp Tool is selected so that Quantize Pitch can be applied, quantising all notes to the nearest semi-tone. This might not always be the most appropriate option but it will shift most notes by a few cents relative to the original vocal line. And you can, if required, go in and adjust the pitch changes by hand afterwards, once the Macro has done the donkey work for you.
The final three commands select the audio event again, set the Quantize resolution to 16th notes and then apply a quantise, shifting the timing of some notes relative to the original. Once the Macro has completed its work, all you need to do is pan and/or blend the levels of the original and ‘faked’ double track to taste.
Titanic Help
I’ll sign off with a few observations. First, the order of the commands you choose is absolutely critical, and you need to include every single step that you would use if executing the same sequence manually. If something isn’t working as you expect, then this is where to start your ‘debugging’ process.
Second, there are a few limitations as well as features I’d love to see Steinberg add. For example, there’s currently no option to expand the Macro portion of the Key Commands panel. We could use a few more editing tools (for example, for moving commands up/down within an existing Macro), and I’d love the ability to duplicate a Macro as a starting point for a new one.
But, in the meantime, Macros are already a very powerful feature — these few vocal-based examples are really just the tip of a very big Macro iceberg, and I hope they’ll inspire you to create some of your own.
Tuesday, May 27, 2025
Monday, May 26, 2025
Cubase: Macro Logical
In last month’s Cubase workshop, John Walden explained how Macros can be used to automate repetitive tasks — and I was reminded me of a surprisingly challenging recent Macro‑making experience of my own. So this month, I’ll dive a little deeper into Macros, exploring some limitations and workarounds. Hopefully, by taking you through how I overcame the challenges posed by one particular Macro, I’ll be able to help you design and troubleshoot some sophisticated Macros of your own.
Missing The Bus
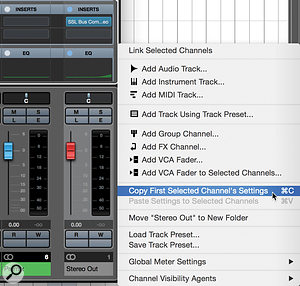 When the Macro has been run, it’s easy to copy and paste the channel settings from the Stereo Out to your new Premix bus.The task I wanted to automate should have been simple: inserting a new ‘premix’ bus — a fancy name for a stereo Group track that sits between Cubase’s master Stereo Output track and the rest of your mix — into an existing project. The idea of a premix bus is that you can put all of your master‑bus processing on this bus, while leaving Cubase’s main Stereo Out track free of processing. This setup allows you to either send or directly route selected sources ‘around’ any bus processing you’ve set up.
For example, I often like to mix into some gentle mix‑bus compression — just 1‑2 dB of gain reduction to ‘glue’ the mix together. But often, what feels like the right setting for the mix as a whole can be a bit too much for the vocals or cymbals. There are various strategies to overcome this, but one is the premix bus. By placing the compressor on the premix bus, I can set the level of the vocals running into the compression using the vocal channel fader as normal, but can later choose to nudge the vocals up a little without impacting on the action of the bus compressor, by sending a little of the vocal directly to the clean master bus. Similarly, if I feel that the drum overheads are a little undesirably coloured by an analogue tape emulation on the bus, but I want to keep that effect on the rest of the mix, I can back off the overheads’ channel fader and use a send to route more overheads to the clean Stereo Out.
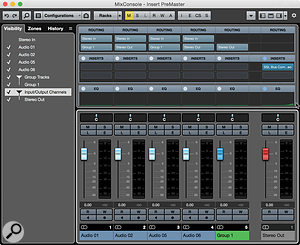 Here’s the test project before running the Macro...Another scenario is where you’re using reference tracks and either don’t wish to use the Control Room or don’t have it (it’s only available with the full Pro version of Cubase): simply route the references to the Stereo Out and use the reference tracks’ channel mute and solo controls to audition your references.
Ideally, you’d create your premix bus before you start work on your project, but there will be occasions when you wish to add one to existing projects. If the project is a busy one with lots of Group tracks, this can be rather fiddly. It requires careful manual selection of tracks and a lot of mouse clicks and key presses — it’s easy to overlook something, and distracts you from the actual job of mixing.
Manual Or Automatic?
A few built‑in commands can help speed things up. For example, in the MixConsole, you can select a track and use the ‘Show Channels that are Connected to the First Selected Channel’ command to reveal all tracks that are routed directly to the selected one. And you can re‑route all the currently selected channels by clicking on one of the channels’ routing, then Shift+Option (Alt+Shift on Windows) clicking the desired destination.
Sadly, Cubase is a little inconsistent in terms of which commands are available to you and how those commands behave, with the choice and result depending on whether you’re viewing the MixConsole or the Project page. The command I’ve just described, for instance, is only available when in the MixConsole. Yet selecting ‘all’ tracks in the MixConsole selects both the visible tracks and any you’ve hidden, whereas in the Project page the same command selects only the visible tracks, not the hidden ones. Accessing the Project Logical Editor, which can be used to make track selections, requires you to be in the Project page.
When it comes to automating things with Macros, the same rules apply; you must be in a certain window to execute certain commands. You’ll also find that lots of obvious commands are toggle types, which invert the current state of something (eg. open a window if it is closed, and vice versa) but can’t actually specify the state (eg. there’s no built‑in command to ‘Open the MixConsole’). Thus, automating the creation of a premix bus, complete with routing, requires some prep work and a little lateral thinking...
Prep School
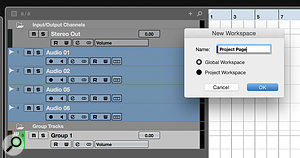 As Cubase only has toggle commands to show/hide the MixConsole, it’s necessary to create a Workspace to provide the Macro with a known starting point.The MixConsole command that hides all tracks that aren’t routed to the Stereo Out requires the Stereo Out to be selected. Automating that selection requires the creation of a Project Logical Editor (PLE) preset, which means you must have the MixConsole closed! The default F3 command to toggle the MixConsole open/closed won’t work in our Macro, as it has no way of knowing whether that window is currently open or closed. So we must create a known starting point using Cubase’s Workspaces: close all open windows except the Project page, go to ‘Workspaces / Add Workspace’ and create a global (so it applies to all projects) Workspace preset called ‘Project Page’. Macros address Workspaces by number, not name, so make a note of the Workspace number and use that in place of Workspace 1 in your Macro.
Next, create that PLE preset — in fact, you’ll need to create a few. The first will select the Stereo Out. Go to ‘Edit / Project Logical Editor’ and set the PLE with the following parameters: Filter Target = ‘Name’; Condition = ‘Equal’; Parameter 1 = ‘Stereo Out’. Leave everything else at the default settings (the Action pane blank, the Function as ‘Select’ and the Macro as ‘Not Set’). Save this as a preset called ‘Select Stereo Out’.
Create a second preset called ‘Select All Except Stereo Out’: use the same settings, but change the Condition parameter to ‘Contains Not’. With both presets saved, go to the ‘File / Key Commands’ and open the Project Logical Editor folder. You should see your new PLE presets listed here, which means they’re now available to add to Macros and/or assign to keyboard shortcuts.
You must also ensure that the Stereo Out track is actually selectable in the Project Page — the Input/Output Channels folder must be expanded. Again, the default commands for specific folders toggle the open/close state of the currently selected folder. And while there’s a command to expand or collapse all folders in your project, that could hide things you don’t want hidden! But you can create the command you need with another PLE preset.
This time in the PLE window’s upper pane, you need to add two conditions. The first row should read: Filter Target = ‘Container Type Is’; Condition = ‘Equal’; Parameter 1 = ‘Folder’. Click on the plus sign to add another row, in which the parameters need to be set as follows: Filter Target = ‘Name’; Condition = ‘Contains’; Parameter 1 = ‘Input/Output’. That selects the folder and the lower pane’s settings, so instruct Cubase to expand it: Action Target = ‘Track Operation’; Operation = ‘Folder’; Parameter 1 = ‘Open’. Finally, set the Function parameter at the bottom of the window to ‘Transform’. (You can check the selection works without performing the action by leaving this set to ‘Select’). Save this as a PLE preset called ‘Open Project IO Folder’.
 Another preparatory step is to sync the Project and MixConsole visibility and track selections.Our final piece of prep ensures that the visibility of tracks in the MixConsole and the Project Page is synchronised. I couldn’t find a way around doing this manually, but you should only need to do it manually once as it will become the default setting. Go to ‘Cubase / Preferences’ and in the ‘Editing / Project & MixConsole’ section, ensure ‘Sync Visibility of Project & MixConsole: On/Off’ is ticked. You can assign this a shortcut if you wish (I used Shift+Alt+S), and can check and change the status by clicking on the ‘=’ icon in the visibility tab to the left of the MixConsole or Project page. If doing this really bugs you (because you want, for other reasons, to be able to un‑sync the two windows), note that Cubase actually has three separate MixConsoles, and each can be set independently to sync with the Project page or not. So you could easily adapt this Macro to use MixConsole 2 or 3 without affecting the sync setting of your main MixConsole — the commands to toggle open/closed these auxiliary MixConsoles are available in the ‘Key Commands’ window.
Building The Macro
Having created your Workspace and channel‑selection commands, you can start work on the Macro itself. Add the commands in the sequence I’ve used, since you can’t drag to reorder commands in a Macro — by default a new command is added below the currently selected one. Get this wrong and you have to delete the command and try again.
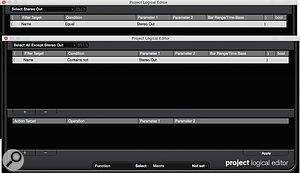 These two Project Logical Editor presets enable the Macro to select the Stereo Out track, and all tracks except the Stereo Out.Go to ‘File/Key Commands’ and click on the Show Macros button at the bottom. Click the New Macro button and call the new Macro ‘Insert Premix Group’. I find it quickest to find commands by typing in the search field at the top — type the text you want and hit enter to find the first result. Use the magnifying glass to find additional results (don’t hit enter twice or you’ll close the Key Commands window). In this search box type ‘Workspace’ and hit enter. From the list select Workspace 1 (the one we created with only the Project Page open). Then, in the Macro sub‑pane click the Add Command button.
Now to select the Stereo Out: type ‘Project IO’ to find your ‘Open Project IO Folder’ PLE preset and add this to your Macro. In the same way, find and add your Select Stereo Out preset.
The next step will need the MixConsole open. Since the Macro’s first command defined the state of the MixConsole as closed, we can add the MixConsole toggle command — it’s in the ‘Devices (Studio)’ folder and is called ‘MixConsole’. Then add the wordy command ‘Channel & Track Visibility — Agents: Show Channels that are Connected to the First Selected Channel’.
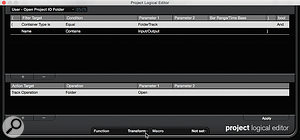 Another Project Logical Editor preset locates the default Input/Output Folder and sets its view to expanded.As discussed earlier, while the MixConsole now displays only those channels we want selected, you can’t actually select them here — you must first return to the Project page. So add either the Workspace 1 or MixConsole toggle command (it doesn’t matter which). Then add your ‘Select All Except Stereo Out’ PLE command, followed by another MixConsole toggle command to return us once again to the MixConsole. Finally, add the ‘Mixer — Add Track to Selected: Group Channel’ to the Macro.
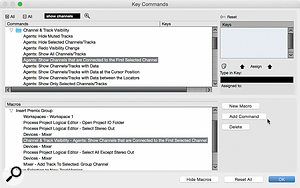 In the upper pane, you can see the command that allows us to select all tracks currently routed to the main Stereo Out. The lower pane lists the different steps that form the finished Macro.And that’s almost it. You can run your Macro either via the ‘Edit/Macros’ menu, or by assigning a keyboard shortcut to your Macro in the Key Commands window. It will create a new Group track routed to your Stereo Out bus, re‑route any tracks currently routed to the Stereo Out to the new Group, and prompt you to name the Group. Call it ‘Premix’ or something similarly descriptive (to make it easy to select via PLE presets, should you ever wish to do so).
The Hidden
I said ‘almost’, because there are two remaining issues. First, you need to make visible in the MixConsole those tracks that were hidden by the Macro. Second, we need to move any processing on the Stereo Out to the new Premix track.
There’s a command (accessible only in the MixConsole view, and called ‘Agents: Undo Visibility Changes’) that should do what we want: it reverses the last visibility changes you made. But this didn’t work reliably for me when used in the Macro. You could use ‘Channel & Track Visibility — Agents: Show All Channels/Tracks’. This will unhide all tracks that were previously hidden, and if you don’t tend to hide many tracks in your projects this is probably the best way to go. Personally, I preferred to do this step manually, using the Visibility pane on the left of the MixConsole, where it’s the work of seconds. But if it really bugs you and you want to aim for Macro perfection, you could design this whole Macro to operate on MixConsole 2 or MixConsole 3 behind the scenes, leaving your main MixConsole’s visibility settings intact. As before, to do that you simply replace the MixConsole commands in your Macro with MixConsole 2 (or 3).
Processing Chain
I’m afraid I met with stauncher opposition when trying to automate the transfer of the processing chain from the Stereo Out track to the new Premix bus. The commands exist to make automation possible, but on my system (at the time of writing, I’m using Cubase Pro 9.5.30 on MacOS), these seemed somewhat buggy, resulting in Cubase crashing. So I ended up doing this step manually. Still, as I know other Cubase users who didn’t experience any problems with this, it’s worth me setting out the steps necessary to automate this side of things.
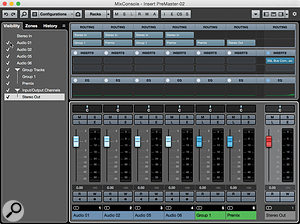 ...and here it is after. All I had to do was hit one key and enter a track name, and the re‑routing of tracks was taken care of automatically.There are a number of ways to save and recall settings: saving and loading track presets, for example, and saving and loading effects chains. But to my mind, the simplest approach is to select the Stereo Out and simply use the Cmd+C (Ctrl+C on Windows), go to the destination track and use Cmd+V (Ctrl+V). If you want to automate that, then you’d create another PLE preset to select your Premix bus, as we did before for the Stereo Out. Then you’d be able to get your Macro to select the Stereo Out, then ‘Copy First Selected Channel’s Settings’, then select the Premix bus and ‘Paste First Selected Channel’s Settings’. (I suggest doing this task as a separate Macro.)
Perhaps this Premix‑bus Macro will be useful to you and perhaps not. But I hope at least it has given you some idea of how you might solve any more complex task‑automation problems; there’s usually a way, even if it isn’t all that obvious at first!
Published September 2018
Saturday, May 24, 2025
Friday, May 23, 2025
Cubase: Robo Pop!
By John Walden
 VariAudio can perform extreme pitch correction, rewrite the melody, and extract MIDI from an audio vocal melody.
Create robotic vocal effects using Cubase’s in-built tools.
While some might think heavily processed, robotic-style vocals a cliché, in pop and EDM tracks they’re here to stay. There are countless ways of turning your pristine vocal recordings into something obviously synthetic and ‘processed’, but two tactics in particular — overcooking pitch correction, and vocoder-style processing — are great places to start, and Cubase has some wonderful tools for the job.
Pitch Perfect
For the ‘Cher meets T-Pain’ sound, the pitch processing must be obviously overcooked, and in Cubase Pro, VariAudio can achieve this: engage VariAudio in the Sample Editor window, select the pitch ‘blobs’ you want to process, and set the Quantize and Straighten controls to 100 percent. The pitch transitions become instantaneous and the pitch-drift of each note will be ironed flat. The results vary with the source material, and with a really well sung phrase, you might find the effect isn’t as ‘obvious’ as you might wish. If so, try splitting any extended blobs into several pieces, then move the shorter blobs to different notes in the same key.
All editions of Cubase include the Pitch Correct plug-in, and this can achieve similar results. Inserted on an audio track, this corrects the pitch in real time. Set the Correction Speed and Tolerance to 100 for the most obvious effect, but you can do more, such as specifying the key/scale for notes to be corrected to. You can also define a Custom Scale — in other words, you can specify your own combination of ‘allowed’ notes, which can result in bigger, more obvious pitch jumps.
You can also try the External MIDI Note setting: a MIDI input will be created for the plug-in, and any MIDI track can be routed to Pitch Correct, allowing you to specify the target note using your keyboard or a MIDI clip. Correction is only performed when a MIDI note is received — in the absence of a MIDI input, the original audio is heard, with no pitch correction applied. You can fashion some truly weird and wonderful pitch correction in this way, doing anything from simply ‘correcting’ the occasional note to completely rewriting the melody.
 Pitch Correct’s target notes for pitch correction can be set by an external MIDI source.
This plug-in has more settings you can abuse, too —for example, adjusting the Formant Shift tweaks the size (and, to some extent, the perceived gender) of the voice. This can easily be pushed into unhuman territory for special effects, and the parameter can be automated.
In Stock
Moving away from the pitch-correction side of things, Cubase’s stock plug-ins provide plenty of dehumanising potential, and Metalizer, Chopper, Phaser, Bitcrusher and Cloner are all well worth exploring. How far to go is down to personal taste, but one tactic is to add a good selection of them, all with fairly subtle settings, and then automate the plug-ins’ bypass in different combinations as the song plays back. This can add useful variety to the vocal ear-candy.
Artist and Pro users can also try inserting the LoopMash FX plug-in. For some real-time glitching, the Stutter, Staccato and Cycle options are well worth experimenting with. And LoopMash FX can, in the same way as Pitch Correct, be controlled via a separate MIDI track.
 Don’t overlook Cubase’s stock plug-ins — they offer plenty of scope for vocal mangling.
Slice Of Life
Both Chopper and LoopMash FX provide options for slice-like glitching, but if you add Groove Agent SE4’s (GA SE4) loop-slicing into the mix you can take your vocal mangling much further — it allows you to ‘play’ your vocal via MIDI in very interesting ways. The first step is to slice your vocal phrase. You can do this manually, but selecting the Split tool and Alt-clicking on the clip will split it as per the current Quantize setting; if in doubt, try eighth-note divisions. To get these slices into GA SE4, open an empty instance of GA SE4, select all the vocal-clip slices, and drag them to an empty GA SE4 Instrument pad (for example, C1). The slices will be mapped sequentially across the MIDI pads (in my eight-bar example, from C1 to D6).
These pads can be triggered by playing the relevant note on your MIDI keyboard. But switch to the instrument’s Pattern panel and you’ll see that the drag/drop of the slices automatically puts a pattern on one pad. This triggers each slice in turn, thus playing the whole original vocal phrase. For now, use the MIDI Export button (to the right of the Pattern page) to drag and drop the pattern onto the GA SE4 Instrument track as a MIDI clip.
Let’s go the whole hog here — insert Pitch Correct plus any of the other effects plug-ins you want to use on the GA SE4 track. Then create a further MIDI track and route it to the MIDI input of the Pitch Correct plug-in. (If you have VariAudio, you can also extract the MIDI from the original vocal melody and copy that MIDI clip to this new MIDI track, to serve as an initial control over Pitch Correct.)
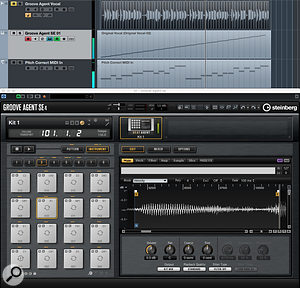 Having sliced your vocal (top track) and dragged it into GA SE4, you can replay the slices via MIDI (middle tack) and, via the Pitch Correct plug-in, control the pitches of each slice (bottom track).There are now two lots of MIDI we can edit (or play in real time) to give us creative control over our vocal phrase. The MIDI clip on the GA SE4 track can be edited to glitch the phrasing of the syllables/words (based on the slices on GA SE4’s pads), while the Pitch Correct MIDI track can be used to control the pitch of each slice. There’s a huge amount of fun to be had here, in ‘re-phrasing’ the sung words, changing the pad/slice order, shortening the MIDI Notes used to trigger each pad (for a cool stutter effect), re-pitching the original melody, reversing slices on particular GA SE4 pads — or all of the above! And, of course, any other insert effects can be applied too.
For a more obvious ‘glitchy’ effect, adjust GA SE4’s Amp settings for each pad to create a fade in. You can do this kind of edit for each pad individually, but this can take quite a while, so why not try selecting a range of pads? Holding the Shift key, click on one pad and then on another. All pads between these two are selected, and any edits will be applied to all selected pads. The different Amp envelope modes are also worth playing with, as each gives a different result. You might also experiment with GA SE4’s filters.
Robot Wars
If you’re prepared to get stuck in with detailed audio editing, Cubase offers plenty more options for generating heavily processed, robotic vocals. But using MIDI to control the ‘performance’ of your processed vocal phrase is so intuitive and so versatile — the approaches described here can take you a long way.
Thursday, May 22, 2025
Wednesday, May 21, 2025
Cubase: MIDI Mod Cons
By John Walden
In my SOS November 2013 Cubase workshop, I explained how those of us with less-than-stellar piano-playing skills can play a harmonically correct MIDI chord performance using Cubase’s Chord Track. But what if you just need some melody or bass line assistance? Well, there are some unsung heroes amongst Cubase’s bundled MIDI plug-ins...
MIDI Modifier
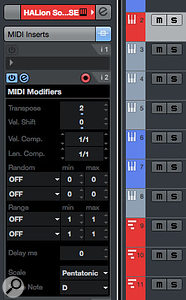 Don’t overlook the humble MIDI plug-ins that are bundled with Cubase — MIDI Modifier in particular can be a powerful tool.Each MIDI/Instrument track’s Track Inspector has a MIDI Modifier section, which allows you to modify your MIDI data in various ways, whether the data is real-time (as you play) or played back from a MIDI clip. There are some useful options, including transpose up/down in semitones, velocity adjustment and random (but constrained) manipulation of note parameters such as pitch, position, velocity and length. Cubase Artist and Pro also include a separate MIDI Modifier plug-in, and while this offers very similar functionality to the Track Inspector, there are some differences. One feature, Transpose To Scale, is required for our ‘keyboard assistant’. It’s super-easy to use: just select the root note of the key and then one of the scale types from the list.
With your key/scale selection made, any MIDI note data will automatically be checked against the chosen key/scale combination and, if required, corrected to ‘fit’. You can now close your eyes and bash away at your MIDI keyboard — whatever notes you press, Cubase ensures everything remains harmonically correct. It won’t guarantee you a melody to die for, but there will be fewer duff notes!
More Mods?
 The Transpose To Scale option comes with a huge selection of preset scale types — although no user-defined scale option is included.Another trick that might appeal is re-mapping the notes of your chosen key/scale to the white keys of your MIDI keyboard, for ease of playing. Having made your key/scale selection, simply adjust the MIDI Modifier’s Transpose setting up/down (either by trial and error or by working out the number of steps required) to settings that get the majority of the notes mapped onto white keys. As a simple example, if a song is in Bb major, the scale contains Bb, C, D, Eb, F, G and A. If we set a Transpose value of -2, Bb notes will actually be played on the C key and Eb on the F key. All the other notes are also transposed by two semitones, but they remain on white keys. This can be made to work for many common scales, including major, harmonic minor and pentatonic, although some (eg. the melodic minor) will have one or two ‘correct’ notes mapped to a black key. With Transpose To Scale active, though, the plug-in will pitch-correct for you if your fingers miss the occasional black key.
If music theory isn’t your strong suit, trial and error with the Transpose function is easy enough. But it would be brilliant if Steinberg were to add some sort of keyboard graphic to the MIDI Modifier plug-in to give a visual cue of the notes in the chosen key/scale you’ve mapped across the keyboard — and then see how they shifted as you adjusted the Transpose value. (If you agree, why not add a request for this on the Steinberg forum?)
Another neat feature is the MIDI Modifier’s Record Output To Track button (red when enabled). With this active, the MIDI notes Cubase records are the modified notes produced by the plug-in, which is useful because if you need to do any editing, the note pitches you see in the piano-roll are the ‘corrected’ ones. If you leave this inactive, the ‘raw’ notes are recorded, but the MIDI Modifier will still correct them on playback. If you choose to have this option active while recording, make sure you bypass the MIDI Modifier on playback, or its settings will be applied for a second time — which is obviously not what you want!
One-note Chords?
There are some other things that the non-specialist piano keyboard hacker might like to do but which aren’t currently possible via the MIDI Modifier plug-in. These include the creation of custom scales and control over the direction of the pitch-correction for out-of-key notes. However, if these are things you would like to be able to do, Cubase Artist and Pro have another MIDI plug-in that can help, called Chorder.
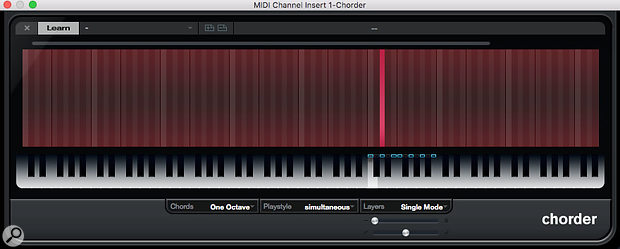 The Chorder plug-in doesn’t have to be used for chords — you can also use it to re-map notes for complex scales, or create custom scales.
I looked at the primary function of this useful little plug-in (building custom chord voicings that can be triggered via a single MIDI note) way back in SOS April 2010, so feel free to read that if you need a quick refresher. It takes a little more effort to configure than the MIDI Modifier options I’ve described above with this plug-in, but it can also be put to good use as a piano keyboard assistant for melody/bass line creation.
The screenshot shows a simple example where I wanted to play white notes (easy for my poorly trained fingers) but to get the seven scale notes of D major (D, E, F#, G, A, B and C#). Note that I’ve selected the One Octave and Single Mode settings. This means that I only have to define my required key mapping for a single octave (it’s then applied across all other octaves) and that I’m not prompted for multiple mappings for different velocity layers (useful when defining full chord voicings but not for our single-note melody application).
The task is then simple — as you select a note on the lower mini-keyboard graphic, click the Learn button, and then select the note from the upper, stripped, area that you want to ‘map’ to your selected note below (to map a chord, you’d select multiple notes in the upper zone). Once a note on the mini-keyboard zone has a mapping applied, a pale blue highlight appears above it. Repeat the process as many times as required for all the notes in your desired scale, and if it contains seven or fewer notes, you can map everything to the white keys for ease of playing. Once the mapping is complete, play away, and the Chorder plug-in will remap your white-key noodling to the programmed scale.
The above process does require you to know what notes are in your target key/scale combination, but if that’s a problem, then you can always consult Google. Two further things are also worth noting. First, when you start playing, if you happen to hit a MIDI key that you’ve not mapped, then no MIDI note will be generated (so no duff notes). Second, if you think it’s an advantage, you can choose to map these ‘empty’ keys as duplicate notes within the required scale. This is what the MIDI Modifier plug-in does, but with Chorder you get to control the mapping and whether ‘wrong’ notes are pitch-corrected up or down. The other option, which I quite like, is to map these empty notes to the root (and perhaps the fourth interval) of the scale. With this configuration, if you did hit a ‘wrong’ key, then your melody gets a root (or fourth) added — as ‘wrong’ notes go, this makes for some pretty solid melodic choices!
Transformed
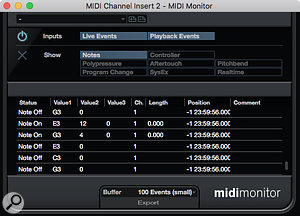 If all this note re-mapping gets a little confusing, the MIDI Monitor plug-in can be a useful troubleshooting tool.This last idea is corrective, but can also be considered ‘creative’ — you can use such mappings to place emphasis on certain scale notes, no matter how random your actual keyboard playing might be. There are other tools in the Cubase MIDI plug-in suite, in particular the Density and Transformer plug-ins (the latter is a real-time version of the Logical Editor and provides an alternative means to access the Transpose To Scale feature), that can apply a creative touch to your melody/bass line construction. Indeed, these might make a good subject for a future column...
Let’s finish with a mention of the MIDI Monitor plug-in. This provides you with a simple window to monitor all MIDI data generated by a MIDI track. This includes note values, so if your attempts to map from one scale to another are leaving you scratching your head then a pair of MIDI Monitors (one instance before MIDI Modifier and one after) can be a useful troubleshooting tool.
Most of us would love to be better at playing the piano keyboard, and it’s still worth working to improve such performance skills. But in the meantime, whatever your current skill level, the suggestions above will at least allow your melodies and bass lines to stay in tune — and leave you free to focus on the creative side of things.
