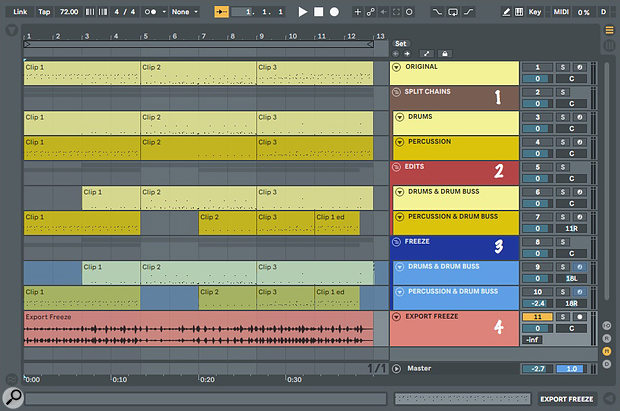
 Screen 1: The four steps to split a drum part into two kits, apply separate effects and export an audio stem for the final mix.
We show you some tips to streamline your mixing in Live.
This month we'll have a look at how to accomplish common mixing tasks in Ableton Live. I'll leave the whens and whys of mixing and mastering to others, but you'll find helpful tips in most issues of SOS, and a good starting point is Hugh Robjohns' 2002 article, Practical Mixing. For more on mastering in Live, check out the February 2015 Live column, 'The Final Act'.
Decluttering
Let's start by cleaning up your Live Set. It's never too early to get rid of the junk, and that's a good way to clear your mind when you're stuck. Delete any unused tracks for which you have no plans, including Return tracks. To save CPU, consider removing or at least deactivating any devices on unused tracks that you do keep. (Muting a track does not deactivate its devices.) Move all remaining unused tracks to the end of the Track list, combine them in a Track Group (Command+G/Control+G) and then fold and mute the Group.
If you are at the final stage of the project and will not be using Session view clips, it's also a good idea to delete all of them along with any clip slot Stop buttons. This will save you from accidentally deactivating an Arrangement view track with an errant key command or button press. It will also save time when Freezing tracks because Freezing automatically applies to both Session and Arrangement view clips (for details see the 'Bouncing & Stems' box).
Organising Your Tracks
A good way to organise the remaining tracks is to assign the same or similar colours to similar tracks: percussion, keys, pads, vocals and so on. In some cases you may want to go a step further and collect similar tracks into a Track Group. This is Live's easiest way to create a submix (the alternative is to route the outputs of multiple tracks to a new audio track). Groups also make it easier to solo or mute all tracks within the Group, as well as to visually tidy up large Sets by folding Groups.
With a track that holds a large Drum Rack, you may want to first split that into separate Drum Racks on their own tracks — drums, percussion and effects, for example. To do that, unfold the Drum Rack track in Session view, select the chains you want to keep together and then choose Extract Chains from Live's Create menu or from any selected chain's context menu. Extracting the chains will also extract MIDI data routed to those chains from any clips on the track. You can now edit the clips individually, apply different effects to each Drum Rack and mix them separately.
The example in Screen 1 above starts with a 16-pad Drum Rack and three MIDI clips. Here are the steps to split the Drum Rack to two tracks, add different Drum Buss processing to each, edit their clips and export an audio stem for the final mix.
1. Unfold the Drum Rack, select the chains you want to extract — congas, cowbells and timbale in this case — and extract them. You'll now have two tracks with a Drum Rack and MIDI clips on each. Enclose the tracks in a Group to create a separate mix bus for the drums.
2. Edit the MIDI clips on the two tracks as needed. This is both easier and more flexible then editing a single clip for all 16 kit pieces. Add Live's Drum Buss effect to each of the Drum Rack tracks and audition different settings or presets.
3. Freeze each of the tracks in the Group. This saves CPU by disabling the Drum Racks and Drum Buss effects while still letting you edit each track's mixer settings.
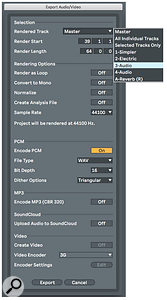
4. Create a stem for the final mix by Exporting the Frozen Group (Command+Shift+R /Control+Shift+R).
Creating Stems
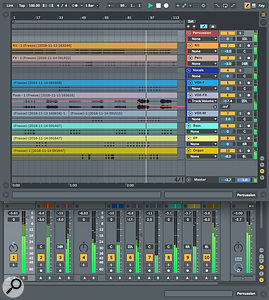
 Screen 2: Each of the tracks of a finished song has been converted to an audio clip spanning the full length of the song. You can edit the resulting tracks and Groups before mastering and rendering the song.The example in Screen 2 starts with an eight-track MIDI arrangement, creates audio stems for each of the song's tracks and encloses the percussion stems and the vocal stems in their own submix Groups.
Start by Freezing, Flattening and Consolidating each of the Set's tracks. You can Consolidate one track at a time or, once they are all Flattened, simply select all tracks for the full range of the song and Consolidate everything at once. (Consolidating doesn't affect Groups; only the tracks they hold will be Consolidated.) If you have any audio effects that you may want to edit after Freezing, move them to a track that you don't plan to Freeze (such as one of the Group tracks) and then move them back to their original tracks after Flattening. Mixer automation is not captured when creating stems in this way, leaving you free to edit your mix. When you want to create stems from your submix Groups as opposed to their individual tracks, export the Group as in the previous example.
Finally...
One last tip: if you prefer to use Live's Session view mixer when working on your arrangement, open a second window for the Set (Command+Shift+W/Control+Shift+W). One window will show Arrangement view, and the other Session view with its mixer. This is most convenient with two monitors, but it is still workable by overlapping the views on a single monitor as in Screen 2.
Published March 2019

No comments:
Post a Comment