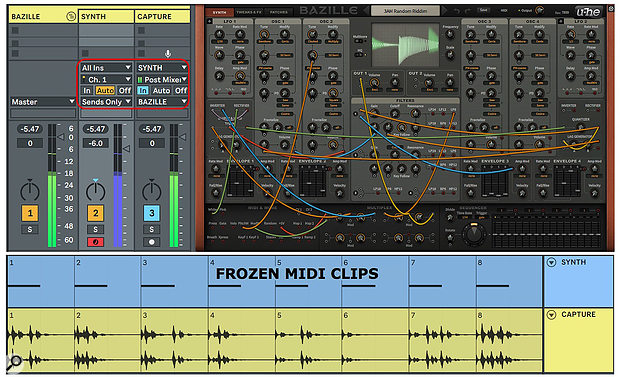
 Screen 1: Freezing eight copies of a four-bar MIDI clip yields eight different four-bar audio clips from this U-he Bazille patch.
We show you how to integrate your modular soft synths with Live.
This month we'll take another look at modular synthesis in Live. In the May 2015 Live column, we covered the Max For Live modular system OSCiLLOT from Max For Cats. The December 2017 column dealt with how to implement modular techniques using just Live Racks, instruments and effects. This time we'll focus on getting the most out of the many virtual modular synths now on the market. You'll find a brief catalogue of what's out there in the 'Cable This' box.
The Hookup
Beyond the default setup for sending MIDI to and receiving audio from instruments in Live tracks, modular synths often require some special treatment. For one thing, they may have multiple audio outputs to which you can send different sounds from a single modular patch. For another, they may split their MIDI note inputs into separate gate, trigger, note number and velocity signals, allowing you to then cable those individually. Finally, they may provide ports for routing MIDI from their sequencers and CV modules to Live (LFOs, graphic mappers, trigger generators and so on). Exploring the in and outs is well worth the effort.
One of the best features of modular synths is their ability to generate evolving sounds that never or almost never repeat. Many synth plug-ins have control-voltage generators with aleatory modes such as Sample&Hold LFOs or sequencers with random step order, but a modular synth's ability to patch these wherever you want makes them much more useful. The downside is that once an aleatory patch generates something you like, it's gone. An easy workaround for that in Live is to route your modular synth track to a dedicated audio track for capturing the synth's output. Of the several ways to do that, I find it most convenient to set the synth track's output to 'Sends Only' (a substitute for 'Off') and to set the capture track's input to come from the synth track as shown at the top left of Screen 1 (above). Set the synth track's Monitoring mode to 'Auto' and the capture track's to 'In'. The synth will now play through the capture track, and you can record it by arming that track. Arming the synth track will allow you to play it from your MIDI controller. To record the MIDI input as well as the synth's output, arm both tracks (hold Control/Command while clicking the second Arm button).
You get three choices for the capture track's input: Pre FX captures only the instrument output, Post FX includes any effects placed after the instrument and Post Mixer captures effects as well as the track's volume and pan settings. I prefer Post Mixer because only that setting allows you to Freeze the synth track, which is often the fastest way to generate audio clips. If the synth patch is self-generating (no MIDI input required), you can simply use empty MIDI clips on the synth track —their length will determine the frozen clip length. For recording (rather than freezing), you may prefer the Pre or Post FX settings because they ignore the synth track's level and pan settings. To save this track setup for each of your modular synths, create a Track Group holding these two tracks and save it in your Live User Library.
The '3AM Random Riddim' Bazille patch at the top right of Screen 1 uses Sample&Hold to generate random rhythmic patterns that are processed by a delay effect. (Turn off the delay on Bazille's Tweaks & FX page for a less cluttered variation.) Single notes or short note phrases generate different rhythm sequences with a hand-drum like sound. At the bottom of Screen 1, eight copies of the same, single-note, four-bar MIDI clip are frozen to generate the eight audio clips shown below. Freezing all eight clips takes just a few seconds as opposed to the time it would take to record the eight clips.
Make It Your Own
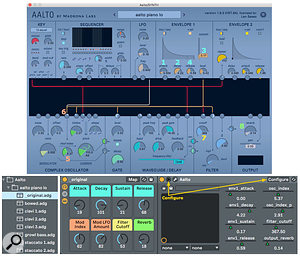
 Screen 2: Eight controls from an Aalto patch are mapped to Macro knobs in an Instrument Rack. Individual Instrument Racks are then saved as different presets for that modular patch.One way to approach modular synth patches is to think of the cabling as defining a synth whose presets comprise different control settings. You can save these as standard plug-in presets, but I like to go a step further by configuring eight essential controls in the Live Instrument and then enclosing that in an Instrument Rack with the configured controls mapped to the Rack's Macro knobs. Individual presets then become separate instances of the Rack, as shown in Screen 2. With most plug-ins, configuring panel controls is simply a matter of clicking the Live Instrument's Configure button and then manipulating the relevant controls on the plug-in panel. Voltage Modular is an exception: to make a control configurable, you need to first right-click it and map it to one of 128 available automation assignments. Mapped controls are configurable as just described. That's common practice with modular instruments that allow you to add and delete modules.
Having multiple audio outputs and being able to add and remove modules in Voltage Modular or Softube Modular gives you a much larger palette. As with hardware modulars, the modules are arranged in horizontal rows, and in Voltage Modular you can save individual rows (called 'Cabinets'). Building up an inventory of Cabinets speeds up configuring full modular patches. For example, you might pair four note-generating cabinets with four sound‑module cabinets and feed them to separate Live tracks.
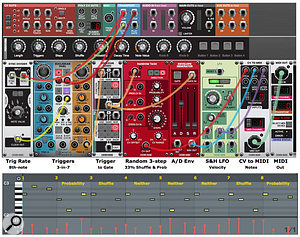
 Screen 3: The Euclidean Duel module steps the Random Task device to generate three‑note sequences while randomly changing the notes or note order. The output is captured in a Live MIDI clip (bottom).
Published May 2019
No comments:
Post a Comment