We look at a free MFL device that can breathe new life into tired loops.
This month we'll explore a real-time recording technique used in performance by the percussionist Frank Wienk (aka Binkbeats), as illustrated in a series of videos on the Ableton website (ableton.com/en/blog/binkbeats-in-and-out-loop). As the introduction clarifies, "It's not about looping," it's about "turning a perfect loop into a perfect song". The second video in the series explains how Binkbeats sets up Live for his performances. His Live Set has dozens of tracks, many of which use a Max For Live plug-in called BinkLooper to create and manipulate Live clips without ever stopping the music. BinkLooper is a free download from Binkbeats' website (binkbeats.com/binklooper), and it is a great tool for beginning a project or for getting unstuck when a project has stalled.
One Click
BinkLooper manages the recording of clips in Session view clip slots on the track on which it is inserted. You use it to record and manipulate clips without ever stopping the music. Without BinkLooper, recording a looping audio or MIDI clip entails arming the track, triggering a clip slot to record the clip and then retriggering the clip or disarming the track, either of which will start the clip playing. You can do that away from your computer with a few button presses on any Live-compatible button box. But what if you need a do-over or quantisation or just want the clip to record for a fixed length and then start playing on its own? In addition to arming, recording and playback, BinkLooper offers all these options and more with a single button press.
BinkLooper comes as both a MIDI and an audio plug-in. Use the audio plug-in on an audio track and use the MIDI plug-in on a MIDI track with or without an instrument. You can use BinkLooper by manipulating its various controls, but the point is to not have to do that. Instead, you use modulation envelopes on dummy clips (clips with no audio or MIDI content). For instance, you might set up envelopes to choose a Scene (and thereby a clip slot on your track), set the length of the loop you want to record, arm the track for recording, launch recording in the chosen clip slot and then play the clip after it has been recorded. Playing the dummy clip then does all of these things without further intervention. For the details on BinkLooper's controls and clip envelopes, see the box 'The Envelope Please.'
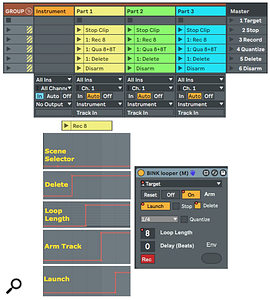
 Screen 1: A Track Group template with an instrument track and three BinkLooper tracks for real‑time layering of MIDI tracks.Screen 1 shows a BinkLooper setup for recording multiple MIDI parts to play a single instrument. You might use this to create several percussion layers for a Drum Rack or to create melody and harmony parts for a pitched instrument.
Each of the MIDI-part tracks in Screen 1 holds an instance of BinkLooper, and the dummy clips on these tracks use modulation envelopes to control BinkLooper settings.
Each track receives and records external MIDI input and routes it to the instrument track. It takes a while to set up the envelopes in the dummy clips, but you can then save the clips in your User library and make only minor changes when reusing them. I like to save a Group holding all four tracks, as in Screen 1.
Alternatively, you can save a single MIDI track holding BinkLooper and any assortment of dummy clips you find useful. You would then drag the track itself into Live or drag its clips directly from Live's Browser to other BinkLooper tracks in your Set. The thing to keep in mind is that BinkLooper needs to be on any track to which you drag the clips in order for the envelopes to be preserved. If you're only creating one part, you can also put the instrument on the BinkLooper track.
There are a variety of ways to set up the modulation envelopes and the order of events is often important. For example, you want to select the desired Scene before deleting, quantising or launching clips. In the '1: Rec 8' clip envelope shown in Screen 1 (above), Scene 1 is selected, and if it holds a clip, that clip is deleted. This is necessary in order to record a new clip in the same slot. After setting the loop length to eight beats and arming the track, the Launch button is enabled. That will launch a clip for recording subject to the Set's launch quantise setting. When synchronising with other playing clips, it's important to trigger the BinkLooper clip with that in mind. This compact setup is good for triggering individual clips. If you prefer to use Scene triggering, the clips need to be spread across different Scenes. That is more convenient in performance because you can then also use BinkLooper clips to segment your performance by Scene.
I Bink, Therefore I Am
The setup for capturing audio is slightly different. For one thing, it uses audio tracks and therefore requires audio dummy clips. The audio you're capturing might come from acoustic or electronic instruments through your audio interface, from a tablet using a protocol such as MusicIO, or from other audio applications running on the same computer that use a utility such as Loopback or LoopBeAudio to send audio to Live. You'll find details on the latter two methods in the September and October 2017 Live columns. In all cases, you route the audio being captured to the audio track holding BinkLooper. The dummy-clip automation settings are the same as for MIDI, and you can save and load audio dummy clips from your Live User library as just described.
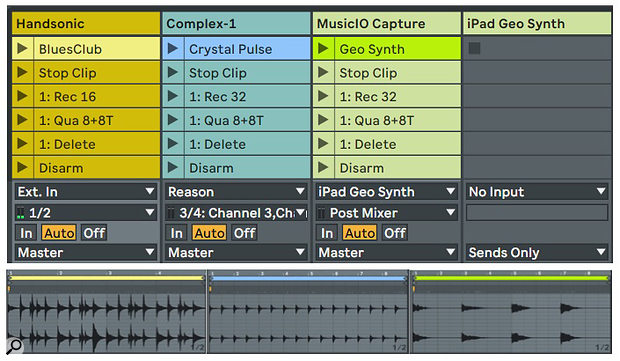
 Screen 2: Three BinkLooper audio tracks in Live capture the output from different external instruments.
Screen 2 shows a three-track example. A Roland Handsonic sends audio to a hardware audio input. Audio from Reason's Complex‑1 modular synth Rack Extension arrives from a Reason audio output port. Audio from the iPad Geo Synth application is received by the MusicIO VST audio effect plug-in on an audio track and routed from that track's output to a BinkLooper audio track for recording. The first Scene holds the recorded audio clips (brighter coloured) shown in detail at the bottom. The other audio clips hold the same BinkLooper envelopes as in Screen 1.
For clarity, all my examples record clips in the first Scene, and this is also how Binkbeats records audio and MIDI clips in his performances and videos. For sketching in an evolving Live Project, you may want to create alternative takes. To do this all you need to do is add a few more target Scenes at the top of the Set. This will automatically move the dummy clips down as necessary. You will then need to duplicate any dummy clips that have a Scene Selector envelope and edit that envelope in order for BinkLooper to target clip slots in each of the new Scenes.
Published June 2019

No comments:
Post a Comment