Welcome to No Limit Sound Productions

Company Founded
2005
Overview

Our services include Sound Engineering, Audio Post-Production, System Upgrades and Equipment Consulting.
Mission
Our mission is to provide excellent quality and service to our customers. We do customized service.

Friday, March 31, 2023

Pitch Perfect With VariAudio

In VariAudio, Cubase 5 users have a sophisticated pitch‑correction tool.

Oops! This recording of someone whistling a series of short notes has been poorly detected by VariAudio probably due to a poor signal level, too many plosives (breaths at the start of each note) and not enough clear pitch information.Oops! This recording of someone whistling a series of short notes has been poorly detected by VariAudio probably due to a poor signal level, too many plosives (breaths at the start of each note) and not enough clear pitch information.

VariAudio is one of the headline features of Cubase 5, but you really need some experience with it to get the best results. Steinberg included a short series of tutorials on VariAudio in Cubase 5's Getting Started manual (based around some sample projects on the install DVD), and these offer a good introduction, so in this column I'll focus on additional tips to improve your VariAudio work process.

Fully Comp

The most obvious application for VariAudio is pitch correction of vocals and instrumental solos, and while it may seem tempting to get straight in there, in the context of a real project it's usually more efficient to do a little editing work on your parts first. For example, when recording vocals, most people record several takes and compile a 'best of' version as their final performance. Such 'comping' is best done prior to any work with VariAudio, so that you get the best performance you can in terms of both pitch and expression, before doing any pitch correction.

With the performance compiled, it's easy to bounce it down (using the File / Export / Audio Mixdown option with the vocal parts soloed, or Audio / Bounce Selection) to create a single consolidated audio event. As VariAudio is accessed by opening an audio event in the Sample Editor, this makes for a simpler workflow, because all the pitch correction can be done in a single instance of the Sample Editor window. Depending on the recording level and/or quality of the performance, it might also be worth applying a little compression, EQ or gating during the bounce process (don't overdo it, though, as you can't undo it): it's useful to get as clean and even a signal as possible before applying VariAudio's pitch-detection process.

Sorting Segments

On the left, the pitch curve suggests the green segment actually contains two different notes. On the right, the segment has been split into two using the scissors tool and the segment boundary aligned with the change in the pitch curve and waveform.On the left, the pitch curve suggests the green segment actually contains two different notes. On the right, the segment has been split into two using the scissors tool and the segment boundary aligned with the change in the pitch curve and waveform.Pitch Perfect With VariAudio

In the Sample Editor, selecting VariAudio's Pitch & Warp or Segments tools will prompt Cubase to analyse the audio and extract pitch information from it. There's no user control over how this process operates, and while it does a good job generally, it's not foolproof. Two common problems occur. First, there might be sections of your performance for which no segment or pitch curve is created. This generally happens when the pitch‑detection algorithm doesn't have enough information to go on (for example, with a weak audio signal or sections of the audio that have little clear pitch information, such as plosives, sibilant or strongly sounded consonants). Second, as mentioned in the Getting Started tutorials, VariAudio might not always generate the ideal number of segments for a particular word or phrase.

Although the Segment tool can be used to expand an existing segment so that it includes a section of the performance that has not been detected by the initial analysis process, there's little benefit in doing this for sections with no relevant pitch‑based content. If there ought to be pitch‑based content (that is, the section is part of a sung melody) but none is detected, it may be that the audio signal is not of sufficiently good quality. If this is the case then re‑recording the offending section is likely to be a much better approach.

Dealing with the second issue by manually fine‑tuning the segments that have been generated is more straightforward. Obvious things to look for are individual segments in which the pitch curve shows a pitch‑shift of a semitone or more, but another possibility is to split segments that span two or more words, where the melody stays on a single pitch. Splitting these into single-word segments can give you greater flexibility to experiment with variations on your melody. The scissors tool is probably the easiest means of splitting the segment at the appropriate point. It's worth comparing the positioning of segment boundaries relative to your audio waveform: providing there's not too much of a clash with obvious shifts in the pitch curve, the segment boundaries can be suitably tweaked to coincide with the waveform envelope for each word.

Quick Fix Pitch?

On the left, the first red segment actually contains three words. On the right, this has been split into three segments and these could now be shifted individually if you wanted to experiment with an alternative melody.On the left, the first red segment actually contains three words. On the right, this has been split into three segments and these could now be shifted individually if you wanted to experiment with an alternative melody.Pitch Perfect With VariAudio

Once you've sorted out any obvious segment issues, it might be tempting to select all the segments and apply a dollop of Pitch Quantize. Although this might be appropriate if you have a decent singer to start with, or if you're subtle in the degree of pitch‑correction applied, when you want to achieve natural results it's much better to use your ears than to rely on the visual display. Some of the perceived character of a performance is often to do with subtle pitch variations, which means that making things too perfect can result in an undesirably mechanical feel. I find that it's generally best to focus in on specific problem notes and apply quantising to those, rather than blanket‑processing everything.

Currently, VariAudio doesn't offer scale‑specific quantising options, so the other obvious thing to watch out for is segments getting quantised towards a note that's not in the key of the song. This can be a particular problem with short passing notes, where the singer is moving up or down through a series of notes, without holding any of them for very long. In most cases, this can be easily fixed by positioning the segment by hand, but there will inevitably be times when this approach leads to obvious and undesirable audio artifacts, and it can simply be best to leave the short note uncorrected for a more natural result.

Straight & Narrow

On the left, the singer has generated a large pitch scoop into the note. On the right, the Straight Pitch control has been used to make this less pronounced.On the left, the singer has generated a large pitch scoop into the note. On the right, the Straight Pitch control has been used to make this less pronounced.Pitch Perfect With VariAudio

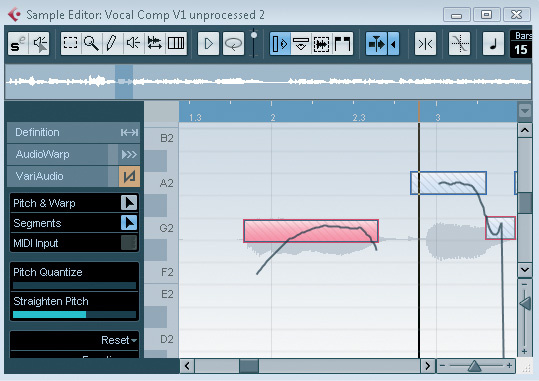
VariAudio also has the Straighten Pitch function, which can be used to reduce the pitch fluctuations in a segment. Sometimes, these are fully intentional on behalf of the singer (for example, a controlled vibrato), but pitch variation at the start of a note, where a singer 'scoops' up or down into the target note, or more random pitch variation within a note, can often be usefully targeted using Straighten Pitch.

As with Pitch Quantize, it pays to focus solely on those notes that your ears tell you are in need of tightening, and to be as subtle as possible with the Straighten Pitch setting: just like a guitar player who bends notes to add character to a solo, some pitch variation within a note is often an important part of a singer's method, and again, too much correction will create an unnatural result.

Melody Writer

On the left, a large amount of pitch variation is present in a long sustained note. On the right, the sustained note has been edited into a single segment and Straighten Pitch applied to reduce the overall pitch drift.On the left, a large amount of pitch variation is present in a long sustained note. On the right, the sustained note has been edited into a single segment and Straighten Pitch applied to reduce the overall pitch drift.Pitch Perfect With VariAudio

VariAudio is intended as a corrective tool, but it can also be used in a more creative capacity, to generate harmonies, for example, or double-tracked parts — or even to rewrite your melody. There's currently no user control over how formants are handled (something else for the wish‑list), so any shifting of notes more than a few semitones up or down has to be done with care, but as shown on page 88 of the Getting Started manual, where a new 'upward flair' is created, the results can be impressive. Even if the audio quality of your melody rewrite isn't acceptable as the final vocal, it can still provide a means of creating a useful guide track for a singer if you decide to re‑record the new melody.

And Finally….

VariAudio is an excellent addition to Cubase 5. Still in its first incarnation, it doesn't offer the same level of control as Auto-Tune EVO or Melodyne, but having it so neatly embedded within your DAW is a big plus. Finally, I should leave you with a health warning: good though VariAudio is, it cannot turn someone with limited singing technique into a Maria Carey or Robert Plant — so it's not a replacement for your singing exercises, or capturing the best performance possible as a starting point!   


Published August 2009

Wednesday, March 29, 2023

Electric Guitar Effects Chains

By Craig Anderton

No guitar effects in Cubase? Actually, there are more options than you can count...

With Apple including their Guitar Amp Pro plug‑in in Logic, Sonar coming bundled with Native Instruments' Guitar Rig, and Ableton adding their new Overdrive plug‑in to Live, guitar‑slinging Cubase 5 users might initially feel a bit left out. But you don't have to, because you can assemble some pretty amazing 'guitar racks' in Cubase: it's just that Cubase takes a more à la carte approach, where you need to draw on the existing effects as if they were stomp-boxes. A VST audio channel in Cubase offers inserts for up to eight series effects, including an amp simulator, so you actually have more options than with many pedalboard setups. Furthermore, you can add some quality 'studio effects', like the new Reverence reverb, as send effects. So think of Cubase as 'virtualising' a pedalboard, then bringing it into the studio so that its output can go to studio rack processors.

When you have a setup that you like, you can easily save it as a track preset — or, better still, create multiple track presets for different types of sounds. Cubase can even make a fine host for live performance, should you decide to trade your rack of effects for a svelte laptop that patches directly into the PA system, as you can switch instantly between racks. (I'll cover how to do this at the end of the article.)

Before I get started, one quick note of caution. Because you need to play 'through' Cubase in order to hear the effects, you'll need a low-latency system — which means a fast computer, and a good audio interface, with quality ASIO or Core Audio drivers. Even if an interface has a 'zero‑latency' monitoring feature, that won't do you any good, as it will simply route the input signal to the output, without going through Cubase or any of its plug‑ins, which kind of defeats the purpose… Preferably, you should also have an interface with a high‑impedance input (suitable for guitar and bass). Many modern interfaces have an 'instrument input' which will do the job, but if not, you'll need to use a guitar‑friendly preamp, compressor, or similarly 'neutral' effect to feed a line input (or use a DI box).

Your Virtual Pedalboard

With this in mind, here's how to create a virtual 'pedalboard' in Cubase. Feel free to substitute your own choice of effects, but I've found this to be a good starting point.

• Go to Project/Add Track, and choose 'Audio' to create a single, stereo audio track.

• Next, click on the track's Edit button (e), which will open up the VST Audio Channel Settings window.

• Cubase includes a chromatic tuner, and the first slot is the best place for it, so that you can keep your axe in tune without bypassing other effects. Click in the first insert field, and in the plug‑in list choose Other/Tuner to load an instance of it here.

• I like to insert a compressor after this, to add some sustain and even out the guitar's dynamics, for a more consistent distortion sound. So for the second insert slot, choose Dynamics/Vintage Compressor, then click on the insert's Edit button to see the compressor's interface, and set up the parameter values as desired. A good starting point would be Input at 17 and Attack at 8.9, with Punch and Auto set to On. You'll probably need to adjust the Input (effectively the Threshold in this case) according to the level of signal coming into the plug‑in. Set the Output to a level that's as high as possible, but doesn't approach clipping.

• Similarly, insert the Soft Clipper into the third insert slot and click on its Edit button. For settings, try putting the Input at ‑0.0, Mix at 55, 0.0, Second at 100, and Third at 57. As with the Compressor, set the output to a high level, again stopping short of distortion. These settings are intended to get you started; you may want to tweak them depending on your guitar, pickup, playing style, and so on.

• For the fifth insert (leave the fourth empty), go to Distortion/AmpSimulator and click on the plug‑in's edit button. For the Amplifier Model, select Crunch, and try the following parameter values: Drive at 8.7, Bass, Middle, and Treble all at 5.0, Presence at 6.2, and Volume set to 5.0. For the Cabinet, select Cabinet 2, with Lo Damping at 38 and Hi Damping at 35.

• In the sixth insert, to get a bit of interesting stereo information from our mono guitar sound, select Spatial/MonoToStereo, and try Width at 170, Delay at 10.0, Color at 10, and Mono switched off.

• Now let's add some slap-back room delay. In the seventh insert (which, incidentally, comes post‑fader in Cubase, as does insert eight), go to Delay/StereoDelay. In the left channel, try setting Delay to 1/16T, Feedback to 6.5, Lo to 50, Hi to 15000, Pan to ‑100, and Mix to 20, and enable Sync, Lo Filter, and Hi Filter. Use the same values for the right channel, but with Delay at 1/16, Feedback at 7.3, and Pan at 100.

• Now that we have some stereo information, we can create a big, wide guitar sound. In the eighth insert, go to Spatial/StereoEnhancer, and start with Width at 168, and all buttons set to off.

• We'll add EQ to give some polish and let the guitar cut through a little better in a mix. Enable a stage in the standard channel EQ (which comes after the inserts in the signal chain), and choose the Parametric II response. Add a boost of around 4‑5dB at 3.5kHz, with a Q of 0.2.This screen shows the VST Audio Channel Settings and the roster of effects used to create our basic guitar rack.This screen shows the VST Audio Channel Settings and the roster of effects used to create our basic guitar rack.

These are the settings I use as my basic rack for adding rock guitar sounds in Cubase, and you might also find it handy as a point of departure, so it's worth saving as a track preset. To do this, right‑click in the audio track containing the 'rack', and choose 'Create Track Preset' from the context menu. When the Save Track Preset dialogue box appears, simply name it and save it: now you can call up your rack for any audio track in any Cubase project!

The Fourth Insert

Remember the fourth slot, just before the amp modeller, that we kept free? This is ideal for adding other effects to shape your sound. No doubt, you'll have some favourite third‑party plug‑ins, but dig into the list of Cubase standard plug‑ins and you'll find some excellent choices for guitar. Here are some of my favourites.

Octave ('Other' category): This effect really surprised me because it tracks well, but inserting the compressor before the Octave plug-in improves the tracking even further. Distorting the post‑octave sound with the AmpSimulator gives a big distortion sound, even with only the Octave 1 level turned up. If you want more of a brontosaurus guitar, turn up Octave 2 as well. In general, I like to leave a fair amount of direct sound in the output mix. You can just as easily go in a cleaner direction by using only the Octave 1 output, and bypassing the AmpSimulator. Select the neck pickup on your guitar, pull back a bit on the tone, and you'll hear a sound that recalls jazz great Wes Montgomery.

StepFilter ('Filter' category): I'm a huge fan of Roger Linn's AdrenaLinn processor. When I play with groups like Air Liquide, it's the only gear I take other than the guitar, and of course a MIDI cable to sync it from the band's MIDI master clock. You can get many of the same effects from Cubase's StepFilter.The StepFilter offers synchronised filter effects that recall Roger Linn's AdrenaLinn signal processor.The StepFilter offers synchronised filter effects that recall Roger Linn's AdrenaLinn signal processor. StepFilter is basically a tempo‑sync'ed dual step‑sequencer, each with 16 steps, and there's a total of eight patterns. One sequencer controls filter cutoff and the other resonance. The filter response morphs from low‑pass to high‑pass, with a stop along the way for band‑pass. You can also copy a pattern, paste it into a different pattern, and create variations. All of these parameters, including pattern selection, can be used with VST host automation control. If you're into electronic guitar effects, you really should check this out — but also try the Tranceformer ('Modulation' category) and Chopper ('Other' category), which are similar, although Chopper works on amplitude, and Tranceformer syncs a ring modulator's carrier frequency to the project tempo'

WahWah ('Filter' category): What's a guitar rack without a Wah? Cubase's is really quite good: not only can you vary the band‑pass filter frequency, you can set high‑ and low‑frequency limits, and the Q at those limits. The frequency responds to host automation, but if you want to do real‑time pedalling, the WahWah shows up as a destination in any inserted MIDI track, so you just need a MIDI foot controller. Because insert four comes before the amp simulator, adding a wah there more faithfully duplicates the traditional rock wah sound, where guitarists patched it between the guitar and (usually overdriven) amp. The filter changes thus occur before distortion, which gives a very different sound compared to placing it after distortion. For more emphasis on the wah sound, you could remove the StereoDelay or StereoEnhancer effect, and place the WahWah in one of those slots instead.

Modulation: There are plenty of interesting options in Cubase that go beyond simple choruses. Try anything from the modulation category in the fourth slot (pre‑amp sim) and seventh or eighth slot (post‑amp sim).

Live Performance Switching

By choosing 'Enable Solo on Selected Track' in the Cubase Preferences you can switch between different 'racks' instantly, simply by selecting a track. By choosing 'Enable Solo on Selected Track' in the Cubase Preferences you can switch between different 'racks' instantly, simply by selecting a track.

This final trick is pretty cool for live use because these effects are very efficient, which means that you can have several tracks of 'racks' without straining your CPU. Go to the Mixer tab at File/Preferences/Project, and check 'Enable Solo on Selected Track'. Solo a track, and now all you need to do to call up a new sound is select a track, and the Solo will 'move' to that track. The change from one sound to another is instantaneous. Now it's time to amaze your audience!    


Published September 2009

Monday, March 27, 2023

Great Loops With LoopMash

By John WaldenBreathe new life into your loops with Cubase's LoopMash.

The LoopMash window with the Edit options displayed.The LoopMash window with the Edit options displayed.

LoopMash was, for me, probably the best new feature introduced in Cubase 5. This natty little plug-in uses one 'master' loop (of your choice) to trigger sliced segments from up to seven other loops. Operation is very intuitive, which makes this an excellent tool for creating new and off‑the‑wall rhythm loops. All the basics of LoopMash's operation are well covered in the Cubase Plug‑In Reference PDF, so I'll focus here on giving you a few practical hints and tips to help make the most of what this great little plug‑in has to offer, as well as offering one or two observations on aspects of LoopMash that could be improved in a future update.

Getting Started

If you want to experiment, the supplied LoopMash presets are a very good place to start, but eventually most users are going to want to load their own loops or import them from third‑party sample libraries. Loops can be dragged and dropped onto a LoopMash track from a number of different locations (for example, from an operating system file browser or from the Cubase Project window, if they've already been imported into the current Project). However, occasionally LoopMash's automatic tempo recognition doesn't get things quite right, which results in a loop that doesn't contain the correct number of slices. If you come across this problem, I've found that the most consistent results seem to be obtained when dragging and dropping from the Pool — so it's probably a good idea to add any loops to the Pool first, and then move to LoopMash from there.

Another little oddity that could confuse new users is identifying which LoopMash track is acting as the 'master'. This is generally indicated by two things: the whole track being highlighted; and the illuminated button to the left of the waveform display. In the vast majority of the 'factory' presets, the topmost track is configured to act as the master loop, but you can select any of the others if you prefer. Indeed, I'd encourage you to do this, because for any given set of loops it will produce yet another set of possible variations. However, if you do change the master track, and then use one of the Scene buttons to flip back to a different set of LoopMash settings, the display doesn't update to identify the new master track associated with that scene. While this is a bit irritating, it's purely a graphical issue; you need to look out for the coloured bars that appear above and below the current step on the master track to identify it. These coloured bars appear whenever a slice in the master track is not being played, but they are masked by the white bars that appear on any track when a slice is being used. The Step button (to the right of the Play button in the LoopMash transport panel) can be useful here, to move through the loop step‑by‑step and identify the master. This button is also very useful for seeing which slices in other loops are being triggered for each step of the master loop when you're making changes to the settings on the Edit page.

More Control

Activating individual outputs for each of LoopMash's tracks can be done via the VST Instruments panel.Activating individual outputs for each of LoopMash's tracks can be done via the VST Instruments panel.

The Edit section includes a dry/wet mix slider, which allows you to adjust the level of the master track relative to that of slices played from loops on other tracks, which is useful, but you're not able alter the levels of the individual tracks in LoopMash. Instead, you have to use LoopMash's multiple outputs: you can activate these from the VST Instruments panel, which will create an audio channel in the mixer for each track. If you opt to work in this way, it's also best to de‑activate the stereo mix output, so you don't duplicate the output from each track.

To then control the overall output from LoopMash, you need to create a Group channel and route the individual track outputs to that (as shown in the screenshot above). This arrangement allows the levels of the individual LoopMash tracks to be balanced, and the level of the overall LoopMash output to be controlled within the mix for the project. Of course, it also allows other basic mixing techniques to be used, such as panning different loops across the stereo image, or sending different parts to delays. Sadly, though, using multiple outputs in this way means that you won't be able to make use of the wet/dry mix slider, which is a shame.

A further advantage of this setup is that it makes it very easy to bounce down the output from LoopMash to an audio track. All that is required is that the LoopMash Group channel is solo'ed and then the usual File / Export / Audio Mixdown menu option can be used to generate the required audio file, for the whole arrangement, or just for a short section defined by the Project cycle markers. This audio file can then be subjected to further processing or exported to another software tool if you like to do your loop processing outside Cubase. In addition, while I haven't found LoopMash to be particularly CPU intensive, if your overall project is pushing your system limits, converting your LoopMash output to a single audio track can give you a little more breathing space.

While using LoopMash's multiple audio outputs is very straightforward and, as described below, provides other processing possibilities, it would be nice if Steinberg added simple level and pan controls to each of LoopMash's tracks at some point. This would be just the ticket when all you need is to bump the volume of one or two loops up or down a bit, to achieve a better balance. The obvious down side of using the Cubase mixer as described above is that these mixer track settings don't change if you use the Scene buttons to flip between different LoopMash configurations — although this is more likely to be an issue if you're using LoopMash 'live' in a performance context rather than in the studio.

Chop Chop

Setting each LoopMash track to output to a separate mixer channel allows level and pan to be controlled in more detail, with the overall output level handled via a Group channel.Setting each LoopMash track to output to a separate mixer channel allows level and pan to be controlled in more detail, with the overall output level handled via a Group channel.

The Edit page also features the Staccato Amount slider, which is used to control the length of the various slices on playback. Using shorter times (with the slider towards the right) gives a much more percussive feel to the performance. This is a 'global' control, however, and, using the multiple outputs as described above, the same sort of effect can be achieved with a little more control by inserting an instance of the Envelope Shaper plug‑in (or whatever third‑party equivalent you might prefer) on each track. As shown in the screenshot below, a combination of high attack, short length and short release settings can produce a more percussive sound, but experimentation is the order of the day.

Where Are My Drums?

Using the mixer also provides additional processing options for each LoopMash track, via Cubase audio plug‑ins such as the Envelope Shaper.Using the mixer also provides additional processing options for each LoopMash track, via Cubase audio plug‑ins such as the Envelope Shaper.

While the slice replacement produced by LoopMash is great, at times you might want your master loop to be playing all the time, to ensure that the overall rhythmic feel is maintained, and simply have the slices from any other loops layered on top. Most of the time, this can be achieved entirely within LoopMash by a careful balance of the Similarity Gain sliders — in particular, having the slider for the master track quite high — and setting the 'Number of Voices' control to two, three or four. This combination ensures that slices from the master track are very likely to be picked for playback and that there are enough voices in total for slices from other tracks to be selected for layering on top. However, if you want to be sure your master loop plays back at all times, or want to get as many replacement slices from your additional loops as possible, the simplest solution is to copy your master track loop to a standard audio track and play it back from there. If you then turn the master track's Similarity Gain slider down to zero (which also frees up a 'voice' to be used by other tracks), while it continues to control the rhythm and influence the selection of slices from other loops, its slices are not output via LoopMash. The relative levels of the master loop and the various LoopMash slices can then be controlled via the Cubase mixer.

Breath Of Life

A quick search on the Steinberg Forums soon brings up a number of other 'wouldn't it be nice if LoopMash could….' comments from users, relating to issues similar to some of the ones I've covered above, so it will be interesting to see if Steinberg do develop the plug‑in further. That said, even as it stands, LoopMash is both a lot of fun and a powerful creative tool. Given the new life it can breathe into a tired loop collection, if you're willing to experiment but have an older version of Cubase, it's probably worth the upgrade price on its own! Happy mashing... 


 Published October 2009


Friday, March 24, 2023

VariAudio: Extracting MIDI From Audio Files

 By John Walden


VariAudio's Extract MIDI function provides three different ways of dealing with pitch-bend data.VariAudio's Extract MIDI function provides three different ways of dealing with pitch-bend data.

Back in SOS August 2009, I took a look at pitch‑correction using Cubase 5's new VariAudio tool, which can be found in the sample editor. While pitch and timing changes are obviously VariAudio's raison d'être, the tool has a further trick up its sleeve: MIDI extraction. In other words, using VariAudio, you can take a monophonic audio performance and extract MIDI timing and pitch information from it, leaving you with a MIDI part in place of your audio file. This type of audio-to-MIDI conversion has been around for quite some time (Logic, for example, has offered it for many years now, and it's also possible in Celemony's Melodyne), but this is the first time the functionality has been built into Cubase.

So why would you want to extract MIDI from your audio? Although none of the current audio-to-MIDI conversion tools are without their particular quirks, they have a number of uses, which include extracting MIDI from a bass-guitar performance, enabling you to double the part with a bass synth (if the bottom end of your mix needs a little beefing up, for example). It can also be a useful way for a guitarist to create melody lines for synths, without using a keyboard or entering the murky waters of MIDI guitar controllers. In addition, extracted MIDI data can be used with Cubase's scoring features to provide notation of parts for other musicians. Surprisingly, for such a potentially useful feature, the MIDI extraction process is given pretty short shrift in Cubase's Operation Manual.

Extraction Basics

The same eight-note audio phrase extracted using each of the three pitch‑bend data modes.The same eight-note audio phrase extracted using each of the three pitch‑bend data modes.

The basic principles of the extraction process are straightforward. Having identified the pitch of individual notes in an audio performance, VariAudio can then export that data to a suitable MIDI part via the Function / Extract MIDI command. If you've used VariAudio's Pitch & Warp or Segment tools, the changes you've made to the segments will be reflected in the timing and pitch of the MIDI notes created.

There are three options, in terms of pitch‑bend data, when outputting the extracted MIDI information. First, the data can be excluded, so you just get the individual note, and this automatically pitch‑quantises MIDI notes to the nearest semitone. As it ignores pitch-bend data, this mode produces a fairly simple output, and is useful if you want to play it back via an instrument that doesn't naturally support pitch-bend (such as a piano), for producing notation (where simpler is generally better for generating a clean-looking score), or if you just need the basics of the part extracted for further MIDI editing. The second option, Notes and Static Pitch-bend Data, simply adds a single pitch-bend event to each of the segment pitches to move it to the nearest semitone — which is effectively a kind of pitch‑quantise by using pitch-bend. I'm not convinced of the value of this mode, so let me know if you find a practical use for it!

The final mode, Notes and Continuous Pitch-bend Data, does exactly what you'd expect, and uses pitch-bend data to match as closely as possible the pitch curve that you see displayed by VariAudio in the Sample Editor. This is great for getting the maximum amount of expression from your audio performance, but it can generate large pitch‑bends, where legato notes slide from one pitch to another. Depending on the pitch‑bend range set in the output dialogue box, a warning indicating the semitone range of the largest pitch-bend in the extracted part might be displayed. You should change the setting in the dialogue to match this, and the setting is then embedded as controller data at the beginning of the MIDI event (you can, of course, view this using the MIDI List Editor). For many MIDI instruments, this will automatically change the pitch-bend range, but if things don't sound right you may also need to manually adjust your sampler patch settings. This is easier to do with some MIDI sound sources than others (for example, you can't manually change this setting for HALion One instruments: you're stuck with whatever default is built into the patch), and even then it can require experimentation. If you get desperate, it's also possible to scale pitch‑bend data using the Logical Editor, but that's outside the scope of this article.

GIGO

VariAudio's pitch detection applied twice to the same guitar phrase. The upper pane is the clean DI'd part, while the lower one is based on the performance recorded through an amp with various effects. Note how the clean performance produces the simpler pitch and note data, which in turn is easier for the MIDI extraction process to work with.VariAudio's pitch detection applied twice to the same guitar phrase. The upper pane is the clean DI'd part, while the lower one is based on the performance recorded through an amp with various effects. Note how the clean performance produces the simpler pitch and note data, which in turn is easier for the MIDI extraction process to work with.

Good though the VariAudio MIDI extraction process can be, some audio sources seem to provide better input signals than others, and it's worth avoiding the frustration of 'Garbage In, Garbage Out'. Performances featuring single notes (no chords), and recorded as mono rather than stereo, are essential. It also helps if the audio is recorded at a reasonable level, isn't smothered with effects and has notes with a clearly defined attack. For example, a dry, DI'd guitar or bass (without amp simulation or effects) can work well and, in general, instruments are easier to work with than vocals, which tend to produce more complex pitch variations. The screenshot above shows a simple example comparing a clean DI'd guitar with the same part recorded via an amp with some effects applied. VariAudio has clearly found it easier to determine pitch data from the former.

It's also worth editing the VariAudio segments prior to extracting the MIDI data. The most important step is to get the start of each new segment aligned with the attacks of the notes in the audio waveform. This ensures that the timing of the MIDI notes generated will closely match that of the audio performance. Segments can be split or deleted where the VariAudio pitch detection algorithm has either created a single segment that spans more than one note, or where two segments have been created for a single note. This ensures that the number of MIDI notes matches the number of notes in the audio part. For greater accuracy, you can zoom in on the audio display as you use the Segments tool.

A Dose Of The Bends

Here, the same audio phrase shown in the previous screenshot has had some minor edits to its segmentation, as described in the main text. VariAudio's Pitch Quantize and Straighten Pitch options have also been applied, prior to using the Extract MIDI function.Here, the same audio phrase shown in the previous screenshot has had some minor edits to its segmentation, as described in the main text. VariAudio's Pitch Quantize and Straighten Pitch options have also been applied, prior to using the Extract MIDI function.

Once you've edited the position and number of segments, you can use the Pitch Quantize and Straighten Pitch sliders to clean up the performance. The usual qualifiers apply here. For example, make sure that when quantising the pitch, wayward notes don't get dragged to the wrong semitone. This is easily corrected by dragging and dropping the segment back where you want it, so you can be quite aggressive with the Pitch Quantize setting.

If you intend to extract the pitch-bend data as well, Straighten Pitch is useful for cleaning up more extreme wobbles. This is perhaps more useful on vocals than instruments, but in either case it needs to be done subtly or you might change (or even lose) the expression of the performance. If you plan to use the MIDI data for a piano or to create notation, extracting without pitch‑bend data is a better option anyway, but if you want, for example, to turn a vocal or guitar performance into a MIDI‑based violin or saxophone performance, retaining the bends of pitch — and experimenting with your settings to get the pitch-bend performance of the MIDI instrument sounding believable — is an important part of the process.

Wot, No Drums?

While VariAudio's MIDI extraction does require a little patience, with practice it can produce very good results. I've posted a couple of audio examples on the SOS web site (/sos/nov09/articles/cubaseaudio.htm). As you'd expect, the quality of what can be achieved depends to a large extent on the playback instrument. It's easy to make the translation to piano‑style instruments, as there are no pitch-bend issues. With parts containing pitch‑bend data, synth‑based sounds tend to be more convincing than virtual versions of 'real' instruments; not surprising when you think how hard it can be to program realistic solo parts for many string or wind instruments!

There are also a couple of things that this audio‑to‑MIDI function can't do. First, the amplitude of the audio is not converted into MIDI velocity data, and all the MIDI notes created are given a default velocity of 100, so volume expression has to be added via subsequent editing. Steinberg might add an amplitude‑to‑velocity element to the algorithm sometime, but for the moment you'll have to look at third‑party plug‑ins to do that.

Second, VariAudio's note- and pitch- detection algorithm is not really designed to work with drum or percussion instruments, so if you were hoping to use it to convert audio drum performances into MIDI data (for example, so you could replace or layer individual drum sounds), you might find yourself frustrated by the results. Again, while this would be nice to see as a future feature, for now I'd stick with third‑party plug‑ins such as KTDrum Trigger (see the SOS May 2007 Cubase workshop for details). A MIDI output on the Gate plug‑in would also be useful in this application. Alternatively, if you're just working with short(ish) loops, you could experiment with some slicing in the Sample Editor and Groove Agent One's drag-and‑drop capabilities — which is perhaps a fitting subject for a future column.    


Published November 2009

Wednesday, March 22, 2023

Overview & Demo of drumlogue: Korg's Three-Fold Hybrid Drum Machine

Replacing Drums With Groove Agent One

In slicing the 'performance' loop in the Sample editor, I used a relatively high sensitivity setting, but still needed to add a couple of extra hitpoints (the darker blue lines) manually.In slicing the 'performance' loop in the Sample editor, I used a relatively high sensitivity setting, but still needed to add a couple of extra hitpoints (the darker blue lines) manually.

In last month's workshop, I used VariAudio to obtain MIDI notes from audio parts, but this approach won't work for drum replacement. In SOS May 2007, Matt Houghton discussed drum-replacement tools for Cubase, but if you only have a few drum loops in which you want to replace some sounds, the Groove Agent One drum machine offers an alternative approach.

Let's consider a simple, yet common scenario involving two drum loops. The first contains the performance that's required, and to which performances by other musicians have been overdubbed, but the specific drum sounds feel a little tame and need beefing up. Having discovered suitable sounds in a second loop, your task is to keep the groove and timing of the first, but to replace some of the actual sounds with hits from the second. I'll work through this example using two loops: a four‑bar 'performance' loop and a two-bar 'sounds' loop, both of which you can download from the SOS web site (/sos/dec09/articles/cubasetechmedia.htm).

The Slice Is Right

Initially, all Groove Agent One's 128 pads are empty but dragging and dropping sliced loops onto a pad automatically maps the slices across a series of pads. Here, the 'performance' loop has been mapped across almost all the pads in the first two groups. The red highlights around the Group 1 and 2 buttons show that pads within those groups are in use, while the green highlight indicates that we are viewing the pads in group two.Initially, all Groove Agent One's 128 pads are empty but dragging and dropping sliced loops onto a pad automatically maps the slices across a series of pads. Here, the 'performance' loop has been mapped across almost all the pads in the first two groups. The red highlights around the Group 1 and 2 buttons show that pads within those groups are in use, while the green highlight indicates that we are viewing the pads in group two.

Audio can be dragged and dropped into Groove Agent One in several ways, which are described in the Plug‑in Reference PDF manual, but when working with loops rather than single hits, some preparatory work is required in the Sample and Audio Part editors.

The first step is to slice the two loops into their individual beats, using the Hitpoint tool in the Sample editor. Increasing the Sensitivity setting adds hitpoints: the aim is to get a hitpoint at each transient created by an individual drum hit. Once you have this about right, click the Edit Hitpoints button to manually add (by holding the Alt or Option key and clicking on the waveform display as I've done in the screenshot above) or delete hitpoints as required. Hitpoint positioning can also be adjusted, and holding the mouse button down over an individual slice auditions it, making it easy to hear where edits might be required. Once the hitpoints are sorted, pressing the Slice & Close button exits the Sample editor and creates an audio part (in the Project window) containing the sliced loop.

Life's A Drag

Having sliced the loop in the Sample editor, opening the resulting audio part allows us to select all the slices and then drag and drop them into Groove Agent One.Having sliced the loop in the Sample editor, opening the resulting audio part allows us to select all the slices and then drag and drop them into Groove Agent One.

When you open a new instance of Groove Agent One, all 128 pads (16 pads in each of eight groups, with each pad triggered via a different MIDI note) are empty. We now need to map each slice from our two loops to individual Groove Agent One pads, which requires a quick visit to the Audio Part editor for each loop in turn.

Double‑click one of the audio parts to open it in the Audio Part editor, and select all the events (each slice) using Ctrl-A (PC) or Command-A (Mac). The parts can be dragged and dropped to an empty pad in Groove Agent One, and when you let go of the mouse button, each slice is automatically mapped to consecutive pads, starting from the pad you dragged onto.

I find it easiest to place my first loop (the 'performance' loop) on the first pad of group one. In this case, because it has four bars' worth of slices, it pretty much fills up all the pads in group two also. Once you've dropped the first loop into Groove Agent One, the double‑headed arrow icon in the Exchange section lights up. Dragging and dropping from this icon back into the Project window creates a MIDI file that, when played back to Groove Agent One, will trigger each slice in turn, recreating the original drum performance.

Having obtained a MIDI version of our performance, it's time to process our 'sounds' loop in the same way. Again, for convenience, I chose to drag and drop the slices into the empty pads, starting on pad one in group three. The example loop being only two bars long, it fills fewer pads. If we were to drag and drop from the Exchange icon to the Project window, we'd get a MIDI part for this second loop — but that's not what we're trying to do...

Keep It Simple, Stupid

The left‑hand pane shows the MIDI part generated by Groove Agent One to play back the 'performance' loop. I've manually selected all the MIDI notes that trigger a kick-drum slice. In the right‑hand pane, I've moved all these 'kick-drum triggers' to the same MIDI note, which means that they'll now trigger the same slice in Groove Agent One. The left‑hand pane shows the MIDI part generated by Groove Agent One to play back the 'performance' loop. I've manually selected all the MIDI notes that trigger a kick-drum slice. In the right‑hand pane, I've moved all these 'kick-drum triggers' to the same MIDI note, which means that they'll now trigger the same slice in Groove Agent One.

Both loops are now sliced and mapped across Groove Agent One's pads, and we have a MIDI part that can trigger our 'performance' loop. Before we swap some of the hits in our 'performance' loop for those from our 'sounds' loop, a bit of MIDI editing is required. The left‑hand side of the Key Editor screenshot below shows the original MIDI part for the 'performance' loop, and I've highlighted each of the main notes that trigger a kick‑drum slice. As you can see, there's a different note for each kick‑drum hit from the original loop.

The right‑hand side of the screenshot shows an edited version of the same MIDI part, but I've moved all the MIDI notes that trigger a kick-drum sample to the same MIDI note. Playing back the MIDI part now will still give you pretty much the same performance, but each occurrence of the kick drum will now trigger the first kick-drum slice, rather than those from later in the loop (you can check this by watching which pads light up in Groove Agent One as slices are triggered). Note that it's best to use the Grid Relative snapping option when moving these MIDI notes, as you are less likely to alter the exact timing of the MIDI notes that trigger each slice.

The same process can be repeated for each of the other drum sounds in the loop, the most obvious ones being the snare, closed and open hi‑hats, and any tom or cymbal sounds. What you're trying to do is get the loop to play back using a smaller number of MIDI notes (and, hence, a smaller number of Groove Agent One pads) than the original. I narrowed the selection down to four MIDI notes that focused on the key elements I wanted from the 'performance' loop: the kick, snare, an open hi‑hat sound, and a second snare that wasn't a full hit in the original loop, and therefore sounded different to the main snare hits.

Replacement Parts

The same process has been repeated for MIDI notes for all the key drum sounds. Note that the Grid relative setting makes it easier to move the pitch of a MIDI note while maintaining its timing position.The same process has been repeated for MIDI notes for all the key drum sounds. Note that the Grid relative setting makes it easier to move the pitch of a MIDI note while maintaining its timing position.

The last step is the easiest of all. Groove Agent One lets you drag the sample from one pad and drop it onto another, simply swapping the pad assignment of the two samples. So, in our example, the kick drum is being triggered by MIDI note E2. Having auditioned the pads containing the slices from the 'sounds' loop, I thought the best kick hit was found on pad C1, and simply clicking on this pad, holding the mouse button down, pointing at the Group 1 button (which toggles the Groove Agent One display to the first group of pads), I was able to drop this replacement kick sound onto pad E2. It was then a case of simply repeating the same swapping process for each of the key sounds in the loop. While you might sometimes require a little further processing to smooth out the transitions between slices (for example, a light dusting of reverb to 'glue' the new loop together), the job is now pretty much done.

However, if you want to blend two sounds together, rather than opt for complete replacement (for example, layering two kick drums for extra definition), it's simply a matter of duplicating all the MIDI notes that trigger the original kick-drum slice and allocating these copies to a second MIDI note that belongs to the pad containing your second kick sample. The relative levels between the two can then be adjusted via the respective MIDI velocities associated with each pair of notes.

So next time you like the way your drummer has played, but perhaps not the way the recording sounds, Groove Agent One might be just what you need to get out of a scrape! 


Published December 2009