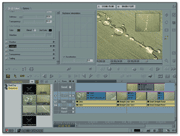
is several samples ahead of the other. The Audio Editor's Nudge tool allows us to move parts a single sample at a time to find the best position for phase coherence.") This acoustic guitar was recorded in stereo with the mics at different distances, and consequently suffers from comb filtering when the left and right signals are collapsed into mono — note how the signal recorded with the closer mic (top) is several samples ahead of the other. The Audio Editor's Nudge tool allows us to move parts a single sample at a time to find the best position for phase coherence.
This acoustic guitar was recorded in stereo with the mics at different distances, and consequently suffers from comb filtering when the left and right signals are collapsed into mono — note how the signal recorded with the closer mic (top) is several samples ahead of the other. The Audio Editor's Nudge tool allows us to move parts a single sample at a time to find the best position for phase coherence.
This month, we explain how to eliminate phase problems in Cubase's Audio Editor, and round up some interesting new plug‑ins.
Craig Anderton wrote an illuminating article in SOS July 2001 about the phase problems that can arise when you try to combine miked and DI'd signals from the same source. As he said, this problem is perhaps most common when you're recording bass guitar: the best recorded bass sounds are often those acheived by miking the bass cabinet and blending that signal with the DI'd output from the bass, but because sound takes a finite amount of time to travel through the air, the miked signal is usually delayed with respect to the DI'd one. Signals recorded via a digital processor such as the Johnson J Station or Line 6 Pod will be delayed even more compared with clean DI'd signals. Signals that are not perfectly in phase will exhibit comb‑filtering artifacts, making them sound hollow or thin, and not as loud as they should be.
Phase problems can also result from mic positioning when making stereo recordings, usually where the mics have been placed at different distances from the source. In this case you won't notice that anything is wrong while the stereo signals are panned hard left and right, but when you click the Mono button on Cubase's Master Output, the affected instruments will drop in level compared to the rest of the mix and start to sound comb‑filtered. When your track is based around a stereo recording of something like a piano or acoustic guitar, this can be a big problem: few people listen to CDs in mono, but a lot of people listen to the radio in mono, and the time when your mix is being broadcast to the nation is not really the ideal moment to find out that it isn't mono‑compatible!
As Craig mentioned in his article, when you're working in a MIDI + Audio sequencer, the easiest way to compensate for the delays that cause phasing problems is simply to move one channel's recording forwards or backwards with respect to the other. For this month's Cubase Notes, I thought I'd explain in more detail how to get the best results.
Side Splitting
 Ohm Force's OhmBoyZ and PredatOhm, in 'funky' and 'classic' skins respectively.
There's no way to persuade Cubase to treat the left and right halves of interleaved stereo audio files independently, so you'll need to make sure that your signals are recorded either as a 'split' stereo file or two mono files on separate tracks (if you want to treat them as a single stereo channel for the purpose of compression and effects, just route them to a group channel in the VST Mixer and add the effects there). I usually record stereo‑miked instruments like this anyway, by using Cubase's Multirecord function to record from two separate mono inputs onto two separate mono tracks simultaneously. If you're stuck with an interleaved stereo AIFF or WAV, you'll need to split it using an external audio editor: the shareware D‑Sound Pro editor on the Mac, for instance, makes it easy to save out the left and right halves of stereo recordings as separate files. You can then import these into fresh mono tracks in Cubase and mute the original stereo recording.
One of the nice things about Steinberg's Nuendo is that it allows sample‑accurate editing and positioning of Events in the main arrange window. Sadly, Cubase doesn't: you'll notice that even with Snap off and horizontal zoom set to maximum, there's a limit to how accurately you can position an Event in time. To make the sort of fine adjustments required to tackle phase problems, you'll need to use the Audio Editor. Select the Event(s) that make up your recording, and double‑click them or choose Edit from the Edit menu. The Audio Editor should open up, displaying both parts of your recording on separate lanes. Set both horizontal and vertical zoom levels to maximum, and you should see the individual waveforms clearly displayed. If you've recorded your files simultaneously onto an Any track, Cubase will have automatically Grouped them, so you'll need to Ungroup them before you can move the two halves independently. To do this, make sure they are selected in the Audio Editor and choose Ungroup from the Do menu.
The shapes of the two waveforms you've recorded will look very similar, and you should be able to see an obvious correspondence between the peaks and troughs in each part. If there's a phase difference, you'll also see that these peaks and troughs don't line up vertically — one part will be slightly ahead of the other. The difference may be just a few samples, but if the two signals are taken from different sources (as for instance when you have an unprocessed mic signal and a DI that has been sent via a digital processor), it may be much more.
With Snap in the Audio Editor set to Off, you should simply be able to pick up one of the audio parts and move it horizontally until the two waveforms seem aligned. Alternatively, when Snap is Off, the Nudge tool allows you to move audio parts left or right a single sample at a time: choose the Nudge tool from the tool palette and simply click or Option‑click over a part to move it left or right respectively.
Testing By Ear

You can usually get pretty close to the optimum result just by lining the two parts up visually, but obviously what matters most is what it sounds like. When you've got a good visual match, try auditioning every alternative within a few samples either side of that position to find the best spot. In the same way as you might find the right frequency to notch out an annoying ring by using boost EQ to exaggerate a narrow band of frequencies, deliberately putting one signal out of phase with the other can help find the best alignment. Cubase's VST Mixer mimics hardware mixers in most respects, but doesn't offer any facility for reversing the phase of a channel. However, you can use an insert plug‑in such as the freeware Fraser's Phase Switch (check out www.audiomelody.com/Plug‑ins/VSTPlug‑ins/FrasersPlug‑ins2.1.htm) to do the same job — but remember to keep Plug‑in Delay Compensation checked in the Audio Setup window, as inserting a plug‑in can introduce a delay which may mess up your phase adjustments. Reverse the phase of one of the two channels, then adjust the respective position of your audio parts until as much of the signal as possible is cancelled out. When you then put the channels back in the correct phase, you should have found the best position for phase coherence. When you're satisfied with the results, you might want to Group the parts to fix your adjustments.
Cubase Tips
In Cubase's Key Editor, the Quantise parameter not only sets the quantise resolution but also the minimum length of notes that can be drawn in with the pencil tool. With Quantise set to 16, for instance, the shortest note that can be drawn in will be a semiquaver.
When you have a MIDI note selected in the Key Editor, its velocity is displayed above the grid, and clicking on that velocity value with the pointer tool allows you to alter it. If you also have other MIDI notes selected, doing this adjusts the velocity of all selected notes by the same amount. This is a handy way of increasing or decreasing the velocity of lots of the notes in a part without altering their relative dynamics.
If you've never visited Steinberg's Cubase community at www.cubase.net, do give it a try. You'll find plenty of 'official' hints and tips as well as active discussion forums where your posts are moderated and read by Steinberg employees and other Cubase experts.
Plug‑in News
Good‑quality VST plug‑ins continue to arrive at the SOS offices by the virtual truckload. French developer Laurent Rabesahala of Ohm Force has been busy creating two interesting plug‑ins called PredatOhm and OhmBoyZ. The former is a tasty multi‑band dynamics/distortion plug‑in which offers unique possibilities for dirtying up your sounds. You can, for instance, gang the controls together in different ways, so that turning one has a similar or opposite effect on another. In conjunction with the parameter automation available in VST, this has almost limitless potential for weird and wonderful sonic mangling, and manages to eliminate much of the digital‑sounding crunch that often plagues other distortion plug‑ins.
PredatOhm is capable of some pretty extreme treatments — I found it especially effective on drums — but Laurent's second plug‑in makes it sound positively tame. OhmBoyZ combines a VST‑synchronised multi‑tap delay with two independent processing paths, each comprising a vicious resonant filter with distortion and feedback. The sheer range of treatments available is impressive: different presets can turn a vanilla drum loop into anything from a fairly convincing backwards LP to a series of clean pitched tones not unlike a harpsichord.
PredatOhm and OhmBoyZ are available in Mac and PC VST formats as well as PC DirectX and BeOS from Laurent's web site at www.ohmforce.com. In both cases, buyers can choose between 'classic' and 'funky' skins: the latter take up more screen space and are harder to get your head around, but certainly look like labours of love! Laurent has come up with an interesting pricing scheme whereby a mere $9.99 buys you the full working version of the plug‑in, but not the licence to use it in commercial recordings. If you want to use Ohm Force plug‑ins on a commercial release, you'll need to buy the Expert or Pro versions ($59 and $149 respectively for PredatOhm and $79/$199 for OhmBoyZ), which add 'crystal clear' 24‑bit processing modes and full MIDI controllability.
Even better value is MDA's EPiano, which is a completely free VST Instrument mimicking the Fender Rhodes electric piano. The interface is basic, but offers all the parameters you need, and the sound is not bad at all. It won't stop Cubase users cursing Emagic for not porting the full version of EVP88 to VST, but it's eminently usable — and at the price, it's a bargain... EPiano can be downloaded from The Plug‑in Spot (www.pluginspot.com) or from www16.brinkster.com/softcentral/mdavst/.