No Limit Sound Productions
Welcome to No Limit Sound Productions. Where there are no limits! Enjoy your visit!
Welcome to No Limit Sound Productions
| Company Founded | 2005 |
|---|
| Overview | Our services include Sound Engineering, Audio Post-Production, System Upgrades and Equipment Consulting. |
|---|---|
| Mission | Our mission is to provide excellent quality and service to our customers. We do customized service. |
Tuesday, February 24, 2026
Monday, February 23, 2026
Cubase 14: Using DAWproject To Exchange Projects Between Cubase & Cubasis
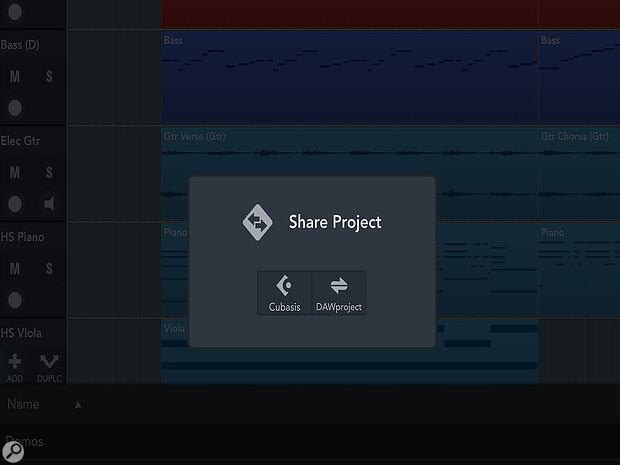 With my demo ready to be moved to Cubase, Cubasis’ Media page now offers the DAWproject format for sharing projects.
The new DAWproject file format promises straightforward project transfers between Cubasis and Cubase.
The act of moving a music project between DAWs isn’t always straightforward, and even though most DAWs offer one or more project export formats the transition can still be somewhat cumbersome and frustrating — especially when it comes to configuring any virtual instruments or effects plug‑ins you want included in the process. In late 2023, Bitwig and PreSonus introduced the DAWproject file format, a new project ‘container’ designed to transfer all of the most important elements (audio tracks, MIDI tracks, mixer and plug‑in configurations included) between any DAWs that support the file format.
In late 2023, Bitwig and PreSonus introduced the DAWproject file format, a new project ‘container’ designed to transfer all of the most important elements (audio tracks, MIDI tracks, mixer and plug‑in configurations included) between any DAWs that support the file format.
While warmly welcomed by many users, relatively few developers have so far added support — but, happily, Steinberg are now one of them. DAWproject import/export was added to Cubase Pro and Artist in v14.0.20 and, wonderfully, Steinberg added the same support to Cubasis 3.7.5. So if you like the idea of moving projects between your mobile and desktop working environments, DAWproject now has the potential to make that easy. In use, it’s a remarkably straightforward process — but, understandably, there are still some ‘gotchas’ to be aware of, so below I’ll take you through the pros and more obvious cons.
To There...
A common use case is transferring an idea started on Cubasis on an iPad, while working away from your studio, to ‘full‑fat’ Cubase for development or completion in the studio. As you’ll see in a moment, the transfer process is very straightforward. But Cubasis is now a pretty feature‑rich recording environment in its own right — so, just how much detail from your Cubasis project might arrive intact in Cubase via the DAWproject container?
A common use case is transferring an idea started on Cubasis on an iPad... to ‘full‑fat’ Cubase for development or completion in the studio.
Let’s assume we’ve created a typical project in Cubasis for a new musical idea. It consists of a number of virtual instrument tracks (drums, bass, piano and synths, for example) and a few audio tracks recorded on a compact, mobile‑friendly audio interface. Perhaps a guitar part or three and a vocal demo. Within the Cubasis mixer, the tracks have been routed to Group Channels (buses for drums, bass, keyboards, guitars) to keep things organised, and to make it easier to create a static mix balance from the various instrument groups. Equally, some routine insert effect processing such as EQ and compression has been applied to some tracks, and both reverb and delay send effects have been configured. We now want to move this idea over to Cubase for further work...
As shown in the first screen, Cubasis’ Media / Share feature options now include DAWproject. Select this and you get a choice of how to move the actual file. In my example, with my iPad sat alongside my desktop macOS system, I could simply use Apple's AirDrop to transfer the DAWproject file over Wi‑Fi. A few seconds later, the file was available on my desktop’s drive system.
In Cubase, you then create an empty project and, from the File menu, choose Import / DAWproject, and browse the file transferred from Cubasis. One click, and, as shown in the next screen, Cubase will pop open the session. Remarkably, you might already be able to continue working. All your audio, MIDI and Group Channel (bus) tracks will appear, along with FX Channels for any send effects used in Cubasis. The routing to the Group Channels is retained too, along with fader levels for all track types. Panning and send settings are also imported. Usefully, from a navigation perspective, track colours are also transferred. And if you’ve used the Tempo or Signature tracks in your Cubasis project, their data is also carried across to Cubase on the desktop — although I did experience an issue with tempo data being displaced along the project timeline in some cases.
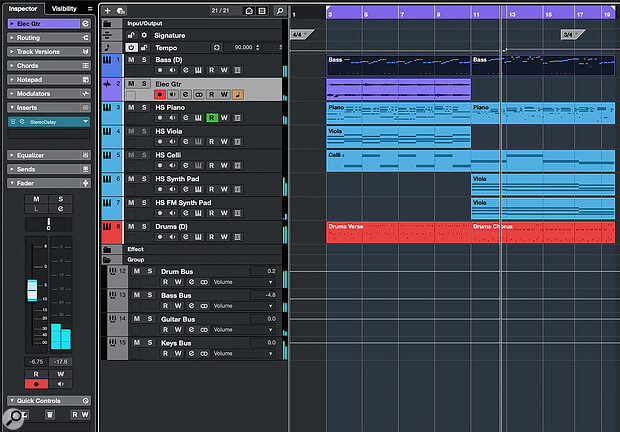 When opened in Cubase, the Cubasis project opens pretty much fully formed, albeit with some notable limitations as explained in the main text.
Know Your Limits
Of course, given that this is an early iteration of the DAWproject feature in Cubase and Cubasis, and that mobile and desktop music software exists in somewhat different ecosystems, there are some limitations to the transfer process. In the case we’re considering here — an idea sketched out in Cubasis being moved to the desktop for further development — the most important considerations probably centre on the exchange of plug‑in instruments and effects data.
For example, Cubasis can’t export data connected with AU, IAA or CLAP plug‑ins. So, if you wish to ensure optimum compatibility with Cubase, your Cubasis project really needs to be constructed using only the effects and virtual instruments bundled with Cubasis itself. Still, it’s not all bad news: if your Cubasis project includes some of Steinberg’s IAP (in‑app purchase) instruments (for example Halion Sonic Selection, FM Classics, Neo FM, LoFi Piano, Iconica Sketch and Micrologue), the Cubase desktop version of the project will find suitable presets in HALion Sonic and Retrologue.
I found that the situation with effects was a little more hit‑and‑miss. For example, RoomWorks SE seemed to map OK, including any settings I’d made. However, while StereoDelay did appear in the imported desktop project, the settings used in Cubasis didn’t. Equally, despite confining myself to the most basic selection of compressor, limiter and EQ choices in Cubasis, sometimes the plug‑ins appeared in Cubase and, at other times, they did not. And while static fader and pan positions translate perfectly, another significant limitation is that any automation data you created in Cubasis does not. Of lesser importance, but I think still worth noting, is that after importing projects into Cubase, I had to reactivate the display of some MixConsole sub‑panels.
And Back...
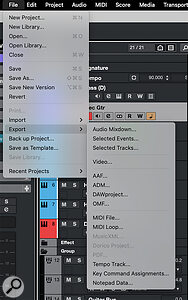 Going from Cubase to Cubasis is also possible via the DAWproject format.There may well be occasions when you wish to move a project in the other direction, perhaps taking a sketch created in Cubase with you as a Cubasis project while you work away from home or to play with on stage. The same sorts of qualifiers apply, of course, but provided that I tailored my virtual instrument and effects choices broadly to those mentioned above, I found that, if anything, the transfer seemed to work more consistently going in this direction.
This seems to be particularly the case for effects plug‑ins: Cubasis was more successful in translating plug‑in selections (although not all of their parameter settings) on importing a project from Cubase. Interestingly, tempo data seemed to move in this direction without any issues. And, if I did happen to include a third‑party plug‑in in my Cubase project before exporting it via the DAWproject container, Cubasis simply ignored it very politely — without throwing a tantrum!
Glass Half Full
When Bitwig and PreSonus introduced the DAWproject concept, their focus would naturally have been on moving projects between different desktop DAWs, but as I’m not a user of Bigwig Studio or Studio One I’ve not had a need to explore this desktop‑to‑desktop process yet (I do collaborate with Logic and Pro Tools users on a regular basis, though, so I’d love to see Apple and Avid get on board!). When moving between different DAWs on a desktop system, my understanding is that third‑party plug‑in data should transfer intact via DAWproject, provided that the plug‑ins concerned are available on the respective host computers (if you are moving projects between two DAWs on the same system, that would obviously be the case).
In that broader context, support for the DAWproject format by Cubase Pro and Artist is obviously a very positive thing. However, I think it’s really neat that Steinberg have looked to include it in Cubasis too. While it has its limitations (some being inevitable due to the very different plug‑in architectures of the desktop and mobile worlds), it does provide a very easy means of moving projects between Steinberg’s desktop and mobile music‑production systems, and when it comes to transferring initial ideas well before you get into the details of the mix, it’s undoubtedly very useful. So I’ll happily take a glass‑half‑full attitude to this additional option!
...it’s worth noting that Steinberg seem to view DAWproject support as a work in progress, and have already published a list of features they’d eventually like added.
Finally, it’s worth noting that Steinberg seem to view DAWproject support as a work in progress, and have already published a list of features they’d eventually like added. This includes support for automation data, time‑stretch data and for multiple outputs. Fingers crossed that there’s enough impetus to continue the required development work. That may well depend upon the likes of Apple and Avid backing the format, but it would likely also bring further benefits to Steinberg‑only users moving between Cubasis and Cubase.
Saturday, February 21, 2026
Friday, February 20, 2026
Cubase 14: Play Probability & Velocity Variance
By John Walden
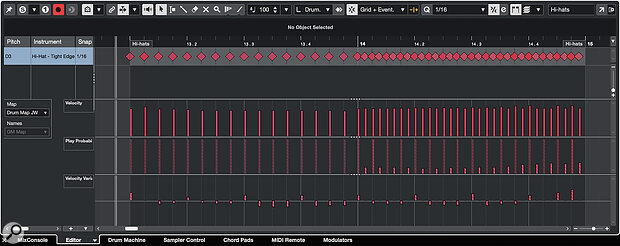 The new Velocity Variance and Play Probability lanes let you easily experiment with performance variations to keep your MIDI loops from feeling static.
Cubase’s Play Probability and Velocity Variance tools can bring your MIDI patterns to life.
Unless you’re intentionally making music with a robotic and repetitive feel, it’s always useful to spice up your MIDI parts to make them feel more ‘human’. Abandoning quantise and playing complete parts in live from start to finish are obviously options, but not everyone has those performance chops, and if you happen to be working with short MIDI loops for things like drum, bass or piano parts, you might want to look to alternative strategies in any case. Cubase has plenty of options on this front, and if you have either the Pro or Artist editions of Cubase 14 there are two new options you can exploit: Play Probability and Velocity Variance. Below, I’ll consider a couple of examples, one a humble MIDI drum loop and the other a simple MIDI bass groove, to see whether we can give these MIDI performances a little extra life. I’ve created a few audio examples to accompany what’s written below, and you can find these on the SOS website at https://sosm.ag/cubase-0825.
Let The Lane Take The Strain
The new Play Probability and Velocity Variance lanes are available in both the Drum Editor and Key Editor windows. In both windows, you can toggle the display of these lanes via the pop‑open menu from the ‘+’ button located towards the bottom right. As for the note velocity lane, the Key Editor shows data for all notes in the MIDI clip, while in the Drum Editor, if you select a specific drum element (kick, snare, hi‑hat...) then you can see data just for that element.
In the Probability Lane, the probability that any given note will trigger on playback is determined by the value (height) of a vertical bar for that note, and this can be set between 100 (full height) and 0 percent. Each time the clip is played, these probabilities are applied. So, for any note with a probability less than 100, you’re essentially choosing a degree of randomisation. In the Velocity Variance lane, the values are initially set to zero (centred upon the line within the lane) and you can apply either positive or negative bias away from this on a per‑note basis. On playback, this then applies a degree of randomisation to the note’s velocity up to the maximum positive or negative bias you’ve set.
Used very subtly, both options can just add a degree of seemingly random variation as your MIDI clip loops during playback. However, if pushed too far and applied to every note, the coherence of the part can be lost. So, let’s consider some useful strategies to ensure that our efforts to inject a human feel also remain musical.
Changing Hats
Let’s start with one of the more obvious candidates: adding some character to a hi‑hat pattern. For example, the screenshot shows a two‑bar hi‑hat pattern in the Drum Editor. In the first bar, this is a simple 16th‑note pattern, while in the second bar the hits follow a 32nd‑note pattern. Some small amounts of positive or negative Velocity Variance have been applied throughout (so that the loop doesn’t sound too robotic on playback), but the hits placed on the 16th‑note grid are all set to 100 percent Play Probability. They will, therefore, always play, and thus ensure the pattern benefits from a consistent ‘core performance’.
That’s not the case with the 32nd notes in the second bar, though. These have Velocity Variance applied but they also have low Play Probability values. These start at around 10 at the beginning of the bar and reach about 35 at the end. On playback, therefore, each of these 32nd‑note hi‑hat hits have a relatively low probability of being triggered, but they’re more likely to be triggered towards the very end of the bar. The end result (which you can hear in the audio examples that accompany this workshop on the SOS website) is a variable degree of 32nd‑note syncopation that’s somewhat stronger at the very end of the two‑bar phrase. This can be really effective: a solid core to the part, but with some variations superimposed upon it each time playback cycles through the loop.
Don’t apply Play Probability to the core hits that give the drum part its foundation — instead, use it on ‘extra’ notes.
There are two general Play Probability strategies being combined in this example that make it more likely you’ll end up with a musically useful result, and they provide a useful starting point for your own experimentation. First, don’t apply Play Probability to the core hits that give the drum part its foundation — instead, use it on ‘extra’ notes. Second, don’t apply it everywhere. Focus on just a part of the overall pattern to give the variations themselves a sense of regularity. In this case, that’s achieved by the two‑bar structure (one bar played straight, the other with variations).
We can obviously apply these strategies to other elements of a drum part, and snare ghost notes (additional snare hits played softly and usually syncopated) are a case in point. Again, the core heartbeat of the kick/snare groove might be left intact, but additional snare hits, set initially with a lower MIDI velocity, can be placed within the pattern. These can then have some Velocity Variation applied. However, the key element is the Play Probability, and with suitable values you can control where these additional ghost hits are most likely to appear within the overall pattern. Again, I’ve provided an audio example (with some additional commentary) that demonstrates this in practice.
Accidental Bass
These same principles can be applied to instruments other than drums, and a good candidate is bass grooves. Again, a two‑bar looping pattern makes a good starting point and the screenshot shows the ‘after’ version. All the core notes of the performance have Play probability set to 100 percent. However, four additional ‘accent’ notes, placed in the second half of each bar, have been added to the part (you can hear both the ‘before’ and ‘after’ versions in the audio examples) and these have been given Play Probability values in the 30‑40‑percent range.
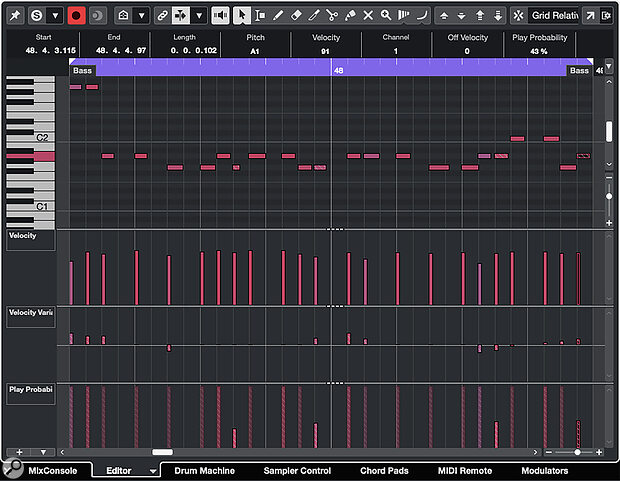 Play Probability can also be used to add accent notes to melodic instruments such as bass.
Again, the core notes of the pattern play every time, but these accent notes pop in and out as the pattern is looped to add some performance variety in the second half of each bar. You can obviously adjust when/where these notes might appear (for example, only in the final bar of a four‑bar loop) and how busy the effect might be (more added notes). Of course, exactly the same principles can be applied to other melodic instruments.
Rein In The Randomness
Both Velocity Variance and Play Probability are, essentially, randomisation processes, and although you can steer those processes with the settings you use, it’s kind of the point that some unpredictable details will appear within the performance. You create your core loop, add some randomisation elements, and then copy that loop multiple times to occupy suitable sections of your overall arrangement (a verse or chorus, for example) along the project’s timeline.
Of course, while the results can be great, and very musical, they’ll also be different every time you hit the playback button. There might be occasions when you are fine with this but you might not get what’s desired when you hit Export to generate your final mix. So, is there a way to ‘lock in’ the best results from your randomisation experiments? Yes! The Merge MIDI In Loop function (from the MIDI menu) lets you do just that. You can use different combinations of steps to achieve this, but a sensible approach is as follows...
 The Merge MIDI In Loop command lets you lock in the performance variations, as shown here using multiple copies of the two‑bar bass loop from the earlier screenshot.
First, duplicate the required MIDI/virtual instrument track (the ‘sensible’ bit; you can always go back to the original if required) and then solo that track. Second, place the left/right locators around the copies of the MIDI loop where you want to lock in the Velocity Variance and Play Probability settings. Third, from the MIDI menu, select Merge MIDI In Loop, and in the dialogue box that appears make sure to tick the Erase Destination button. When you then click OK, a single new MIDI clip replaces all of the MIDI loop clips.
If you then open that clip in the Drum or Key Editor, you’ll see that your randomisation elements have been applied, and the Velocity Variance and Play Probability values reset. You can then audition sections of this new MIDI clip to find the best performance variations your randomisation efforts have created and simply copy/paste these as required along the timeline to create your final performance, complete with all of its interesting human‑esque variations. Ta‑da! Your super‑cool performance additions and accents will now appear at the same points every time you play through your project.
Thursday, February 19, 2026
Wednesday, February 18, 2026
Cubase 14: Create Driving Bass Sounds
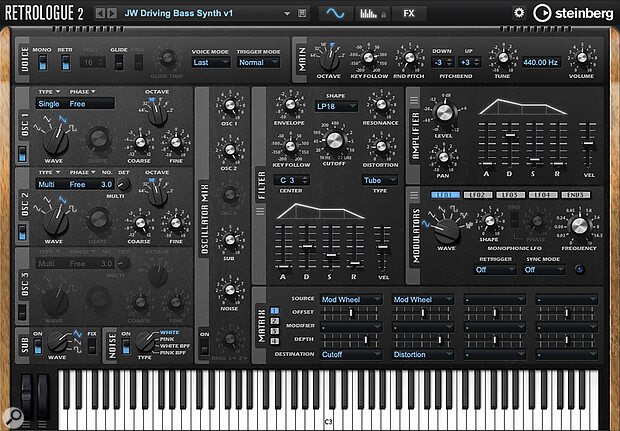 All the settings required for our Retrologue bass synth sound can be accessed from a single page of the GUI.
Explore the world of bass synth sound design with Cubase’s Retrologue and HALion Sonic.
Whether in electronic music or contemporary film, TV or game scores, powerful pulsing bass synth sounds are often used to drive the music or visual action along. If you want such a sound, you might get lucky searching for the perfect preset — but designing your own is not only satisfying, but will also ensure you get a sound that’s a perfect fit. It’s something that you can easily do in Cubase Artist/Pro’s Retrologue 2 synth plug‑in. And while Elements users could buy that synth separately, they already have access to HALion Sonic, which is more than capable enough for the job. So let’s get rolling some DIY driving bass synth sounds...
Bass‑ics
Bass synth patches come in all sorts of sonic shapes and sizes, so before we start we need a target in mind. We’ll aim for something that can provide a pulse‑like rhythmic element, and that perhaps suggests a fast attack and a short release, allowing short staccato notes to be played without a rapid progression of notes getting in the way of each other. I’d also like it to be dynamic. In this case, I’m thinking it should provide a solid (maybe slightly subdued?) low‑end tone for any low‑intensity sections of our project, but, while retaining that low‑end foundation, it should also be able to get more strident (maybe more aggressive?) when greater intensity is required. Finally, I’d like to be able to gradually transition between these two sonic characters in real time, which means we may need to include some velocity or controller‑based parameter modulation.
Retrologue 2 makes all of this mercifully straightforward. Indeed, all the settings I needed to create this sound can be seen in the first screenshot, and I was able to configure them without leaving the main Synth page of the GUI. So, let’s now break down just how I arrived at this configuration. And if you want to hear how the sound evolves through the stages I describe below, check out the audio examples that we’ve made available on the SOS website at https://sosm.ag/cubase-0925.
Solid Base
When you open a first instance or Retrologue 2, the ‘init’ preset starts you off with a single oscillator enabled and the filter section’s cutoff wide open. The first element of our target sound — that solid low‑end foundation — is easy to configure from here. In this case, I retained the sawtooth waveform for osc 1 (it’s more harmonically complex than a sine wave, but either could work), but turned the Octave control down one notch. I adjusted the amplifier ADSR settings to ensure a fast attack, a longer decay stage, and minimal sustain or release. Within the filter section, the most important thing was to adjust the cutoff to around 50Hz. But I also added a small amount of resonance and tube distortion, and made some adjustments to the filter envelope.
This combination of settings removed the mid/high‑end fizz from the sound, but I then opted to switch on the sub‑oscillator and adjusted its Mix control, just to blend in a little extra low end. I used the triangle waveform for this, as I liked the fairly smooth character this added to the low end.
Character Enhancer
That simple osc1 and sub combination provides the foundation for our ‘low intensity’ bass sound but, at this stage, it will likely be a bit lacking in character. It certainly isn’t going to get us into the ‘high intensity’ territory that we also want to achieve.
To start tackling that, I turned my attention to the second oscillator, osc 2. Again, I used a sawtooth waveform but, in this case, I pitched it an octave above osc 1, and applied a slight detuning (I used a combination of the Coarse and Fine knobs for this). However, I also set the oscillator type to Multi and used three voices, setting the Det (detuning between these voices) at a subtle 10 cents. If you open the filter fully and audition this oscillator on its own (as in the audio example), what it lacks in low end it makes up for with some gritty mid‑frequency drive, while the use of multiple, detuned voices adds some stereo width. Hold that thought for a minute...
That grit becomes much more subtle when the filter cutoff is brought back down to 50Hz. Then, I simply blended osc 2 into the mix with osc 1 and the sub‑oscillator. Without adjusting any other settings, it immediately adds an extra ‘analogue synth’ character: it’s warmer and with a nice touch of saturation, but without (yet) being super aggressive. For any ‘low intensity’ bass synth target, this should do very nicely.
As you move the mod wheel up, the filter opens, adding in more of that osc 2 grit... and more of the filter’s distortion.
Added Intensity
As noted above, osc 2 provides plenty of additional aggressive character that we can tap into to achieve our ‘high intensity’ bass tone. There are a number of routes we could explore, including changing the blend of osc 1 and 2. However, I opted for a little hands‑on control configured in Retrologue’s Matrix. Here, I set the mod wheel to modulate both the filter cutoff and distortion controls. Therefore, as you move the mod wheel up, the filter opens, adding in more of that osc 2 grit noted earlier, and more of the filter’s distortion.
You can tweak the two Depth sliders to taste but, as demonstrated in the audio example, we can already move from our solid ‘low intensity’ bass sound to a much more aggressive ‘high intensity’ sound, simply by adjusting the mod wheel position. Oh, and as an optional touch, you can also enable the noise oscillator for an additional sense of ‘angry’ that becomes more noticeable the further the filter is opened.
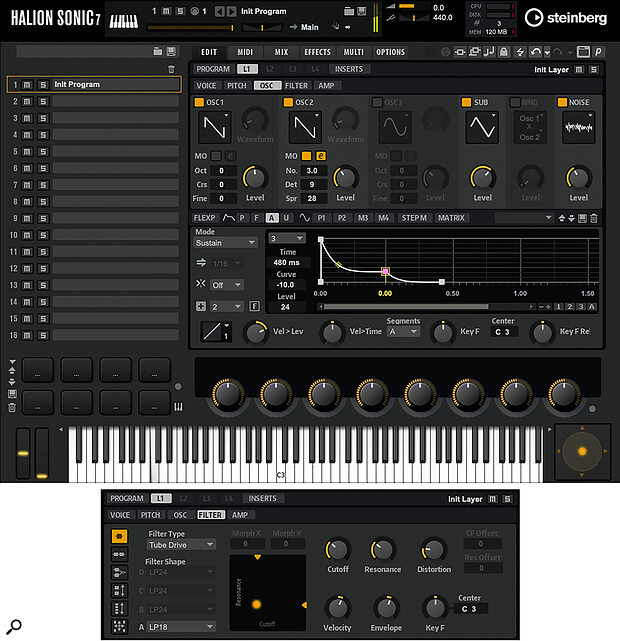 HALion Sonic provides all the options you need, but you have to dip into the oscillator panel, the amplifier envelope and the filter page to access them all.
Elemental Alternatives
Cubase Elements users can achieve something very similar to what I’ve described above in HALion Sonic (HS). However, unlike with Retrologue, which puts all the options you need in a single GUI page, in HS you do have to go digging a little. A useful first step is to initialise your first Program slot (right‑click on the slot and choose Init Program), to ensure you have a ‘blank’ slot to work in. HS Programs can consist of up to four sound layers, and the controls for each are accessed using the L1‑L4 buttons. With a layer selected, you get access to HS’s various synth engine parameters, spread across the Voice, Pitch, Osc, Filter and Amp panels. For our purposes, we need only one layer because (as shown in the composite screenshot) each one offers multiple oscillator options, much like Retrologue.
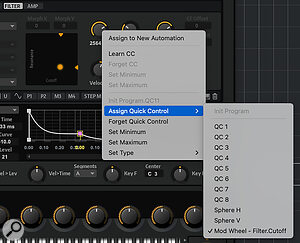 HALion Sonic’s Quick Control options allow you to configure the mod wheel to modulate between the low‑ and high‑intensity elements of our bass sound.To construct the basics of our sound, we must dip into three areas: the oscillator panel; the amplifier envelope (which can be edited below the osc panel); and the filter panel. The screenshot shows a composite of these different views, and across these three different panels you can configure something broadly similar to the Retrologue example, with two sawtooth oscillators (set to different octaves, slightly detuned, and with one using multiple voices), a sub‑oscillator and, optionally, a noise generator and a filter with tube distortion, with the cutoff initially set to roll off much of the mid/high‑frequency content.
Finally, we need to map the filter cutoff and distortion controls to the mod wheel. As shown in the final screen, this can be done by right‑clicking on each control in turn, and selecting the Assign Quick Control option, which includes the mod wheel option. Multiple parameters can be assigned to a single hardware control. Instead of a modulation depth option, from this same pop‑up menu you can also set the minimum and maximum values allowed for the target parameter. It’s also worth experimenting with the Set Type options; I found the Absolute option the most straightforward to use in this case.
Compared with Retrologue, configuring the combination of oscillators, filter settings and hands‑on modulation in HALion Sonic is a little more fiddly, since it requires you to visit multiple parts of the GUI. But it works! So, from a low‑intensity bass pulse to a high‑intensity, more aggressive bass‑driven rhythm, all versions of Cubase have a perfectly good set of tools for your DIY bass synth sound design adventures.