The latest update to Cubase sees Steinberg’s DAW embrace single-window working and integrated sampling.
For the fourth year in a row, Steinberg have delivered a major update to Cubase. Released on December 7th, Cubase 9 introduces new ways of working, new tools and many improvements. And, for the first time, new versions of Cubase Pro and Cubase Artist were released simultaneously, along with the entry-level Cubase Elements. Given that the installer is the same for Pro and Artist, I assume they might now just be the same application, with the licence on your Steinberg Key dictating whether the Pro or Artist functionality should be enabled. Either way, this will be a welcome step for Artist users, who no longer have to wait for the upgrade to become available after the Pro release.
To make things easy, I’ll refer simply to Cubase 9 when discussing matters applicable to both Pro and Artist, and state Cubase Pro 9 when describing features only available in this version. For a full comparison of what features are available in the different flavours of Cubase, including the Elements version, refer to Steinberg’s web site.
The first major change to note is that Steinberg have redesigned the Cubase icon. The familiar diamond and circle on a transparent background is now a less tinted red on a white background, with app-like rounded corners. This is in keeping with the icon for Steinberg’s recently released Dorico scoring application, and actually stands out a little better on my cluttered desktop.
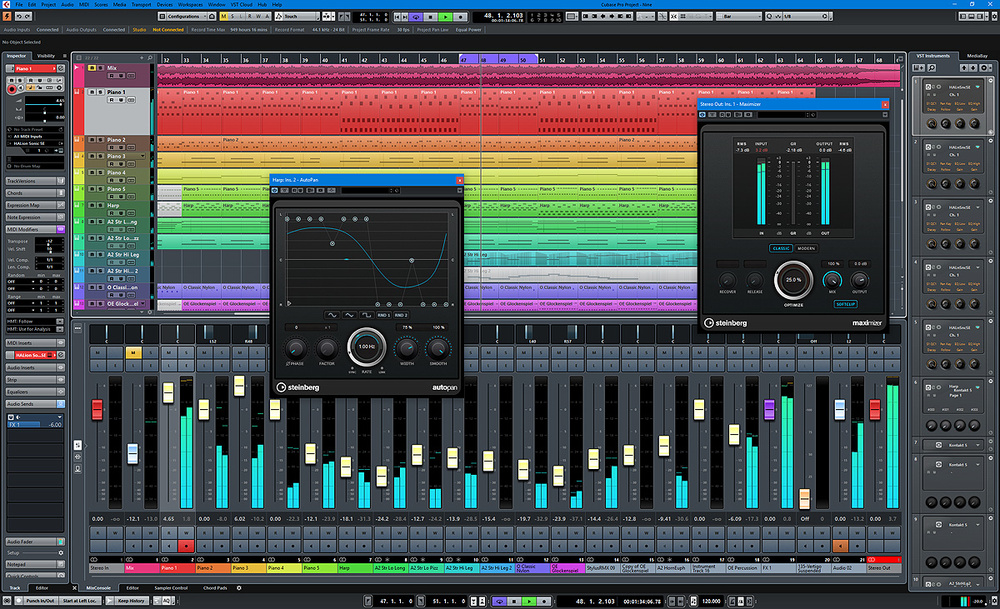
After installing and launching Cubase 9, I felt a little discombobulated when the Project window appeared for the first time. It’s basically the same Project window as before, but with a few immediately apparent changes: the core toolbar functionality is now centred rather than left-aligned, and a new Transport Zone (the same height as the toolbar) has been added to the lowest part of the window.
The toolbar is now split into three sections, with new left and right sections (justified left and right accordingly) joining the original toolbar controls. The left section contains the Project History buttons for undo and redo, which I’m sure I will never click, and, inexplicably and optionally, the Constrain Delay Compensation button. The Right section provides a new home for the Setup Window Layout button, where you can specify what parts of the user interface are displayed in the Project window from a pop-up. I find it slightly odd Steinberg decided to move this to the opposite side of the window from where it was previously located — the visibility buttons have been on the left-hand side of the window for nearly 15 years — but there we are.
When you click the Setup Window Layout button, you’ll notice the Inspector and Racks sections have been renamed Left Zone and Right Zone respectively, and the button itself is now part of a group of Window Zone Controls that provides dedicated buttons to hide and show the Left and Right Zones on the toolbar. One improvement to what is now called the Right Zone is that it can be made much narrower than before. Whereas it used to require 471 pixels of horizontal screen space, Cubase 9 reduces this to a much more reasonable 231 pixels, and what a difference!
The visibility of the toolbar sections can be toggled as before, and you can dismiss the new left and right sections by unticking the Left and Right Divider items when right-clicking on the toolbar or clicking the new Setup Toolbar button. And I should point out that this updated design for the toolbar has been applied to all windows that make use of them.
The Transport Zone provides a full implementation of the controls found in the traditional Transport Panel, except for the Arranger controls, and contains the same left and right dividers as the toolbar. It’s clearly reminiscent of recent versions of Logic Pro and Studio One, although, to be fair, Steinberg are far from the only developers in this market to be inspired by the competition. Being based on the Transport Panel, the Transport Zone features the same cryptic icons that were introduced in Cubase 8.5, along with the same ghastly vertical three-dot buttons to toggle how much detail is displayed for a control. My problem with these buttons is that I’m never sure what user interface elements I’m going to conceal or reveal.
Whether you’ll welcome the Transport Zone is completely dependent on how you work (or want to work). I’m so used to looking at the top of the monitor for the current song and timecode position that on a 30-inch display, my eyes feel as though I’m wearing a pair of old-fashioned reading glasses when I look at this Zone. But some users will undoubtedly find it helpful, and it does solve that ever-pressing philosophical question of where one should position the Transport Panel.
Joining the Project window’s Left and Right Zones is the new Lower Zone. In a sense, Cubase has had this Zone since the introduction of Chord Pads in version 8; but where this real estate was previously reserved only for Chord Pads, it can now also display other aspects of the interface, such as the mixer and various editors. Again, you might be reminded of other music and audio applications with interfaces that make a single-window workflow possible.
To display the Lower Zone, click the Show/Hide Lower Zone button in the Window Zone Controls section of the toolbar, or use the key command (Ctrl+Alt+E, by default). At the bottom of the Lower Zone is a series of tabs, allowing you to select what the Lower Zone displays, along with a slightly superfluous settings button that configures what tabs are displayed in the bar. If you get into working with the Lower Zone, you’ll probably want to use the key commands that are available to toggle the visibility of the Lower Zone with the specific interface you want to see, since this is much faster than showing the Lower Zone and then clicking the appropriate tab.
The Mix Console tab displays much of the Mix Console interface, and there are buttons on the left side that allow you to toggle the toolbar and set whether Faders, Inserts or Sends are displayed in the Zone. If you notice the interface becoming vertically cramped, you can resize the Zone by hovering over the dividing line between the Event Display and the Lower Zone until the mouse pointer changes to a resizing tool, and dragging upwards. You’ll find that the Lower Zone can be resized to almost eclipse the Event Display.
Next to the Mix Console tab is an Editor tab, which can display any of Cubase’s MIDI or audio editors, with the exception of the List editor — an implementation of which Steinberg should really add to the Right Zone, just like Logic Pro! When you double-click an event or part, Cubase 9 defaults to opening the appropriate editor in the Lower Zone, rather than in a separate window as before. And while some existing users might find this a little cheeky, it’s a good way to demonstrate the availability of this feature, and it can be changed if you don’t like it. You can also set whether the Open Editor commands open editors in the Lower Zone or a new window. This is set to Window by default and applies to both menu choices and key commands, but if you leave it this way you can still use key commands to open the different editors in the Lower Zone, as Steinberg have added extra commands for exactly this purpose. A nice touch when a MIDI editor is open in the Lower Zone is that a pop-up menu is added to the tab so you can easily switch between the different editors.
Now, you might be thinking that displaying editors in the Lower Zone is all well and good, but what about the Inspectors for these various windows, which do not appear in the Lower Zone interface? Well, Steinberg have thought about this, and the Inspector now features tabs at the bottom to switch between the Inspector for a track on the Project window and the Inspector for an editor. And, conveniently, the appropriate Inspector is automatically displayed depending on whether the Event Display or the Lower Zone has focus.
Last but not least is a really neat command called Link Project and Lower Zone Editor Cursors, which is available in the Key and Drum Lower Zone editors as a button on the toolbar, next to the Auto-Scroll button (it is also configurable as a key command). Its snappy name is somewhat misleading, since the Project cursor is always linked, wherever you adjust it; but what is really linked are the zoom factors and horizontal scroll position. This makes it possible to line up both the editor and Event Display precisely, and if you scroll or zoom in one part of the user interface, the other will be updated accordingly.
One reason I found this particularly useful is that it can be a workaround of sorts for a feature whose absence I’ve often lamented: the ability to see tempo, signature and marker tracks in the editor windows. If you divide the Track List and keep these tracks at the top, you can size the Lower Zone to a height that keeps them visible. It’s not perfect, but it’s better than nothing.
Whether or not the Lower Zone will be useful to you depends entirely on how you use Cubase, and how many displays are attached to your computer. For example, if you’re using Cubase in a multi-monitor environment, the Lower Zone probably won’t significantly change your habits. However, if you work with Cubase on a laptop or other single-display system, this is where the Lower Zone could make a big difference as, until now, a single-window workflow hasn’t been possible, and juggling multiple windows was never particularly fun.
Cubase 9 introduces the first new track type since VCA Faders were introduced in Cubase 8. Sampler tracks are probably the biggest new creative feature in version 9, and I think a large number of Cubase users are going to love them, particularly anyone involved in electronic music production.
There are two ways to create a Sampler track; the first, as you might expect, is with the Add Sampler Track command, but the second is to drag an audio event from the Event Display (or the Audio Pool or even the desktop) onto the Sampler Control page in the Lower Zone. Cubase will add a Sampler track to your Project that’s ready to play that piece of audio as a sample when triggered by a MIDI note, with Sampler Control showing the waveform and some basic editing controls. You can adjust the start and end points, as well as creating a fade in and out by dragging handles, much as you would for an audio event.
By default, the sample is mapped from C0 to C6 with C3 (middle C) being the root note, and you can modify these parameters by dragging the handles on the Sample Control keyboard. As with a classic sampler, playing a note above the root results in the sample being sped up to play at a higher pitch, and playing below the root slows the sample down. However, Sampler Control includes an Audio Warp mode that, when enabled, results in the sample being pitch-shifted so the speed remains constant even as the pitch is adjusted. And similarly, in the case of a loop, Audio Warp can be used to synchronise the tempo of the loop with the Project’s tempo.
Next to the Audio Warp settings are sections to adjust the pitch of the sample, a filter, and an amplifier stage. The pitch can be adjusted in semitones and cents, with a glide control that lets you specify the length of a pitch glide from the previous pitch played to the current. The filter offers multiple types (such as Tube, Classic and Clip) and shapes (LP24, BP12, HP6 and so on), along with the requisite cutoff, resonance and (where applicable) drive controls. Finally, the amplifier section offers volume and pan controls, as you might expect.
Each section has an independent envelope generator that can be edited by clicking that section’s Show/Hide Envelope. attack, sustain and release nodes are included, but you can add extra nodes to the envelope by double-clicking it, or change the shape by dragging between two nodes, and it’s even possible to set a playback mode. The default is Sustain, where the envelope is triggered once and sustained until you release the key; but there’s also a neat Loop mode where the envelope loops between the Attack and the Sustain Nodes until the key is released. While this seems to work just fine in the Pitch and Amp Envelope editors, though, it doesn’t seem to function for the filter envelope, where it would be probably the most useful.
Although these parameters can’t be mapped to a control surface or MIDI continuous controller in the Sampler Control interface, they are assignable to a track’s Quick Controls. When a Sampler track is created, Cubase automatically creates a default Quick Control mapping (filter cutoff, resonance, drive, and envelope amount, attack and decay, plus amplifier envelope attack and decay), although many more parameters are assignable, such as sample start and sample speed, which could be fun. And Sampler Control also features Read and Write Automation buttons on the toolbar, so you can create automation from directly within the interface.
In addition to the parameters discussed, you’ll find some additional settings for the Instrument on the Sample Control toolbar. You can set whether the sample should be one-shot, or choose from a variety of loop modes, and you can also set the sample to be fixed pitch, such that there is no transposition across the keyboard. Additionally, there’s a reverse mode, which I’m sure will get abused, and a monophonic mode.
Sampler Control always shows the Instrument for the currently selected Sampler track, or, if no such track is selected, a message inviting you to drop an audio sample on it. In addition to showing and hiding Sampler Control via the general Lower Zone controls, each Sampler track header has a button for setting and indicating what track is being edited in Sampler Control. I did find a tiny glitch here, though, because if the Lower Zone is hidden and you have a Sampler track selected, clicking the Sample Control button on that track’s header will indeed open Sample Control, but it will be empty — you need to click it again to show the actual Instrument. After that, everything works as expected.
In addition to being able to work with Sampler Control as a page in the Lower Zone, you can also open it in an independent window by clicking the Open in Separate Window button on the Sampler Control toolbar. I really wish there was a key command for doing this, which would be handy if you had the Lower Zone hidden, or perhaps clicking the track header’s Sampler Control with a modifier could do it? Also, it would be nice if this window could be ‘always on top’ like most other Cubase windows, and a Link mode so that it too reflected the currently selected Sampler track would be welcome. Finally, there seems to be a tiny anomaly in that the Show/Hide Amp Envelope button is missing when Sampler Control is displayed in its own window.
Instruments can of course be saved as Presets (via the toolbar), and it’s worth noting that these are track presets rather than the VST presets you might normally create in a plug-in. The reason for this is so a Sampler track preset can also include insert effects and other track-based settings. And if you explore the included Caleidoscope library for Sampler tracks, you’ll find that the majority make good use of inserts and EQ.
Should you wish to perform more complicated manipulations, Sampler Control lets you transfer the Sampler track Instrument to the included Groove Agent SE, or the full version of Groove Agent or Halion, if you have those plug-ins installed. Simply click the Transfer to New Instrument button on the Sampler Control toolbar, and if you select, say, Groove Agent SE, Cubase will automatically create a new Instrument track with an instance of that plug-in and with your Instrument loaded, which is rather nifty.
(A small visual bug I noticed was that, when triggering a Sampler track from an external MIDI keyboard, the on-screen notes on the Sampler Control keyboard stay highlighted, even after a note has been released. Clicking on the keyboard notes resets them.)
In the modern Cubase era, the program has offered multiple undo and redo for most editing commands, along with the ability to see and manipulate the history of your edits in the Edit History. However, not all actions performed in Cubase were undoable. For example, if you moved a fader on the mixer, this would not be recorded as an undoable action. This changes in Cubase 9, and Mix Console now has a dedicated undo/redo history of its own, which is completely independent from the existing undo/redo history.
 Mix Console now has its own independent history for mix adjustments. The orange line represents its current state.When you open Mix Console, you’ll notice it has undo and redo buttons left-justified on the toolbar, just like the Project window, although these are for the new Undo and Redo Mix Console Step commands. (You can also trigger these commands with the Alt+Z and Alt+Shift+Z key commands respectively.) To browse the history of mix steps, a new History tab is provided in the Left Zone. This lists each action performed with a detail on what was changed. For example, if you move a fader on a Channel called ‘Audio 01’ to -15dB, the history will record an action of ‘Audio 01 / Volume’ with a detail of ‘-15dB’.
In addition to being able to undo and redo one mixer step at a time, you can also drag the orange line representing the current Project state, upwards to move back through the history or forwards, just like in the normal Edit History window. Also, like the normal edit history, it’s worth noting that the mix history isn’t saved with the Project. I don’t think that’s a bad thing, though, since it would likely create colossal Project files if the history was included.
Not every mixer action is recorded in the history, since there are certain controls like mute and solo that you’re more likely to use for checking things rather than as part of a mix. The following Mix Console parameters are recorded: level and pan adjustments, filter, gain and phase changes in the Pre rack, insert plug-in modifications, EQ, alterations on the Channel Strip rack, modifications on the Sends rack, and, in Cubase Pro, changes to the Cue Sends and Direct Routing racks.
There are many plug-in-related changes in Cubase 9, and now that Cubase is only available as a 64-bit application, Steinberg have decided to end support for 32-bit plug-ins. This means that the VST Bridge is no more, and while I’m sure this will frustrate some who have that favourite old plug-in that never made it to the 64-bit world, I think this is a sensible step forward. I never found running 32-bit plug-ins via VST Bridge a particularly satisfying experience, although you may be able to work around its absence with third-party solutions such as Vienna Ensemble Pro.
 The Plug-in Manager now features a third tab for plug-ins that have been blacklisted by the Plug-in Sentinel.To enforce this change, and to guard against potentially unreliable plug-ins, Cubase 9 also includes the so-called Plug-in Sentinel, which, for some, may be as overbearing as it sounds! The Plug-in Sentinel was first introduced in Dorico where, by default, it allowed only VST3 plug-ins to be used, admitting only VST2 plug-ins that were on a whitelist supplied by Steinberg. Although this list was user-editable (just about), only plug-ins on the originally supplied whitelist were officially supported.
Thankfully, Steinberg haven’t taken such drastic measures in Cubase 9, and it’s still possible to use VST2 plug-ins without having to declare them on a whitelist. However, the Plug-in Manager now includes a third tab for plug-ins that have been blacklisted by Plug-in Sentinel. Plug-ins are included on the blacklist if they crash whilst being scanned by Plug-in Sentinel (which happily, doesn’t crash Cubase); while blacklisted plug-ins are unavailable to use by default, you can manually re-enable them at your own risk. The only plug-ins that cannot be re-enabled are of the 32-bit variety.
Mac users may notice some plug-ins being blacklisted that have always worked fine, and the reason for this, according to Steinberg, is that they “found a problem in OS X 10.11 (El Capitan) and previous versions which cause plug-ins compiled with an older Objective C Runtime version to become unstable”. Apple have apparently fixed the problem in Mac OS Sierra, but the only solution for those running on an earlier OS is to get updated versions of the affected plug-ins from the developer.
Two plug-ins that shouldn’t end up on the blacklist are the new Frequency and Maximizer effects. Frequency is a very precise EQ that is only available with Cubase Pro and offers eight fully parametric bands. Each band can be a low shelf, peak, high shelf or notch, with the first and last bands adding five additional cut filters offering 6, 12, 24, 48 and 96 dB/octave slopes. You can also specify whether each band operates in stereo, dual mono, or Mid/Sides mode. Linear phase operation can be enabled on a per-band basis, and each band has a handy button to invert the current gain value, so you can sweep a boost to find the offending frequency and then switch it to attenuate instead.
Frequency’s user interface is clear and functional, showing a piano keyboard across the frequency range. When a band’s frequency is within a given pitch, that piano key is highlighted with that band’s colour, which is a nice touch. And, as you hover the mouse over the EQ curve area, a crosshair appears, along with a box to report the gain and frequency of the current mouse position, the closest note pitch and by how many cents it is off. A spectrum display shows an FFT analysis, and you can either disable this or view it as a 60-band bar-graph.
Maximizer is a loudness maximising plug-in of the type commonly used for mastering, but has its place in other situations as well. Two modes are provided called Classic and Modern. Steinberg say that Classic is “suited to all styles of music”, where Modern is “particularly suited for contemporary styles of music”, whatever that means! Classic mode has controls to set the percentage of loudness optimisation, and whether or not to soft clip the signal to give it a tube-like warmth. The Modern algorithm adds two more to adjust the release time and the recovery time, which allows for a faster signal recovery at the beginning of the release.
Although it’s not a new plug-in, AutoPan might as well be thought of this way. Where its predecessor had just four simple controls (Rate, Width, Sync and the choice of two waveforms), the Cubase 9 incarnation is considerably more flexible. The waveform has 14 adjustable points; there are three presets to get you started (Sine, Triangle and Pulse), along with a random mode that generates a random waveform, and a random continuous mode, where a fresh waveform is generated every cycle. There’s a smooth control for the waveform, and also a weird Link mode that modulates both the left and right channels simultaneously, which creates a pulsing effect rather than an auto-pan.
Steinberg have also applied the design of the new and updated plug-ins to Brickwall Limiter, Compressor, Envelope Shaper, Expander and Gate. (Maybe they could take a look at Chopper next?!) The design of Steinberg’s plug-in user interfaces has been steadily improving over the last few years, and I think they’ve finally hit upon an appearance where the plug-ins — cliché alert — look as good as they sound!
The last plug-in-related improvement is the ability to enable side-chain inputs for compatible VST3 instruments, allowing you to route the output of an audio track through the processing of an instrument plug-in. Currently, as far as I know, the included Retrologue synth is the only plug-in that yet supports this.
Cubase 9 is one of those versions that might, on the surface at least, not seem as exciting as previous updates. But as you begin to delve into the new features and improvements, you start to uncover the level of depth that people have come to expect from Steinberg. Some of the new features are admittedly very specific, so existing users will only see benefits where Steinberg have tackled something applicable to them. The Lower Zone, for example, is great for laptop users, but less so for multi-monitor workflows. And the (admittedly brilliant) Sampler track is something that users will embrace or find irrelevant. However, something as seemingly unexciting as Plug-in Sentinel will benefit everyone if it succeeds in making Cubase more stable by excluding errant plug-ins, and if one looks at Cubase 9 from the perspective of the whole application, Steinberg’s Advanced Music Production System continues to be an impressive and sophisticated offering.
Cubase is now a 64-bit-only application and, on the Mac, is officially compatible with macOS Sierra (10.12) and OS X 10.11 (El Capitan). As with Cubase 8.5, Windows users can be running Windows 7, 8.1 or 10.
One slight disappointment is that Cubase is still not DPI Aware on Windows (and presumably not Retina-aware for Mac users, although I couldn’t check this), and I thought about copying and pasting the exact same complaint from my Cubase 8.5 review to labour the point, but that would’ve seemed a little lazy. Nonetheless, the point remains that an increasing majority of laptops and monitors now feature high-resolution displays, and it would be nice if Cubase could appear a little crisper on them.
A particularly interesting new feature in Cubase Pro 9 is the ability to create multiple Marker tracks. It’s now possible to have a maximum of 10 Marker tracks in a Project, although only one can be active at any given time. The active Marker track is indicated and set by a new Activate button on the track header, which is symbolised with a tick icon. And it’s the active Marker track that’s used for transport navigation (the Locate Next and Previous Marker Key Commands, for example) as well as the Cycle Markers available in the Export Audio Mixdown window. You can also manage multiple Marker tracks in the Marker window, via a new Track pop-up menu in the toolbar that lets you select and edit the active Marker track.
Initially, you might wonder why having multiple Marker tracks would be useful, but I think there are many different circumstances where this could come in handy. For example, if you’re recording a song with different instruments and people, you might want to have one Marker track that represents the overall song structure, and then create additional Marker tracks whilst recording and editing the vocals, guitars, drums and so on. The possibilities get even more interesting if you’re working on a cue for a film or TV show, since you could have one Marker track set to Linear time base representing key frames in the video, and another set to Musical time base to represent the musical form of the cue.
Steinberg seem to have made an unusual slip with the documentation for “Working with Multiple Marker Tracks”, as it describes using key commands to activate the next and previous Marker Tracks in an example featuring a narrator and dialogue sections. The accompanying screenshot is Nuendo’s Marker window, which features ADR functionality, and so I wonder if this section of the manual is here by mistake. For one thing, Cubase doesn’t have those key commands, which seems a shame, as I imagine they would be quite useful.
One thing that’s a little bizarre about Cubase 9 is that the program’s documentation is no longer installed automatically. So whereas in Cubase 8.5, pressing F1 would open the PDF Operating Manual, in version 9 you now get an alert saying that the manual could not be found — and, indeed, if you look inside the Cubase 9 folder in Program Files / Steinberg on Windows, or within the application package on Mac OS, there is no longer a Documentation folder.
However, the documentation does exist, and if you visit www.steinberg.help, you can download the PDF manuals or browse the online help. And if you create a ‘Documentation’ folder in Cubase 9’s program folder on Windows, or in the Contents folder of the application’s package on Mac OS, and copy the PDF files to this destination, F1 will once again work as normal and open the Operation Manual.
Unfortunately, the Operating Manual is now the only element of the documentation that can be opened within Cubase. Whereas the first item in the Help menu used to be a Documentation submenu for accessing the various PDF manuals, there is now a single item called Cubase Help. I found that on my Windows system, selecting this item performed no action whatsoever; however, on my Mac (and indeed another Windows system), this item opened a web browser to display the online help for Cubase, so this must have been an issue with my system.
Pros
- Sample Control makes it easy to create simple, sampled instruments.
- The Lower Zone improves the workflow for single-display systems.
- Having an independent undo/redo history for Mix Console is handy.
Cons
- Still no way to see tempo and time-signature tracks (or indeed one or more marker tracks) in the Key Editor.
- A few minor issues to iron out.
Summary
Cubase 9 again moves the application forward with user-interface improvements that might seem familiar from elsewhere, and some impressive new tools to satisfy both creative and technical needs.
Test Spec
- Steinberg Cubase Pro 9.0.1.
- HP Z800 workstation with dual Intel Xeon X5690 processors, 48GB memory and Nvidia Quadro 6000 graphics, running Windows 10 Pro.
Published March 2017
 Cubase’s Drum Editor, with a simple drum pattern that’s been ‘humanised’ via a little velocity editing and some subtle timing tweaks via the Quantize panel.
 EDM snare roll anyone? This is easy to create with the Drum Editor toolset.
 and the standard ‘diamond’ note display, shown in the other screenshots.") The Show Note Length button allows you to toggle between a Key Editor-style display (shown here) and the standard ‘diamond’ note display, shown in the other screenshots.
The Show Note Length button allows you to toggle between a Key Editor-style display (shown here) and the standard ‘diamond’ note display, shown in the other screenshots. The ‘Create Drum Map from Instrument’ option will interrogate your VSTi and attempt to populate your Drum Map with a full list of the drum sounds in the current preset.However, Groove Agent (including GA SE) now includes lots of presets that don’t just contain conventional drum sounds — there are also loops, such as synths, guitars and bass samples that are part of the ‘kit’ and can be triggered via a MIDI note. These loops might be many beats or bars in length, so the Drum Editor’s default of short note lengths, and no ability to see the note length, can be a problem when programming by hand. Switching to the new Note Display option solves that.
 If your drum pattern only uses a few sounds, the ‘Show Drum Sounds with Events’ option can tidy up the Drum Editor display considerably!

 variations also added for the snare and kick hits.")