By John Walden
 My initial programmed drum pattern — not exactly full of ‘feel’!
Cubase has all the tools required to add a human feel to your programmed acoustic drum parts.
Last month (http://sosm.ag/cubase-0117), I took you through the MIDI Drum Editor’s core features, its enhancements since Cubase 8 and its links to Groove Agent SE, and touched on how the Drum Editor can help ‘humanise’ programmed parts. As this last point is really significant for non-drummers, this month I’ll discuss various other ways to make your programmed performances more realistic.
Adjust In Time
I’ll use a pattern I programmed using the MIDI Drum Editor, as described last month. If you decide instead to ‘play’ the initial pattern in via a MIDI keyboard or drum pads, then (aside, perhaps, from some initial quantising) the subsequent steps could be very similar. My preference is to start with patterns that are at least eight bars long, as this helps to reduce obvious repetition. In the example, I’ve opted for a simple eighth-note hi-hat pattern, with a classic rock-style kick and snare. It’s a solid enough groove, but it doesn’t sound very ‘human’.
To transition our pattern from ‘robot’ to ‘human’, we need timing and velocity variations. For timing, we can manipulate two elements: first, we can emulate the swing or groove that a human drummer supplies, where notes are deliberately pulled/pushed against the ‘grid’; and second, we can add random timing variations to mimic human ‘imperfections’.
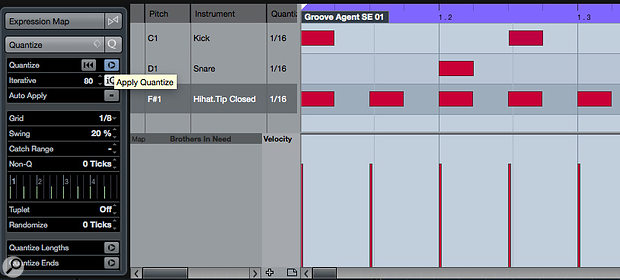
 The Drum Editor’s Quantise Panel can be used to add a subtle groove to the programmed pattern.
To explore swing/groove, start in the MIDI Drum Editor’s Quantise Panel. Once you’ve selected the drum hits to which you want to apply some swing, there are several interacting settings to be aware of. I set Grid to 1/8, as most of the hits in my pattern were placed on eighth-note intervals; the chosen setting is reflected in the Drum Editor’s grid display. Adjust the Swing setting, and you’ll see the grid display start to change, with alternative off-beat grid lines moving. Hit the Quantise button and the notes will align to this new grid. The strength with which they’re ‘magnetised’ to the new grid can be moderated by engaging the Iterative Quantise option and adjusting the Iterative Strength value. A more powerful option is the Groove Quantise feature — see the article in SOS July 2012 if you wish to explore that further: http://sosm.ag/cubase-groove-pt1. As mentioned last month, you can also add random timing variations using the Quantise Panel, but I’ll discuss a more sophisticated approach later.
Varied Velocity
As with timing variations, there are a number of potential levels (no pun intended) at which velocity variation can be created. You can select a drum lane in the Drum Editor and adjust the individual velocity of each hit by hand — this doesn’t take long if you’re working with only a few patterns, and allows you to accent specific beats to change the rhythmic feel. I’ve done this in the screenshot example, and my manual velocity editing also included the few ‘decorative’ snare hits in bars four and eight. In bar four, low velocities were applied to the ‘ghost’ notes while the very simple snare roll was given higher velocities, with a ‘ramp’ towards the end of bar eight. Try to avoid simply duplicating these ‘human’ touches; copy your finished pattern and then apply further tweaks to the copies.
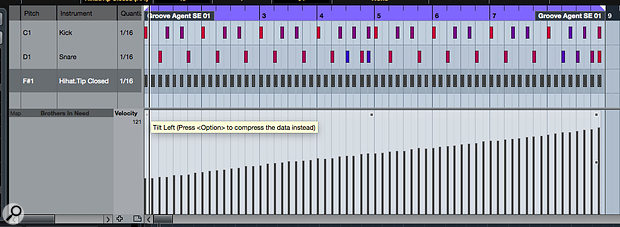
 Some basic manual editing, as shown here for the hi-hat lane, can be used to further emphasise the accented hits within a pattern. Note the colour (velocity) variations also added for the snare and kick hits.
Logical Editor
For subtle random variation to timing and velocity, Cubase has just the tool: the Logical Editor. As Mark Wherry described in SOS January 2006 (http://sosm.ag/cubase-0306), this is essentially a MIDI equivalent of your word processor’s ‘search and replace’ tool. You configure filter ‘conditions’ to select certain MIDI notes/events (including by position, pitch and velocity) and transform the selection by applying actions (including changing the velocity or note position settings). Some Logical Editor presets are provided (they’re in the MIDI menu), but none is ideal for our purposes, so we need to open the Logical Editor itself.
There are many options, but the screenshot illustrates what’s possible. In the upper-most panel, I’ve defined the filter conditions to select exactly what I want from my MIDI part. I’ve used two conditions. The first indicates that I’m looking only for notes (Type is, Equal, Note). The second selects notes based on a specific position — I’ve used the ‘Outside Bar Range’ condition and set parameter 1 and 2 to 0 and 22 (shown in MIDI ticks; you can set them manually or by dragging in the Bar Range/Time Base column). This second filter selects all notes except those on beat one. Notes on beat one are therefore excluded from any changes I ask the Logical Editor to apply.
For illustration, I added two ‘actions’ in the next panel. For any selected note, the first applies a random position adjustment of between -5 and +5 MIDI ticks. The second applies a further random adjustment of -5 to -10 to the ‘Value 2’ parameter — for note objects, ‘Value 2’ is MIDI velocity. (This is explained on page 899 of the Cubase Operation Manual, along with some other useful details.)
 The Logical Editor can be a bit intimidating but it is a powerful MIDI editing tool and great for adding subtle random timing and velocity variations to programmed drum parts.
The final action required is setting the Function value to Transform. Then, when I click the Apply button, the Filters tell the Logical Editor which notes to select, and the Operations apply the specified changes to the selected notes; hey presto, your robot drummer should now sound a little bit more human. The Undo button will rescue you if you don’t like the results, and you can save your Logical Editor settings as a preset for use the next time you need to add a bit of ‘random’ to a drum pattern.
In practice, I tend to use separate Logical Editor presets to randomise note position and note velocity, as this gives you a little more control over proceedings. Given the principles outlined in this example, though, there are all sorts of other ways to humanise your drum pattern, including systematically increasing notes that fall on (or close to) the beat and changing velocities for one specific drum. Given that a Logical Editor configuration can be applied to multiple patterns in an instant, this is potentially a massive time saver.
Down The Lane
You can apply some further, very easy, tweaks in the Drum Editor’s velocity lane. As in the Piano-roll Editor, once you select some notes (in the example screenshot I’ve selected just the hi-hats) and hover your mouse in the note velocity lane, four tiny control nodes appear, and each of these offers another MIDI data-editing option.
 Here, just to illustrate the principle of the available tools, I’ve tilted the hi-hat velocities from left to right, but these ‘node’ tools can be very useful for quickly adjusting the velocity dynamics of your drum parts.
For example, the top-centre node adjusts the relative values of MIDI velocity for all selected notes. This is useful for song-level adjustments. For example, patterns used in a louder chorus section can have their note velocities increased easily, while those in the more laid-back verse sections can be made more restrained. The nodes top-left and top-right allow you to ‘tilt’ the velocity data, which can be great if you want to simulate a drummer gradually playing harder or softer. The mid-right node allows you to scale the velocity data around the centre value, which is useful for fine-tuning a previously created velocity ramp.
If you also hold down the Opt/Alt key while grabbing the top-left/top-right nodes, you have the option to either compress (by dragging down) or expand (by dragging up) the range of the velocity data. The effect is not quite the same as applying an audio compressor to the drum sound but it does provide a very neat way to reduce or augment the performance ‘dynamic’ within the pattern.
Like it or not, virtual drummers are a fact of life for many recording musicians, and while efforts to make that virtual drummer sound ‘human’ are only one small step towards giving your tracks that elusive ‘all natural’ vibe, hopefully this workshop shows that this is at least one small step that’s very easily taken in Cubase!
Published February 2017
No comments:
Post a Comment