Here's how to set up your own hardware–controlled channel strip in Cubase.
Softube’s Console 1 system (http://sosm.ag/jun14console1) is an excellent idea. Having hands–on control over channel selection and standard channel–strip plug–ins can make navigating a mix much easier than with a mouse. And using a standard set of plug–ins on every channel means you’re freed from the burden of choice, which can waste so many of your precious mixing minutes.
You’re forced to use Softube’s (admittedly excellent) plug–ins, though — you can’t use Cubase’s bundled plug–ins or any other third–party ones you’ve invested in over the years. That got me wondering if I could create my own channel strip in Cubase, based on whatever plug–ins I wished to use, and control it using one of my existing MIDI control surfaces. While my solution may not rival the elegance of Console 1, I did find a way to do precisely what I wanted using nothing but Cubase 7.5’s Generic Remote facility, my chosen plug–ins and a Behringer BCR2000 MIDI controller. In this article, I’ll explain how you can configure your own channel strip and controller.
The aim is to create a Cubase project template. It will feature a standard channel strip on each of the mixer’s audio channels. We’ll use Cubase’s Generic Remote facility to map the BCR2000 so that it can select channels, and have a common set of hardware controls for tweaking various parameters on the currently selected channel. We’ll also consider setting up some other things, such as send–effects routing.
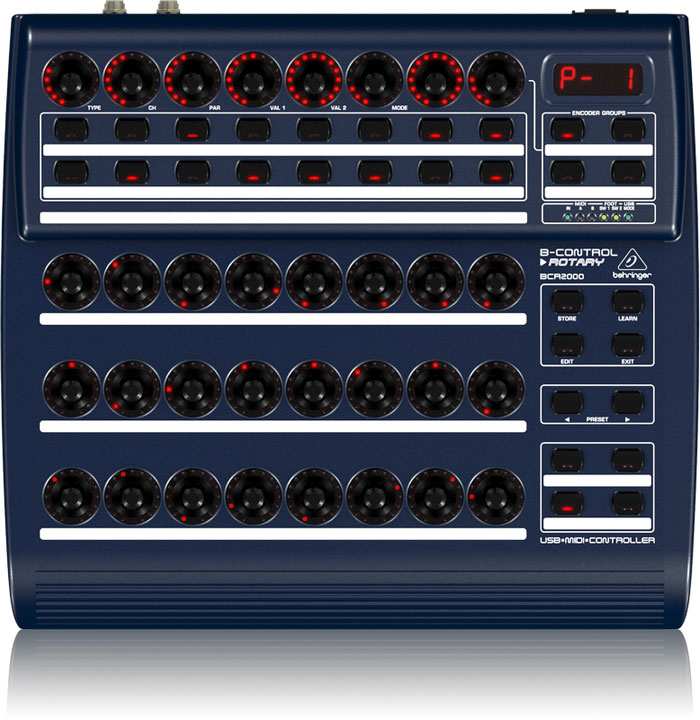
Why did I choose the BCR2000? Partly because it was to hand, and partly because it’s inexpensive. But a few things make it particularly handy. As it boasts so many physical controls, you can assign plenty of functions to a single button press or knob turn, and the less you have to think about switching from one bank of controls to another, the freer you are to get on with the mix.
Complete control of a channel strip’s functions can use up a lot of controls very quickly — count the knobs and switches on the Waves SSL channel-strip plug–in and you’ll see what I mean. You can always be more selective in which parameters you want to access with your controller but, as a rule, the more controls to which you have direct access in one controller preset, the better. If your controller has only a handful, check the manual to see if there’s a way to scroll to different banks or presets. You may be able to assign the controller to an EQ in one mode, and press another button to have it control the dynamics section, for example, allowing you to control a more comprehensive ‘strip’ than at first you’d thought possible. and decide which parameters you’d like controlled by which hardware controls. I found it helpful to add labels in an imaging program, so I could work from that when setting up the Generic Remote.") The first step is planning: choose your channel–strip plug–in(s) and decide which parameters you’d like controlled by which hardware controls. I found it helpful to add labels in an imaging program, so I could work from that when setting up the Generic Remote.
The first step is planning: choose your channel–strip plug–in(s) and decide which parameters you’d like controlled by which hardware controls. I found it helpful to add labels in an imaging program, so I could work from that when setting up the Generic Remote.
The BCR2000 offers useful types of control: there are many continuous rotary encoders (32 in total) and assignable buttons (20) and eight of the encoders double up as buttons to add to that tally. The BCR2000 can receive parameter information back from Cubase and all the encoders are circled by LEDs so they can indicate the current parameter value on the selected channel. Rotary encoders are far better suited to our task than the analogue pots and faders used on cheaper controllers — a knob or fader that has a fixed start and end point can cause problems when switching from one channel to another with different settings, as the hardware control will be in the wrong place! Novation, Mackie and Icon make or have made suitable alternative controllers, and they’re not alone. Pretty much anything with a combination of motorised faders or rotary encoders and buttons will do.
By default, the buttons on the BCR2000 generate MIDI notes (they can be programmed to transmit other data if you prefer). This means you could try this out with any MIDI piano keyboard or drum pad, particularly if it also features encoders and/or moving faders.
The other thing you’ll need, other than a copy of Cubase, is to decide on the plug–in(s) to employ in your standard channel strip. To keep things simple, I’ll use just one (Waves SSL E–Channel) but you can choose as many as you have insert slots available. Bear in mind, though, that keeping things in a single plug–in (such as a Neve or SSL channel-strip emulation) means you only have one plug–in GUI to open and close, which makes it easier to see all the key channel parameters at a glance. It also means you need only a single button to open and close it.
With your controller (to make explanation easier I’ll assume you’re using a BCR2000) hooked up to your computer, fire up a blank Cubase project and go to Devices / Device Setup / Remote Devices and select Generic Remote. If a Generic Remote is not visible in the list on the left, click the ‘+’ sign to add one, then select the BCR2000 from the MIDI Input and Output drop–down menus.
Saving a Generic Remote file is not intuitive — you’d think that hitting ‘Apply’ would do the job. While that updates the details for the current project, it seems (on Cubase 7.5.2 running on Windows 7 64–bit, at least) not to get recalled when closing and re–opening the project. Instead, all of the settings are stored in XML files which you must Export to save your settings. Do that now, so you have a backup of your starting point, and call it ‘generic–default.xml’ or some such. We’ll use the same approach later to save the changes we make to a different XML file. You can create as many XML files as you wish, which means you could create a virtual Neve strip, a virtual API one or whatever alongside the SSL one. You just need to create a project template with the right plug–ins and import the correct XML file in the Generic Remote.
While setting things up, you’ll be opening and closing the Generic Remote Editor frequently, so I suggest creating a keyboard shortcut to open the Device Setup window. I found that Alt–D (D for Device) was easy to remember and wasn’t allocated to anything else.
Now to make the control names in the top half of the grid meaningful. In the Control Name column type in names for each control you wish to use, and when done you can delete any surplus rows to avoid confusion. For example, for my BCR2000, I added two entries for the dual–purpose encoders 1–8, one for ‘rotate’ and another for ‘push’. Then I added one entry each for the other encoders, and one for each button. If you value your sanity, do this in an ordered, logical way, and make a note of which button/knob/fader is called what. I found it useful to download a picture of the BCR2000, open it in an imaging application and add text labels so I could figure out what I wanted where.
When you’re done labelling, you need to allocate a hardware control to each row in the upper table. This sort of thing was tedious back in the day, but the Generic Remote’s MIDI Learn facility makes it easy. Make sure the Learn tickbox is ticked, then click in the Control Name column in the first row, and twiddle/press the corresponding control. Cubase will fill out most of the information for you, including the control type, MIDI channel, note and value range. However, it will not put any data in the Flags field. This field determines whether you want Cubase to ‘see’ signals from any given control and/or feed back the parameter value so it can be displayed on the BCR2000. You want both the Receive (on by default) and Transmit flags to be enabled — the first means Cubase will detect data from that control, the second that it will send channel–parameter information back to the unit, to allow the LED rings to reflect the current value, for instance. In the upper table all controls need to be set to Receive in the Flags column, and if you want your rotary encoders’ LEDs to reflect the current channel’s parameter value, you’ll need to set it to Transmit too.
You’ll need to go through and do the same for each and every hardware control you wish to be able to use, but I’d suggest getting one control up and running and controlling the desired parameter first, as if you get anything wrong at this stage it’s a lot of work to unpick! It’s also a good idea to untick Learn when editing the Flags field — I tended to forget it was on when I was working things out, and inadvertently assigned the wrong control several times! When you’ve got one control working, hit Export to save your Generic Remote as an XML file so you don’t lose your work.
To use the Generic Remote as a channel-strip controller, you’ll need to place the same plug–in(s) in the same insert slot(s) on every channel. You’re also going to need to create an audio channel for each track you’re going to want your controller to be able to select. So if you want to use your controller to be able to select 32 channels, you’ll need to create 32 audio tracks. If you don’t do this, you’ll find that the option to select those channels is not available in the relevant Generic Remote menu, and that’s the only reason you must create them now; you can, if you wish, delete surplus channels later, before saving your project template. When it comes to creating a real project based on this template, you can either save a channel preset and recall it for new channels, or just duplicate existing channels.
Click OK to close the Generic Remote window, create an audio channel and insert your chosen plug–in(s). I put the SSL plug–in in insert slot 2 so that I’d have slot 1 free for any corrective work — a de–esser, perhaps, or a more surgical EQ to nix bothersome resonances — without having to move the SSL plug–in to a different slot (and thus break communication with the BCR2000). I then created another 31 channels (you can create fewer or more if you wish — it really depends on what sort of material you’ll be working on) and dragged and dropped (while holding Alt) the SSL plug–in to copy it to the other channels’ insert slot 2. By enabling all sends in your project template, you won’t need to switch them on or off to make use of your dedicated hardware send controls.
Next, I selected all the channels in the mixer (click on the left–most one and shift–click the right–most, engage Q–link at the top of the mixer) and enabled all the effects sends on all channels, but left the actual send values at zero. This makes it possible to assign each send level to a specific knob on the BCR2000 for the selected channel, without having to think about enabling or disabling the send. The idea is that you create up to eight (you may not need or want that many) effects channels as your standard send effects. For example, you might want a short and long reverb and delay, a widener patch, a parallel distortion and so on — the choice is yours. There’s nothing to stop you creating more effects tracks and having different sends for each channel — you’ll still have direct access to the send level. But having a basic set of standard send effects can be a useful time saver.
So, you have Cubase recognising your controller, and you have your channels, standard processors and sends set up in a project. Now it’s time to start assigning plug–in parameters to the BCR2000’s controls. This is done in the lower table of the Generic Remote window, the row names of which match those you created in the top table earlier. While the upper table tells Cubase what information is coming in, the bottom one tells it what controls to issue to your project when a knob is twisted or a button pressed.
Each entry in the Device column needs to be set to VST Mixer. There are other options in this column that you can explore, which give access to transport controls, key commands, macros and so on, but as I already have most such things assigned to keyboard shortcuts, I didn’t want to tie up the controls on the BCR2000 unnecessarily. The three other columns you’ll need to tweak are Channel/Category, Value/Action and Flags. To make your control act only on the current channel, you need to set the channel category in the lower table to Selected. For channel–selector buttons, you’d choose the relevant channel instead.
Click in a cell in the Channel/Category column to access the drop–down menu. For anything associated with the channel strip (plug–in parameters, send levels and so on) set this to ‘Selected’ so that the control signal will only affect the current channel. In a similar fashion, specify the plug–in parameter you wish to control via the Value/Action drop–down list. This process is tedious if you use a mouse — I found typing in the search filter at the top much speedier. For example, typing ‘Inp’ whittled the list down to the InputLevel parameter for the Waves SSL plug–in on insert slot 2, and pressing enter assigned that row’s control.
For rotary controllers, you don’t want anything selected in the Flags field. I found that things were set to Push Button and Toggle by default so I had to deselect these — failure to do so will lead to some strange behaviour of your plug–in controls. As the push buttons are MIDI notes, though, they need to be set to Toggle. That way, each note–on command toggles the status of a button on your plug–in, rather than engaging it momentarily.
 You’ll probably find that you need to set the commands from any buttons to Toggle in the lower table. If rotary encoders are set to toggle, they’ll go from zero to maximum — worth bearing in mind when troubleshooting!As far as the plug–in control is concerned, that’s pretty much it. You just decide which parameters you want which hardware controls to govern, select them in the table, and away you go. Do the same to give you control over the channel FX Send levels. And remember to export your XML file to save your work (boring advice, I know, but repeating it might save you lost hours!).
So far, you’ll only be able to control the plug–in when it’s instantiated on the currently selected channel, but ideally you’ll want to be able to select that channel via the BCR2000’s buttons. If you’ve not done so already, repeat the process for assigning controls to the plug–in via MIDI Learn, so that Cubase can ‘see’ the hardware buttons. This time, in the bottom half of the Generic Remote window, we don’t want to operate on the Selected Channel — because we’ve not yet selected it!
Set the Device value for the control to VST Mixer, the Channel/Category value to the desired audio track (as I mentioned earlier, you have to have created the tracks already if you wish to be able to select them here), the Value/Action field to Selected and the Flags to Push Button and Toggle. Press Apply, and your button should now select the specified channel. Repeat the process for as many channels as you have buttons for. On the Behringer BCR2000, I assigned the two rows of eight buttons at the top of the unit to the first 16 channels.
That’s not a huge number of channels for a mix is it? Fortunately, the BCR2000 has buttons that allow you to scroll from one controller ‘preset’ to another — for each preset, you can assign the buttons to a different set of 16 channels. The beauty of this is that all those controls that you routed to parameters on the currently selected channel needn’t change. All you need to do is make sure that the buttons are operating on a different MIDI channel in each preset (hold Edit, press the button and twiddle the ‘Ch’ knob). Once done, you can map the second bank of 16 buttons to select channels 17–32, the third to 33–48 and so on. Sixteen channels multiplied by 16 presets (one for each MIDI channel) gives you up to 256 channel–selector buttons if you need them.
If you have a controller with fewer controls that supports this preset/bank switching, you could use one preset for your EQ, another for compression, another for tape saturation, and so on, or you could assign one preset to control your send–effect chains. You’re only really limited by your imagination.
If you have any controls left over, you’ll want to assign one to the channel pan control too. You don’t really need to control the Cubase mixer channel gain or fader levels if using the SSL plug–in, as that has its own input and output level controls, but you could do so if your chosen plug–ins lacked this. If you want to map things like Cubase channel mute and solo (I already had keyboard shortcuts for this sort of thing, so chose to leave BCR2000 buttons free for other functions) you can find these commands in the Value/Action column. The Read/Write enable commands might be worth setting up if you’re going to use your controller to record automation. If you really want to go to town, I suggest investigating the options in the Device list.
When you’re done, export your XML file one last time, then save your Cubase Project as a Template. Create a new project from your Template. If you followed my instructions to the letter, everything should be working perfectly — but I bet you have missed something somewhere! Here’s a quick guide to some of the niggles I encountered.
Making plug–ins appear in a standard place on the screen for all channels is fiddly as, while Cubase remembers the last place the plug–in GUI was placed, it does so separately for each channel. The only route I found to achieve this was to manually drag the instance for each track to the same place (eg. top–left of the screen) for each and every channel and not move it again. Instead, assign a BCR2000 button to the task of opening and closing the plug–in window on the selected channel. If your channel strip combines several different plug–ins, though, this is a pain. And it’s similarly annoying if you decide during a mix that you’d rather all instances appeared in a different place.
I neglected to restore my BCR2000 to its factory default settings before embarking on this adventure, and I found on occasion that I’d inadvertently set up two different controls to govern the same MIDI parameters on the same channel. That caused some head scratching at the time! If you encounter this, it’s pretty easy to track down the offending controllers by scanning the Address column in the uppermost table of the Generic Remote window for the same values.
I tracked several problems down to having deselected the toggle function when it should have been selected or vice versa. I also neglected to set the Flags field for the controller to Transmit in the top part, to get the LED visual feedback working properly. And, try as I might, I couldn’t find a way to make the buttons’ LEDs light when the parameter was active. Not that I found that to be a huge problem, but do let me know if you figure out how to do that!
Annoyingly, I found that using the full resolution of the rotary encoders meant that once I’d moved a parameter away from it’s default position, I couldn’t return to it using the BCR2000, although I could using the mouse. That’s fine for some parameters, but not for all. If it’s a problem, the trick is to reduce the range of the control very slightly by limiting its input value to 126 instead of 127 (in the Max Value field in the upper table in the Generic Remote window). This enables you to return to a neat and tidy zero/unity using your knobs.
One pleasant surprise was that the two subtly different–sounding versions of the Waves SSL plug–in (the E–Channel and the G–Channel) both worked with the same Generic Remote setup, so I was able to use whichever I preferred on any channel, and mix and match mono and stereo versions without having to re-map things.
With the right control surface, the options are pretty much endless. I’ve found that working with a standard strip like this can save a lot of time and dithering (not in the technical sense of the word!) while mixing. And, as I invariably find that I do at least the first pass of my mixes better when working quickly, it’s been well worth me spending the time I’ve taken to set this up. Now I just need to resist the temptation to build a hundred different channels and Generic Remotes!
Published January 2015
 Use a ‘spare’ audio, FX or Group channel to host your ‘VCA Master’ instances of BC Gain — but be sure to choose the stereo version of the plug‑in.
 1. In the MixConsole, Alt–drag and drop the second plug–in instance to copy it to any other channels you want to be part of the same VCA group. All of the plug-in’s settings will be copied, including the Group assignment. In this way you can quickly assign several channels to a single VCA group.
 Link the VCA Master instances of BC Gain to a MIDI channel’s fader, either using MIDI Learn, or programming the values by hand. Setting the plug–in’s Control Max value to +20.2dB results in a more useful gain range and near–unity position.Second, you might have noticed that the MIDI protocol’s 0–127 settings are causing a couple of issues: by default, the ‘zero’ point (ie. no gain, no attenuation) lies somewhere in between values 63 and 64 — your plug–in’s gain control can be set to +0.47 or –0.47 dB, but not unity. There’s no getting around the resolution of the MIDI fader itself, but you can tweak how the BC Gain plug–in responds. I found that restricting the maximum gain to 20.2dB (leaving the minimum at –60) gave a more useful control range that placed an almost no boost/attenuation position (–0.01dB) of the MIDI channel fader at about the same place (MIDI value 95) as unity gain on the regular audio channel faders, leaving you with around 20dB of gain and 60dB of attenuation available. What’s more, if you make sure you create and set up all of your VCA Master instances of the BC Gain plug–in first, and only add new instances as you need them for each channel, the grouping will be relative — so as it loads at unity by default, you’ll always be able to return to that value by placing your MIDI fader at 95. Neat!
 offset on the Master instance, the knob on the channel instance can be set precisely to 0.00dB gain/attenuation. Assigning the channel instance on the same group as the master means it, and any other instances in the group, will be controlled by your MIDI Fader.") Despite the slight (–0.01dB) offset on the Master instance, the knob on the channel instance can be set precisely to 0.00dB gain/attenuation. Assigning the channel instance on the same group as the master means it, and any other instances in the group, will be controlled by your MIDI Fader.
Despite the slight (–0.01dB) offset on the Master instance, the knob on the channel instance can be set precisely to 0.00dB gain/attenuation. Assigning the channel instance on the same group as the master means it, and any other instances in the group, will be controlled by your MIDI Fader. Mixer to create a dedicated VCA mixer, which you can assign its own shortcut key (‘V’ for VCA, perhaps?).") You can use the Visibility controls of Cubase’s second (or third) Mixer to create a dedicated VCA mixer, which you can assign its own shortcut key (‘V’ for VCA, perhaps?).With all these extra channels and instances, your project can soon start to feel very cluttered. You could, if you wished, abandon the MIDI faders and use your VCA Master channel’s Quick Controls to govern the VCA group master levels. Personally, I prefer to have the option of having the VCA faders in the MixConsole. You can take advantage of Cubase’s multiple mixers, though. Go to Devices/MixConsole 2 (you can assign a keyboard shortcut to this). Use the mixer’s Visibility function (on the mixer’s left, or revealed using the mixer’s Setup Window Layout icon, top left, if hidden) to hide all channels except those you wish to see. This doesn’t affect what you see on the main MixConsole, but on MixConsole 2 you can see only your dedicated VCA controls. In the Project page, you can hide all these MIDI channels inside a collapsed Folder track if you wish.
You can use the Visibility controls of Cubase’s second (or third) Mixer to create a dedicated VCA mixer, which you can assign its own shortcut key (‘V’ for VCA, perhaps?).With all these extra channels and instances, your project can soon start to feel very cluttered. You could, if you wished, abandon the MIDI faders and use your VCA Master channel’s Quick Controls to govern the VCA group master levels. Personally, I prefer to have the option of having the VCA faders in the MixConsole. You can take advantage of Cubase’s multiple mixers, though. Go to Devices/MixConsole 2 (you can assign a keyboard shortcut to this). Use the mixer’s Visibility function (on the mixer’s left, or revealed using the mixer’s Setup Window Layout icon, top left, if hidden) to hide all channels except those you wish to see. This doesn’t affect what you see on the main MixConsole, but on MixConsole 2 you can see only your dedicated VCA controls. In the Project page, you can hide all these MIDI channels inside a collapsed Folder track if you wish.


. Grove Agent ONE has a similar function.")


 and decide which parameters you’d like controlled by which hardware controls. I found it helpful to add labels in an imaging program, so I could work from that when setting up the Generic Remote.")


