Welcome to No Limit Sound Productions

Company Founded
2005
Overview

Our services include Sound Engineering, Audio Post-Production, System Upgrades and Equipment Consulting.
Mission
Our mission is to provide excellent quality and service to our customers. We do customized service.

Monday, July 20, 2026

Cubase Pro: Folder Tracks and Group Channels in v15.0.20

 By John Walden

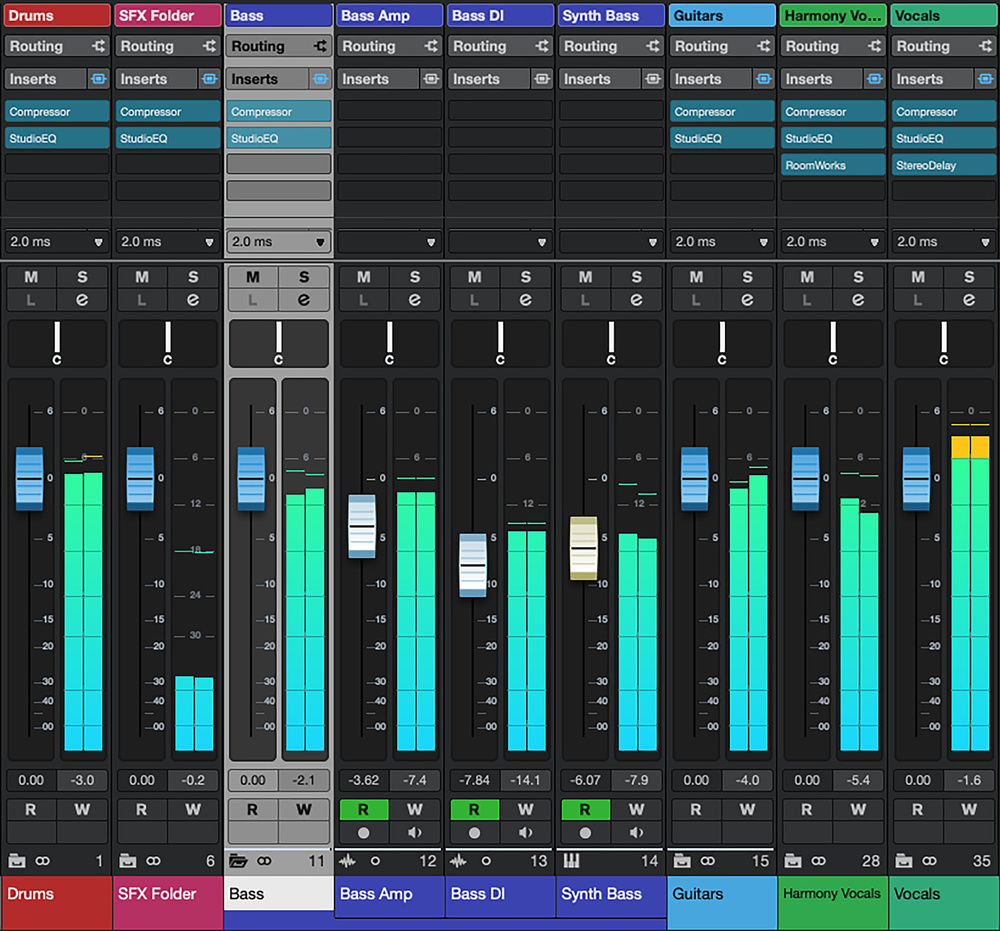
The new combined Folder/Group tracks/channels now appear within the MixConsole and can be opened (as the Bass Folder is here) or closed, providing genuinely useful additional channel visibility options as track/channel counts rise.The new combined Folder/Group tracks/channels now appear within the MixConsole and can be opened (as the Bass Folder is here) or closed, providing genuinely useful additional channel visibility options as track/channel counts rise.

Could the new Folder Track features in Cubase help you better organise your projects?

Once a Cubase project’s track count starts to grow, two of its track types can be really helpful in keeping things organised, efficient and under control: Folder Tracks and Group Channels (or, as labelled in the Operation Manual PDF, ‘Group Channel Tracks’!). The former are essentially just containers that let you organise tracks in the Project window, and quickly control their visibility. The latter provide all the features of a standard audio‑carrying channel (inserts, sends, EQ, the Channel Strip etc) but also help you organise the audio routing in more complex projects, allowing Cubase’s MixConsole to emulate the audio subgroup concept of a traditional hardware mixer. Putting both to full use makes managing more complex projects a whole lot easier, but both have been around for quite some time now...

Groups Meet Folders, Folders Meet Groups

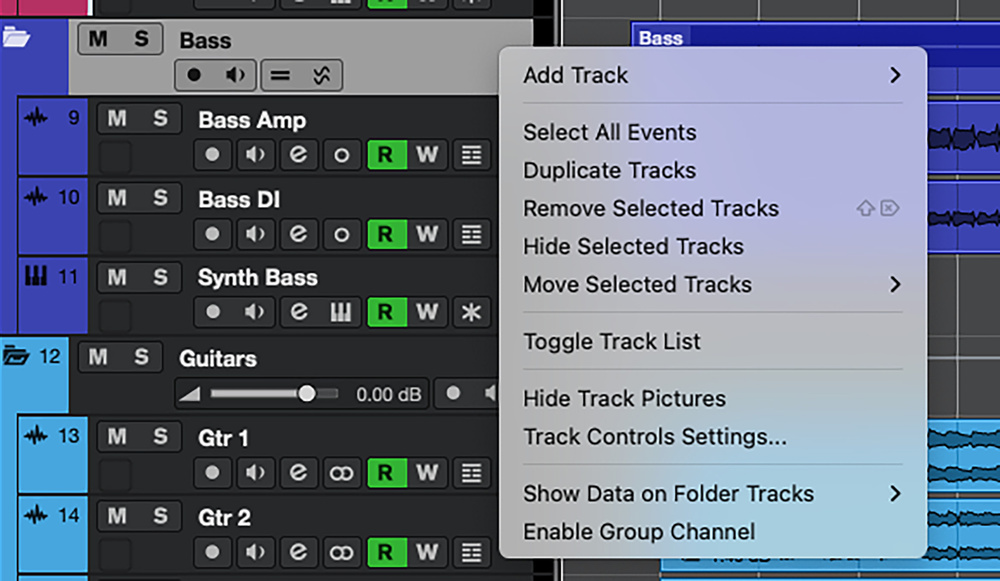
In the recent Cubase 15.0.20 update of Cubase Pro, Artist and Elements, though, Steinberg sprang a bit of a surprise: it’s now possible to merge the functionality of Folders and Groups into what you might think of as a ‘super‑Folder’. It’s optional, so the tried and trusted options are still available, but now, when adding a Folder Track to your project (as shown in the screenshots), you have the option to enable Group Track‑like capabilities for any Folder you create. You can also add this capability to existing Folders, of course.

If you have an old‑school Folder within your project, the Enable Group Channel option lets you easily convert it to the new format.If you have an old‑school Folder within your project, the Enable Group Channel option lets you easily convert it to the new format.

This combined Folder/Group Track option is a feature some users have been requesting for years, probably because a number of other DAWs already facilitate such an approach, so it’s great to see it in Cubase. So, with ‘Folders As Groups’ now official A Thing, let’s consider what it can do for your project management and workflow — and whether there are any catches.

Convenience (In) Store

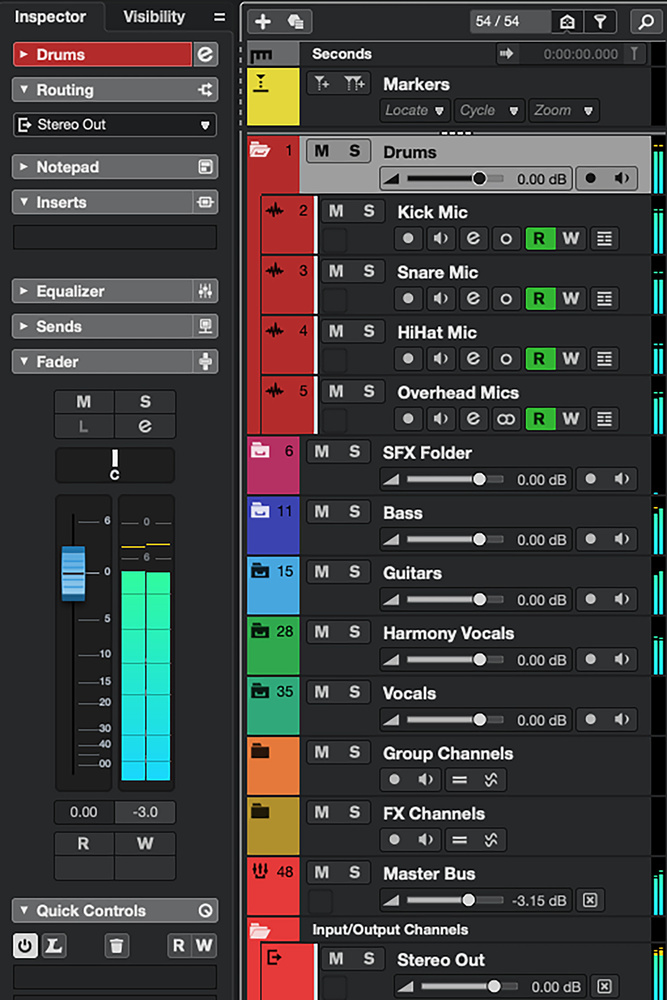
The new Folders can be opened/closed as before within the Project window’s Track List but, as shown within the Inspector panel, they now also have full audio capabilities.The new Folders can be opened/closed as before within the Project window’s Track List but, as shown within the Inspector panel, they now also have full audio capabilities.

As soon as your track count requires vertical scrolling of the Project window’s Track List, the convenience of using Folders is abundantly apparent. Whether the new Folder type or the old ones, probably the most obvious strategy is to add one for each subset of your tracks (drums, bass, guitars, keys, vocals...).

With the appropriate tracks placed in each of your (sensibly named) Folders, you can use them in the Project window for the Folder’s long‑standing primary...


Published July 2026

Friday, July 17, 2026

Cubase Pro: Reference Tracks

Cubase offers various options for comparing your mixes with reference tracks.

When Sample Magic announced that they'd soon stop supporting their Magic AB plug-in, some of you asked me to recommend other mix-referencing tools. Several plug-in options exist, including Mastering The Mix's Reference, Melda's MCompare, and ADPTR's Metric AB, but you may be able to do what you want using Cubase alone...

Simple A/B'ing

Cubase's Pro's Cue Sends can be used to monitor your reference tracks via the Control Room without the signal flowing through your project's master stereo bus — but while this side-steps any bus processing, it also skips the loudness metering, and it uses up one of only four available Cue Sends.Cubase's Pro's Cue Sends can be used to monitor your reference tracks via the Control Room without the signal flowing through your project's master stereo bus — but while this side-steps any bus processing, it also skips the loudness metering, and it uses up one of only four available Cue Sends.An obvious approach is to put references on a track in your mix project and align the clips with the relevant parts of the arrangement. If you don't use master bus processing, this can work well: keep the reference track muted, and when you solo it, it will play and all the other tracks will be muted. But if you use master-bus processing, as many of us do, you don't want to apply this processing to your references. There are a couple of ways around this.

One is to create a second stereo output in the Studio/Audio Connections window and route your reference track to that. This bypasses the processing but now your references aren't reflected on the master-bus loudness metering. If that's important to you, you could use a Group track as your master bus, and route that and your reference track to the default stereo output (on which you put no processing).

Right On Cue

Cubase Pro's Control Room offers an alternative. Although (curiously) the Control Room doesn't allow you to select different output busses, you can monitor artist cue mixes, and can route your references to one of those. Go to Studio/Audio Connections, make sure the Control Room is activated, and in the Control Room tab hit Add Channel. Select Add Cue, create a stereo Cue Mix with a meaningful name (eg. 'Reference'), and leave it routed to no output.

Again, you'll need a track in your project to host your reference tracks. Set its output to No Bus. Strangely, there's no option to display the Cue Mixes in the Track Inspector, so to send your reference track to your Cue Mix you'll need to open the track's Channel Settings window (you'll find Cue Sends in a tab adjacent to the regular sends) or the MixConsole (if Cue Sends aren't there make them visible via the Racks drop-down). Enable the Reference send and set it to unity gain. In the Control Room section of the mixer, next to the main Mix button, you'll see a button marked C1 (for Cue Mix 1). With your mix playing, hit C1 to toggle between monitoring your reference track and your mix project. If you go to Edit / Key Commands and search for Cue 1 On/Off, you can assign a keyboard shortcut to this action.

It's pretty slick, but there are a couple of down sides. First, Cubase gives you a rather meagre ration of Cue Mixes — you have a maximum of four in your project — which could be problematic if you need them for another purpose. Second, Cubase's master-bus metering continues to tell you what's happening in your mix while you listen to your references — so if you want to match the loudness of the reference to that of your mix (as you should) you'll need a separate loudness meter on your reference track, which is a bit of an inconvenience.

Although (curiously) the Control Room doesn't allow you to select different output busses, you can monitor artist cue mixes, and can route your references to one of those.

The Logical Approach

The Project Logical Editor can be used to create a  handful of basic 'building block' commands to use in Macros (see below).The Project Logical Editor can be used to create a handful of basic 'building block' commands to use in Macros (see below).What if you want to meter what you're listening to on Cubase's master meters? Here's an approach that uses Cubase's powerful Project Logical Editor (PLE) and Macro facilities. We'll use these to automate both the 'simple' A/B mute/solo approach described above, and the bypassing of the master bus processing. As with other approaches, you'll need to create a track for your references, but this time leave it and your mix routed to the main Stereo Out. Name this track 'Reference' and mute it.

Next, we'll make four simple PLE presets to use in our Macro. A little quirk of Cubase is that you need to be in the Project page to access the PLE (I have no idea why!). From here, go to Project / Project Logical Editor. The PLE can appear daunting, but we can just customise an existing preset. I started with the 'Visibility — Show Tracks containing Drum in the Name' preset. In the top section, change the second row's Condition from 'Contains not' to 'Equal' and change Parameter 1 from 'Drum' to 'Reference'. The bottom section tells the PLE what action to perform, so change the Operation from 'Hide Track' to 'Solo'. That's your first PLE preset done, so click on the + icon at the top to save this as a new preset called 'Reference — Solo'.

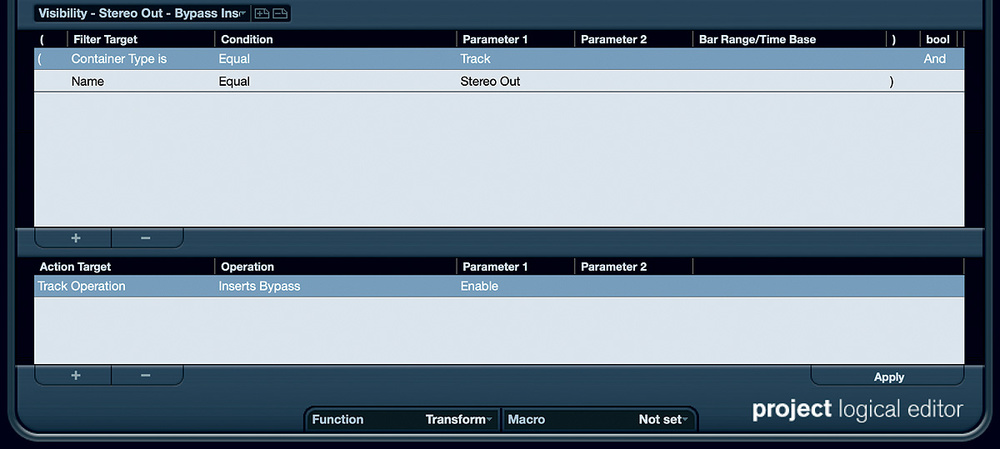
Next change the Operation from 'Solo' to 'Mute' and save it again, this time as 'Reference — Mute'. With the same PLE window still open, in the top section, change the second row's Parameter 1 from 'Reference' to 'Stereo Out', and in the bottom section change the Operation to 'Inserts Bypass'. Save this as a preset called 'Stereo Out — Bypass Inserts'. Finally, change Parameter 1 in the bottom section from 'Enable' to 'Disable', which does the reverse (it will reactivate the Stereo Out bus's inserts) and save this as 'Stereo Out — Activate Inserts'.

These simple Macros run the Project Logical Editor presets and bypass the master-bus processing whenever the reference track is soloed. This way, you  always have access to the built-in metering of the master stereo bus, but the bus processors will act only on the mix you're working on, not the reference track.These simple Macros run the Project Logical Editor presets and bypass the master-bus processing whenever the reference track is soloed. This way, you always have access to the built-in metering of the master stereo bus, but the bus processors will act only on the mix you're working on, not the reference track.Finally, we'll stitch these presets together using a pair of Macros that we can assign keystrokes. Go to Edit /Key Commands and open the Macro window at the bottom. Hit the New Macro button, and label your Macro 'Reference Track — On'. In the upper pane's search bar type 'Process Project' to take you to the relevant folder (I find this quicker than scrolling). Open this, and locate the PLE presets you just created. Select 'Stereo Out — Bypass Inserts' and hit the Add Command button. Then select 'Reference — Solo' and hit the Add Command button again. Create another new Macro called 'Reference Track — Off' and add the commands 'Reference — Mute' and 'Stereo Out — Activate Inserts'.

You'll find your two new Macros in the Macro folder in the upper pane, and here you can assign them shortcut keys. Sadly, I've been unable to find a way to toggle between the two Macros with a single key command, but I did find easy to remember shortcuts: Ctrl+R for 'Reference Track — On' and Shift+Ctrl+R for 'Reference Track — Off'. It's worth mentioning that I'm on a Mac, so the Ctrl key may be assigned to different functions on Windows, but you get the idea. Now, with your mix playing back, hit Ctrl+R to switch to your references, and Shift+Ctrl+R to switch back to your mix.

Checking reference mixes with this technique can be performed using just a  couple of key commands.Checking reference mixes with this technique can be performed using just a couple of key commands.Note that this won't work if you have other tracks soloed in your mix, or any automation of the master fader. If the solo issue really bothers you, put the 'Deactivate All Solo States' command at the beginning of your 'Reference Track — On' Macro, though note that you'd have to re-solo things when you switched back to your mix. Note also that you won't be able to take advantage of Cubase's Solo Defeat Mode. On the plus side, you can use Cubase's loudness metering to make sure your reference is at the same level as that particular part of your mix (using clip gain on the references is the best approach), and thus ensure that you're making objective comparisons.

Decisions, Decisions...

While none of these options for monitoring reference tracks and clips is perfect, they can all work pretty well if they fit your own workflow. Each one offers different pros and cons — hopefully there's a tactic here that will do the job for you.


 Published July 2019

Wednesday, July 15, 2026

Cubase Pro: Audio Alignment & ADR

 By John Walden

Screen 1: The Audio Alignment Panel, primed to tighten up a  double-tracked vocal part.Screen 1: The Audio Alignment Panel, primed to tighten up a double-tracked vocal part.

Cubase Pro 10's Audio Alignment Panel can do more than just deliver tight backing vocals!

The new Audio Alignment Panel (AAP) was one of Cubase 10's most eye-catching new features — it allows you to align the timing of two (or more) audio clips almost instantly, by automating its AudioWarp and Hitpoints/Slices facilities. What was previously a time-consuming manual chore now takes just a few clicks. It holds obvious appeal for working double-tracked lead vocals and stacked backing vocals, but it can also be useful in some other scenarios, as I'll show — but let's start with the obvious...

On The Double

Screen 1 (red waveforms), above, shows a section of a double-tracked lead vocal. The waveform (and audio examples below) show that the singer actually did a pretty good job, but there was scope for improvement — and the AAP allowed us to tighten things nicely.

Open the AAP (from the Project window toolbar or via the Audio menu), select the audio clip that will act as your Reference (timing master) in the Project window, and click the '+' button for the Reference entry in the AAP. The track's name should appear. Repeat this for the Target clip (the audio whose timing you wish to adjust to match the Reference). In this example, that's our second lead vocal take.

For double-tracked vocals, the Match Words option is best; the AAP will use AudioWarp to stretch/compress the Target to more closely match its timing to that of the Reference. You can also set the Alignment Precision, which is similar in concept to quantising (higher values produce a more precise timing match). I chose 100 percent, which could be extreme for some styles, but if you take things too far you can simply undo the processing once applied. Experimenting with the Alignment Precision in this way makes it super-easy to find the setting that sounds the most musically appealing. And that's it. It takes just a few clicks and a few seconds. Typically, no further manual tweaking will be required, but you can move the AudioWarp markers by hand as normal if you feel the need to tweak any little details.

Well Stacked

Screen 2: Aligning multiple backing vocal tracks at once.Screen 2: Aligning multiple backing vocal tracks at once.

The same principles apply when dealing with more parts, as with stacked backing vocals. Screen 2 (blue) shows five vocal takes and, as before, I've identified my Reference take. But this time, I've selected and added multiple (four) Target clips. If you do this and then click Align Audio, all targets will be time-corrected relative to the Reference clip in a single operation. Again, experiment with the Alignment Precision — in this case, I opted for 80 percent, which struck a nice balance between tightness and a natural sound.

In my experience, with a reasonable vocal performance as a starting point, the AAP produces a very good result nine times out of 10. If you find that you do need to go in and manually tweak an AudioWarp marker or two, don't get frustrated: just try and remember just how much time you've saved overall!

Read My Lips

Another common application for the AAP is Automatic Dialogue Replacement (ADR), a common practice in film/TV post-production. The idea is that less-than-perfect on-set dialogue is overdubbed and replaced in a studio, but with timing correction applied so that lip-sync with the picture is maintained. There are specialist software tools for this task (notably Synchro Arts' Revoice Pro 4, reviewed in SOS April 2019), but if you can't justify the additional outlay, is the Audio Alignment Panel worth exploring?

Screen 3: Although it doesn't quite match Revoice Pro for high-end professional ADR duties, Cubase's AAP is still capable of great results.Screen 3: Although it doesn't quite match Revoice Pro for high-end professional ADR duties, Cubase's AAP is still capable of great results.

Screen 3 (purple) shows a typical case, with a section of on-set spoken dialogue (the top-most track, recorded with a boom mic and with background noise) and a version of the same dialogue recorded in more ideal studio conditions, to be used as a replacement (the middle track; no correction yet applied). As indicated by their respective waveforms, the replacement dialogue is not a disaster, but still there's scope to tighten the timing.

In the AAP, the on-set dialogue acts as our Reference and the studio version our Target. I experimented with different Alignment Precision settings and also with engaging the Prefer Time Shifting setting. The latter is well worth exploring if your voiceover artist is particularly good to start with, as it does less time stretching/compression and more slicing and moving — so, in theory, it ought to sound cleaner. In this case, despite my less-than-average voiceover skills, the default AAP settings did the best job.

One other option worth trying is to split the Target audio into separate clips for each distinct phrase and then process these independently. While this takes more time — and in this case it didn't really seem to bring any great benefits — it could be a useful approach when faced with just a few stubborn phrases.

The bottom-most track shows the AAP-corrected dialogue. The shifts in the waveform transients, while modest, are easily seen and heard; on the whole, the result is a much tighter match to the timing of the original dialogue. Would it satisfy the more exacting demands of a sound editor on a Hollywood film? Perhaps not. But for most of us it's certainly a huge time–saver, even if we find ourselves making the occasional manual edit.

Guitar's The Star

Vocals aren't the only source that's commonly double-tracked. Guitars are another popular candidate; in fact, in some genres (metal springs to mind) they can often be quadruple-tracked. A really good player can pull this feat off without breaking sweat, but us mere mortals might need a little help to get the same super-tight result. In principle, it's no different from tightening vocals, but if the part is busy, or the sound overdriven, or if the player uses techniques such as palm muting or slides, it's not difficult to imagine Cubase struggling to determine where the AudioWarp markers should sit. So, is the AAP a viable option here?

Screen 4: It might be primarily intended for vocal alignment, but the AAP can also work well on other instruments, such as double-tracked guitars.Screen 4: It might be primarily intended for vocal alignment, but the AAP can also work well on other instruments, such as double-tracked guitars.

In Screen 4 (green) there are again three waveforms. Top and middle are the original, unprocessed, double-tracked guitar parts (a grungy riff followed by a short chord sequence) and, as the marker positions indicate, the performances were not a million miles apart but the note/chord transient positions are consistently different. The bottom track shows the result of applying the AAP to the middle track, using the top one as a Reference. While some transients don't line up perfectly with the Reference, the match is certainly closer — and if you check out the audio examples, you'll hear that the riff section in particular feels much tighter.

Having tried the same approach with a range of other guitar parts, the results were generally pretty good. Yes, you can defeat the AAP with performance/sound combinations that are rhythmically very complex, or the sounds slathered in effects, both of which understandably make automatic identification and matching of transients more challenging. And if you usually DI your guitar parts, it's perhaps worth using the clean DI signal for alignment, before adding distortion or amp-sim effects. But given that the process takes only a few seconds, it's well worth seeing if the results are usable or not.

So, for vocals, this new facility is a huge time-saver that delivers great results. And even for non-vocal applications the Audio Alignment Panel can be well worth a try.


Published August 2019

Monday, July 13, 2026

Cubase Pro: Key Commander

The Key Editor is packed with MIDI editing features but the trick to a faster workflow is training yourself to access them as efficiently as possible.The Key Editor is packed with MIDI editing features but the trick to a faster workflow is training yourself to access them as efficiently as possible.

With some DIY Smart Controls for Cubase's Key Editor, you could become a MIDI-editing ninja.

Cubase Pro 10's VariAudio Smart Controls bring all the main VariAudio functions within easy reach when you hover the cursor over a pitch segment. It saves you time, and makes you less likely to lose your musical focus. Seeing the concept applied so brilliantly in VariAudio made me hanker after a similar 'smart toolset' for the MIDI Key Editor. When editing MIDI data here, repetitive tasks include: entering and selecting notes, changing note positions or lengths, transposing notes and muting or deleting notes. The potential for streamlining things is obvious, so — in the absence of VariAudio-style Smart Controls here — just how close to hand can we bring the tools and settings required to perform these sorts of tasks?

Tool Utility Belt

The most frequently used MIDI editing tools (eg. Draw, Erase, Trim) are available in the Tool Buttons Palette of the Key Editor's toolbar. This is easy to access, but going back and forth between this Palette (to select each tool) and the notes you wish to edit means a lot of 'mouse travel', particularly if you're working in a floating Key Editor, perhaps expanded to give you more screen space in which to work (rather than the compact Lower Zone).

The Key Editor already has a more immediate option that's similar to 'smart tools' — the Toolbox pop-up menu. Right-click and hold while hovering the cursor in the MIDI note grid, and a pop-up Tool Buttons Palette will appear, allowing swift tool selections. If this is the only thing you retrain yourself to do, you'll already have saved yourself a lot of time!

Enabling the right-click pop-up Tool Buttons Palette is an instant time-saver.Enabling the right-click pop-up Tool Buttons Palette is an instant time-saver.

This pop-up only appears when the 'Pop-up Toolbox on Right-Click' option is enabled in the Tools section of Cubase's Preferences. Otherwise, right-clicking opens a subset of the main MIDI menu. There are all sorts of useful commands here, particularly in the Functions submenu, and it can be good to have easy access to this. I prefer the Toolbox as the default right-click action, but you can have the best of both worlds: press the Cmd (Mac) or Ctrl (Windows) key when right-clicking and the MIDI menu will be displayed instead of the Toolbox.

Keyboard shortcuts are another option for rapid-fire tool changes. Many tools are already assigned (in the Tools section of the Key Commands panel) to the number keys. I rejigged these to put the tools I use most frequently (Object, Draw, Mute and Erase) on keys 1 to 4. With one hand on my mouse and the other hovering over these keys, I can select these tools rapidly.

If you right-click and hold while the mouse is hovering in the MIDI note grid, a pop-up version of the Tool Buttons Palette appears.

Snap To It

Using the Object Selection tool to select notes doesn't require you to leave the note editing grid, but controlling subsequent movement of notes might. I find that for most note movements along the timeline I want to snap to the grid, move the note relative to the grid, or turn snap off altogether. You can change between these different modes in the Snap section of the Key Editor's Toolbar.

There are no smart-tool-style pop-up options, but there are still faster ways to move between these modes. By default, for example, you can toggle Snap on/off using the J key — or, probably better, defeat Snap temporarily by holding Cmd (Mac) or Ctrl (Windows) as you move one or more MIDI notes. In the Key Command dialogue's Edit section, you can also define Key Commands for each of the Snap types. I tend to favour Grid and Grid Relative, so I've created easy-to-use key combinations for these.

Key Commands make it super-easy to flip between different quantise resolutions as you enter or move notes within the Key Editor.Key Commands make it super-easy to flip between different quantise resolutions as you enter or move notes within the Key Editor.

Whether inserting new notes with the Draw tool or moving notes with the Object Selection tool, if you want their position to snap in some way to the grid, you'll often find yourself moving between different grid resolutions. The grid resolution can be set via the Quantize section of the Key Editor's Toolbar but, again, this involves navigating to the Toolbar, clicking and selecting the required resolution from the drop-down menu. To speed things up, the Quantize Category in the Key Commands windows comes with all the common grid divisions pre-defined, using Ctrl+number combinations. So, for example, quarter-note or 16th-note quantise settings can be selected with Ctrl+4 and Ctrl+9, respectively.

Nudge, Nudge

Two further useful Key Editor facilities are the Nudge Palette and the Transpose Palette. They aren't shown by default, but you can toggle their display on via the Settings options at the far-right of the Key Editor's Toolbar string (the cogwheel icon). Collectively, these palettes provide options to move and trim the lengths of selected notes in a speedy fashion. For example, in the Nudge Palette, you can trim the start or end of selected notes relative to the current quantise settings.

Of course, if you configure and master the appropriate Key Commands you may never need to turn on the display of the Nudge and Transpose palettes in the first place; you'll have much quicker access to the same functions. The Nudge section of the Key Commands window has options for moving notes left/right along the timeline or up/down in pitch. Some of these have keyboard shortcuts assigned by default, while others need assigning manually if you use them often enough to make a shortcut worthwhile. Nudge Left/Right are great for moving notes along the timeline but the Up/Down and Up/Down Larger Step commands are also worth considering — these transpose selected MIDI notes by a semitone or an octave, respectively, without requiring any fiddly mouse work.

Adding the Nudge Palette and Transpose Palette to the Key Editor Toolbar brings some useful editing options, but you can also access the same tools via Key Commands.Adding the Nudge Palette and Transpose Palette to the Key Editor Toolbar brings some useful editing options, but you can also access the same tools via Key Commands.

Looking at the Key Command's Nudge section, you could be forgiven for thinking that the various Trim commands aren't available for assignment. Actually, they are, but for some reason Steinberg have listed them as Start Left, Start Right, End Left and End Right. If you're unfamiliar with the MIDI note Trim options, these are well worth exploring, especially if you frequently need to tidy up less-than-stellar keyboard performances!

Work Smarter

If you do a lot of MIDI editing, committing only these few key commands and modifiers to finger-muscle memory should save you a massive amount of time in most projects. And not only can you finish projects more quickly (which is obviously great if you have clients with deadlines), but getting what are otherwise tedious editing tasks out of the way rapidly allows you to retain a sharper focus on the creative side of things.

Given just how rich Cubase's MIDI editing features are, the examples I've suggested only scratch the surface, and there are more than enough options for me to revisit the theme in a future column. Of course, if someone in Steinberg's Cubase development team is trying to work out how to bring VariAudio-style Smart Controls to the MIDI Key Editor, there'd be no need for such an article. In the meantime, if you're prepared to train your fingers to fully exploit them, there are plenty of shortcuts available. 


Published October 2019

Friday, July 10, 2026

Cubase Distroyer Plug-in

By John Walden

We dish the dirt on Distroyer, the new distortion plug-in introduced in Cubase 10.

Cubase boasts several impressive distortion tools and whether you want saturation, overdrive, fuzz or lo-fi effects, there's something for the job. But Cubase 10 brought Pro and Artist users a new toy called Distroyer, so let's see (and hear — you'll find audio examples at www.soundonsound.com/cubase-distroyer-plugin-audio-examples) what it can do.

Package icon cubasedistroyer.zip

Scene Of Destruction

Distroyer's somewhat unconventional Mix control presents some interesting creative options —  but note that you'll need to use the plug-in as a send effect if you want to do true parallel processing.Distroyer's somewhat unconventional Mix control presents some interesting creative options — but note that you'll need to use the plug-in as a send effect if you want to do true parallel processing.While users of Cubase's older Distortion will instantly recognise Distroyer's heritage, Distroyer offers more controls and, like Quadrafuzz 2, makes it possible to aim the processing at a specific frequency range. Distroyer also has some design quirks, most notably in terms of the Mix control as I'll discuss below, but these also give this tool a distinct character and feel.

The first screen shows the settings required to 'zero' Distroyer's controls, so the audio sounds the same as when the plug-in is bypassed. This is a useful starting point, especially if you intend a fairly subtle effect. As explained in Cubase 10's Plug-in Reference PDF, some of the controls apply to the 'wet' signal only, and the wet/dry balance is adjusted via the Mix knob. These include the Lo/Hi Filters, which allow you to restrict the distortion effect to a specific frequency range. Incidentally, once set, if you click and hold in the blue zone that defines the frequency range, you can drag the whole range left/right to find the sweet spot. Drive adjusts the distortion character, going from a gentle overdrive to something more full-on, while the Offset control, which you can adjust via the graphic or the slider display, can tweak that character further. The Spatial control changes the left/right characteristics of the distortion and can generate some very cool stereo effects when applied to individual instruments.

Interestingly, the Boost, Shelf Freq, Shelf Gain and Tone controls operate on both the wet and the dry signals. Boost acts as a distortion gain control, while you can also adjust the frequency and gain of a high-shelf filter. Tone is actually a low-pass filter and, of course, Output sets the overall output level. As these controls come after the Mix knob, they can influence the overall sound regardless of the Mix knob setting. This somewhat unusual configuration makes for some very interesting creative options when Distroyer is used as an insert processor; if you want more conventional 'wet/dry' parallel processing, simply deploy the Distroyer as a send effect.

Kick It

With filter settings like these, Distroyer can really add some punch to your kick's low end, even when working with a pre-mixed drum loop.With filter settings like these, Distroyer can really add some punch to your kick's low end, even when working with a pre-mixed drum loop.Because you are able to restrict the frequency range to which distortion is applied, Distroyer is a particularly useful tool for manipulating kick drum sounds, whether of the acoustic or electronic variety. It's particularly helpful if you're working with pre-mixed loops and finding the kick in need of a little 'something extra' to get it to punch through in your mix. While some focused EQ might also do the trick on occasion, adding new harmonic content with distortion can often be more effective — and in this role, Distroyer is a powerful tool.

The second screen shows some suitable settings to get you started: the Lo/Hi Filter is set to span just the 40 to 100 Hz range, and the Offset is set to neutral but the Drive to 9, to give quite a strong distortion effect. While Mix is set to 100 percent (so the full drum loop is subject to processing), the Tone (low pass) filter is set at 150Hz so that the bulk of the high-frequency content (eg. snare and cymbals) doesn't actually reach the output. Leaving Boost at zero also means that Distroyer won't colour the sound outside the frequency range bracketed by the Lo/Hi filters. And with the Shelf Gain set to zero, the high-shelf filter is also essentially bypassed.

I've used Distroyer as a send effect, so the balance between the unprocessed drum loop and this 'kick enhancement' is dictated by the send level from the drum loop's track. Distroyer's various filters mean that any distortion applied to the higher-frequency elements doesn't reach the plug-in's output, but if you want to get even more aggressive with your kick you can gradually roll up the Boost and experiment with the Offset.

Because you can restrict the frequency range to which distortion is applied, Distroyer is a very useful tool for manipulating kick drum sounds.

If, instead of using a mixed loop, your kick has its own dedicated channel in Cubase's MixConsole, you can push Distroyer harder — and turn even an underwhelming kick into a cone-ripping monster in a way no amount of EQ could achieve alone. If it's thump enhancement you want, the settings described above will again serve as a starting point — just tweak the Boost, Offset and Drive controls to take things from subtle saturation to more daring decimation.

Distroyer is also great at enhancing the attack/beater/click element of your kick sound.Distroyer is also great at enhancing the attack/beater/click element of your kick sound.As your dedicated kick channel means you don't have to worry about Distroyer destroying other drum elements, the Lo/Hi Filter settings can be used more creatively here to target the effect exactly where you want it in the frequency spectrum; this can be a great help if you need to give the kick its own dominant frequency relative to any bass sounds used in the mix.

Of course, the Lo/Hi Filter can also be used to focus Distroyer's processing on the click (beater) element of your kick too — to bring out more of its percussive attack. The third screen shows a possible send-return effect starting point for this application. The click of the beater is generally found in the 2-4 kHz range so I set the Lo/Hi Filter accordingly, dialled in plenty of Drive and Boost, and gradually increased the Mix from zero until I started to hear the effect. After that, the fine-tuning is a matter of taste.

Bass Enhancer

In SOS May 2018's Cubase workshop, I discussed band-splitting your bass sounds to apply different processing to the low, mid and high-mid frequency ranges, and one option is to distort to the mid/high-mid components — with the aim of improving the definition of the bass in the mix. I used Cubase's VST Bass Amp plug-in in that earlier workshop and Quadrafuzz 2 could also be used, but the principle works just as well with Distroyer. And Distroyer's control set offers some different and potentially useful options.

With two Distroyer instances configured as send effects, you can target processing on your bass track's low end to add girth, while treating the low/hi mids differently, to help the part cut through.With two Distroyer instances configured as send effects, you can target processing on your bass track's low end to add girth, while treating the low/hi mids differently, to help the part cut through.The basic setup involves two sends from your bass track to separate effects channels, each with an instance of Distroyer inserted. The final screen shows some example settings. The amounts of Drive and Boost can be set to taste, but the most crucial parameters are the Hi/Lo Filter values. One instance is set to add processing only to the sound below 200Hz, essentially providing a bit of overdrive to the fundamental frequencies of the part. The other, however, is configured to operate in the 200-5000 Hz range and, depending on the Boost, Drive and Offset controls, this can add some nice sizzle to the harmonics above the fundamental frequencies, which can help the bass cut through more clearly. Then, simply balance the wet/dry mix, and the degree of low and/or low-mid/high-mid distortion, by varying the two send levels. As in the May 2018 article, you could also add an instance of Studio EQ to each effects channel prior to Distroyer, to provide even finer control over the frequencies that each instance is processing.

Don't Stop Me Now

Of course, it doesn't have to be just kicks and basses! The principles are the same for other applications — just restrict the frequency range you want to focus the processing on and set the distortion to be as subtle or as brazen as you want — but the somewhat unconventional control set always seems to help make Distroyer an interesting creative tool. While I've just about filled my allotted space for this month, I've included in the audio examples on the SOS website a couple of other potential applications for Distroyer: vocal processing and master-bus processing.

Finally, it's perhaps worth me repeating that Quadrafuzz 2 also offers frequency-specific distortion options — so it could just as easily be used as Distroyer in the above examples. I'd suggest that you experiment and see what works best for you, but whatever your thoughts, I reckon Distroyer is a very worthwhile creative addition to Cubase's plug-in suite. 


Published December 2019