Welcome to No Limit Sound Productions. Where there are no limits! Enjoy your visit!
Welcome to No Limit Sound Productions
| Company Founded | 2005 |
|---|
| Overview | Our services include Sound Engineering, Audio Post-Production, System Upgrades and Equipment Consulting. |
|---|---|
| Mission | Our mission is to provide excellent quality and service to our customers. We do customized service. |
Saturday, May 30, 2020
Friday, May 29, 2020
Creative Thinking In Ableton Live
By Len Sasso
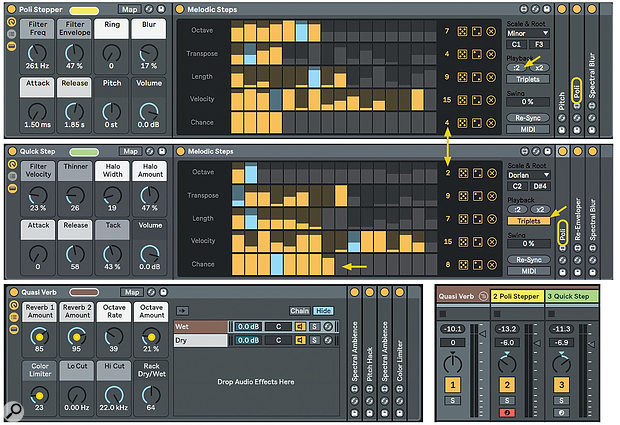 Screen 1: Step‑sequencing Instrument Racks Poli Stepper and Quick Step feed the Quasi Verb Audio Effects Rack at the bottom.
We explore a free Max For Live Pack that could change the way you make music in Live.
if you want to take your music in an unexpected direction, there’s a free Max For Live Pack on offer that just might do the trick. Creative Extensions by Amazing Noises (www.ableton.com/en/packs/creative-extensions) comprises a malleable step sequencer for creating long‑form, randomly varying sequences, as well as two versatile instruments for playing them. But the icing on the cake is its collection of five mind‑bending audio effects for taking your sounds to the next level. This month we’re going to look at just what Creative Extensions can do you for.
Extending Creatively
For a first look, create a new Live set with two MIDI tracks and choose a tempo in the 70s. Go to Creative Extensions’ Racks/Sounds folder and, from the Sequence category, insert the ‘Poli Stepper’ Instrument Rack on one track and the ‘Quick Step’ Rack on the other (see Screen 1). Notice that each Rack uses the sequencer (named Melodic Steps) to play the Creative Extensions instrument, Poli. On the right side of the Melodic Steps panels click the ‘:2’ button in the Poli Stepper Rack and click the ‘Triplets’ button in the Quick Step Rack. Start Live playing, pan the tracks slightly apart and adjust their levels to taste. Notice that Poli Stepper plays a quarter‑note sequence, Quick Step plays an eight‑note triplets sequence, and the two instruments are tuned an octave apart. Most importantly, while the patterns are repetitive in nature, the sequences almost never actually repeat either individually or relative to each other. We’ll see why at the beginning of the next section.
To get a taste of the five effects, enclose both tracks in a Track Group and insert the Quasi Verb effect from the Pack’s Effect Racks/Space folder on the Group track. Start Live playing again and you’ll notice some added space along with a bit of coloration. Turn Quasi Verb’s first, second, fourth and fifth Rack knobs fully counterclockwise and then turn them up individually to hear the contribution of the three effects used in the Rack: Spectral Blur, Pitch Hack and Color Limiter. (The Spectral Blur preset is labelled ‘Spectral Ambience’ and is used twice.)
For a very different approach using the same three effects, replace the Quasi Verb Rack with the ‘Serial Pitch Hacker’ Rack from the Modulation & Rhythmic folder. Turn the Rack’s Recycle knob to ‘0 percent’ and the Pitch Blend knob to ‘0.’ You’ll now hear the pattern change every three bars, and the notes and sounds will play in reverse in some iterations. Rotate the Pitch Blend knob fully clockwise and the repeat rate will be four bars. More on how all that works in the Pitch Hack section below.
Steps & Sounds
Melodic Step’s deceptively simple control panel belies the complexity of the sequences it can generate. It has five 16‑step rows: Octave, Transpose, Length, Velocity and Chance. You’ll find controls at the right end of each row for step count, randomisation and reset. Depending on the variation in step‑count settings, it can take a long time for the rows to come back into alignment (1260 steps in the example at the top of Screen 1), but the Re‑Sync button, which you can automate, gives you the last word. With the MIDI button turned on, incoming MIDI Notes toggle the sequencer on and off as well as setting the root note. The Chance row controls how likely each step is to trigger. Because the lowest Velocity level is 15, you must pull the corresponding Chance bar all the way down to force a rest. Melodic Step’s scale choices are limited, but you can work around that by inserting Live’s Scale effect after Melodic Steps.
Creative Extensions’ two instruments, Bass and Poli, are upgrades of instruments from the Max For Live Essentials Pack. Bass is a bass‑oriented five‑oscillator monosynth also useful for leads and pitched effects, whereas Poli offers mono, poly and unison modes and is useful for everything. They have similar layouts with sub‑panels for sources, filter, modulation and global controls (see Screen 2). The oscillator sub‑panels have buttons to toggle between mixing (bars icon) and tuning (tuning‑fork icon).
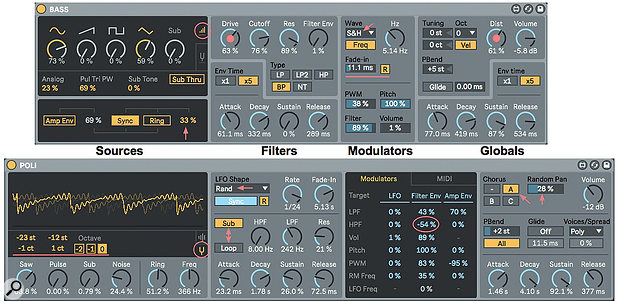 Screen 2: The Bass and Poli instrument controls are divided into four panels: sources, filters, modulators and global settings.
You can tune Bass’ sine, sawtooth, pulse and triangle oscillators in semitones and cents. The sub‑oscillator is always an octave below the zero tuning of the other oscillators; its Sub Tone control adds distortion and the Sub Thru button bypasses the filter. The bottom of the panel holds toggles for oscillator hard‑sync and ring‑modulation, which are applied to the saw, pulse and triangle oscillators, and you can apply the amp envelope to the modulation amount. Both modulators use a hidden oscillator whose tuning is set as a percentage of two octaves by the numerical to the right of the Ring button. The filter section offers five filter types along with ADSR envelope controls. The Drive control applies overdrive distortion before the filter. The modulation section holds a free or sync’ed, multi‑waveform LFO that you can apply to pulse‑width, pitch, filter and volume. (In Sync mode the LFO is only active when Live’s transport is running.) You can set an LFO fade‑in time, and in Free mode, you use the R button to make the LFO reset with each note. The Globals panel includes master volume; tuning in octaves, semitones and cents; saturation via the Dist knob; pitch‑bend; glide or portamento; and ADSR amp‑envelope controls.
Poli offers a coloured‑noise generator along with sawtooth and pulse oscillators and a sine/sawtooth sub‑oscillator. The XMod control in the mixing panel uses the pulse oscillator to modulate the pitch of the sawtooth oscillator. Sine/sawtooth ring modulation is also available. You can tune the sawtooth and pulse oscillators independently and shift the sub‑oscillator down one or two octaves. The graphic at the top of the oscillator section gives a real‑time view of the final output, including the effect of modulation and the envelopes. The filter section houses separate high‑pass and resonant low‑pass filters with switches to let the sub‑oscillator bypass the filters and to loop the AD stages of the ADSR filter envelope. The modulation section lets you apply the LFO and both envelopes to a variety of targets, and the envelope routings are bipolar. The section’s MIDI tab lets you also route key number, velocity and aftertouch to a few targets. Finally, the Globals panel offers chorus, random panning, pitch‑bend range and target (sawtooth or all oscillators), glide, a mono/poly/unison mode drop‑down (with percent detuning for unison mode), and ADSR amp‑envelope controls.
Just For Effect
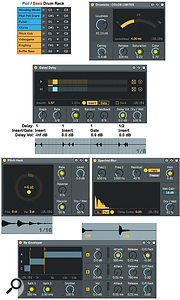 Screen 3: Creative Extensions’ five audio effects with the settings described in the main text.Each Creative Extensions effect has a personality all its own and tweaking their controls is the best way to get a sense of what they do. For source material in Screen 3, I’ve used an eight‑pad Drum Rack with four Poli and four Bass percussive presets. Here’s a brief description of each effect.
- Color Limiter is a straightforward limiter with saturation to add some colour to the output. Loudness affects the input, Ceiling sets the limiting threshold and Release sets how fast limiting fades out when the signal drops below the Ceiling. Saturation sets the amount at the selected Color.
- Gated Delay is a delay and reverse effect. Steps and Rate set the number of steps and the rate at which the steps are traversed. Delay determines the delay time, which you can randomise. Delay Vol determines the amount of delay in the output. Orange and blue squares indicate activated delay and reverse steps. A sparse drum loop is a good source for testing.
- Pitch Hack is a delayed pitch‑shifting effect. The large centre dial sets the pitch transpose of the delayed signal. The Fine and Var settings introduce a random variation range from that pitch. The Rate knob sets the timing and size of the repeated segment, but it is scaled by the pitch setting — a setting of ‘0 st’ results in no delay. Use the Reverse and Recycle knobs to reverse and recycle the output.
- Re‑Enveloper is a three‑band compressor/expander with separate attack‑release envelopes for each stage. Try it as an alternative to Live’s Multiband Dynamics effect.
- Spectral Blur is a granular effect that creates a ‘halo’ of blurred grains resembling a reverberation tail. The grains can be grabbed from either inside or outside the frequency range set by the Freq1 and Freq2 knobs. The Residual knob controls the level of the unprocessed frequencies. The Halo knob sets the length of the reverb tail in Halo mode.
Published December 2018
Thursday, May 28, 2020
Wednesday, May 27, 2020
Ableton: Auto-switching Instrument Racks
By Geoff Smith
 Screen 1: Prepare your Instrument Rack by dragging an empty Instrument Rack preset onto a MIDI track.
Find out how to prepare your Instrument Rack for performance in Live.
In this issue's interview with drum & bass artist Wilkinson, he describes how he uses Live's Instrument Racks during performance, with his Project automatically switching to the right sounds in sync with his band's backing tracks. In this short walkthrough, we'll show you exactly how it's done.
First, open Ableton Live, set the Browser to display Categories / Instruments, and drag the Instrument Rack folder onto the first MIDI track (see Screen 1 above).
Now open the disclosure arrow for the instrument presets you want to add, then drag and drop the presets onto the instrument rack in the Devices panel, as in Screen 2.
 Screen 2: To create an Instrument Rack that you can use as a song playlist, drag instrument presets from the Browser straight into the Instrument Rack and then assign each instrument a unique Chain Selector value.
Next, on the far left‑hand side of the Devices panel, click the Show/Hide Chain List button to display the Chain List editing panel. Click on the Chain button in the Chain List panel to display the Chain Select Editor. Then, for each instrument in the Instrument Rack, set the Chain List zone so that each instrument has its own value.
In Screen 2 I have set the first instrument to have a value of 0, the second a value of 1 and the third a value of 2. When the Chain Selector automation parameter is set to 0 you will hear only the first instrument; when it's set to 1 you will hear only the second instrument. To layer two instruments together, you simply have to set them to the same zone value.
Chain Keep Us Together
To automate the Chain Selector value, create three empty clips in track 1 and double‑click on the first clip so that the lower panel displays the Clip View. Next, in the bottom‑left corner of the Clip View panel, click on the Show/Hide Envelopes box. If the last parameter you changed was the Chain Selector, this should be automatically selected in the Envelope Editor; if not, select it from the Envelopes panel's Device and Control Chooser drop‑down menus. Now draw in a Chain Selector value of 0 for the first clip, 1 for the second clip and 2 for the third (see Screen 3). Rename the three clips Song 1, Song 2 and Song 3 (when you create your actual setup you can use the name of the songs).
 Screen 3: Add your Chain Selector automation inside a clip that is labelled according to the name of the song that the patch is used in; this will help keep your backing track project organised and clear.
Now when you launch the clip for Song 1, 2 or 3, it will change the Chain Selector value so that the Instrument Rack will only play the instrument needed for that song. You can copy a clip from Session View using Command+C (Windows: Ctrl+C) and paste it into the Arrangement View using Command/Ctrl+V.
Creating the clips with their song names in Session View in effect gives you an organised bank of clips which are conveniently labelled with the song name (and section, if needed). This makes it easier to add the Chain Selector changes for different songs in the Arrangement View alongside your backing tracks. It also means that when you want to edit anything in the Arrangement View, all of those instrument changes are encapsulated in clearly labelled regions.
Published January 2019
Tuesday, May 26, 2020
Monday, May 25, 2020
Step Sequencers
By Len Sasso
 Screen 1: M4L Step Sequencer plays a nine-step eighth-note loop, Fore-Back. The varied step probabilities result in different 16-step patterns.
Max For Live has a rich assortment of step sequencers. We look at some of the best.
Step sequencing is nearly as old as synthesis itself — early modular systems offered step-sequencer modules, and there were stand-alone hardware step sequencers as well. In the world of DAWs the role of the step sequencer has largely fallen to manipulating MIDI clips, although step sequencer plug-ins are plentiful and provide features not easily replicated using MIDI clips. Max For Live is the source for most of these devices in Live, and the selection is large and varied. Back in December we took a look at Melodic Steps from the Creative Extensions Live pack. This month we'll explore four of my favourite melody-oriented sequencers in greater detail.
Step One
Before we get into the MFL devices, let's start with a quick look at using a MIDI clip as a step sequencer. You can emulate many step-sequencing functions using MIDI clips by combining them with Live's assortment of MIDI Effects devices. For a template, create a MIDI clip, select a Grid and Time Signature, create notes of the same pitch and velocity at each grid position and then disable all the notes (Ctrl+0). Duplicate the clip and enable some notes to establish the desired rhythm sequence. Next, adjust the enabled notes' pitches, velocities and lengths, or use Live's Random and Velocity MIDI effects to randomise the pitch and velocity of enabled notes and use the Scale effect to restrict or scale-correct their pitches. You'll find more details in the April 2012 and August 2015 Live workshop columns, and Ableton offers three excellent videos in the tutorial 'Generate endless musical ideas with Live's MIDI devices' (ableton.com/blog). In the third video, Dennis DeSantis shows how to use Live's Groove Pool to overcome the quantised feel associated with step-sequenced clips. This also works for step sequences captured from the sequencers discussed below.
Step To The Max
Step Sequencer from the free Max For Live Pack 'M4L Big Three' (www.ableton.com/en/packs/big-three) is the closest in look and feel to editing a MIDI clip. But two features set it apart: probability note triggering and multiple playback modes. Step Sequencer sequences have a maximum of 16 steps. The loop brace at the top allows you to change the start and end points of the sequence and, thereby, its length. Buttons along the top select the editing mode. View All mode (see Screen 1 above) displays horizontal bars showing each note's pitch and duration along with faint vertical bars showing its velocity and probability (the third vertical bar has no function). The buttons to the left of the Edit Mode selectors let you transpose the sequence in semitone steps and shift it right or left in time. The 'R' button randomises everything. In the Sequence Setup section at the far right, you can choose from five playback modes: Forward, Backward, Fore-Back, Rotate and Random. Finally, Step Sequencer actually holds four sequences, and they can play together, which offers a lot of variation when you use different timing, length and direction for each sequence. The MIDI Handling tab lets you use MIDI for real-time pitch and time shifts as well as to choose which sequences are playing.
When a step sequencer changes the sequence over time, you'll want to capture its output for manual editing. To do this, place the sequencer on one MIDI track and route that track's output to a second MIDI track, which can also host the playback instrument. For sequencers that I use frequently, I save a Track Group with those two tracks but without the playback instrument.
A Bit More Beef
K-Devices' MOOR (k-devices.com/products/moor/) offers several unusual features: you can assign each step its own length, shuffle the note order ('Scramble'), change the sequence length in small increments ('Rate'), accelerate or decelerate the playback speed during a single pass ('Bend') and shift the whole sequence a fraction of a step. Try using a couple of MOORs in parallel to generate complimentary sequences and then make slight adjustments to their Rate, Bend and Shift settings.
MOOR steps are denoted by triangular wedges. In Velocity mode ('V' icon), you click-drag on a wedge to set its note's velocity. In Chance mode ('%' icon) you drag bars vertically in a bar chart to set the probability that its step will trigger. The box on the left is where you set step size, step count and root note. In the section on the right you can reset, randomise or scramble velocity, chance, pitch and length as well as save and recall presets. You'll find a button at top-right for exporting single-pass sequences, but the process is a bit flakey, so you're better off using the capture method described above. In either case, all notes span their full step size, but you can adjust their length manually.
Adam Florin's Patter (adamflorin.work/projects/patter/) covers the last mile in probability-based sequencing. Every parameter has knobs for setting the centre (Mean) and standard deviation (Dev) of an accompanying interactive bar graph. The right half of the panel comprises four sections: rhythm (top left), note/rest distribution (bottom left), accent (top right), and pitch (bottom-right). Patter chooses values based on the distributions shown in the bar graphs, generates what it calls a 'segment' matching the results, and then repeats that process.
- Rhythm: the top parameter is the note resolution relative to quarter notes. For example, '1/2' denotes an eighth note and '2' denotes a half note. Below that is a multiplier or divisor for the resolution. With a multiplier of 3, a quarter note becomes an eighth-note triplet and with a divisor of 3 it becomes a dotted quarter-note.
- Notes and Rests: you can have as many as four notes and three rests per generated segment, and you can choose to have the rests come before or after the notes. Each segment's length is the sum of the two values, and when either deviation is greater than zero, segment lengths will vary. But once you capture multiple segments, you can adjust the resulting sequence's length to suit.
- Accent: this distribution determines where in the pattern accents (notes with velocity 100 versus 64) fall. Unaccented notes only occur in segments with more than one note.
- Pitch: selects pitches from the chosen scale (the chromatic scale if no keys are highlighted). The Toggle or Live switches let you use incoming MIDI to select pitches.
If you dial in Patter settings with all deviations set to zero, you'll get a repeated segment playing a single pitch. One good way to generate manageable sequences is to start with that setup and then increase one or two of the Dev knobs a bit. Another option is to use large Dev settings and turn looping on. Keep the Loop Dev at zero and use Mean to set the number of segments in the loop. Each time you start Live playing, Patter will generate the Mean number of segments and then continue to loop them until you stop Live. Since the loop doesn't persist, it's a good idea to record the results. Finally, you can link multiple Patters on different tracks or next to each other on the same track or in the same MIDI Rack, and then set them to either follow each other or play together.
Sauce For Your Beef
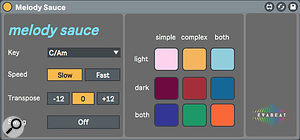 Screen 4: Melody Sauce offers nine algorithms for generating MIDI sequences at the click of a button.When your head starts to throb or you don't even want to go there, EVAbeat's Melody Sauce from Isotonik Studios may be the answer. It generates MIDI clips at the click of a button with minimal interference from you. You choose a scale, a speed and a pitch range; turn Swing on or off and then click one of eight buttons to choose the algorithm for the generated clip. Melody Sauce generates a MIDI clip and places it in the next available Session view clip slot on the Melody Sauce track. (If there are no empty clip slots, existing clips will be overwritten.) Notes in Melody Sauce clips all have velocity 100, but you can use Live's Velocity effect for variation. You can thin out the generated clips by placing Live's Random effect after Melody Sauce, setting it to transpose some notes outside of the Melody Sauce range and then following that with Live's Pitch effect to allow only in-range notes.
Published February 2019
Saturday, May 23, 2020
Friday, May 22, 2020
Mixing With Ableton Live
By Len Sasso
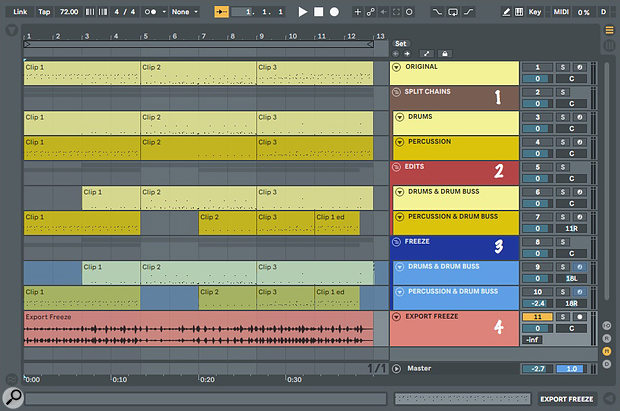 Screen 1: The four steps to split a drum part into two kits, apply separate effects and export an audio stem for the final mix.
We show you some tips to streamline your mixing in Live.
This month we'll have a look at how to accomplish common mixing tasks in Ableton Live. I'll leave the whens and whys of mixing and mastering to others, but you'll find helpful tips in most issues of SOS, and a good starting point is Hugh Robjohns' 2002 article, Practical Mixing. For more on mastering in Live, check out the February 2015 Live column, 'The Final Act'.
Decluttering
Let's start by cleaning up your Live Set. It's never too early to get rid of the junk, and that's a good way to clear your mind when you're stuck. Delete any unused tracks for which you have no plans, including Return tracks. To save CPU, consider removing or at least deactivating any devices on unused tracks that you do keep. (Muting a track does not deactivate its devices.) Move all remaining unused tracks to the end of the Track list, combine them in a Track Group (Command+G/Control+G) and then fold and mute the Group.
If you are at the final stage of the project and will not be using Session view clips, it's also a good idea to delete all of them along with any clip slot Stop buttons. This will save you from accidentally deactivating an Arrangement view track with an errant key command or button press. It will also save time when Freezing tracks because Freezing automatically applies to both Session and Arrangement view clips (for details see the 'Bouncing & Stems' box).
Organising Your Tracks
A good way to organise the remaining tracks is to assign the same or similar colours to similar tracks: percussion, keys, pads, vocals and so on. In some cases you may want to go a step further and collect similar tracks into a Track Group. This is Live's easiest way to create a submix (the alternative is to route the outputs of multiple tracks to a new audio track). Groups also make it easier to solo or mute all tracks within the Group, as well as to visually tidy up large Sets by folding Groups.
With a track that holds a large Drum Rack, you may want to first split that into separate Drum Racks on their own tracks — drums, percussion and effects, for example. To do that, unfold the Drum Rack track in Session view, select the chains you want to keep together and then choose Extract Chains from Live's Create menu or from any selected chain's context menu. Extracting the chains will also extract MIDI data routed to those chains from any clips on the track. You can now edit the clips individually, apply different effects to each Drum Rack and mix them separately.
The example in Screen 1 above starts with a 16-pad Drum Rack and three MIDI clips. Here are the steps to split the Drum Rack to two tracks, add different Drum Buss processing to each, edit their clips and export an audio stem for the final mix.
1. Unfold the Drum Rack, select the chains you want to extract — congas, cowbells and timbale in this case — and extract them. You'll now have two tracks with a Drum Rack and MIDI clips on each. Enclose the tracks in a Group to create a separate mix bus for the drums.
2. Edit the MIDI clips on the two tracks as needed. This is both easier and more flexible then editing a single clip for all 16 kit pieces. Add Live's Drum Buss effect to each of the Drum Rack tracks and audition different settings or presets.
3. Freeze each of the tracks in the Group. This saves CPU by disabling the Drum Racks and Drum Buss effects while still letting you edit each track's mixer settings.
4. Create a stem for the final mix by Exporting the Frozen Group (Command+Shift+R /Control+Shift+R).
Creating Stems
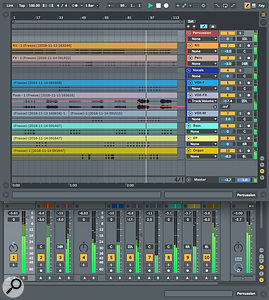 Screen 2: Each of the tracks of a finished song has been converted to an audio clip spanning the full length of the song. You can edit the resulting tracks and Groups before mastering and rendering the song.The example in Screen 2 starts with an eight-track MIDI arrangement, creates audio stems for each of the song's tracks and encloses the percussion stems and the vocal stems in their own submix Groups.
Start by Freezing, Flattening and Consolidating each of the Set's tracks. You can Consolidate one track at a time or, once they are all Flattened, simply select all tracks for the full range of the song and Consolidate everything at once. (Consolidating doesn't affect Groups; only the tracks they hold will be Consolidated.) If you have any audio effects that you may want to edit after Freezing, move them to a track that you don't plan to Freeze (such as one of the Group tracks) and then move them back to their original tracks after Flattening. Mixer automation is not captured when creating stems in this way, leaving you free to edit your mix. When you want to create stems from your submix Groups as opposed to their individual tracks, export the Group as in the previous example.
Finally...
One last tip: if you prefer to use Live's Session view mixer when working on your arrangement, open a second window for the Set (Command+Shift+W/Control+Shift+W). One window will show Arrangement view, and the other Session view with its mixer. This is most convenient with two monitors, but it is still workable by overlapping the views on a single monitor as in Screen 2.
Bouncing & Stems
Live offers several options for converting one or more tracks to a single audio clip. Reasons to do this include saving CPU; allowing audio manipulations such as reversing, slicing and time-stretching; cleaning up your arrangement; and sharing your work with collaborators. When mixing, it simplifies the process by eliminating instrument and effects plug-ins. It also lets you go back to the mix when some of those plug-ins are no longer available. Having said that, it is a good idea to save a track or Track Group as its own Live Set before you bounce it to a stem. You can do that either by dragging individual tracks or Track Groups into the Current Project folder in Live's Browser or by keeping a pre-bounce copy of the whole Set. I find it easiest to keep a folder for pre-bounced tracks and Groups rather than trying to remember which Set they came from.
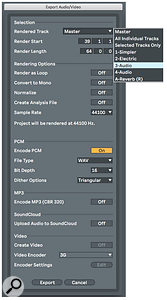 Screen 3: Live's Export Audio/Video dialogue lets you render all or selected tracks in your Set in a variety of audio and video formats, with some basic audio processing options.
Live's Consolidate function is a handy way to combine multiple audio clips on the same track. Consolidating creates a single audio file in the format specified in your 'Record/Warp/Launch' preferences and places it in your Set's 'Samples/Processed/Consolidated' folder. Consolidation renders audio clip fades and crossfades. However, Consolidation does not capture processing by audio effects on a track, and Consolidating MIDI files on instrument tracks simply combines the MIDI files.
That brings us to Live's Export function (File menu or Command+Shift+R /Control+Shift+R), which is Live's most versatile way to capture audio. You're undoubtedly familiar with Export from rendering your Live Sets, but the Rendered Track menu at the top of the Export dialogue lets you also export individual tracks or all the tracks that are selected in your Set or all tracks in your Set. You're also presented with a variety of export options. When you want to create stems from multiple tracks for mixing in a new Live Set, Export is usually the fastest way to get the job done. And, Exporting captures all mixer automation and effects processing.
Published March 2019
Thursday, May 21, 2020
Wednesday, May 20, 2020
Making Sampled Instruments In Ableton Live
By Len Sasso
 Screen 1: Eight Antidrum sounds are captured in an audio clip, which is then sliced in Simpler to create a kit with triggers starting at C1.
We look at how to capture and reuse third‑party samples in Live.
If you're using third-party sound libraries, it's often a good idea to capture the sounds you've found and edited for posterity in one of Live's sampling instruments. The small effort required makes it much easier to locate and reuse the sounds at a later date. The strategy is different for capturing one-shots, loops and layered sounds, and it also depends on whether you plan to apply individual effects processing to some of the sounds. I've used the Ensemble presets from Native Instruments' Antidrum Machine for my examples, as they map all available articulations across the MIDI keyboard, and that's what you're most likely to encounter in other third-party percussion and sound-effects collections.
Freeze!
The first step in capturing sounds from an instrument is to sequence the MIDI notes that trigger them. (You can skip this step when you're starting with audio files rather than an instrument, but you'll need to edit the audio files to capture just the sounds you want.) Keep the MIDI notes equally spaced and far enough apart to keep one sound from spilling over into the next. You will also need to adjust the note lengths for sustained sounds. If your source instrument is velocity sensitive, you may want to fine‑tune the sequence by adjusting MIDI note velocities. The final step is to render the result to an audio file. The easiest way to do that in Live is to Freeze the instrument track and then either Flatten it, which overwrites the original instrument, or copy the Freeze file to a new audio track. If needs be, you can make the Freeze file conform to the sample rate and bit depth you've set in Live's preferences by Consolidating it (Command+J/Control+J).
The fastest way to convert the captured audio file to a Live instrument is to drag the file to the Drop area of a Simpler or to the 'Drop an Instrument or Sample Here' area of a new MIDI track, which automatically creates a Simpler. Next change Simpler to 'Slice mode' to sequence the individual sounds across the MIDI keyboard starting at C1 (MIDI note 36). In Simpler's Sample window, you'll see slice markers at each of the transients detected in the original audio file. The 'Slice By' drop-down menu about a third of the way from Simpler's left edge offers three other slicing options, and 'Region' is the easiest when using equally spaced slices — just set the number of regions to the number of slices. Other important settings are marked in red in Screen 1. Poly mode lets you play multiple hits at once, Retrigger ensures that each note retriggers the sample rather than layering it, Vol
 Screen 2: The three Slicing Drum Rack presets result in Drum Racks with pads starting at C1 holding the slices.
By The Slice
'Slice to New MIDI track', available for warped audio clips from the clip's context menu or Live's Create menu, creates a Drum Rack filled with Simplers or Samplers with a separate pad for each slice. It can also slice to a single Sampler and map the slices across the keyboard. You can slice by Warp Marker, transient, bar or note size. In each case, the slices are triggered by notes starting at C1, but you can then edit the trigger-to-note mapping. A number of slicing presets are offered, and you can add your own. To create your own Simpler or Sampler Drum Rack slicing preset, insert a Simpler or Sampler with your choice of settings in any pad of a new Drum Rack and make whatever Rack Macro knob assignments you wish. Place the Drum Rack in your User Library's Defaults/Slicing folder. For Sampler presets, place a preconfigured Sampler in that folder.
 Screen 2: The three Slicing Drum Rack presets result in Drum Racks with pads starting at C1 holding the slices.
In Screen 2 I've sliced the audio clip from the previous example using the custom 'Slicing Drum Rack (1-shot)' preset. The critical settings for that preset are 1-Shot mode, Trigger and Snap. Whether each Simpler's Warp mode is enabled is determined by the 'Preserve warped timing' button in the slicing dialogue. For percussive sounds, which you don't want to be affected by the project's tempo, leave that off. After slicing, you can turn warping on for individual Simplers as needed. I prefer not to make Macro knob assignments in slicing presets because they apply to all pads. Notice that each Simpler holds the full, unsliced sample with boundaries enclosing a single slice. This lets you adjust the boundaries as needed.
The custom 'Slicing Drum Rack (Classic)' preset is intended for material that you want to warp and possibly loop. Its Simpler is in Classic mode, and I use it with 'Preserve warped timing' turned on in the slicing dialogue. This preset is handy for audio files capturing sequences of different lengths that you want to trigger individually. For example, Antidrum Machine's built-in arpeggiator and accompanying velocity sequencer generates patterns that vary depending on both the number of held notes and their pitches. After recording a few of these in a single audio clip, capture them with the 'Slicing Drum Rack (Classic)' preset with warping turned on, and each sequence's tempo and looping will conform to your song's tempo.
Sample This
Slicing to a single Sampler rather than a Drum Rack assigns each sliced region to its own one-note key zone. You can then move and expand the key zones as well as combine them with velocity and Sample Select zones. The example in Screen 3 starts with three Antidrum Machine sounds: hitting a fire extinguisher with the palm of the hand, striking it with a mallet and a mallet roll. Each of these is captured in its own key zone. The hand- and mallet-strike key zones are expanded to cover the two‑octave range C0 through C2. The mallet roll is restricted to C1 because Sampler doesn't offer warping, and the roll speed will change with pitch. The Root setting of each zone has been adjusted to align the three sounds' pitches. The result is a two-octave pitched instrument with the mallet roll available for C1 only. The next step is to create Sampler fade-in velocity zones for each slice so that lower velocities play only the palm strike, mid‑range velocities add the mallet strike and high velocities add the mallet roll when playing C1. (You can make the mallet roll cover the whole range without pitch-based speed by Grouping the above Sampler in an Instrument Rack, deleting the mallet roll, and then adding a Simpler chain to play and warp the mallet roll. However, the mallet-roll speed will then depend on song tempo.)
Once you've captured a collection of sounds in a Simpler, Sampler or Drum Rack, consider applying some effects processing and then recapturing the results. That's especially useful with effects that change with each pass. Here are three examples:
Echo: follow your Drum Rack, Simpler or Sampler with the 'Liquourice Whip' preset for Live's Echo effect. You may need to lower the Gate Threshold setting on Echo's Character tab to hear the effect. Echo will process the same incoming sound in a different way each time. Collect some of those in a new Simpler, Sampler or Drum Rack.
Resonators: follow your Drum Rack, Simpler or Sampler with an Audio Effects Rack with several chains holding Resonators effects. Dial in a different chord on each Resonators effect. Map one of the Rack's Macro knobs to the Resonators' Note knobs and another to the Racks Chain Selector. Automate or use MIDI note ranges to change roots and chord types while playing or sequencing the source instrument.
Vocoder: enclose your Drum Rack, Simpler or Sampler in a new Instrument Rack and mute its chain (speaker icon). Create a second chain and drag in a vocal clip, which will create a Simpler. Set the vocal Simpler to Slice mode, edit the slices as needed and precede it with a Pitch effect to separate the notes that play it from the notes that play the first chain. Add a Vocoder to the second chain, set its Carrier to 'External' and set Audio From to the first chain '- Post FX'.
Published April 2019
Subscribe to:
Posts (Atom)


