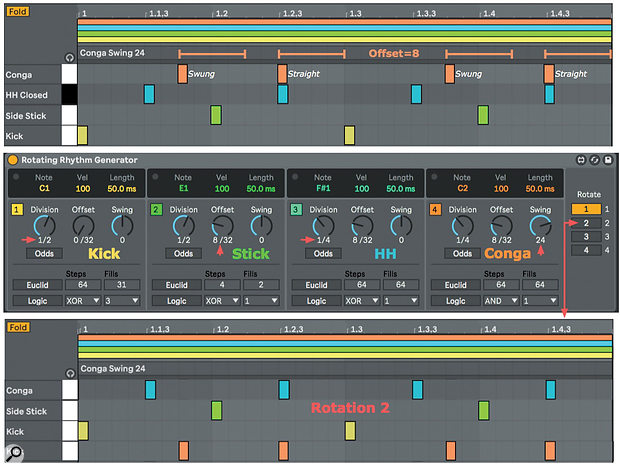
 Screen 1: RRG generates Kick, Side Stick, High Hat and Conga patterns with different Division, Offset and Swing settings. The effect of Rotation is shown at the bottom.
We look at a different approach for creating rhythms in Live.
Live's free CV Tools Pack includes a Max For Live device that offers a refreshing take on MIDI note sequencing. As its name implies, the Rotating Rhythm Generator (RRG) is designed specifically for generating and manipulating rhythm patterns, but its uses extend well beyond that. Unlike the other devices in CV Tools, RRG is a standard MIDI effect rather than a CV output device. Should you wish to use it with external hardware or software, you can use other devices in the CV Tools Pack to route control voltages to and from it.
High RRG
RRG starts with four identical note generators. The controls in the lower part of each generator set the rhythm. The numbered button on the left edge identifies the generator by colour as well as turning it on and off. The three numericals in the black window at the top set the pitch, velocity and length of the notes generated. At RRG's right end you'll find four buttons used to rotate the four patterns relative to the four note outputs. When you choose a rotation other than the first, each black window's colour coding changes to show which generator controls its note output, and the controlling generator's number also appears to the left of the note display. Generators must be enabled to work in rotations, but you can suppress note outputs by setting their velocity to zero. When you do that for all but one generator, for example, rotation becomes a pattern swapper for a single note. Rotating patterns is a powerful tool for adding variety to a rhythm track while preserving its basic rhythm — try automating or modulating the Rotate control.
You can use RRG with any MIDI instrument, but it works especially well with Live's Drum Rack. You might use one RRG to sequence four kit-pieces and then use MIDI clips to play the rest. Alternatively, you can combine several RRGs in a MIDI Effect Rack and use them to play the whole kit. In either case, it's a good idea to put the RRG or Rack of RRGs on its own MIDI track and route that to the Drum Rack on a separate track. If you're using RRG with other MIDI clips, put these clips on a third MIDI track also routed to the Drum Rack track. You can now capture everything in MIDI clips on the Drum Rack track.
Kick & Stick
RRG's note-pattern controls start with the Division knob. You use that to generate a steady stream of notes at the interval set by the knob. The choices range from a 32nd note to one note every eight measures. Turning on the Odds button below the knob adds missing note divisions of the form 1/N for N32. The remaining controls let you venture beyond four streams of equally spaced notes. Offset shifts the whole pattern earlier in time. The Offset range is always 32 steps, but the step size depends on the Division setting — there are 16 steps per Division. For example, to generate a quarter-note kick-and-stick pattern, set Division to 1/2 (half-note) for both the kick and the stick patterns and then pull the stick back a quarter-note by setting its Offset to 8 (half of a half-note). If you want to add a hi-hat on alternate eighth-notes, set its pattern's Division to 1/4 and again set Offset to 8 (this time, that's half of a quarter-note).
This brings us to the Swing knob. Positive swing values move notes at even-numbered steps later in time and negative values move notes at odd-numbered steps later in time. The range is ±50 and the amount of swing is in proportion to the Division setting. In Screen 1 (shown above), notice that the Offset of 8 shifts the quarter-note 'Conga Swing 24' pattern earlier by an eighth-note, thereby pulling the swung notes, which were in the second and fourth beats of the measure, into the first and third beats, and pulling the straight notes, which were on the first and third beats, to the middle of the second and fourth beats. Try other Offset multiples of four in this example.
Euclid & Logic
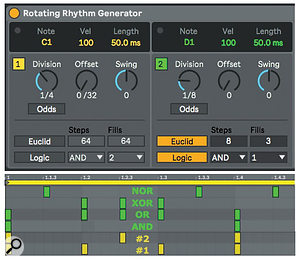
The Euclid and Logic controls at the bottom of each note generator take RRG beyond steady-stream note generation. Each is activated using the button with its name, and each has two parameters. Turning Euclid on fills a fixed number of steps as evenly as possible. Division sets the step size, and Offset shifts the whole pattern left (earlier in time) in single steps. That gives you all possible rotations of the pattern. As before, positive and negative Swing settings push steps at even- and odd-numbered divisions. Euclid's Steps (0 to 64) and Fills (0 to the number of Steps) parameters determine which steps hold notes. If the number of fills (F) divides the number of steps (S) then you get a note every S/F steps. Otherwise, there's a bit more calculating to do, and RRG does that under the hood. (You'll find a detailed explanation of Euclidean rhythms in the December 2014 Live column.) Beyond generating lots of new rhythm patterns, you can use Euclid to create very occasional events by having many steps with few fills. That is handy for longer, non-percussive sound effects.
 Screen 2: RRG's Euclid and Logic modules provide diverse note distributions along with dependency between note generators.
Four By Four
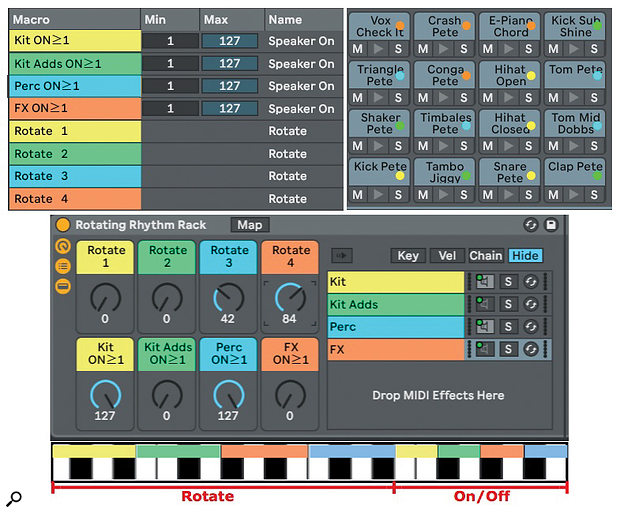
Combining several RRGs in a MIDI Effect Rack lets you generate and rotate more kit pieces. But they're still organised in groups of four, so you'll want to assign each RRG to kit pieces you want to rotate together and control with Logic settings. In Screen 3, I've split four RRGs into two banks of standard kit pieces and one bank each for percussion and sound effects. Using RRGs to play 16 kit pieces can get quite busy, so you'll want to disable and rotate the RRGs independently. Using the Rack's Chain Activators is a better way of disabling the RRGs than using their Device Activators because this allows them to keep running.
 Screen 3: Four RRG's in a MIDI Effect Rack sequence 16 pads of a Drum Rack. Two octaves of MIDI notes are mapped to Macro knobs that activate and rotate individual RRGs.
I use the four bottom Macro knobs for the Chain Activators and map the four top Macro knobs to the RRGs' rotators. For keyboard control, you can map two octaves of MIDI notes to the Macro knobs: four assignments with a four-note range to select each possible rotation and four assignments with a two-note range to control each Chain Activator. As mentioned, you can then capture the results by using separate tracks for the RRG Rack and the Drum Rack.
Beyond Beats
There are several ways to use an RRG as a chord generator and arpeggiator. The simplest is to drag sampled chords to pads in a Live Drum Rack, but that's also the least flexible because you're working with audio and can't apply scale correction or arpeggiation after the fact. A more flexible alternative is to use a third-party device that maps MIDI notes to chords. Examples include Scaler from Plugin Boutique and Chord Memorizer from Max For Cats.
It's also fairly straightforward to build your own chord machine from Live MIDI effects. Start with a MIDI Effect Rack with chains holding several Chord MIDI effects and map a Macro knob to choose among the chains. Follow that Rack with Live's Scale and Arpeggiator effects. Assign Macro knobs to the Scale Base and Arpeggiator Rate and Gate, and use the full anticlockwise position of the Macro knobs to turn Scale and Arpeggiator off. Precede the chord Rack with Random and Note Length MIDI effects, map a few more Macro knobs and you're done. Now use a single RRG and the zero-velocity trick described at the beginning to rotate different rhythm patterns to the chord generator.

No comments:
Post a Comment