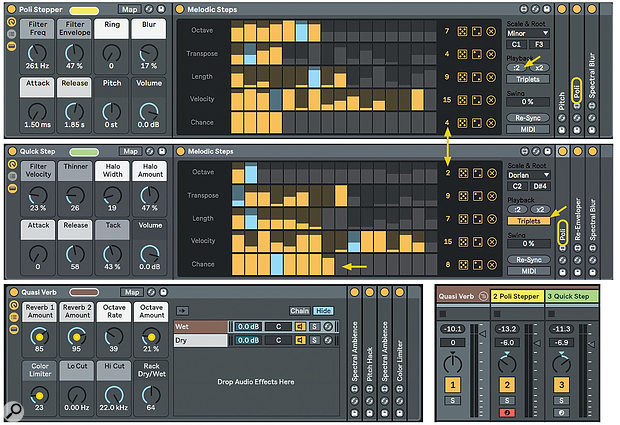
 Screen 1: Step‑sequencing Instrument Racks Poli Stepper and Quick Step feed the Quasi Verb Audio Effects Rack at the bottom.
We explore a free Max For Live Pack that could change the way you make music in Live.
if you want to take your music in an unexpected direction, there’s a free Max For Live Pack on offer that just might do the trick. Creative Extensions by Amazing Noises (www.ableton.com/en/packs/creative-extensions) comprises a malleable step sequencer for creating long‑form, randomly varying sequences, as well as two versatile instruments for playing them. But the icing on the cake is its collection of five mind‑bending audio effects for taking your sounds to the next level. This month we’re going to look at just what Creative Extensions can do you for.
Extending Creatively
For a first look, create a new Live set with two MIDI tracks and choose a tempo in the 70s. Go to Creative Extensions’ Racks/Sounds folder and, from the Sequence category, insert the ‘Poli Stepper’ Instrument Rack on one track and the ‘Quick Step’ Rack on the other (see Screen 1). Notice that each Rack uses the sequencer (named Melodic Steps) to play the Creative Extensions instrument, Poli. On the right side of the Melodic Steps panels click the ‘:2’ button in the Poli Stepper Rack and click the ‘Triplets’ button in the Quick Step Rack. Start Live playing, pan the tracks slightly apart and adjust their levels to taste. Notice that Poli Stepper plays a quarter‑note sequence, Quick Step plays an eight‑note triplets sequence, and the two instruments are tuned an octave apart. Most importantly, while the patterns are repetitive in nature, the sequences almost never actually repeat either individually or relative to each other. We’ll see why at the beginning of the next section.
To get a taste of the five effects, enclose both tracks in a Track Group and insert the Quasi Verb effect from the Pack’s Effect Racks/Space folder on the Group track. Start Live playing again and you’ll notice some added space along with a bit of coloration. Turn Quasi Verb’s first, second, fourth and fifth Rack knobs fully counterclockwise and then turn them up individually to hear the contribution of the three effects used in the Rack: Spectral Blur, Pitch Hack and Color Limiter. (The Spectral Blur preset is labelled ‘Spectral Ambience’ and is used twice.)
For a very different approach using the same three effects, replace the Quasi Verb Rack with the ‘Serial Pitch Hacker’ Rack from the Modulation & Rhythmic folder. Turn the Rack’s Recycle knob to ‘0 percent’ and the Pitch Blend knob to ‘0.’ You’ll now hear the pattern change every three bars, and the notes and sounds will play in reverse in some iterations. Rotate the Pitch Blend knob fully clockwise and the repeat rate will be four bars. More on how all that works in the Pitch Hack section below.
Steps & Sounds
Melodic Step’s deceptively simple control panel belies the complexity of the sequences it can generate. It has five 16‑step rows: Octave, Transpose, Length, Velocity and Chance. You’ll find controls at the right end of each row for step count, randomisation and reset. Depending on the variation in step‑count settings, it can take a long time for the rows to come back into alignment (1260 steps in the example at the top of Screen 1), but the Re‑Sync button, which you can automate, gives you the last word. With the MIDI button turned on, incoming MIDI Notes toggle the sequencer on and off as well as setting the root note. The Chance row controls how likely each step is to trigger. Because the lowest Velocity level is 15, you must pull the corresponding Chance bar all the way down to force a rest. Melodic Step’s scale choices are limited, but you can work around that by inserting Live’s Scale effect after Melodic Steps.
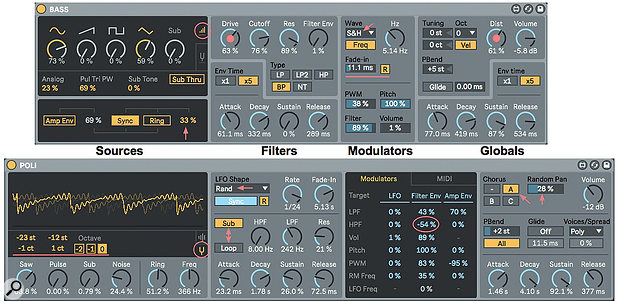
Creative Extensions’ two instruments, Bass and Poli, are upgrades of instruments from the Max For Live Essentials Pack. Bass is a bass‑oriented five‑oscillator monosynth also useful for leads and pitched effects, whereas Poli offers mono, poly and unison modes and is useful for everything. They have similar layouts with sub‑panels for sources, filter, modulation and global controls (see Screen 2). The oscillator sub‑panels have buttons to toggle between mixing (bars icon) and tuning (tuning‑fork icon).
 Screen 2: The Bass and Poli instrument controls are divided into four panels: sources, filters, modulators and global settings.
You can tune Bass’ sine, sawtooth, pulse and triangle oscillators in semitones and cents. The sub‑oscillator is always an octave below the zero tuning of the other oscillators; its Sub Tone control adds distortion and the Sub Thru button bypasses the filter. The bottom of the panel holds toggles for oscillator hard‑sync and ring‑modulation, which are applied to the saw, pulse and triangle oscillators, and you can apply the amp envelope to the modulation amount. Both modulators use a hidden oscillator whose tuning is set as a percentage of two octaves by the numerical to the right of the Ring button. The filter section offers five filter types along with ADSR envelope controls. The Drive control applies overdrive distortion before the filter. The modulation section holds a free or sync’ed, multi‑waveform LFO that you can apply to pulse‑width, pitch, filter and volume. (In Sync mode the LFO is only active when Live’s transport is running.) You can set an LFO fade‑in time, and in Free mode, you use the R button to make the LFO reset with each note. The Globals panel includes master volume; tuning in octaves, semitones and cents; saturation via the Dist knob; pitch‑bend; glide or portamento; and ADSR amp‑envelope controls.
Poli offers a coloured‑noise generator along with sawtooth and pulse oscillators and a sine/sawtooth sub‑oscillator. The XMod control in the mixing panel uses the pulse oscillator to modulate the pitch of the sawtooth oscillator. Sine/sawtooth ring modulation is also available. You can tune the sawtooth and pulse oscillators independently and shift the sub‑oscillator down one or two octaves. The graphic at the top of the oscillator section gives a real‑time view of the final output, including the effect of modulation and the envelopes. The filter section houses separate high‑pass and resonant low‑pass filters with switches to let the sub‑oscillator bypass the filters and to loop the AD stages of the ADSR filter envelope. The modulation section lets you apply the LFO and both envelopes to a variety of targets, and the envelope routings are bipolar. The section’s MIDI tab lets you also route key number, velocity and aftertouch to a few targets. Finally, the Globals panel offers chorus, random panning, pitch‑bend range and target (sawtooth or all oscillators), glide, a mono/poly/unison mode drop‑down (with percent detuning for unison mode), and ADSR amp‑envelope controls.
Just For Effect
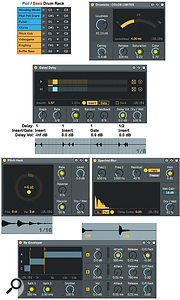
 Screen 3: Creative Extensions’ five audio effects with the settings described in the main text.Each Creative Extensions effect has a personality all its own and tweaking their controls is the best way to get a sense of what they do. For source material in Screen 3, I’ve used an eight‑pad Drum Rack with four Poli and four Bass percussive presets. Here’s a brief description of each effect.
Published December 2018
No comments:
Post a Comment