By Mark Wherry
The first paid‑for update to Cubase for two years introduces some major innovations for sequencing and composition, including integrated Melodyne‑style pitch correction and editing.
It's been nearly nine years since Sound On Sound last reviewed Cubase 5. However, that was version 5 of the original Cubase application, the last version released before the introduction of Cubase SX. Since then, Steinberg have been consistently improving Cubase alongside their other, more post‑production‑oriented audio application, Nuendo. Cubase 4, released a little over two years ago, dropped the 'SX' suffix, returning the product to its original name once again.
Unlike the earlier versions of Cubase SX, which added interesting tools for musicians to embrace, Cubase 4, if I'm being honest, just didn't seem that exciting to me. Most of the new functionality centred around the new Media Bay, which only really helped you navigate the content that was provided by Steinberg, and VST3, an update to Steinberg's plug‑in technology that was initially unavailable to third‑party developers.
However, in the two years following Cubase 4's release, Steinberg released two important updates: 4.1, bringing significantly better mixer routing (and parity with Nuendo 4.1), and, more recently, 4.5, which introduced VST Sound as a new way to integrate content into Media Bay. In addition, the VST3 SDK was finally made available to third‑party developers. Although the uptake has been slow, the first third‑party VST3 plug‑ins have now started to appear, and you get the feeling that Cubase 4 was, in retrospect, setting the scene for greater things to come. Enter Cubase 5.
 Cubase 5 now makes it possible to include the Tempo and Time Signature tracks in the Track List of the Project window. Note how the selected Time Signature event shows up in the Event Info Line.
Bizarrely, one of the features I was happiest to see in Cubase 5 is also, by comparison, one of the smallest. I'm sure that I haven't been the only Cubase user who, over the years, has dreamed of being able to see and edit Tempo and Time Signature events in the Project window without having to open the Tempo Track editor. Well, it's finally possible: you can now create a Tempo track and a Time Signature track in the Track List on the Project window, and edit Tempo and Time Signature events directly on these tracks.
The best place for the Tempo and Time Signature tracks is obviously at the top of the Track List, and so Cubase's Divide Track List feature is essential here to ensure that these tracks stay next to the ruler, even if you scroll the Track List. Part of me wishes Steinberg would have incorporated these new tracks into a larger ruler, but this implementation is at least consistent with adding Video, Marker, Arranger, Transpose, and other ruler tracks. And an added bonus is that you have easy access to Process Tempo and Process Bars via Track buttons on the Tempo and Time Signature tracks respectively.
Perhaps the biggest down side to having Tempo and Time Signature variation implemented within tracks rather than as part of the main ruler is that it's currently not possible to add these types of tracks to other editor windows, such as the Key editor. Given that you can now edit tempo and time signature events in the Project window, it would be handy to be able to do this while editing MIDI notes as well (and no, using the in‑place MIDI editing just isn't the same). Even though Logic Pro's piano‑roll editor and Pro Tools 8's MIDI editor have fewer features than Cubase's Key editor, both afford you the ability to manipulate tempo and signatures without having to open another window.
 When enabled, the Virtual Keyboard shows up at the end of the Transport panel and transforms your computer's keyboard into a MIDI input device.Another small yet potentially handy feature is that Steinberg have brought the Virtual Keyboard from their Sequel 2 into Cubase, allowing you to use your computer's keyboard as a MIDI input device. When Virtual Keyboard is enabled (from the Devices menu or by toggling Alt/Option‑K), a new section of the transport panel shows a visual representation of what keys on your keyboard trigger the Virtual Keyboard.
A series of indicators underneath the Virtual Keyboard display shows you which octave you're playing, and you can adjust this range with the left and right cursor keys. A slider to the right of the Virtual Keyboard shows you the velocity level that will be triggered (although you can't actually see the precise number), which can be adjusted using the up and down arrow keys.
An alternate piano‑roll display mode is also provided for the Virtual Keyboard, offering enhanced mouse control over a three‑octave range and adding a few extra notes playable by the computer keyboard as well, although you unfortunately lose the on‑screen labels to let you know what keys trigger what notes. In this mode, clicking a note and dragging the mouse horizontally adds pitch‑bend, while dragging vertically controls modulation, and additional sliders are displayed to the left of the keyboard for these controls as well.
While you're probably not going to use your computer's keyboard for performing a virtuosic solo, the Virtual Keyboard is invaluable for those situations when you might only have your laptop and no access to a MIDI keyboard. My only complaint is that when Virtual Keyboard is enabled, only a couple of other key commands are supported (such as the space bar), which becomes a real pain. Obviously the Virtual Keyboard isn't going to be compatible with every key command, but I really think all commands that use modifiers or the numeric keypad should be allowed. As it is, you have to keep toggling Virtual Keyboard on and off, usually when you realise it's still enabled and that's why the key command you just pressed isn't working.
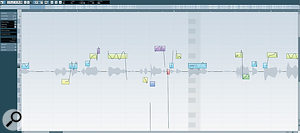
 VariAudio is a new way to edit the pitch (and, to some extent, the timing) of monophonic notes in an audio event directly in the Sample editor.
The first big feature that really caught my attention in Cubase 5 is VariAudio, which makes it possible to detect and manipulate the individual notes of a monophonic audio recording directly in Cubase's Sample Editor window. If you've ever seen or used Celemony's Melodyne, you'll instantly get what VariAudio is about, and while it was obvious that this type of technology belonged in a digital audio workstation, as opposed to having to exchange audio files with another application or plug‑in, it's a pleasant surprise to see Steinberg implementing such functionality in Cubase 5. Note, however, that VariAudio is only available in the full Cubase 5: Cubase Studio 5 users will have to upgrade to Cubase to get this feature.
To edit an audio recording with VariAudio, you simply open it in the Sample editor (usually by double‑clicking an audio event on the Project window) and open the VariAudio section of the Sample editor's Inspector to switch to this mode. You'll notice that the vertical amplitude scale is replaced by a piano keyboard, and a single waveform will be displayed, even if the audio event itself is stereo. In order to edit the individual notes, Cubase needs to analyse the audio and create so‑called Segments, where each Segment will represent a single note in the audio. You can do this by enabling the 'Pitch & Warp' mode in the VariAudio Inspector section.
A Segment is basically akin to a note in the Key editor, in that its pitch is plotted on the vertical axis and time position on the horizontal. Should VariAudio not quite detect the Segments as it should, a Segments mode is also provided to let you adjust where the Segments are defined within a piece of audio. For example, if VariAudio fails to distinguish two notes of the same pitch that are very close to each other, you can simply divide that one Segment into two at the appropriate place on the waveform.
Unlike notes in the Key editor, Segments don't necessarily fall onto discrete pitch steps, since, especially with singers, the chances of having recorded a precise frequency for that pitch is quite unlikely, for both creative and technical reasons. If you hover the mouse over a Segment, the editor will display the numerical deviation from the detected pitch in cents (if you have sufficient horizontal resolution), a value that can easily be adjusted in either the Info Line or by using other mouse and keyboard commands.
Another visual cue that's displayed when you hover the mouse over a Segment is a translucent piano keyboard that appears in the background behind that particular note. This is useful because the main background for the editor is a single‑colour gradient that, unlike the background in the Key editor, doesn't distinguish black and white notes. Having a translucent keyboard appear behind a note is fancy, but in some ways, just having the whole background show the translucent keyboard might actually be more useful, at least as an option. Knowing the pitches of notes you're not hovering over can actually get quite tricky if you have a large display.
Segments can be dragged up and down to different pitches, just like notes in the Key editor, which is great for rewriting parts. And though you can't duplicate Segments, you can always duplicate the audio event being edited onto another track in the Project window and edit the Segments in the duplicate to create a harmony line, for example. One particularly nice touch when rewriting the pitches of notes in this way is a MIDI step input mode, which works similarly to MIDI step input in the Key editor, letting you adjust each successive Segment's pitch simply by playing it on your MIDI keyboard.
These features are great for creative editing, but VariAudio can be used for corrective editing as well, enabling you to easily fix the tuning of notes, or even iron out pitch deviations within a note, such as a singer's vibrato. You don't necessarily have to adjust each Segment manually, thanks to two useful functions that proportionally adjust the currently selected Segments closer to an absolute state. Pitch Quantize gradually pulls a note closer to its identified pitch, while Straighten Pitch evens out the micro‑tuning within the note that VariAudio detected. Very handy indeed.
What's nice about VariAudio's micro‑tuning detection is the way the editor plots this information as a graph for each Segment, allowing you to easily see the pitch deviation within a Segment. VariAudio even allows you to go beyond simply straightening out this micro‑tuning, so you can tilt the micro‑tuning graph by dragging the top left or top right of a Segment, making it possible to easily apply a portamento from or to the next Segment.
You can freely drag Segments up and down to adjust the pitch, but not from side to side. However, it is possible to adjust the timing by dragging either the bottom‑left or bottom‑right corner of a Segment. This causes Warp Tabs to be created, meaning that adjusting the start and end points of a Segment can affect any Segments that might be either side of the one in question. This limits the type of timing edits that can be performed using VariAudio, but it's not dissimilar to the way this type of editing is handled in the current version of Melodyne.
As well as manipulating audio, VariAudio has another neat trick up its sleeve: converting the detected Segments in an audio event to a MIDI part. And what's particularly useful is that this process can convert micro‑tuning information into either static or continuous pitch‑bend data. If you choose static pitch‑bend conversion, the pitch‑bend will be used to provide the tuning adjustment in cents, as opposed to the continuous conversion, which will attempt to mimic the complete micro‑tuning graph with pitch‑bend data.
Overall, VariAudio is a pretty impressive feature, both in terms of what it lets you do and the quality of the results, although I found that pitch adjustments sounded more natural than time adjustments, especially when performing a more drastic edit. And while Cubase doesn't necessarily replace a product like Celemony's Melodyne, especially with the forthcoming version of Melodyne supporting polyphonic material, it's so much more convenient to have this type of editing in your digital audio workstation, particularly since the edits are non‑destructive, are saved with your Project, and can easily be adjusted at any time.
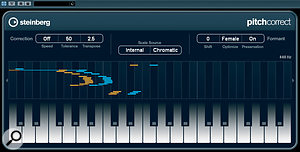
 The new Pitch Correct plug‑in provides automatic, real‑time pitch correction for situations when you don't need the editing control afforded by VariAudio.Accompanying the new VariAudio feature in the pitch‑correction department is the new Pitch Correct plug‑in, which is included in both Cubase and Cubase Studio, and is based on Yamaha's Pitch Fix technology. Pitch Correct is basically Steinberg's answer to Auto‑Tune, and corrects, in real time, the pitch of notes detected in monophonic material.
In recent years, sample‑based instruments have continued to grow and become more complex, offering an incredible amount of control for the composer looking to create natural‑sounding performances of acoustic instruments. However, for the most part, the method for how we use sequencers to program these sampled instruments has remained largely the same, and the sequencer is mostly dumb about the context of the music being programmed.
One example of this is the way many sampled instruments use key switches (notes on a MIDI keyboard that trigger an action in a sampled instrument) to select different articulations. For instance, you might have a violin instrument where the key switches allow you to select different playing styles, such as legato, staccato, pizzicato, and so on. This is fine, but it can make editing the resulting MIDI data quite difficult, since you have to remember what the various key switches trigger — and, rather annoyingly, since they are merely notes, key switches don't chase, so if you jump around to different parts of the Project, most sequencers won't know to go back and find the last key switch to ensure your pizzicato section really does play pizzicato.
Steinberg have solved this problem in a rather neat way in Cubase 5 by introducing a feature called VST Expression that's conceptually similar to Drum Maps. In the same way a Drum Map can be assigned to a MIDI or Instrument track to tell Cubase what drums are assigned to what notes, VST Expression enables an Expression Map to be assigned so that Cubase knows about the various articulations that can be played by the instrument to which the track is routed.
An Expression Map defines Articulations, and there are two different types of Articulation provided: Directions and Attributes. A Direction is a general change in playing style for a duration in a given part, such as when a violinist switches from bowed notes (arco) to pizzicato, whereas an Attribute is an articulation that's just applied to a single note. For example, if our imaginary violinist is playing an arco passage but the occasional note should be played staccato, the Direction will be arco, and the staccato notes will be assigned the staccato Attribute.
 The VST Expression Setup window is where you manage, create and edit Expression Maps. Here you can see the included Violins Combi Expression Map for Steinberg's Halion Symphonic Orchestra VST Instrument.This is obviously pretty powerful, but what's even more useful is that Articulations aren't just there to provide access to key switches. Once an Articulation is defined in an Expression Map, you actually have quite a bit of control over what it will do when active, and having it trigger a key‑switch note is just one possibility. Articulations can send MIDI Program Change messages, change the channel on which MIDI data is sent, and also manipulate the pitch, length and velocity of notes, much like the old MIDI Meaning feature found in the score editors in Cubase and many other sequencers. This means that even if you're working with an older instrument that doesn't support key switches, it's possible to instead create an Expression Map that sends Program Change messages to reproduce the same type of behaviour that we've been discussing for newer, key‑switchable instruments.
In addition to these various output mapping options, each Articulation also allows the input mapping of a MIDI note, enabling you to switch Articulations in Cubase from a MIDI keyboard in exactly the same way you would a conventional key‑switchable instrument. This is important because it means that when you perform key switches on your MIDI keyboard, Cubase now knows about these key switches and will record them as Articulation events instead of MIDI notes. Unless, that is, you're using the Retrospective Record feature, since this mode still seems to capture the key switches as notes — an issue which, according to Steinberg, should be fixed very soon.
While the input and output mapping options are quite comprehensive, there are a couple of extra options that would make Expression Maps even more useful. Firstly, it would be great to have the option of sending MIDI Controllers (in addition to notes and program changes) in the output mapping section, and Steinberg will apparently include this in a 5.0.1 update that may even be available by the time you read this. It would be equally useful to have more input mapping options; for instance, you might want to trigger Articulations from a different type of controller, and there are situations where it's useful not to have notes triggering Articulations, such as when you want to select the same Articulation on multiple instruments that have different pitch ranges simultaneously from a single MIDI message.
Working with Expression Maps is pretty simple. You assign a Map to a MIDI or Instrument track via the Expression Map pop‑up in the new VST Expression Inspector Section, from where you can also open the VST Expression Setup window to edit and create Maps. Fortunately, Cubase 5 comes with a selection of ready‑made Expression Maps for the Halion One and Halion Symphonic Orchestra instruments to get you started (HSO is sold separately, but you get a 90‑day demo with Cubase 5). Creating your own Expression Maps is not particularly hard, but does require reading the appropriate chapter in the manual.
 A new Articulations controller lane in the Key editor makes it easy to edit Articulations. Note how the Event Info Line now has an Articulations option, which in this example shows that a Half‑Tone Trill Attribute has been applied to the selected note.Once an Expression Map is assigned, you can use the new Articulations controller lane in the Key, Drum and In‑place editors to visually edit Articulation changes. The Articulations controller lane works similarly to other controller lanes, but is divided into a number of sub‑lanes, one for each Articulation, making it easy to see and edit Articulation changes.
While the Articulations controller lane enables you to see all Articulations, from an editing perspective it's most convenient for working with Directions. For assigning Attributes to individual notes, there's a new Articulations option in the Event Info Line. When one or more notes are selected, this lets you assign an Attribute from the pop‑up menu listing all available Attributes in the currently assigned Expression Map.
Although assigned Attributes do show up in the Articulations controller lane, this isn't always the best way to see what Attributes are assigned to what notes, because it's obviously possible to have a chord where the top note might have a different Attribute from the other notes in the chord, an accent, maybe. The ability to colour notes by Attribute would be very helpful. Meanwhile, the List editor is actually one of the clearest places to see all of the Articulation data, since Directions show up as Text events and Attributes are listed in the Comment field of a given MIDI note event.
 The Score editor enables you to both see Articulation events in a musically relevant way and add new Articulation symbols via the VST Expression Inspector Section. While the notes aren't interesting, this example shows a direct interpretation of the same data displayed in the Key editor illustration.One of the most useful editors for interpreting Articulation events is the Score editor, and this is where things could get really interesting for composers who work with notation and would like to have a more precise score to pass onto an orchestrator (via MusicXML), or even directly to a musician. Because Articulations that are defined in an Expression Map can either have a musical symbol or an item of text associated with them, Articulation events automatically appear on the score in the Score editor in a mostly musically correct fashion, which is just fantastic. And although they appear light blue by default, you can easily change the colour of their appearance, if you like, in the Preferences window.
There are a couple of areas where the layout of Articulations could be improved. Firstly, Direction Articulations often end up on the staff, and especially for text events, it would be great to set a default staff offset so they would mostly stay clear, either above or below. Secondly, it would be helpful if there was a default Articulations Text Attribute Set, so that you could globally change the font used for Articulation text.
In addition to showing existing Articulation events, you can also add Articulations to the score, as all of the available Articulations show up as symbols in a new VST Expression Section of the Score editor's Inspector.
VST Expression is a powerful and generally well thought‑out feature, and Steinberg have clearly thought about what a composer will need. As with VariAudio, it was perhaps inevitable that sequencers would incorporate such a feature, now that composers are working with increasingly large and complex soft‑synth setups. But I think Steinberg deserve credit for being the first to address this need, and for incorporating it meaningfully into so many areas of the program, and especially into the Score editor.
Staying with the theme of new MIDI‑related composing features, an oft‑neglected and sadly under-used feature of Cubase is the ability to use MIDI plug‑ins to process MIDI events on MIDI tracks, just as you would process audio events on audio tracks with VST effects plug‑ins. In Cubase 5, Steinberg have revitalised their collection of bundled MIDI plug‑ins with updated interfaces and some completely new plug‑ins, such as MIDI Monitor.
MIDI Monitor is a rather useful tool that lists the MIDI events being output by the track on which it's inserted. You can even save the listed events in a text file for further study. To help prevent the list from becoming cluttered with events that you don't want to see, various filters are provided for different types of MIDI events, and you can even filter out events played back from MIDI parts or live MIDI input.
 Beat Designer is a new MIDI plug‑in step sequencer that makes it easy to create drum patterns.Besides analysis, if you spend time creating drum loops from individual samples, you'll almost certainly like the new Beat Designer MIDI plug‑in, a pattern‑based step sequencer ideal for programming drums. Each pattern consists of a number of lanes, and each lane can be set to trigger a specific MIDI pitch. The name of a lane is based on the Drum Map that's set for the track on which Beat Designer is being used, and a General MIDI map is used if no Drum Map is set. This is all right, except that I'm guessing most people will use Beat Designer with VST Instruments, and wouldn't it be nice if somehow the drum names used in the VST Instrument could find their way into Beat Designer? One would hope this would at least be possible with those made by Steinberg.
Adding steps is a simple matter of clicking in the step display for a given lane, and you can remove a step by clicking it again. You can also set the velocity for a step by clicking and dragging, where the colour of the step will change to reflect the velocity, which is a nice touch; and Beat Designer also makes it easy to add flams to individual steps. You can set between and one and three flams for a step to play by clicking in the bottom part of a step, and the number of flams will be indicated by one, two, or three dots. At the bottom of the Beat Designer interface are global controls for how the flams are performed, and you can adjust the timing and velocity of the flams. Being able to vary the timing is actually very neat, because this makes it possible to have the flams play before or after the beat. Staying with timing, you can also set each lane to one of two swing settings, in addition to setting a slide value to independently move a lane forwards or backwards in time.
A pattern can be between one and 64 steps, and you can set the resolution of these steps between a half note and a 128th note, with various triplet options along the way. The resolution of the pattern also dictates the note length of a step; so if the resolution is eighth‑note, each step will last for a quaver on a eighth‑note grid. Because the triggered length is global across all lanes, I can't help but think it would be useful to have a gate control on each lane, so you could add to or subtract from the global note length.
The hierarchy of patterns is little confusing at first, but in essence, a single pattern bank (which can be stored as a preset) consists of four sub‑banks, and each sub‑bank contains 12 patterns. The pattern selector is represented by an on‑screen one‑octave keyboard, and you can either select patterns using a combination of Beat Designer's on‑screen keyboard and sub‑bank buttons, or remotely via MIDI over a four‑octave range when Jump mode is enabled. Not enabling Jump mode lets you still trigger sounds on the MIDI Track rather than changing patterns, which is also quite useful.
 Groove Agent ONE is an MPC‑inspired drum machine VST Instrument that can also be used to play the individual slices of a drum loop.
A new instrument plug‑in that works particularly well with Beat Designer is Groove Agent ONE. This is not a version of Steinberg's separately available Groove Agent VST Instrument, but Steinberg's take on an MPC‑like drum machine, even offering the ability to import mappings from MPC PGM‑format files. It provides a really simple way of playing back one‑shot samples or loops.
Although Groove Agent ONE is supplied with a number of preset kits, what's really nice about this plug‑in is how easy it is to create your own kits. As you would expect, there are 16 virtual pads onto which you can drag audio events from your Project or audio files from the Media Bay, and then trigger the assigned sound by clicking the pad or by setting a MIDI note that will trigger it remotely. It's possible to drag multiple sounds to a single pad, thereby creating different layers that are triggered via velocity; and if 16 pads aren't quite enough, Groove Agent ONE actually offers eight Groups of 16 pads (similar to an MPC's pad banks), accessible via the Group buttons. These conveniently show a red outline if they contain assigned pads.
An LCD‑style view in Groove Agent ONE's interface enables you to adjust various settings for the currently selected pad, such as tuning, adding a filter, adjusting the amplifier envelope, setting the play direction (making it easy to reverse a sample non‑destructively), defining whether the pad triggers the sample to play one‑shot or for as long as the pad (or corresponding MIDI note) is held down, and so on. There are 16 stereo outputs available from Groove Agent ONE, and it's possible to assign individual pads to any of these outputs. One slightly curious omission in terms of editable parameters is that it doesn't seem to be possible to adjust the sample start and end points, which is a shame, since a waveform overview is available from the LCD.
A particularly neat trick Groove Agent ONE has up its virtual sleeve is that it's also possible to use it for playing back sliced loops. Simply slice up a loop in the Sample editor (which you can easily do by creating hitpoints and using the Slice & Close button), open the sliced loop in the audio Part editor, select all the audio events and drag them onto a pad. The slices will be added to consecutive pads so that you can now trigger elements of the loop from a MIDI keyboard.
Better still is that, by dragging the MIDI Export pad in the Exchange section into your Cubase Project, you can make Groove Agent ONE export a MIDI file that plays the slices for you as a loop again, just as you can do with some third‑party instruments, such as Spectrasonics' Stylus RMX. This is a pretty nice feature, and my only complaint is that the MIDI file you import is always added to a new track — you can't drag the MIDI file onto a track that's already created and has its output set. However, this isn't strictly a Groove Agent ONE issue and is something of a minor point.
Overall, Cubase 5 is a really fantastic update, and, compared to version 4, actually has musically useful new features that cater to many different groups of musicians. From major new facilities like VST Expression and VariAudio, to more workflow‑oriented improvements like the batch export feature in the Export Audio window, which I didn't have space to discuss in more detail, allowing you to perform multiple exports of tracks or mixer channels with a single command, there really is something to make every Cubase user smile in this update.
Like any piece of software, it would seem, Cubase 5 isn't perfect. There are a few quirks here and there, such as an instability that can manifest itself when you have multiple controller lanes open in the Key editor, or the fact that certain 'on top' windows like the transport panel don't always minimise correctly with the parent window on Windows Vista. But at least Steinberg will be addressing many of these issues in the forthcoming 5.0.1 update mentioned earlier. One particular area of the application I wish Steinberg would look at in a future version, though, is the Preferences window.
With so many preferences, it's becoming really hard to remember where to find certain options, especially when they get moved around from version to version or disappear altogether. Mac OS X Tiger's System Preferences window showed one possible approach to locating certain settings, allowing you to search for items and having the window disclose where suitable matches might be found. And even Reaper, the "reasonably priced” digital audio workstation, offers a Find field in its Preferences window. We really need something like this in Cubase.
Ultimately, though, I actually do like the direction of Cubase 5. Rather than simply focus on redoing the user interface, or adding only 'me too' features from competing products, Steinberg seem to have really thought about functionality that will help users get more from the application. If Sound On Sound ever has to review Cubase 5 for a third time, there will be a high standard to beat.
Unless otherwise stated, references to Cubase 5 in this review relate to both the product that's named Cubase 5 and its feature‑reduced sibling, Cubase Studio 5. If someone could just explain to me why the version with fewer features is the one that's called Cubase Studio, I'd love to understand this particularly odd convention.
With more and more computers being sold with 64‑bit operating systems, and musicians' demands increasing due to the desire to run more plug‑ins and ever‑larger sample libraries, having 64‑bit music applications is becoming quite important. Although Steinberg have made available 64‑bit versions of Cubase 4 (and Nuendo 4) for some time, Cubase 5 marks the release of the first fully supported 64‑bit release of Cubase on the 64‑bit (x64) version of Windows Vista. This is a great thing, especially for those working with large Projects, although there are a couple of points to bear in mind if you're considering running the 64‑bit version of Cubase 5.
The most important consideration is that there need to be 64‑bit drivers for all of the hardware you require on your system. Most computer components should be covered, including most audio hardware, but some musician‑specific hardware lacks 64‑bit support at present, including DSP cards and instruments like Access's Virus TI. While plug‑ins technically need to also be specifically compiled to work inside a 64‑bit application, Steinberg supply Cubase with a technology called VST Bridge, allowing your existing 32‑bit plug‑ins to run with the 64‑bit version of Cubase. For more information about this, check out our Nuendo 4 review back in the December 2007 issue of SOS (/sos/dec07/articles/nuendo4.htm).
Besides hardware and plug‑ins, Propellerhead's ReWire and REX file technologies are currently unsupported in 64‑bit operating systems, and users who work with video inside Cubase should note that QuickTime support is also unavailable at the moment. If you use one of Cubase's other Video Players, you need to make sure you have 64‑bit video codecs that support the video files you'll be using.
A 64‑bit release of Cubase for Mac users is also being prepared, but, in order for this to be possible, Steinberg needed to port all of Cubase's application framework code to use Apple's Cocoa framework instead of the old Carbon API, which originally eased the transition for developers from Mac OS 9 to X. So Cubase 5 now makes full use of the Cocoa framework, making a Mac 64‑bit release possible, although it seems likely Steinberg may introduce this following the release of Apple's next major version of Mac OS X, Snow Leopard (10.6).
 LoopMash is a great plug‑in for creating new loops based on existing loops, and the results often sound as quirky as its interface suggests.
New in Cubase 5 (but not Cubase Studio 5) is a unique plug-in called LoopMash. When you drag in a loop from the Project window or Media Bay, its rhythmic and spectral properties are analysed, it's chopped into quaver slices and it's placed onto one of eight tracks. When you drag in more loops, LoopMash will then start to look for slices in those loops that are similar to slices in the 'master' loop. For example, if you drag in an acoustic guitar loop, LoopMash might substitute snare hits from a master drum loop with what it thinks are similar slices from the guitar loop, which can be pretty neat.
Most of the magic happens algorithmically, but there is some user control. A slider on each track tells LoopMash how vigorous it should be in detecting similar slices. The lower the value, the fewer slices will be used from that track. You can also set how many slices should play at the same time, so if you have two loops playing and 'Number of Voices' is set to 1, only one slice will play at a time. You can choose how many slices can be triggered from the same loop at once, and set a randomisation factor to vary the results.
The plug-ins bundled with DAWs are often fairly uninspiring, but LoopMash is a quirky exception, generating from existing audio loops ideas you would never otherwise have thought of.
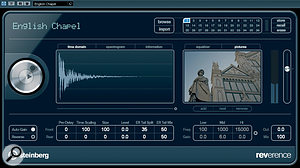
 Reverence is a new VST3 convolution reverb that sounds remarkably decent for a Steinberg reverb! Here you can see it being used on a 5.1 audio track.
I think it's fair to say that the reverb plug‑ins bundled with Cubase have never been particularly stunning. However, this is another area that Steinberg have addressed in Cubase 5 (although, sadly, not in Cubase Studio 5), finally taking the lead of many other developers and including a good‑quality convolution reverb plug‑in.
Reverence (and I can't make up my mind if I like this name or not) has most of the settings you would expect to find in a reverb, such as the ability to change the reverb time, adjust the EQ of the reverb, and so on, along with a couple of settings you might not expect. For example, a single Reverence preset actually has the ability to comprise 36 different programs, where a program defines all of the settings for a reverb, including the impulse response. A program is, therefore, basically the same as a preset; but the advantage in having 36 presets within a preset, as it were, is that all of the impulse responses required for the programs in a preset are pre‑loaded with the preset. This makes it possible to switch between programs without the usual lag associated with recalling a convolution reverb preset, which is great if you need to automate changes in impulse responses.
A couple of other options I liked, which you'll find in some other reverbs (but not all) include the ability to reverse the impulse response — great for sound-design work — and a play button that triggers a click, so you can audition a setting without having to run audio through the plug‑in.
Reverence sounds pretty good, with some decent impulse responses supplied, such as a venerable chapel in Cambridge and, slightly more esoteric, a tunnel. But, perhaps best of all, Reverence is capable of surround operation, with many surround impulses provided to take advantage of this capability. Unfortunately, though, I did encounter a slight performance issue when running the surround version of Reverence on my test computer, an older but still pretty powerful dual quad‑core Xeon machine running at 2.66GHz with 16GB memory. Cubase's red CPU overload indicator started flashing and the audio output became garbled. This would happen in a Project with only one 5.1 audio track and only Reverence loaded, so I'm not sure if I was doing something wrong, but unfortunately I didn't have time to test this on another configuration. The stereo version worked just fine, however, and seemed quite efficient.
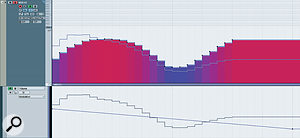
 You can now control how Volume automation events on a MIDI track interact with Volume MIDI Controller events in the controller lane. The grey line indicates the actual values that will be sent to your MIDI device, having been modulated by the automation events on the same track.
Cubase 5 offers a number of improvements when it comes to automation, some of which have been facilitated by the inclusion of Nuendo 4's Automation Panel. While you don't get all the commands from Nuendo 4, a particularly useful one is the ability to be able to suspend the reading and writing of certain types of automation, such as Volume, Pan, EQ, and other mixer controls. This means that it's now possible to just record pan automation, for example, so that any volume moves are ignored during a pass, which is a big improvement over the all‑or‑nothing approach in previous versions.
Another improvement concerning automation, which is a completely new feature in Cubase 5, resolves a long‑standing issue concerning a conflict between automation events and MIDI Controller data, whereby having Volume automation events on a MIDI track would result in MIDI Controller 7 (Volume) messages being sent to your MIDI device. This wasn't necessarily a problem, but the same MIDI track could simultaneously contain MIDI Controller 7 data that could conflict with the automation, and Cubase had no way of dealing with the fact that two completely different sets of MIDI Controller 7 messages were being sent to the same device.
This issue has received some serious thought by Steinberg, and it's now possible to define how automation and MIDI Controller events should interact with each other via a new Part Merge Mode option on automation tracks. When you work with MIDI Controller data in the controller lanes or the Key, Drum or In‑place editor, the familiar coloured blocks still represent controller data, but a new automation‑style blue outline appears along the top. The blue line is accompanied by a second, grey outline that shows you the actual value of the MIDI Controller that will be sent to your MIDI device — the consolidation of MIDI Controller and automation data into a single stream of messages for any given type of MIDI Controller.
There are a number of different Part Merge Mode options to set how automation and Controller events interact, and the default is Average, meaning that an average value between the controller data in a part and the Automation events on a track is used. Personally, I found the Modulation option more sensible for me, since it provides a more obvious trim‑like functionality, allowing you to keep the basic shape of your controller data, but adjust it proportionally with automation events. But the good thing is that, whichever mode works best for you, it's possible to set your own defaults for each type of MIDI Controller individually, using the MIDI Controller Automation Setup window.
The new MIDI Controller automation handling is something certain Cubase users have been waiting for since Cubase SX 1, and although it can initially seem a little complicated, it's a very thorough and well thought‑out solution.
Pros
- VariAudio provides Melodyne‑like editing of monophonic audio right inside Cubase's Sample editor.
- VST Expression makes using sampled instruments that feature key‑switchable articulations far more manageable.
- Many new plug‑ins that you'll actually want to have!
Cons
- Third‑party developers have been slow to embrace VST3‑related technologies, leaving some of Cubase's potential untapped for the majority of non‑Steinberg plug‑ins and content.
Summary
Cubase 5 is arguably the most impressive release of Cubase since its reboot with SX seven years ago. It offers useful, fun, and innovative new features and improvements that should benefit both existing Cubase users and the new users this release will surely attract.
 While there are plenty of alternative approaches to treating vocals, the processing chain suggested here can form a good starting point.The basics of recording a good vocal performance are pretty much the same whatever your recording system: put together a suitable mic, a clean preamp and audio interface, a recording room that doesn't colour the sound in any detrimental way — and some suitable singing talent — and you're most of the way there. However, there remain plenty of options, both creative and corrective, for maximising the impact of vocals in your mix. In this article I'm going to look at how a number of Cubase 4's audio plug–ins (and, in passing, some freeware alternatives) can be used to form a basic signal processing chain for vocals.
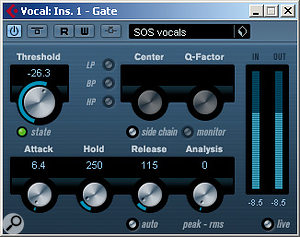 If a gate is required, set a fast attack time and then adjust the release time to suit the material.To keep things short and sweet, I'll assume that the basic vocal performance has already been captured and edited to create a composite track. I'll also ignore the usual send effects like reverb and delay, which we've covered in this column and our Mix Rescue features many times before, and instead focus on how you can most usefully use insert effects on a mono vocal track.
 De-essers are handy but try not to overdo it!Gates are used to strip away unwanted audio when it falls below a user–determined level. An alternative is to use the Detect Silence function from the Audio/Advanced menu: this is in effect an off–line gate plug–in that simply edits out the silent parts of a track, meaning your computer isn't needlessly streaming 'silent' audio from your hard drive. Automating the level can have a similar effect on the sound, but remember that any pre-fade sends on the vocal channel won't be muted by bringing the fader level down.
 It can be useful to combine two compressors for vocal processing.After the gate, I often use the DeEsser plug–in to address those silly, stubborn sibilance issues. Some folks hate de–essers, while others seem happy to let them do a job. I'm in the latter camp: I'm happy to use them where needed, although if I've done a good job of recording the vocal in the first place, I'd expect sibilance to have been resolved at source. When a de–esser is required, it's best to place it before any standard compressor in the signal chain, as I explained at the beginning of this article.
 Bass roll–off aside, it's best to keep EQ fairly subtle if you want to maintain a natural sound.The compression should tame your track and make it more controllable, so let's look more closely at how you might use EQ for a bit of tonal shaping. When we talk about the tonal qualities of a sound, they're often described using terms such as 'nasal', 'boomy' or 'boxy'... but, of course, you won't find those terms on your EQ! Helpfully, for us studio–using mortals, some golden–eared folk have attempted to translate those words into more specific frequency ranges, and there are also some useful pointers in the EQ article in this edition of SOS. For example, a low–pass filter turning over at 100Hz (as in the screenshot) can help get rid of any unnecessary bottom end (making the vocal less 'boomy' and getting it out of the way of the bass and kick), and for less prominent backing vocal parts you might be able to set it even higher. If the sound is a little 'boxy' or 'nasal', then a cut of a few decibels somewhere in the 200–1.5kHz range can help. A similar amount of boost centred somewhere in the 2–7kHz range can be used to add a little extra presence, while shelving EQ anywhere from 10kHz upwards can be used to add 'air'. Exact frequencies and amounts of gain will vary according to the tonal character of the voice, so even these very general ideas will serve only as a starting point, and it's important that you experiment and use your ears. One way to find what works best is to use a very narrow boost and adjust the frequency while listening out for the most resonant, boxy sound. When you find that point, turn the boost into a cut to filter out the offending frequencies. However, with all EQ — unless you are attempting to correct an obvious flaw in the original recording — subtle use of the gain controls and low Q settings will produce more natural results.
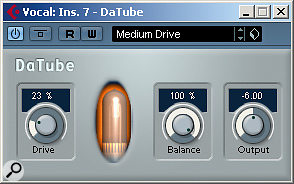 For a little extra attitude, a gentle touch of distortion can help.By this stage, the vocal should be clean of unwanted artifacts, be well–controlled in terms of dynamics, and have a suitable tonal balance, with no unnecessary bottom end — all of which means it will be perfect for feeding in to any pitch–correction processor that you might need to employ. Although Cubase 4 is capable of pitch manipulation, there's no insert plug–in for it, so you have to perform the processing off–line... which itself means you need to bounce the track down if you want to do any other processing beforehand. I'd usually opt to use a third–party tool such as Melodyne or Auto-Tune here — and if those excellent plug–ins are out of your reach you could try a less sophisticated alternative like the freeware Gsnap (www.gvst.co.uk/gsnap.htm). Whichever plug–in you choose, this is probably the best stage at which to apply it — but do remember that it's easy to overdo things!


