Many Cubase users also own high‑quality drum virtual instruments and sample libraries that aren't mapped to the GM standard. Fortunately, you can create your own dedicated drum maps.
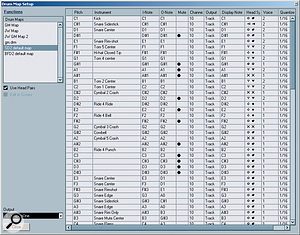
 The GM Drum Map being used in the Drum Editor.
For many home and project studio owners, recording a full drum kit is simply not a practical option. As an alternative, drum sample libraries such as Toontrack's Superior Drummer 2 or FXpansion's BFD2 offer amazing levels of detail, often with a large number of different performance articulations for key kit pieces such as snare or hi‑hat. However, when programming your MIDI drum parts, you need to know that the MIDI notes you play are going to trigger the sounds you want to hear — and that's where a knowledge of Cubase's Drum Maps can come in handy.
Mapping Out The Territory
The Cubase Operation Manual does a decent job of describing the main features of the Drum Editor and Drum Map functions. In addition, Mark Wherry discussed both of these back in SOS October and November 2003, so I've no intention of going through all the basics again here: a brief reminder of some key points will suffice, and you know where to go for some extra homework if required. I'll then work through the construction of two example drum maps for the two popular drum sample instruments I mentioned above, but the same principles could be applied to any set of sampled drum sounds.
The first screen shot (above) shows the Drum Editor window open for a MIDI track using the default GM‑based drum map. The Channel Number and Output columns can be useful if you wish to use multiple drum samplers/instruments to playback your MIDI drum track, but here it's the Pitch, Instrument, I‑Note (Input Note) and O‑Note (Output Note) columns that we're interested in. The Instrument column simply holds a label for each available drum sound and — as we'll see in a moment — this list can be edited as required. It's easy to become confused by the purpose of the other three columns, though. Essentially, they enable the Drum Map to perform two different 'note conversions': one when you play notes in and record them to your MIDI track; and one when you replay that track through your drum sample instrument.
 As explained in the main text, Drum Maps perform two stages of note conversions based upon the entries in the Pitch, I‑Note and O‑Note columns.As an example, let's imagine I have a drum sampler instrument in which the bass‑drum sound is attached to note D5 but, for reasons of personal preference, I like to play an F0 note to trigger my bass drum (perhaps my left hand has better timing...). The second screen shot illustrates how this would appear in the Drum Map Setup window, and shows a bass‑drum sound where the Pitch, I‑Note and O‑Note are set to C1, F0 and D5 respectively. What this means is that if I play an F0 note on my MIDI keyboard (my I‑Note), Cubase will actually record that as a C1 (the corresponding note in the Pitch column). On playback, the Drum Map will take that C1, do the second stage of the conversion and turn the C1 into a D5 (the corresponding O‑Note), sending the D5 note to the drum sampler instrument.
The purpose of the I‑Note and the O‑Note should be pretty obvious from all this: they simply allow you to configure the layout of your drum sounds to the keys (or pads) you prefer on your MIDI input device, while still triggering the right note for each sound within your drum sampler instrument; and they also make it easy to convert the playback of a MIDI track for a different drum sampler, should you need to, simply by setting up a different set of O‑Note values within the Drum Map.
For our purposes, the Pitch column isn't really significant. It specifies the actual MIDI note that's recorded, and is only really relevant if you intend to export your MIDI composition and play it back via a GM sound‑set (you'd need to make sure it follows the GM mapping standard to ensure sensible playback). In the Drum Map Setup window there's also a column labelled Display Note. This is only relevant if you intend to use the Cubase scoring features to produce drum notation (it allows you to customise the vertical position of each drum within the score) so, again, we can ignore it in what follows here.
A Superior Map
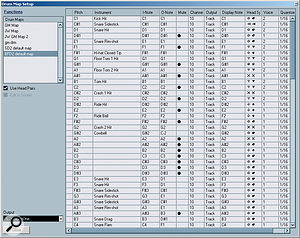
 This screen shows one of the author's drum maps for SD2.
The NY Avatar kit that's loaded as the 'default' in Superior Drummer 2 features eight different snare articulations, including straight hit, edge hit, rimshot, rim only hit and various flams and rolls — and these are the kind of performance options (plus the detailed velocity layers) that provide the necessary detail to create a genuinely convincing drum track. I've included a table that shows the MIDI notes SD2 requires to trigger each of the sounds in this default kit (although note that this list would be slightly different for any of the other kits available for SD2).
In order to get SD2 to trigger correctly, these notes should be specified as the O‑Notes in our Drum Map. An example is shown in the third screen shot (below). Of course, the layout can be configured in any way you see fit but I've adopted a combination of three strategies here. First, I've retained the standard GM mapping position of the more common drum hits in the C1‑B2 range. Second, I've created clusters of keys for some of the more detailed articulations. As an example, the screen shot shows a cluster for the various snare hits between E3 and D4, which includes pairs of keys for each of the snare‑centre and snare‑edge articulations — because this can help when playing snare rolls. Although not shown here, I've used the same approach with the hi‑hat (between C‑1 and D#0), cymbals (between C5 and B5) and toms (between C6 and G6). Finally, I've muted any keys to which I didn't want to assign a drum sound, using the Mute column.
The end result is a map that can be used to play back basic GM‑created MIDI loops, but that also allows you to focus on the detailed snare, hi‑hat, cymbal and tom articulation when you need to add a greater level of realism. Having created your drum map, you can save it via the Functions drop‑down menu in the top‑left corner of the Drum Map Setup window. This will create a DRM file that you can load into future Cubase projects. Alternatively, you could save a Cubase template project that contains the drum map, and this would then be available in any project based on that template. If you'd like to see my full SD2 drum map, or adapt it for your own use, you can go to the SOS web site at /sos/feb09/articles/cubasetechmedia.htm where it is available to download.
Big, Friendly Map
FXpansion's BFD2 has sophisticated mapping options, a well‑specified MIDI editor and a drum track for sequencing MIDI patterns into a complete performance. However, plenty of users will prefer to stick with their familiar Cubase editing and sequencing tools, or might have an existing MIDI drum part in Cubase that they wish to play back via the BFD2 sound set. In these cases, a Drum Map for BFD2 can be very useful — again, I've included a table (above) with the trigger notes used in BFD2's default startup kit.
Of course, exactly the same sort of system described above for SD2 can be adopted for a BFD2 drum map. I've placed my own BFD drum map alongside that for SD2 on the SOS web site so, again, please feel free to download this and adapt it for your own use. Where possible, I've mapped my articulation clusters within the same range of keys as used in the SD2 map because this consistency makes it easier to move between playing the two instruments.
Drum Maps With & Without Drums
Although I've used SD2 and BFD2 to illustrate the use of drum maps in Cubase, the principles outlined here could be used with any sample‑based drum instrument. However, a couple of other drum‑map‑related points are worth making, by way of wrapping up.
First, those using electronic drum kits to play in their MIDI drum parts will obviously find Drum Maps useful. While top‑of‑the‑range electronic kits include pads with multiple sensing zones that can give the player access to different articulations for each basic kit piece, budget kits are generally less well endowed in this regard. In such cases, a Drum Map could be used to (for example) re‑map a number of different drum heads to trigger different snare articulations, allowing detail to be added as a second pass to a basic performance.
Second, Drum Maps don't have to be used just for drums. They can also be useful if you have a collection of other one‑shot samples that need to be triggered in your project. For example, I've compiled a Halion programme that contains a range of one‑shot synth and orchestral hits, sound effects and vocal shouts. Triggering them via a Drum Map can be useful because the Instrument column of the Drum Map can be used to provide a suitable descriptive label for each sound — which makes them much easier to program.
Cowbell C#‑2
Published February 2009

No comments:
Post a Comment