By Craig Anderton
No guitar effects in Cubase? Actually, there are more options than you can count...
With Apple including their Guitar Amp Pro plug‑in in Logic, Sonar coming bundled with Native Instruments' Guitar Rig, and Ableton adding their new Overdrive plug‑in to Live, guitar‑slinging Cubase 5 users might initially feel a bit left out. But you don't have to, because you can assemble some pretty amazing 'guitar racks' in Cubase: it's just that Cubase takes a more à la carte approach, where you need to draw on the existing effects as if they were stomp-boxes. A VST audio channel in Cubase offers inserts for up to eight series effects, including an amp simulator, so you actually have more options than with many pedalboard setups. Furthermore, you can add some quality 'studio effects', like the new Reverence reverb, as send effects. So think of Cubase as 'virtualising' a pedalboard, then bringing it into the studio so that its output can go to studio rack processors.
When you have a setup that you like, you can easily save it as a track preset — or, better still, create multiple track presets for different types of sounds. Cubase can even make a fine host for live performance, should you decide to trade your rack of effects for a svelte laptop that patches directly into the PA system, as you can switch instantly between racks. (I'll cover how to do this at the end of the article.)
Before I get started, one quick note of caution. Because you need to play 'through' Cubase in order to hear the effects, you'll need a low-latency system — which means a fast computer, and a good audio interface, with quality ASIO or Core Audio drivers. Even if an interface has a 'zero‑latency' monitoring feature, that won't do you any good, as it will simply route the input signal to the output, without going through Cubase or any of its plug‑ins, which kind of defeats the purpose… Preferably, you should also have an interface with a high‑impedance input (suitable for guitar and bass). Many modern interfaces have an 'instrument input' which will do the job, but if not, you'll need to use a guitar‑friendly preamp, compressor, or similarly 'neutral' effect to feed a line input (or use a DI box).
Your Virtual Pedalboard
With this in mind, here's how to create a virtual 'pedalboard' in Cubase. Feel free to substitute your own choice of effects, but I've found this to be a good starting point.
• Go to Project/Add Track, and choose 'Audio' to create a single, stereo audio track.
• Next, click on the track's Edit button (e), which will open up the VST Audio Channel Settings window.
• Cubase includes a chromatic tuner, and the first slot is the best place for it, so that you can keep your axe in tune without bypassing other effects. Click in the first insert field, and in the plug‑in list choose Other/Tuner to load an instance of it here.
• I like to insert a compressor after this, to add some sustain and even out the guitar's dynamics, for a more consistent distortion sound. So for the second insert slot, choose Dynamics/Vintage Compressor, then click on the insert's Edit button to see the compressor's interface, and set up the parameter values as desired. A good starting point would be Input at 17 and Attack at 8.9, with Punch and Auto set to On. You'll probably need to adjust the Input (effectively the Threshold in this case) according to the level of signal coming into the plug‑in. Set the Output to a level that's as high as possible, but doesn't approach clipping.
• Similarly, insert the Soft Clipper into the third insert slot and click on its Edit button. For settings, try putting the Input at ‑0.0, Mix at 55, 0.0, Second at 100, and Third at 57. As with the Compressor, set the output to a high level, again stopping short of distortion. These settings are intended to get you started; you may want to tweak them depending on your guitar, pickup, playing style, and so on.
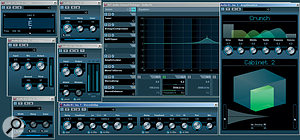
• For the fifth insert (leave the fourth empty), go to Distortion/AmpSimulator and click on the plug‑in's edit button. For the Amplifier Model, select Crunch, and try the following parameter values: Drive at 8.7, Bass, Middle, and Treble all at 5.0, Presence at 6.2, and Volume set to 5.0. For the Cabinet, select Cabinet 2, with Lo Damping at 38 and Hi Damping at 35.
• In the sixth insert, to get a bit of interesting stereo information from our mono guitar sound, select Spatial/MonoToStereo, and try Width at 170, Delay at 10.0, Color at 10, and Mono switched off.
• Now let's add some slap-back room delay. In the seventh insert (which, incidentally, comes post‑fader in Cubase, as does insert eight), go to Delay/StereoDelay. In the left channel, try setting Delay to 1/16T, Feedback to 6.5, Lo to 50, Hi to 15000, Pan to ‑100, and Mix to 20, and enable Sync, Lo Filter, and Hi Filter. Use the same values for the right channel, but with Delay at 1/16, Feedback at 7.3, and Pan at 100.
• Now that we have some stereo information, we can create a big, wide guitar sound. In the eighth insert, go to Spatial/StereoEnhancer, and start with Width at 168, and all buttons set to off.
• We'll add EQ to give some polish and let the guitar cut through a little better in a mix. Enable a stage in the standard channel EQ (which comes after the inserts in the signal chain), and choose the Parametric II response. Add a boost of around 4‑5dB at 3.5kHz, with a Q of 0.2. This screen shows the VST Audio Channel Settings and the roster of effects used to create our basic guitar rack.
These are the settings I use as my basic rack for adding rock guitar sounds in Cubase, and you might also find it handy as a point of departure, so it's worth saving as a track preset. To do this, right‑click in the audio track containing the 'rack', and choose 'Create Track Preset' from the context menu. When the Save Track Preset dialogue box appears, simply name it and save it: now you can call up your rack for any audio track in any Cubase project!
The Fourth Insert
Remember the fourth slot, just before the amp modeller, that we kept free? This is ideal for adding other effects to shape your sound. No doubt, you'll have some favourite third‑party plug‑ins, but dig into the list of Cubase standard plug‑ins and you'll find some excellent choices for guitar. Here are some of my favourites.
Octave ('Other' category): This effect really surprised me because it tracks well, but inserting the compressor before the Octave plug-in improves the tracking even further. Distorting the post‑octave sound with the AmpSimulator gives a big distortion sound, even with only the Octave 1 level turned up. If you want more of a brontosaurus guitar, turn up Octave 2 as well. In general, I like to leave a fair amount of direct sound in the output mix. You can just as easily go in a cleaner direction by using only the Octave 1 output, and bypassing the AmpSimulator. Select the neck pickup on your guitar, pull back a bit on the tone, and you'll hear a sound that recalls jazz great Wes Montgomery.
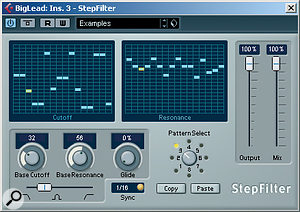
StepFilter ('Filter' category): I'm a huge fan of Roger Linn's AdrenaLinn processor. When I play with groups like Air Liquide, it's the only gear I take other than the guitar, and of course a MIDI cable to sync it from the band's MIDI master clock. You can get many of the same effects from Cubase's StepFilter. The StepFilter offers synchronised filter effects that recall Roger Linn's AdrenaLinn signal processor. StepFilter is basically a tempo‑sync'ed dual step‑sequencer, each with 16 steps, and there's a total of eight patterns. One sequencer controls filter cutoff and the other resonance. The filter response morphs from low‑pass to high‑pass, with a stop along the way for band‑pass. You can also copy a pattern, paste it into a different pattern, and create variations. All of these parameters, including pattern selection, can be used with VST host automation control. If you're into electronic guitar effects, you really should check this out — but also try the Tranceformer ('Modulation' category) and Chopper ('Other' category), which are similar, although Chopper works on amplitude, and Tranceformer syncs a ring modulator's carrier frequency to the project tempo'
WahWah ('Filter' category): What's a guitar rack without a Wah? Cubase's is really quite good: not only can you vary the band‑pass filter frequency, you can set high‑ and low‑frequency limits, and the Q at those limits. The frequency responds to host automation, but if you want to do real‑time pedalling, the WahWah shows up as a destination in any inserted MIDI track, so you just need a MIDI foot controller. Because insert four comes before the amp simulator, adding a wah there more faithfully duplicates the traditional rock wah sound, where guitarists patched it between the guitar and (usually overdriven) amp. The filter changes thus occur before distortion, which gives a very different sound compared to placing it after distortion. For more emphasis on the wah sound, you could remove the StereoDelay or StereoEnhancer effect, and place the WahWah in one of those slots instead.
Modulation: There are plenty of interesting options in Cubase that go beyond simple choruses. Try anything from the modulation category in the fourth slot (pre‑amp sim) and seventh or eighth slot (post‑amp sim).
Live Performance Switching
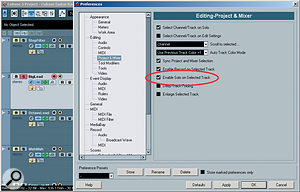
 By choosing 'Enable Solo on Selected Track' in the Cubase Preferences you can switch between different 'racks' instantly, simply by selecting a track.
This final trick is pretty cool for live use because these effects are very efficient, which means that you can have several tracks of 'racks' without straining your CPU. Go to the Mixer tab at File/Preferences/Project, and check 'Enable Solo on Selected Track'. Solo a track, and now all you need to do to call up a new sound is select a track, and the Solo will 'move' to that track. The change from one sound to another is instantaneous. Now it's time to amaze your audience!
Published September 2009
No comments:
Post a Comment