Saturday, April 30, 2016
Friday, April 29, 2016
Pitch Perfect With VariAudio
Steinberg Cubase Tips & Techniques
Technique : Cubase NotesIn VariAudio, Cubase 5 users have a sophisticated pitch‑correction tool.
John Walden
 and not enough clear pitch information.")
Oops! This recording of someone whistling a series of short notes has been poorly detected by VariAudio probably due to a poor signal level, too many plosives (breaths at the start of each note) and not enough clear pitch information.Oops! This recording of someone whistling a series of short notes has been poorly detected by VariAudio probably due to a poor signal level, too many plosives (breaths at the start of each note) and not enough clear pitch information.
VariAudio is one of the headline features of Cubase 5, but you really need some experience with it to get the best results. Steinberg included a short series of tutorials on VariAudio in Cubase 5's Getting Started manual (based around some sample projects on the install DVD), and these offer a good introduction, so in this column I'll focus on additional tips to improve your VariAudio work process.
Fully Comp
The most obvious application for VariAudio is pitch correction of vocals and instrumental solos, and while it may seem tempting to get straight in there, in the context of a real project it's usually more efficient to do a little editing work on your parts first. For example, when recording vocals, most people record several takes and compile a 'best of' version as their final performance. Such 'comping' is best done prior to any work with VariAudio, so that you get the best performance you can in terms of both pitch and expression, before doing any pitch correction.
With the performance compiled, it's easy to bounce it down (using the File / Export / Audio Mixdown option with the vocal parts soloed, or Audio / Bounce Selection) to create a single consolidated audio event. As VariAudio is accessed by opening an audio event in the Sample Editor, this makes for a simpler workflow, because all the pitch correction can be done in a single instance of the Sample Editor window. Depending on the recording level and/or quality of the performance, it might also be worth applying a little compression, EQ or gating during the bounce process (don't overdo it, though, as you can't undo it): it's useful to get as clean and even a signal as possible before applying VariAudio's pitch-detection process.
Sorting Segments

On the left, the pitch curve suggests the green segment actually contains two different notes. On the right, the segment has been split into two using the scissors tool and the segment boundary aligned with the change in the pitch curve and waveform.On the left, the pitch curve suggests the green segment actually contains two different notes. On the right, the segment has been split into two using the scissors tool and the segment boundary aligned with the change in the pitch curve and waveform.Pitch Perfect With VariAudio
In the Sample Editor, selecting VariAudio's Pitch & Warp or Segments tools will prompt Cubase to analyse the audio and extract pitch information from it. There's no user control over how this process operates, and while it does a good job generally, it's not foolproof. Two common problems occur. First, there might be sections of your performance for which no segment or pitch curve is created. This generally happens when the pitch‑detection algorithm doesn't have enough information to go on (for example, with a weak audio signal or sections of the audio that have little clear pitch information, such as plosives, sibilant or strongly sounded consonants). Second, as mentioned in the Getting Started tutorials, VariAudio might not always generate the ideal number of segments for a particular word or phrase.
Although the Segment tool can be used to expand an existing segment so that it includes a section of the performance that has not been detected by the initial analysis process, there's little benefit in doing this for sections with no relevant pitch‑based content. If there ought to be pitch‑based content (that is, the section is part of a sung melody) but none is detected, it may be that the audio signal is not of sufficiently good quality. If this is the case then re‑recording the offending section is likely to be a much better approach.
Dealing with the second issue by manually fine‑tuning the segments that have been generated is more straightforward. Obvious things to look for are individual segments in which the pitch curve shows a pitch‑shift of a semitone or more, but another possibility is to split segments that span two or more words, where the melody stays on a single pitch. Splitting these into single-word segments can give you greater flexibility to experiment with variations on your melody. The scissors tool is probably the easiest means of splitting the segment at the appropriate point. It's worth comparing the positioning of segment boundaries relative to your audio waveform: providing there's not too much of a clash with obvious shifts in the pitch curve, the segment boundaries can be suitably tweaked to coincide with the waveform envelope for each word.
Quick Fix Pitch?

On the left, the first red segment actually contains three words. On the right, this has been split into three segments and these could now be shifted individually if you wanted to experiment with an alternative melody.On the left, the first red segment actually contains three words. On the right, this has been split into three segments and these could now be shifted individually if you wanted to experiment with an alternative melody.Pitch Perfect With VariAudio
 Once you've sorted out any obvious segment issues, it might be tempting to select all the segments and apply a dollop of Pitch Quantize. Although this might be appropriate if you have a decent singer to start with, or if you're subtle in the degree of pitch‑correction applied, when you want to achieve natural results it's much better to use your ears than to rely on the visual display. Some of the perceived character of a performance is often to do with subtle pitch variations, which means that making things too perfect can result in an undesirably mechanical feel. I find that it's generally best to focus in on specific problem notes and apply quantising to those, rather than blanket‑processing everything.
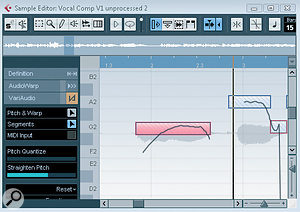 Currently, VariAudio doesn't offer scale‑specific quantising options, so the other obvious thing to watch out for is segments getting quantised towards a note that's not in the key of the song. This can be a particular problem with short passing notes, where the singer is moving up or down through a series of notes, without holding any of them for very long. In most cases, this can be easily fixed by positioning the segment by hand, but there will inevitably be times when this approach leads to obvious and undesirable audio artifacts, and it can simply be best to leave the short note uncorrected for a more natural result.
Straight & Narrow
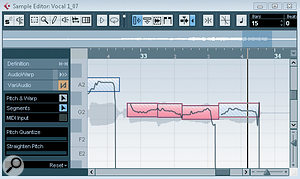
On the left, the singer has generated a large pitch scoop into the note. On the right, the Straight Pitch control has been used to make this less pronounced.On the left, the singer has generated a large pitch scoop into the note. On the right, the Straight Pitch control has been used to make this less pronounced.Pitch Perfect With VariAudio VariAudio also has the Straighten Pitch function, which can be used to reduce the pitch fluctuations in a segment. Sometimes, these are fully intentional on behalf of the singer (for example, a controlled vibrato), but pitch variation at the start of a note, where a singer 'scoops' up or down into the target note, or more random pitch variation within a note, can often be usefully targeted using Straighten Pitch.
As with Pitch Quantize, it pays to focus solely on those notes that your ears tell you are in need of tightening, and to be as subtle as possible with the Straighten Pitch setting: just like a guitar player who bends notes to add character to a solo, some pitch variation within a note is often an important part of a singer's method, and again, too much correction will create an unnatural result.
Melody Writer
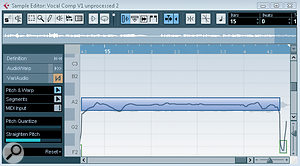
On the left, a large amount of pitch variation is present in a long sustained note. On the right, the sustained note has been edited into a single segment and Straighten Pitch applied to reduce the overall pitch drift.On the left, a large amount of pitch variation is present in a long sustained note. On the right, the sustained note has been edited into a single segment and Straighten Pitch applied to reduce the overall pitch drift.Pitch Perfect With VariAudio
VariAudio is intended as a corrective tool, but it can also be used in a more creative capacity, to generate harmonies, for example, or double-tracked parts — or even to rewrite your melody. There's currently no user control over how formants are handled (something else for the wish‑list), so any shifting of notes more than a few semitones up or down has to be done with care, but as shown on page 88 of the Getting Started manual, where a new 'upward flair' is created, the results can be impressive. Even if the audio quality of your melody rewrite isn't acceptable as the final vocal, it can still provide a means of creating a useful guide track for a singer if you decide to re‑record the new melody.
And Finally….
VariAudio is an excellent addition to Cubase 5. Still in its first incarnation, it doesn't offer the same level of control as Auto-Tune EVO or Melodyne, but having it so neatly embedded within your DAW is a big plus. Finally, I should leave you with a health warning: good though VariAudio is, it cannot turn someone with limited singing technique into a Maria Carey or Robert Plant — so it's not a replacement for your singing exercises, or capturing the best performance possible as a starting point!
Thursday, April 28, 2016
Wednesday, April 27, 2016
Quick Controls
Steinberg Cubase Tips & Techniques
Technique : Cubase NotesWith even a basic hardware MIDI controller, Quick Controls make writing automation in Cubase much more convenient.

John Walden
The Inspector's Quick Control panel provides slots for eight parameters.The Inspector's Quick Control panel provides slots for eight parameters.
Whether it's for mixing audio tracks or tweaking synth parameters, the ability to record, edit and save automation data as part of your music projects is now a powerful feature of all but the most basic of DAWs. Even a simple hardware control surface, such as a bank of sliders or rotary knobs on a MIDI keyboard, makes the whole process more tactile. The ease with which you could do this took a big leap forward with the Device Panels that were introduced in SX3 (see SOS March 2005), but Cubase 4 took things further by adding Quick Controls. These are much easier to configure than Device Panels, and offer some of the same functionality, though they are not full replacements. So, if you have a suitable collection of knobs to twiddle, let's work through some examples of Quick Controls in use.
I Want It Now

The Quick Controls dialogue box allows you to link your MIDI hardware's controls to the eight Quick Control slots.The Quick Controls dialogue box allows you to link your MIDI hardware's controls to the eight Quick Control slots.
Quick Controls is one of the panels that appears in the Inspector for both audio and MIDI tracks, and has eight parameter slots available. Setting up your Quick Controls is a three‑stage process, and I'll start with an overview of these stages before looking more closely at each in turn, offering some practical examples along the way. I'll also discuss a couple of less positive aspects.
The first task is to link a series of knobs or faders on your external hardware controller to the Quick Control slots. You can do so via a dialogue box found at Devices / Device Setup / Quick Controls (see screenshot opposite). Once made, these links are global, and apply to all tracks in all projects. So, if you've assigned QC1 to be controlled by the first knob on your MIDI hardware controller, that assignment will be consistent for any track that uses Quick Controls. This consistency is a big advantage of this approach.
The dialogue box also includes a 'learn' facility. Once you've chosen the correct MIDI input, attaching a specific hardware controller to each Quick Control simply involves selecting a Quick Control from the list, moving the required hardware control (be it knob or slider) and then pressing the Learn button. Once all the entries are complete, pressing Apply, followed by OK, should complete this first stage of the process.
Assign Of The Times

A context‑sensitive menu makes parameter selection very easy.A context‑sensitive menu makes parameter selection very easy.
The second stage involves selecting target parameters for the eight Quick Controls in the Inspector display for a particular track. When you open the Quick Controls panel in the Inspector, you'll see the eight Quick Control slots, all initially blank. Clicking on any one of them opens a context‑sensitive selection menu from which any of the available target parameters can be selected. For audio tracks, this includes obvious parameters such as volume and pan position, but also parameters for any insert effects and send levels to FX channels — although note that the last of these only becomes active if the send is switched on for that track in the Sends panel of the Inspector.
For MIDI tracks, the available options include any parameters of a VSTi that can be automated — but there's a bit of a catch. For any of Steinberg's bundled VST Instruments, the menu lists all the parameters by name, which makes it easy to find the key parameters you want to put under Quick Control. With most third-party ones, however (at least, most of those that I've used with QCs), you get a rather unhelpful list of controller numbers instead — so either some hit‑and‑miss experimentation or consultation of the VSTi technical documentation will be required.
Control What?
MIDI tracks pointed at a particular VSTi offer that instrument's key parameters for Quick Control in a named subfolder, as shown here for Mystic.MIDI tracks pointed at a particular VSTi offer that instrument's key parameters for Quick Control in a named subfolder, as shown here for Mystic.

There are some obvious targets for Quick Controls. For audio tracks, the most useful parameters include volume, pan (using the Standard Panner Pan Left‑Right control) and send levels. For example, if you're dealing with a vocal track, you might have send levels to both a reverb and a delay configured as Quick Control targets. A further possibility is to assign three Quick Controls to the gain, frequency and Q of one band of the track EQ. This gives you a single, sweepable band under Quick Control, which can be very useful when making initial EQ adjustments during a mix. Doing all of the above still leaves a single slot available, and this might be used for a particular Insert effect parameter, such as the threshold on a compressor or the drive level for a distortion or tube-emulation plug‑in.
For MIDI tracks, the selection is likely to be more varied, depending on which VSTi is involved, but volume and pan are again obvious candidates. Some care is needed, though. As shown in the screenshot on the following page for a Mystic‑based track, there are two parameters for both volume and pan: one pair at the top of the list, and a second under the Amp/Fx section. Both volume options would work, but to control pan you need to select the second, which links directly to the Pan parameter on Mystic's main GUI. Indeed, it's generally best to use options from the named section of the Quick Control selection menu, as these all link to the specific controls found on the VSTi interface.
For synths such as Monologue, A1 (if you have it installed from an earlier release), Prologue or Spector, the other obvious targets are in the filter section, or the key parameters for any built‑in effects. For example, controlling the delay level for the identical effects sections found in Spector, Mystic and Prologue allows you real‑time control over the loudness of repeated notes — which is perfect for another dance cliché, where the delay is raised in level for the last note of any melody line.
Preset Pleasure

Once you've created a useful set of Quick Controls, these can be saved to a Track Preset — in theory at least!Once you've created a useful set of Quick Controls, these can be saved to a Track Preset — in theory at least!
Once you've created a useful Quick Control setup for an audio or MIDI track, the third and final step ought to be to create a Track Preset that you can load into future projects. I say 'ought' because — for PC users at least (I'm not sure whether this problem exists on the Mac version) — saving Quick Control settings in projects or as Track Presets can be problematic. Although Quick Control settings used in audio tracks seem to be saved and restored correctly via the usual Track Preset system (right‑clicking on the track within the Track List allows the Create Track Preset option to be selected from the pop‑up menu), for users of Cubase 4 or the initial v.5.0.0 release of Cubase 5, things can be less predictable for MIDI‑based tracks. The Quick Control parameter labels appear when a new track is created from the MIDI Track Preset, but the controls are not responsive (no blue value bar appears under each control), and the only way to restore operation is to choose each parameter again via the selection menu — which makes Quick Controls rather less quick than they might otherwise be!
This seemed to be a genuine bug for MIDI‑based tracks (a quick search of the Cubase Forum at www.cubase.net will bring up a number of threads on the topic), but fortunately, it is one of the issues that Steinberg have dealt with in the recent Cubase 5.0.1 release which became available just as I was finishing this column. Incidentally, for those using a pre‑ 5.0.1 version, the Duplicate Track option suffers from the same problem, and some users even report that Quick Controls 'disappear' in the same fashion when reloading a project. While I've only had a short time to experiment with 5.0.1, things now seem to work perfectly, both when applying Track Presets and re‑loading projects that use Quick Controls. However, Quick Controls are still not 'active' if you duplicate an existing track. Once the new track has been assigned to its own instance of a VSTi, a Track Preset has to be applied to the duplicate to bring the Quick Controls to life.
A Few I Made Earlier

Use the Show All Used Automation option if you need to manually edit any Quick Control automation data for a particular track.Use the Show All Used Automation option if you need to manually edit any Quick Control automation data for a particular track.
This issue notwithstanding, I've created some example Track Presets that can be downloaded from the SOS web site at /sos/jul09/articles/cubasetechmedia.htm. These include a few alternatives for audio tracks and (fingers crossed!) MIDI tracks, aimed at a number of the VSTis that come bundled with Cubase. Each of these presets is suitably named, so it ought to be obvious what their intention is.
The files need to be placed in the user Track Presets folder. The exact location of this folder can vary depending on the operating system and your configuration, and it's also separate from the folder containing the factory‑supplied Track Presets. If in any doubt, the best way to find the correct folder is to create a dummy Track Preset with a distinctive name and then search your file system for the folder containing that file.
Automation
Obviously, the main application of Quick Controls is for the automation of key parameters, and the inclusion of the Read and Write automation buttons in the Inspector's Quick Control panel makes this very easy. Having engaged the 'W' (write) button during playback, any controller movements are then recorded — and engaging the 'R' button will then reproduce those parameter changes on subsequent playback. If you want to see and manually edit any of the automation data created, right‑clicking on the track and selecting the Show All Used Automation option will open up each parameter in a separate lane, which is very neat. One final point is that Quick Controls work for a particular track whenever that track is selected in the Track List: they don't require the Quick Control panel to be open in the Inspector.
Send Control?
Despite the bug I described earlier, Quick Controls are an excellent, and genuinely useful feature in Cubase — and ideally I'd like to see the same convenient means of control extended to control other aspects of Cubase. Currently, although Quick Controls can be used to control parameters on Insert effects for audio, MIDI and instrument tracks, they can't be used to change parameters on send effects other than send levels and pan. It would be great to have the same sort of functionality available to control, for example, FX channels, Group channels and the audio output channels of VSTis — but I'm afraid that's something that for the time being will have to remain on the wish‑list.
Advanced Compression Control
In this column in SOS April 2009, Mike Senior described a parallel compression method using five different compressors, each placed on a Group channel and fed by sends from the original vocal track, in order to mix and match the tonal characteristics of the various compressors. While the overall level of the final vocal can be controlled at a number of points in such a signal chain, varying the send levels to each of the compressors will dictate how hard each compressor is driven and this might, for example, be used to provide contrast between different song sections. As Quick Controls can be used to control send levels from an audio track, they provide a simple and convenient way to tweak these settings while experimenting.
Published in SOS July 2009
Tuesday, April 26, 2016
Electric Guitar Effects Chains
Steinberg Cubase Tips & Techniques
Technique : Cubase NotesNo guitar effects in Cubase? Actually, there are more options than you can count...
Craig Anderton
With Apple including their Guitar Amp Pro plug‑in in Logic, Sonar coming bundled with Native Instruments' Guitar Rig, and Ableton adding their new Overdrive plug‑in to Live, guitar‑slinging Cubase 5 users might initially feel a bit left out. But you don't have to, because you can assemble some pretty amazing 'guitar racks' in Cubase: it's just that Cubase takes a more à la carte approach, where you need to draw on the existing effects as if they were stomp-boxes. A VST audio channel in Cubase offers inserts for up to eight series effects, including an amp simulator, so you actually have more options than with many pedalboard setups. Furthermore, you can add some quality 'studio effects', like the new Reverence reverb, as send effects. So think of Cubase as 'virtualising' a pedalboard, then bringing it into the studio so that its output can go to studio rack processors.
When you have a setup that you like, you can easily save it as a track preset — or, better still, create multiple track presets for different types of sounds. Cubase can even make a fine host for live performance, should you decide to trade your rack of effects for a svelte laptop that patches directly into the PA system, as you can switch instantly between racks. (I'll cover how to do this at the end of the article.)
Before I get started, one quick note of caution. Because you need to play 'through' Cubase in order to hear the effects, you'll need a low-latency system — which means a fast computer, and a good audio interface, with quality ASIO or Core Audio drivers. Even if an interface has a 'zero‑latency' monitoring feature, that won't do you any good, as it will simply route the input signal to the output, without going through Cubase or any of its plug‑ins, which kind of defeats the purpose… Preferably, you should also have an interface with a high‑impedance input (suitable for guitar and bass). Many modern interfaces have an 'instrument input' which will do the job, but if not, you'll need to use a guitar‑friendly preamp, compressor, or similarly 'neutral' effect to feed a line input (or use a DI box).
Your Virtual Pedalboard
With this in mind, here's how to create a virtual 'pedalboard' in Cubase. Feel free to substitute your own choice of effects, but I've found this to be a good starting point.
• Go to Project/Add Track, and choose 'Audio' to create a single, stereo audio track.
• Next, click on the track's Edit button (e), which will open up the VST Audio Channel Settings window.
• Cubase includes a chromatic tuner, and the first slot is the best place for it, so that you can keep your axe in tune without bypassing other effects. Click in the first insert field, and in the plug‑in list choose Other/Tuner to load an instance of it here.
• I like to insert a compressor after this, to add some sustain and even out the guitar's dynamics, for a more consistent distortion sound. So for the second insert slot, choose Dynamics/Vintage Compressor, then click on the insert's Edit button to see the compressor's interface, and set up the parameter values as desired. A good starting point would be Input at 17 and Attack at 8.9, with Punch and Auto set to On. You'll probably need to adjust the Input (effectively the Threshold in this case) according to the level of signal coming into the plug‑in. Set the Output to a level that's as high as possible, but doesn't approach clipping.
• Similarly, insert the Soft Clipper into the third insert slot and click on its Edit button. For settings, try putting the Input at ‑0.0, Mix at 55, 0.0, Second at 100, and Third at 57. As with the Compressor, set the output to a high level, again stopping short of distortion. These settings are intended to get you started; you may want to tweak them depending on your guitar, pickup, playing style, and so on.
• For the fifth insert (leave the fourth empty), go to Distortion/AmpSimulator and click on the plug‑in's edit button. For the Amplifier Model, select Crunch, and try the following parameter values: Drive at 8.7, Bass, Middle, and Treble all at 5.0, Presence at 6.2, and Volume set to 5.0. For the Cabinet, select Cabinet 2, with Lo Damping at 38 and Hi Damping at 35.
• In the sixth insert, to get a bit of interesting stereo information from our mono guitar sound, select Spatial/MonoToStereo, and try Width at 170, Delay at 10.0, Color at 10, and Mono switched off.
• Now let's add some slap-back room delay. In the seventh insert (which, incidentally, comes post‑fader in Cubase, as does insert eight), go to Delay/StereoDelay. In the left channel, try setting Delay to 1/16T, Feedback to 6.5, Lo to 50, Hi to 15000, Pan to ‑100, and Mix to 20, and enable Sync, Lo Filter, and Hi Filter. Use the same values for the right channel, but with Delay at 1/16, Feedback at 7.3, and Pan at 100.
• Now that we have some stereo information, we can create a big, wide guitar sound. In the eighth insert, go to Spatial/StereoEnhancer, and start with Width at 168, and all buttons set to off.
• We'll add EQ to give some polish and let the guitar cut through a little better in a mix. Enable a stage in the standard channel EQ (which comes after the inserts in the signal chain), and choose the Parametric II response. Add a boost of around 4‑5dB at 3.5kHz, with a Q of 0.2.This screen shows the VST Audio Channel Settings and the roster of effects used to create our basic guitar rack.This screen shows the VST Audio Channel Settings and the roster of effects used to create our basic guitar rack.
These are the settings I use as my basic rack for adding rock guitar sounds in Cubase, and you might also find it handy as a point of departure, so it's worth saving as a track preset. To do this, right‑click in the audio track containing the 'rack', and choose 'Create Track Preset' from the context menu. When the Save Track Preset dialogue box appears, simply name it and save it: now you can call up your rack for any audio track in any Cubase project!
The Fourth Insert

Remember the fourth slot, just before the amp modeller, that we kept free? This is ideal for adding other effects to shape your sound. No doubt, you'll have some favourite third‑party plug‑ins, but dig into the list of Cubase standard plug‑ins and you'll find some excellent choices for guitar. Here are some of my favourites.
Octave ('Other' category): This effect really surprised me because it tracks well, but inserting the compressor before the Octave plug-in improves the tracking even further. Distorting the post‑octave sound with the AmpSimulator gives a big distortion sound, even with only the Octave 1 level turned up. If you want more of a brontosaurus guitar, turn up Octave 2 as well. In general, I like to leave a fair amount of direct sound in the output mix. You can just as easily go in a cleaner direction by using only the Octave 1 output, and bypassing the AmpSimulator. Select the neck pickup on your guitar, pull back a bit on the tone, and you'll hear a sound that recalls jazz great Wes Montgomery.

StepFilter ('Filter' category): I'm a huge fan of Roger Linn's AdrenaLinn processor. When I play with groups like Air Liquide, it's the only gear I take other than the guitar, and of course a MIDI cable to sync it from the band's MIDI master clock. You can get many of the same effects from Cubase's StepFilter.The StepFilter offers synchronised filter effects that recall Roger Linn's AdrenaLinn signal processor.The StepFilter offers synchronised filter effects that recall Roger Linn's AdrenaLinn signal processor. StepFilter is basically a tempo‑sync'ed dual step‑sequencer, each with 16 steps, and there's a total of eight patterns. One sequencer controls filter cutoff and the other resonance. The filter response morphs from low‑pass to high‑pass, with a stop along the way for band‑pass. You can also copy a pattern, paste it into a different pattern, and create variations. All of these parameters, including pattern selection, can be used with VST host automation control. If you're into electronic guitar effects, you really should check this out — but also try the Tranceformer ('Modulation' category) and Chopper ('Other' category), which are similar, although Chopper works on amplitude, and Tranceformer syncs a ring modulator's carrier frequency to the project tempo'

WahWah ('Filter' category): What's a guitar rack without a Wah? Cubase's is really quite good: not only can you vary the band‑pass filter frequency, you can set high‑ and low‑frequency limits, and the Q at those limits. The frequency responds to host automation, but if you want to do real‑time pedalling, the WahWah shows up as a destination in any inserted MIDI track, so you just need a MIDI foot controller. Because insert four comes before the amp simulator, adding a wah there more faithfully duplicates the traditional rock wah sound, where guitarists patched it between the guitar and (usually overdriven) amp. The filter changes thus occur before distortion, which gives a very different sound compared to placing it after distortion. For more emphasis on the wah sound, you could remove the StereoDelay or StereoEnhancer effect, and place the WahWah in one of those slots instead.
Modulation: There are plenty of interesting options in Cubase that go beyond simple choruses. Try anything from the modulation category in the fourth slot (pre‑amp sim) and seventh or eighth slot (post‑amp sim).
Live Performance Switching
By choosing 'Enable Solo on Selected Track' in the Cubase Preferences you can switch between different 'racks' instantly, simply by selecting a track. By choosing 'Enable Solo on Selected Track' in the Cubase Preferences you can switch between different 'racks' instantly, simply by selecting a track.
This final trick is pretty cool for live use because these effects are very efficient, which means that you can have several tracks of 'racks' without straining your CPU. Go to the Mixer tab at File/Preferences/Project, and check 'Enable Solo on Selected Track'. Solo a track, and now all you need to do to call up a new sound is select a track, and the Solo will 'move' to that track. The change from one sound to another is instantaneous. Now it's time to amaze your audience!
Monday, April 25, 2016
Saturday, April 23, 2016
Great Loops With LoopMash
Steinberg Cubase Tips & Techniques
Technique : Cubase NotesBreathe new life into your loops with Cubase's LoopMash.
John Walden

The LoopMash window with the Edit options displayed.The LoopMash window with the Edit options displayed.
LoopMash was, for me, probably the best new feature introduced in Cubase 5. This natty little plug-in uses one 'master' loop (of your choice) to trigger sliced segments from up to seven other loops. Operation is very intuitive, which makes this an excellent tool for creating new and off‑the‑wall rhythm loops. All the basics of LoopMash's operation are well covered in the Cubase Plug‑In Reference PDF, so I'll focus here on giving you a few practical hints and tips to help make the most of what this great little plug‑in has to offer, as well as offering one or two observations on aspects of LoopMash that could be improved in a future update.
Getting Started
If you want to experiment, the supplied LoopMash presets are a very good place to start, but eventually most users are going to want to load their own loops or import them from third‑party sample libraries. Loops can be dragged and dropped onto a LoopMash track from a number of different locations (for example, from an operating system file browser or from the Cubase Project window, if they've already been imported into the current Project). However, occasionally LoopMash's automatic tempo recognition doesn't get things quite right, which results in a loop that doesn't contain the correct number of slices. If you come across this problem, I've found that the most consistent results seem to be obtained when dragging and dropping from the Pool — so it's probably a good idea to add any loops to the Pool first, and then move to LoopMash from there.
Another little oddity that could confuse new users is identifying which LoopMash track is acting as the 'master'. This is generally indicated by two things: the whole track being highlighted; and the illuminated button to the left of the waveform display. In the vast majority of the 'factory' presets, the topmost track is configured to act as the master loop, but you can select any of the others if you prefer. Indeed, I'd encourage you to do this, because for any given set of loops it will produce yet another set of possible variations. However, if you do change the master track, and then use one of the Scene buttons to flip back to a different set of LoopMash settings, the display doesn't update to identify the new master track associated with that scene. While this is a bit irritating, it's purely a graphical issue; you need to look out for the coloured bars that appear above and below the current step on the master track to identify it. These coloured bars appear whenever a slice in the master track is not being played, but they are masked by the white bars that appear on any track when a slice is being used. The Step button (to the right of the Play button in the LoopMash transport panel) can be useful here, to move through the loop step‑by‑step and identify the master. This button is also very useful for seeing which slices in other loops are being triggered for each step of the master loop when you're making changes to the settings on the Edit page.
More Control

Activating individual outputs for each of LoopMash's tracks can be done via the VST Instruments panel.Activating individual outputs for each of LoopMash's tracks can be done via the VST Instruments panel.
The Edit section includes a dry/wet mix slider, which allows you to adjust the level of the master track relative to that of slices played from loops on other tracks, which is useful, but you're not able alter the levels of the individual tracks in LoopMash. Instead, you have to use LoopMash's multiple outputs: you can activate these from the VST Instruments panel, which will create an audio channel in the mixer for each track. If you opt to work in this way, it's also best to de‑activate the stereo mix output, so you don't duplicate the output from each track.
To then control the overall output from LoopMash, you need to create a Group channel and route the individual track outputs to that (as shown in the screenshot above). This arrangement allows the levels of the individual LoopMash tracks to be balanced, and the level of the overall LoopMash output to be controlled within the mix for the project. Of course, it also allows other basic mixing techniques to be used, such as panning different loops across the stereo image, or sending different parts to delays. Sadly, though, using multiple outputs in this way means that you won't be able to make use of the wet/dry mix slider, which is a shame.
A further advantage of this setup is that it makes it very easy to bounce down the output from LoopMash to an audio track. All that is required is that the LoopMash Group channel is solo'ed and then the usual File / Export / Audio Mixdown menu option can be used to generate the required audio file, for the whole arrangement, or just for a short section defined by the Project cycle markers. This audio file can then be subjected to further processing or exported to another software tool if you like to do your loop processing outside Cubase. In addition, while I haven't found LoopMash to be particularly CPU intensive, if your overall project is pushing your system limits, converting your LoopMash output to a single audio track can give you a little more breathing space.
While using LoopMash's multiple audio outputs is very straightforward and, as described below, provides other processing possibilities, it would be nice if Steinberg added simple level and pan controls to each of LoopMash's tracks at some point. This would be just the ticket when all you need is to bump the volume of one or two loops up or down a bit, to achieve a better balance. The obvious down side of using the Cubase mixer as described above is that these mixer track settings don't change if you use the Scene buttons to flip between different LoopMash configurations — although this is more likely to be an issue if you're using LoopMash 'live' in a performance context rather than in the studio.
Chop Chop

Setting each LoopMash track to output to a separate mixer channel allows level and pan to be controlled in more detail, with the overall output level handled via a Group channel.Setting each LoopMash track to output to a separate mixer channel allows level and pan to be controlled in more detail, with the overall output level handled via a Group channel.
The Edit page also features the Staccato Amount slider, which is used to control the length of the various slices on playback. Using shorter times (with the slider towards the right) gives a much more percussive feel to the performance. This is a 'global' control, however, and, using the multiple outputs as described above, the same sort of effect can be achieved with a little more control by inserting an instance of the Envelope Shaper plug‑in (or whatever third‑party equivalent you might prefer) on each track. As shown in the screenshot below, a combination of high attack, short length and short release settings can produce a more percussive sound, but experimentation is the order of the day.
Where Are My Drums?

Using the mixer also provides additional processing options for each LoopMash track, via Cubase audio plug‑ins such as the Envelope Shaper.Using the mixer also provides additional processing options for each LoopMash track, via Cubase audio plug‑ins such as the Envelope Shaper.
While the slice replacement produced by LoopMash is great, at times you might want your master loop to be playing all the time, to ensure that the overall rhythmic feel is maintained, and simply have the slices from any other loops layered on top. Most of the time, this can be achieved entirely within LoopMash by a careful balance of the Similarity Gain sliders — in particular, having the slider for the master track quite high — and setting the 'Number of Voices' control to two, three or four. This combination ensures that slices from the master track are very likely to be picked for playback and that there are enough voices in total for slices from other tracks to be selected for layering on top. However, if you want to be sure your master loop plays back at all times, or want to get as many replacement slices from your additional loops as possible, the simplest solution is to copy your master track loop to a standard audio track and play it back from there. If you then turn the master track's Similarity Gain slider down to zero (which also frees up a 'voice' to be used by other tracks), while it continues to control the rhythm and influence the selection of slices from other loops, its slices are not output via LoopMash. The relative levels of the master loop and the various LoopMash slices can then be controlled via the Cubase mixer.
Breath Of Life
A quick search on the Steinberg Forums soon brings up a number of other 'wouldn't it be nice if LoopMash could….' comments from users, relating to issues similar to some of the ones I've covered above, so it will be interesting to see if Steinberg do develop the plug‑in further. That said, even as it stands, LoopMash is both a lot of fun and a powerful creative tool. Given the new life it can breathe into a tired loop collection, if you're willing to experiment but have an older version of Cubase, it's probably worth the upgrade price on its own! Happy mashing...
Friday, April 22, 2016
Thursday, April 21, 2016
VariAudio: Extracting MIDI From Audio Files
Steinberg Cubase Tips & Techniques
Technique : Cubase NotesJohn Walden
VariAudio's Extract MIDI function provides three different ways of dealing with pitch-bend data.VariAudio's Extract MIDI function provides three different ways of dealing with pitch-bend data.

Back in SOS August 2009, I took a look at pitch‑correction using Cubase 5's new VariAudio tool, which can be found in the sample editor. While pitch and timing changes are obviously VariAudio's raison d'être, the tool has a further trick up its sleeve: MIDI extraction. In other words, using VariAudio, you can take a monophonic audio performance and extract MIDI timing and pitch information from it, leaving you with a MIDI part in place of your audio file. This type of audio-to-MIDI conversion has been around for quite some time (Logic, for example, has offered it for many years now, and it's also possible in Celemony's Melodyne), but this is the first time the functionality has been built into Cubase.
So why would you want to extract MIDI from your audio? Although none of the current audio-to-MIDI conversion tools are without their particular quirks, they have a number of uses, which include extracting MIDI from a bass-guitar performance, enabling you to double the part with a bass synth (if the bottom end of your mix needs a little beefing up, for example). It can also be a useful way for a guitarist to create melody lines for synths, without using a keyboard or entering the murky waters of MIDI guitar controllers. In addition, extracted MIDI data can be used with Cubase's scoring features to provide notation of parts for other musicians. Surprisingly, for such a potentially useful feature, the MIDI extraction process is given pretty short shrift in Cubase's Operation Manual.
Extraction Basics

The same eight-note audio phrase extracted using each of the three pitch‑bend data modes.The same eight-note audio phrase extracted using each of the three pitch‑bend data modes.
The basic principles of the extraction process are straightforward. Having identified the pitch of individual notes in an audio performance, VariAudio can then export that data to a suitable MIDI part via the Function / Extract MIDI command. If you've used VariAudio's Pitch & Warp or Segment tools, the changes you've made to the segments will be reflected in the timing and pitch of the MIDI notes created.
There are three options, in terms of pitch‑bend data, when outputting the extracted MIDI information. First, the data can be excluded, so you just get the individual note, and this automatically pitch‑quantises MIDI notes to the nearest semitone. As it ignores pitch-bend data, this mode produces a fairly simple output, and is useful if you want to play it back via an instrument that doesn't naturally support pitch-bend (such as a piano), for producing notation (where simpler is generally better for generating a clean-looking score), or if you just need the basics of the part extracted for further MIDI editing. The second option, Notes and Static Pitch-bend Data, simply adds a single pitch-bend event to each of the segment pitches to move it to the nearest semitone — which is effectively a kind of pitch‑quantise by using pitch-bend. I'm not convinced of the value of this mode, so let me know if you find a practical use for it!
The final mode, Notes and Continuous Pitch-bend Data, does exactly what you'd expect, and uses pitch-bend data to match as closely as possible the pitch curve that you see displayed by VariAudio in the Sample Editor. This is great for getting the maximum amount of expression from your audio performance, but it can generate large pitch‑bends, where legato notes slide from one pitch to another. Depending on the pitch‑bend range set in the output dialogue box, a warning indicating the semitone range of the largest pitch-bend in the extracted part might be displayed. You should change the setting in the dialogue to match this, and the setting is then embedded as controller data at the beginning of the MIDI event (you can, of course, view this using the MIDI List Editor). For many MIDI instruments, this will automatically change the pitch-bend range, but if things don't sound right you may also need to manually adjust your sampler patch settings. This is easier to do with some MIDI sound sources than others (for example, you can't manually change this setting for HALion One instruments: you're stuck with whatever default is built into the patch), and even then it can require experimentation. If you get desperate, it's also possible to scale pitch‑bend data using the Logical Editor, but that's outside the scope of this article.
GIGO

VariAudio's pitch detection applied twice to the same guitar phrase. The upper pane is the clean DI'd part, while the lower one is based on the performance recorded through an amp with various effects. Note how the clean performance produces the simpler pitch and note data, which in turn is easier for the MIDI extraction process to work with.VariAudio's pitch detection applied twice to the same guitar phrase. The upper pane is the clean DI'd part, while the lower one is based on the performance recorded through an amp with various effects. Note how the clean performance produces the simpler pitch and note data, which in turn is easier for the MIDI extraction process to work with.
Good though the VariAudio MIDI extraction process can be, some audio sources seem to provide better input signals than others, and it's worth avoiding the frustration of 'Garbage In, Garbage Out'. Performances featuring single notes (no chords), and recorded as mono rather than stereo, are essential. It also helps if the audio is recorded at a reasonable level, isn't smothered with effects and has notes with a clearly defined attack. For example, a dry, DI'd guitar or bass (without amp simulation or effects) can work well and, in general, instruments are easier to work with than vocals, which tend to produce more complex pitch variations. The screenshot above shows a simple example comparing a clean DI'd guitar with the same part recorded via an amp with some effects applied. VariAudio has clearly found it easier to determine pitch data from the former.
It's also worth editing the VariAudio segments prior to extracting the MIDI data. The most important step is to get the start of each new segment aligned with the attacks of the notes in the audio waveform. This ensures that the timing of the MIDI notes generated will closely match that of the audio performance. Segments can be split or deleted where the VariAudio pitch detection algorithm has either created a single segment that spans more than one note, or where two segments have been created for a single note. This ensures that the number of MIDI notes matches the number of notes in the audio part. For greater accuracy, you can zoom in on the audio display as you use the Segments tool.
A Dose Of The Bends
 Here, the same audio phrase shown in the previous screenshot has had some minor edits to its segmentation, as described in the main text. VariAudio's Pitch Quantize and Straighten Pitch options have also been applied, prior to using the Extract MIDI function.Here, the same audio phrase shown in the previous screenshot has had some minor edits to its segmentation, as described in the main text. VariAudio's Pitch Quantize and Straighten Pitch options have also been applied, prior to using the Extract MIDI function.
Once you've edited the position and number of segments, you can use the Pitch Quantize and Straighten Pitch sliders to clean up the performance. The usual qualifiers apply here. For example, make sure that when quantising the pitch, wayward notes don't get dragged to the wrong semitone. This is easily corrected by dragging and dropping the segment back where you want it, so you can be quite aggressive with the Pitch Quantize setting.
If you intend to extract the pitch-bend data as well, Straighten Pitch is useful for cleaning up more extreme wobbles. This is perhaps more useful on vocals than instruments, but in either case it needs to be done subtly or you might change (or even lose) the expression of the performance. If you plan to use the MIDI data for a piano or to create notation, extracting without pitch‑bend data is a better option anyway, but if you want, for example, to turn a vocal or guitar performance into a MIDI‑based violin or saxophone performance, retaining the bends of pitch — and experimenting with your settings to get the pitch-bend performance of the MIDI instrument sounding believable — is an important part of the process.
Wot, No Drums?
While VariAudio's MIDI extraction does require a little patience, with practice it can produce very good results. I've posted a couple of audio examples on the SOS web site (/sos/nov09/articles/cubaseaudio.htm). As you'd expect, the quality of what can be achieved depends to a large extent on the playback instrument. It's easy to make the translation to piano‑style instruments, as there are no pitch-bend issues. With parts containing pitch‑bend data, synth‑based sounds tend to be more convincing than virtual versions of 'real' instruments; not surprising when you think how hard it can be to program realistic solo parts for many string or wind instruments!
There are also a couple of things that this audio‑to‑MIDI function can't do. First, the amplitude of the audio is not converted into MIDI velocity data, and all the MIDI notes created are given a default velocity of 100, so volume expression has to be added via subsequent editing. Steinberg might add an amplitude‑to‑velocity element to the algorithm sometime, but for the moment you'll have to look at third‑party plug‑ins to do that.
Second, VariAudio's note- and pitch- detection algorithm is not really designed to work with drum or percussion instruments, so if you were hoping to use it to convert audio drum performances into MIDI data (for example, so you could replace or layer individual drum sounds), you might find yourself frustrated by the results. Again, while this would be nice to see as a future feature, for now I'd stick with third‑party plug‑ins such as KTDrum Trigger (see the SOS May 2007 Cubase workshop for details). A MIDI output on the Gate plug‑in would also be useful in this application. Alternatively, if you're just working with short(ish) loops, you could experiment with some slicing in the Sample Editor and Groove Agent One's drag-and‑drop capabilities — which is perhaps a fitting subject for a future column.
Wednesday, April 20, 2016
Tuesday, April 19, 2016
Cubase: Multi-articulation | Audio
Audio Examples From Cubase Techniques February 2010
Technique : Cubase NotesJohn Walden
This Download accompanies the Cubase Technique VST Expression workshop for SOS February 2010 (/sos/feb10/articles/cubasetech_0210.htm). There are two Expression Maps: the completed stings Expression Map as described in the main text; and the completed Expression Map for an electric bass multi using normal, muted, staccato and slap bass sounds, on MIDI channels 1 to 4 respectively. Each performance style has 5 levels of dynamics defined. As described in the article, you may need to tweak these maps to use with the libraries you decide to use in Cubase.
Published in SOS February 2010
Monday, April 18, 2016
Saturday, April 16, 2016
Technique Workshop | Audio
Steinberg Cubase Tips & Techniques
Technique : Cubase NotesJohn Walden
The following audio examples accompany this month's Cubase Technique column, about extracting MIDI information from audio files using Cubase's Variaudio.
Guitar Extraction Audio icon guitarextraction.mp3
This short clip includes four sections. It starts with the untreated DI'ed electric guitar phrase. This was then subjected to the MIDI extraction process as described in the main article and three versions of that are included. The first contained no pitchbend data and is played back via a sampled piano. The third and fourth used continuous pitchbend data and are played back via sampled sax and lead synth patches respectively. When heard in isolation, the sax phrase, while not a complete disaster, is perhaps not as convincing as the synth performance.
Bass Extraction Audio icon bassextraction.mp3
This short clip features a DI'ed electric bass phrase. MIDI extraction has been performed and this is then played with a bass synth patch. Three versions are presented; bass synth in isolation (no pitchbend data), DI'ed electric bass and bass synth (no pitchbend data) layered and DI'ed electric bass and bass synth (with pitchbend data) layered. Both of the layered versions could be used to add extra weight to the bottom end of a mix.
Published in SOS November 2009
Friday, April 15, 2016
Thursday, April 14, 2016
VST Expression
Steinberg Cubase Tips & Techniques
Technique : Cubase NotesVST Expression, introduced in Cubase 5, enables you to extract the best from multi‑articulation sample libraries.
John Walden
Expression can be added via the Articulation Lane in the Key Editor.

As anyone who plays a 'real' instrument (one that doesn't generate its sound by entirely electronic means) knows, recreating a convincing performance of the same instrument using samples can be a difficult task. The process is made somewhat easier if you're using a sampled instrument that includes a range of performance articulations, and this is most commonly controlled via 'keyswitches'. These are used to trigger different sample layers that contain the various performance options, but although this can work well, it can take a lot of work to become really fluent with it.
Steinberg designed their VST Expression system to make things simpler. Similar in concept to drum maps, this new function was first unleashed in Cubase 5 and is targeted at multiple articulations for a single instrument. The key strengths of this approach are twofold: it allows you to combine different approaches to generating articulations; and it gives you the ability to 'add' expression after the basic performance has been recorded. Steinberg included a small number of new instruments in HalionOne that support VST Expression but, as with drum maps, it's also possible to create bespoke VST Expression presets for third-party instruments.
Performance Enhancement
The screenshot above shows a MIDI part being edited in the Key Editor (the Cubase 5 Project containing this part can be downloaded from /sos/jan10/articles/cubasetechmedia.htm), played using the new HalionOne VST Expression-ready Tenor Sax instrument. (The new instruments have a 'VX' in the preset name, so it's easy to spot them.) If an instrument has an Expression Map assigned to it, the articulations can be added and edited in the Articulation Lane. For example, in this case, I've used the 'growl' and 'fall' articulations for particular notes in the phrase.
Adding articulations 'after the fact' as part of the editing process is often easier than trying to play keyswitches in 'live' via your keyboard. While the Key Editor's Articulation Lane provides the most obvious route to do this, another option is the Score Editor. Indeed, for those using Cubase to generate a score for other musicians, the fact that Expression Map articulations will appear in the printed score could prove very handy.
Map Reading

VST Expression articulations appear in the Score editor: a great facility for composers.
In order to use any of these articulation editing tools, the instrument needs an Expression Map. The basics of Expression Map creation is explained in the Cubase 5 Operation Manual, so I won't cover all that ground here. However, the manual deals with some significant details in rather a terse fashion (it's very much a manual rather than a tutorial). Perhaps the most useful of these is how articulations can adjust MIDI data in real time, so I'll focus on that.
The HalionOne Tenor Sax Expression Map contains five articulations, each based on a keyswitch that accesses a different performance layer (such as 'growl' or 'fall'), but Expression Maps aren't just about keyswitch options. They can be used to generate other forms of 'expression' by applying changes to the recorded MIDI data — and this allows you to get much more out of your sampled instrument, whether it has keyswitch articulations or not.
For example, let's imagine you wanted a phrase to be both staccato (short notes) and fortissimo (relatively loud). If you were using just keyswitched articulation changes, you might need an instrument with three sample layers: one for just staccato, a second for fortissimo, and a third for staccato and fortissimo. However, only the most detailed sample libraries are going to provide this degree of sample layer coverage for all the possible combinations of performance characteristics — and even then, it would eat up a lot of RAM to hold all the layers active.
You could, of course, emulate some of these performance variations via MIDI in the way you play; shorter notes for staccato and higher velocities for fortissimo. While you can do this as part of your performance, you can also add it after the fact via an Expression Map.
The screenshot (right) shows an example where five different performance types have been built from three articulations. In each case, the Output Mapping section has been used to change the MIDI data in real time on playback. For fortissimo (ff), I've increased the MIDI velocity to 150 percent of its actual value, while for staccato, I've shortened the length of the MIDI note to 20 percent of its actual value. And where both fortissimo and staccato are required, I've applied both of these changes.
Play, Then Shape
When using Expression Maps, the simplest method to build a performance uses four steps. Using the simple Expression Map described above (and which is also available from the link given earlier), the approach might be as follows.
1. Having created your MIDI track and linked it to the appropriate synth patch, open the VST Expression slot in the track's Inspector panel to select the Expression Map — or load it from a disk folder via the VST Expression Setup window if it doesn't already appear in the Inspector list.
2. Record the basic performance via your MIDI keyboard. Focus just on getting the right notes for now, rather than building expression into the performance.
3. Now for a couple of clean‑up tasks. First, apply any MIDI quantising you wish to use, to make expression elements within the Articulation Lane a little neater. Then, more importantly, use the MIDI/Functions/Velocity menu option to scale your overall MIDI velocity to somewhere in the middle of the velocity range. As any performance articulations you subsequently apply can include both increases and decreases in the MIDI velocity (to generate softer and louder passages), you need to make sure you have some room for manoeuvre: a fortissimo articulation won't work if you're already at the maximum MIDI velocity value before you apply it!
4. The final stage involves adding in your 'expression' using one of the MIDI editors — and the Articulation Lane in the Key Editor is the most obvious choice. If your Expression Map is set up correctly, this is easy to do and should help bring the performance to life.
The Right Direction

This Expression Map uses real‑time adjustment of MIDI data to create five articulations from three keyswitched sample layers.
As shown in the Articulations section in the VST Expression window, an articulation can be set as either a Direction or an Attribute. Attributes apply to single notes, whereas Directions apply to all notes until the next Direction is received.
In our example, fortissimo is specified as a Direction and, once placed in the Articulation Lane, it will apply to all notes until a different Direction is applied. In contrast, I configured the staccato articulation as an Attribute, so it only applies to specific individual notes: once that note is played, the next note is played at its original length. Clearly, only one Direction can apply at any one time, but multiple Attributes can be combined with a Direction (just as I've added the staccato Attribute to the fortissimo Direction), to build different performance options. I'm sure there are some musical rules that, strictly speaking, dictate which performance options are conventionally regarded as Directions and which are regarded as Attributes, but when constructing your own VST Expression Maps, you might need to be a little more flexible in how you assign them in the Articulations panel, if you're to create the performance combinations you require.
Just An Expression?
Space precludes me delving more deeply into some of the other Expression Map options (for example, the use of Groups) in this month's column, but it's a subject I'll come back to. Meanwhile, combining the MIDI options described above with a sampled instrument that already includes keyswitched performance options, provides tremendous flexibility. For example, if your sampled instrument includes a staccato layer accessed via a keyswitch, you could use the MIDI‑based technique described above to generate different levels of dynamics (soft, normal, loud, very loud...), and the same principle could be applied to all of the keyswitch layers — which means that the potential for creating more believable sounding performances is considerable.
Steinberg's web site hosts a selection of Expression Maps for some third-party sample libraries (www.steinberg.net/index.php?id=1944&L=1), and this list should grow over time. Until then, building your own Expression Maps for particular instruments isn't that difficult, provided you're prepared for some initial experimentation until you get your head around the way that various elements slot together. As a starting point, I've placed a second — and rather more detailed — MIDI‑based Expression Map on the SOS web site (see web address given earlier), so go on: express yourself!
Wednesday, April 13, 2016
Tuesday, April 12, 2016
Cubase: VST Expression | Audio
Audio Examples From Cubase Techniques January 2010
Technique : Cubase NotesJohn Walden
This Download contains the three separate files to accompany the SOS January 2010 Cubase Technique workshop (/sos/jan10/articles/cubasetech_0110.htm) on the VST Expression function.
Monday, April 11, 2016
Saturday, April 9, 2016
Cubase Techniques | Audio
Audio Examples From Cubase Techniques December 2009
Technique : Cubase NotesJohn Walden
Here is a selection of audio files to accompany this month's Cubase Technique (/sos/dec09/articles/cubasetech_1209.htm)
Performance Loop Audio icon performanceloop.mp3
This loop contains a nice performance, and was the pattern used for other musicians to overdub their parts against (so we need to retain this groove), but the sounds themselves sound a little flat, as the original recording was hit rather too hard with a compressor.
Sounds Loop Audio icon soundsloop.mp3
Having started to mix, it's clear that the drum sounds themselves are not strong enough — so how about the more 'rawk' orientated sounds found in this loop?
Loop with Replaced Sounds Audio icon loopwithreplacedsounds.mp3
This is the result of the Groove Agent One-based drum replacement — where key sounds from the 'performance' loop have been replaced by drum hits from the 'sounds' loop. It has improved matters, but the greater ambience on the snare sound now sounds like it is being gated by the slicing process. This might be fine is some musical contexts (very '80s Phil Collins) but a little extra processing, such as some global reverb, might help smooth things out for a more natural sound. Equally, the snare slice used could be edited to fade the ambience out more naturally.
Loop with Layered Sounds Audio icon loopwithlayeredsounds.mp3
You can also try blending the kick and snare hits from the 'sounds' loop with those of the 'performance' loop. This produces a much more natural result, but both the kick and snare sounds now have much more impact than in the original 'performance' loop: job done!
Friday, April 8, 2016
Thursday, April 7, 2016
Building Your Own Multi-articulation Instrument
Steinberg Cubase Tips & Techniques
Technique : Cubase NotesLast month, we introduced Cubase's VST Expression facility. Now it's time to build your own multi‑articulation instrument.
John Walden
Five string sounds loaded into Kontakt Player 4, ready for some Expression Map magic.

In last month's column, I introduced Cubase's VST Expression system and looked at how Expression Maps can be used to adjust MIDI data in real time. With this follow‑up article, I want to show how you can use Expression Maps to enhance your simple sample‑based instruments — by combining them to create multi‑articulation instruments with keyswitching.
This technique has three benefits: first, a more sophisticated and expressive version of an instrument can be created and controlled from a single MIDI track, so you'll no longer require separate MIDI tracks for different articulations; second, you'll be able to add and edit performance variations after the performance has been recorded; and third, because you're now using a single MIDI track, you'll be able to add expression marks to a printed score. The most obvious context in which you might wish to do this is with orchestral sounds, such as strings — so I'll use this as my main example — but the same principles can be applied to any instrument.
Simple Doesn't Mean Bad
A top‑of‑the‑range orchestral sample library with keyswitching built in doesn't come cheap. A cheaper instrument is likely to be simpler, but that doesn't mean it can't get the job done. In fact, many decent 'all‑in‑one' libraries or hardware synths now include some very respectable orchestral sounds, and you may have access to some perfectly good ones already.
For example, if you have any orchestral instruments, you'll probably have at least some of the following string performance styles: arco (normal bowing), legato (where notes run smoothly into one another), staccato (short, clipped notes), pizzicato (plucked with the fingers) and tremolo (a rapidly repeated note). The problem is that these are likely to be single instruments, and won't be key‑switchable — which is where VST Expression comes in, because by constructing a suitable Expression Map you can use the different expressions together as if they were a single instrument.
Fully Loaded
Let's break the process down into steps. The first requires that you have both a suitable set of sampled instruments and a multitimbral sample‑playback tool (one where different instruments are accessed via different MIDI channels). This rules out Cubase's HalionOne, which only allows one instrument per instance, but the full version of Halion would be fine, as would many third-party instruments.
I'll base my example around Native Instrument's widely used Kontakt Player 4 (which is available as a free download from NI's web site). As shown in the first screenshot, I've loaded five string patches, and in this case I've used 'light' versions of each patch from Peter Siedlaczek's String Essentials 2 library. Don't worry if you don't have it, because the whole process could just as easily be based around five patches from a basic GM‑style synth. If you want to replicate my example on your own system, simply match the performance articulations and MIDI channel numbers that I've used: arco (channel 1), legato (channel 2), pizzicato (channel 3), staccato (channel 4) and tremolo (channel 5). I chose these simply because they cover the most obvious styles for a general string performance.
The next step is to create an empty MIDI track and set its output routing to your multitimbral sample‑playback tool (ie. Kontakt Player in this example). It's probably best to set the output MIDI channel to that of your default sound, although the Expression Map we're about to create will change the final MIDI channel sent to the sample player, according to the articulation we wish to play.
On The Map

A single MIDI track can be used to control all five performance styles.
Of course, the next step is the creation of the Expression Map. As described last month, go to the VST Expression panel in the Inspector and open the VST Expression Setup window, then start a new Expression Map. The screen opposite shows the Map I created for this example, which uses the five sampled performance articulations and, for each one, defines five levels of dynamics (going from a relatively soft pp up to a loud fff). This gives a total of 25 sound slots used in the central panel and 10 entries in the Articulations panel.
The dynamics levels have been created using the same approach as last month, so, for each level, the Output Mapping panel's MIDI velocity setting is used to adjust the actual velocity of the note by a fixed percentage (I used a range from 70 percent for the soft pp up to 160 percent for the loud fff, but the exact settings are a matter of personal taste). For some articulations, you can also use the MIDI note Length setting to change the note length. For example, I used 150 percent for all the legato articulations, as this seemed to work nicely with my samples, and seemed to help them 'run together'. In contrast (and unlike last month's example), the staccato samples I used were suitably short and snappy already, so I didn't need to use the Length setting in this case.
The key element in completing this Expression map is the Output Mapping panel's Channel setting. For each of the five performance styles, the Channel setting must match the MIDI channel number for the sampled instrument in your playback tool. This allows the Expression Map to automatically remap the incoming MIDI data and send it out to the right MIDI channel, in order to select the performance style required.
Directions & Attributes

The completed Expression Map. Note the use of the Channel, Length and Velocity settings in the Output Mapping panel for the currently selected Legato fff Sound Slot.
The only other key consideration is what to define as a 'Direction' and what as an 'Attribute', and I've tried to follow convention. When notating string parts, performance styles such as arco, legato and pizzicato tend to be written as 'directions' — and once you see the symbol for one of these styles, it will apply to all subsequent notes until you see a different symbol. In contrast, staccato and tremolo are more commonly written as 'attributes': they apply only to the notes that are marked, after which the player will return to the previous playing style.
With the exceptions of features such as accents (which I've avoided here to keep the example relatively straightforward), dynamic levels such as pp, mp and f are always noted as 'directions', which apply until the next dynamic level is noted.
Remote Control
The final step — which is optional — is to define Remote Keys for each articulation. If you intend to add your expression via one of the MIDI editors after playing the part, rather than during performance, you can leave the Remote Key settings blank, but if you want to be able to switch between articulations via your MIDI keyboard (that is, create key switches), then a note can be assigned to a particular Sound Slot in the central panel of the VST Expression Setup window. As these keyswitches are only likely to be used while playing 'live', there's no need to define one for every Sound Slot (although you can if you want to). In this case, I've simply defined one key switch for each of the five main performance styles and done this for the mp dynamic level in each case. These would be perfectly adequate while playing in a part, allowing me to switch between performance styles, and then add my full range of dynamics expression after recording, using one of the MIDI editor windows.
Usefully, once a note is used as a Remote Key, it doesn't generate a sound in the sample player (the Expression Map automatically mutes it): this is helpful if your sampled instrument has sounds mapped across the entire key range but you still want to use key switches. I also tend to engage Latch Mode, as this means you don't have to hold down the key switch: just press it once, then release, and it will stay active until the next key switch is pressed. Finally, if you want to move your key switches to another area of the keyboard (perhaps to use them with a different MIDI keyboard controller), the Root Note setting allows this to be done automatically, without remapping the individual switching notes.
No Strings Attached

Once the Expression Map is in place, the Key Editor's Articulation lanes can be used to add expression to the performance.
The example uses orchestral strings, but there's no reason to limit yourself to orchestral instruments, and a good candidate for this technique is electric bass. There are lots of good, single‑articulation, sampled bass instruments that could be used to create a comprehensive, keyswitched version. To get you started, I've put a map based on four playing styles (sustained, muted, staccato and slapped), along with my main strings example, on the SOS web site at /sos/feb10/articles/cubasetechmedia.htm. Simply add your own samples and experiment!
Subscribe to:
Posts (Atom)