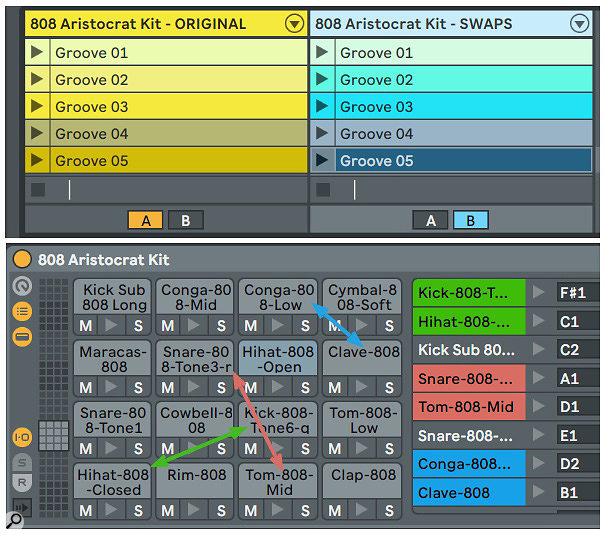
 Screen 1: The A side of Live's Crossfader plays the clips with the original kit; the B side plays them with the three kit-piece swaps indicated by the red, green and blue arrows.
We show you how to chop and change drum kit pieces on the fly in Ableton Live.
This month we're going to look at real-time kit-piece swapping using Live Drum Racks. In the examples, the Drum Racks and their associated MIDI clips come from the Drum Essentials Pack included with Live 10, but these techniques work with any instrument plug-in (not just drums) and any batch of MIDI clips.
Change Is Good
The easiest way to swap two kit pieces in a Live Drum Rack is to drag one Drum Rack pad over the other. The instruments assigned to the two pads will then be swapped, whereas the notes that trigger the pads will remain the same. (You can accomplish the same thing by changing the pads' MIDI Note-In assignments in the Rack's Chain List.) Depending on the MIDI clip you're playing, some swaps work better than others, but it's surprising how often unlikely candidates work. An easy way to check this out is to load a Drum Rack into Live along with several clips that play it, duplicate that track, swap some pads in the duplicate track and then assign the A and B sides of Live's Crossfader to crossfade between the two tracks. In Screen 1 above, I've swapped the kick and hi-hat, the snare and tom and the conga and clave. In this example, the rapid hi-hat patterns in clips 1 and 3 don't work well when swapped with the kick, but the other swaps produce more subtle and interesting variations.
Another way to swap kit pieces is to swap note lanes in the MIDI clips, and that has the advantage of allowing different swaps for different clips. You could, for example, avoid the kick/hi-hat swap in clips 1 and 3. To move a note lane, click the keyboard at the left edge of Live's Note editor to select all notes in that lane and then use the mouse or the up/down arrow keys on your keyboard to move all the notes. Landing on populated lanes will not affect their notes unless you deselect the notes you're moving. Neither of these is a real-time process, and moving note lanes is fairly tedious when you're working with multiple clips. There is a better way.
Making A Scene
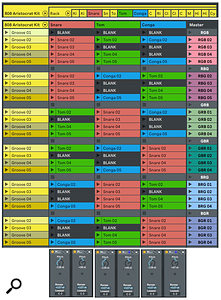
Start with a Drum Rack track such as the one in Screen 1 (above) and click the wedge at the right edge of its track header to unfold its Chain Mixer. Next, click the wedge at the right edge of the Chain Mixer to unfold the Drum Rack's kit-piece channels, as shown at the top of Screen 2. Find the chains you want to swap and, one-at-a-time, drag each chain outside of the Rack. (Alternatively, you can right-click in each chain's title bar and select Extract Chains from the drop-down menu.) Each extracted chain becomes a Drum Rack with a single pad holding the instrument assigned to that chain. The MIDI notes in clips on the original track that trigger that chain will also be extracted to new clips on the new track.
One more step is necessary to make the exported clips swappable among the new tracks: all of their notes and corresponding kit pieces must be moved to the same pitch. The obvious way is to manually move the notes and then to also move the kit pieces in the new Drum Racks. A quicker solution is to insert two MIDI Pitch effects before the Drum Rack on each new track. Set the first Pitch Effect to re-pitch all notes to C2 (MIDI note 0) by setting its Pitch knob to -128. Set the second Pitch Effect's Pitch knob to the note number of the Drum Rack pad holding that instrument (36 for C1, for example). This method has the added advantage that it's a lot faster than moving the MIDI notes in each of the clips on each track and then moving each track's Drum Rack pad.
 Screen 2: Snare (red), tom (green) and conga (blue) MIDI clips are extracted from five Groove Clips in the Drum Essentials 808 Aristocrat Kit. Each track re–routes all pitches to its instrument using the pair of Pitch Effects shown at the bottom.
The Groove 01 row at the top has blank MIDI clips for all three kit pieces because they were not played in Groove 01. The remaining four Grooves have at least one extracted MIDI clip. I've duplicated these four Scenes five times and swapped clips horizontally to generate the remaining 20 combinations that are possible without changing a clip's row. That ensures that when you trigger full Scenes, the yellow clips triggering the remaining kit pieces are from the same Groove Clip as the snare, tom and conga clips. However, there's no need for that restriction — try Follow Actions on the yellow clips with any snare-tom-conga combination. Follow Actions can also be used on the snare, tom and conga tracks, but with one caveat: they may trigger the same clip on different tracks, thereby layering two kit pieces. You can avoid that by inserting an empty Scene below each of the Groove 05 clips, as shown in Screen 2. That ensures that Follow Actions stay within clips from the same kit piece.
Tips & Tricks
Here's one way to clean things up a bit and then capture single clips holding your favourite combinations:
1. Load the 808 Aristocrat Kit on a new MIDI track.
2. Delete the Drum Racks on the original track as well as on all the extracted tracks. (Do not remove the Pitch Effects on the extracted tracks.)
3. Once their instruments have been deleted, you can route the output of the four tracks to the new 808 Aristocrat Kit track and record the results as new MIDI clips on that track. For example, you might use Follow Actions on each of the segments in Screen 2 to generate long MIDI clips and then slice out the 'keepers'.
4. When you're finished, the new 808 Aristocrat Kit track will hold your favourite swap clips, and you can delete the other tracks.
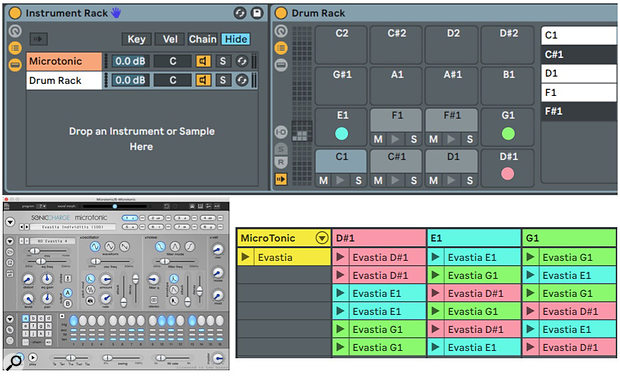
Although this method relies on features of Live's Drum Racks, it is easy to adapt it for any drum plug-in and collection of MIDI clips. The first step is to insert the drum plug-in on a MIDI track and enclose it in an Instrument Rack (Command+G/Control+G). Next, drag an empty Drum Rack to the Drop Area of that Instrument Rack to create a new chain. The Drum Rack will come with a single chain for the C1 pad. You'll need to create a chain for each pad corresponding to a note lane you want to extract from MIDI clips playing your drum instrument. You can do that by Option/Alt–dragging the C1 chain to the corresponding pad in the Drum Rack. The Drum Rack chains will remain empty. For a template, you could create an Instrument Rack with an empty chain for the drum instrument and another chain holding a Drum Rack with typical chain assignments (C1 through D#2, for example).
 Screen 3: The Instrument Rack at the top holds chains for MicroTonic and for a Drum Rack with extractable chains for pads C1 through G1. Playing the Scenes (bottom right) will swap the MicroTonic kit pieces.
In Screen 3, I've inserted Sonic Charge MicroTonic as the instrument and then created chains for C1 through G1 to correspond to MicroTonic's eight pads. I've then exported a MicroTonic MIDI clip to the MicroTonic track. Notes routed to that track as well as MIDI clips played on it will both play MicroTonic and trigger the Drum Rack pads. The reason for the Drum Rack is that, even though its active chains are empty, extracting a chain will extract the corresponding MIDI notes in clips on the track. Routing them back to the MicroTonic Drum Rack track will play MicroTonic, and using dual Pitch Effects as in Screen 2 will swap MicroTonic kit pieces when you swap the extracted clips.
Published July 2019
No comments:
Post a Comment