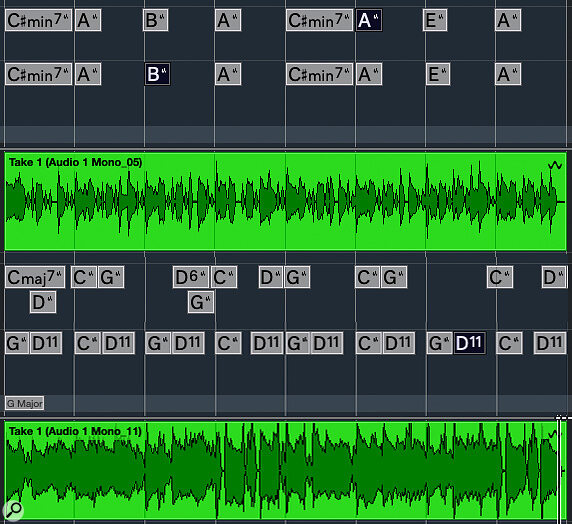
 The upper half of the screenshot shows the Audio To MIDI Chords result from a fairly simple strummed guitar performance with three‑ and four‑note chords. The chords were correctly identified (top) and only some minor timing edits (second row) were needed. The lower half shows a less successful example, based on simple chords but with some open‑string drones. Cubase’s chord identification struggled but, even so, the required editing took only a couple of minutes.
We get to grips with Cubase 12’s new Audio To MIDI Chords feature included in Pro, Artist and Elements.
One of the most intriguing features Steinberg introduced in Cubase 12 is Audio To MIDI Chords. Included in Pro, Artist and Elements, it’s one of a number of enhancements to the Chord Track system and the basic process couldn’t be easier. Simply drag and drop an audio recording onto the Chord Track: Cubase will analyse it to work out the chord and key/scale changes contained within, and will then populate the Chord Track with that information. Obviously, you can use this to analyse commercial tracks and sampled loops, but in this column I’ll focus on using it when you’ve laid down your own musical ideas — a strummed guitar part, for example — and want to develop them further in Cubase but are a little unsure of the chords.
Keep It Simple?
It’s quite a tricky thing that Cubase is attempting to do here, and common sense suggests that simpler recordings should increase the chances of success — so how ambitious can you be? In my experiments, Cubase did an impressive job of extracting the chord sequences from clean DI electric guitar performances containing three‑note triad chords, even when played with busier rhythms, and with four‑note chords the identification was still good, though not always quite as accurate. Unsurprisingly, the results grew less predictable as I reached the limits of my jazz‑flavoured voicings, and I found that arpeggiating the chords or using an alternating thumb bass note could throw the detection off track. Things were also a little hit‑and‑miss with guitar chords that featured open strings as ‘drones’.
When extracting the chords from an overdriven or heavily processed guitar sound, the process was still very usable if the original part featured a solid chord progression. I also experimented with a bunch of EDM‑style synth/piano loops and, with the same qualifiers about harmonically complex chords, the process also did a decent job with this type of audio source. By the way, note that the chord identification process won’t distinguish between different voicings or inversions; a G minor will be displayed on the chord track as G minor, regardless of how or where you play it on the neck.
The first screenshot and the audio examples (you can find these at: https://sosm.ag/cubase-0722) show how successful my various experiments were.
If you do find that Audio To MIDI Chords struggles to analyse any given performance (for example one that contains complex rhythms and processed sounds), you can always record a simplified ‘guide performance’ — simplify the strumming or just play chords where you want the chord changes to appear.
Check & Change
 Chord Events in the Chord Track can be auditioned easily with a virtual instrument such as HALion Sonic SE.
Once Audio To MIDI Chords has done its thing, you can check the chord identifications and timings in several ways. The easiest is to add an instrument track (I used a HALion Sonic SE acoustic piano patch) and, in the Chord Track’s Inspector panel, ensure the Acoustic Feedback button is enabled (the ‘speaker+cursor’ icon is orange). Then, in the Chord Track’s header in the Track List, use the Select Track For Auditioning drop‑down to pick the target track (in this case, my HSSE piano). On playback, the Chord Track sends simple block chord changes to this target track and, as the performance loops, you can easily compare the timing of the Chord Track changes with those in your audio performance. Then simply then add/remove or adjust the position of the Chord Events, until all the chord changes are perfectly timed.
 The Chord Editor’s Detected tab can help with editing any Chord Events created using the Audio To MIDI Chords function.When it comes to editing the chords themselves the previous Chord Editor tools remain available, but Cubase 12 adds an option specifically for Audio To MIDI Chords. Called the Detected tab, this is found in the Chord Assistant panel, and it’s only available when the Chord Events have been detected by Cubase from an audio source.
It shows a list of chords that might be suitable alternatives to Cubase’s own first choice, and they’re ranked in order of likelihood. You might actually find that the Chord Editor offers alternative chord choices that are more interesting than the original performance — that could be great if you’re stuck in a rut! Any changes you make here (or using other Chord Editor options) will be reflected during playback, so cross‑checking between your original audio and the virtual instrument is quick and easy.
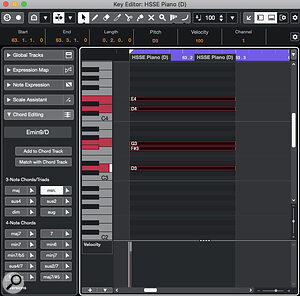
 If you’re struggling to identify a chord in a guitar performance, you can always enter the notes into a MIDI event and let Cubase help.By the way, if you are struggling to match a chord from within your own guitar recording using the Chord Editor, you can always create a new MIDI track and, based upon the fingering of the chord (including any open strings), enter those notes into a MIDI clip. If you then select all the notes, the Chord Editing panel in the Track’s Inspector will take its best guess at identifying the chord for you. Usefully, it also offers an Add To Chord Track button, so you can easily add it to your chord sequence.
There’s An App For That
Once you’ve smoothed out any of the wrinkles, what can you do with your perfectly populated Chord Track? Quite a lot actually, given how deeply the Chord Track is integrated with other Cubase 12 features! But I’ll finish this month’s column by exploring two simple, yet very useful applications.
First, having started with a strummed guitar part, you may wish to add virtual instruments to flesh out a musical arrangement. As I’ve mentioned before in these columns, my piano skills are somewhat limited, so I’ll often turn to the Chord Pad system to trigger MIDI chord sequences for instruments such as piano, keys or synths. And, as the Chord Pads system includes the Assign Pads From Chord Track option, the Chord Track can be used to populate the Chord Pads instantly with all the chords required for your project.
 Once your Chord Track is populated with the correct chords, the full chord set can be assigned to the Chord Pads for use with any virtual instruments.Second, if you add and select a new instrument track and execute the Project / Chord Track / Chords To MIDI command, this will create (on the selected MIDI track) a MIDI clip containing block chord changes based on the Chord Track. Then select a patch for your virtual instrument that uses an arpeggiator (whether built into the instrument or courtesy of a MIDI plug‑in such as Arpache 5), hit Play, and you have an instant arpeggiated chord pattern that follows the chord sequence of your original audio recording. Tweak the arpeggiation to suit, and the results can seem almost magical!
Of course, a suitably stocked Chord Track can be used for a whole range of other applications. And, as Audio To MIDI Chords provides such a useful kickstart in populating the Chord Track, it’s probably a topic I’ll return to in future columns.
No comments:
Post a Comment