 StepFilter might not be the most powerful filter plug‑in ever created, but its step‑based pattern sequencer opens up some very interesting creative possibilities.
Want to create your own signature sounds? Cubase makes sound design easy.
There’s something very satisfying about making music with sounds you’ve designed yourself, and Cubase provides plenty of options to explore on this front. It’s a big topic, and I’ll consider two different angles in successive workshops: this time, I’ll transform a live audio input source into something more ‘synthetic’; and next month I’ll look at ways you can create playable instruments from a simple, single sample. In both cases, I’ll provide audio examples to illustrate the text, and you’ll find this month’s below or at https://sosm.ag/cubase-1221 with full captions.
Before we start, check your audio buffer size (in the Studio menu, select the Studio Setup panel and, via the Audio System section, open your audio interface’s Control Panel). This needs to be set low enough that real‑time monitoring through a plug‑in chain feels responsive, but not so low as to cause clicks and pops. Second, engage the Monitor button for the audio track you’ll use for your audio input. You may need to disable direct monitoring on your audio interface too, so that you are monitoring only the audio being processed in Cubase.
Sustain
You can process any live audio input through a Cubase plug‑in chain, but let’s start with something simple: transforming some sustained DI electric guitar chords into something that sounds more like a rhythmic synth. Sonically, an unprocessed guitar DI signal can sound pretty uninspiring. One problem may be a lack of sustain, in which case a useful first processing stage might be compression. In my example, I used (or rather abused!) Cubase’s Tube Compressor. With a fast attack, slow release and high ratio, the compressor quickly reduces the initial transients in the audio input while the slow release makes the sustained portion of the sound appear louder. As our aim is something synth‑like, we can think of this compressed DI guitar as our synth’s ‘oscillator’.
StepFilter & MidiGate Rhythm
Some filtering might be a good next step and StepFilter is a good starting point. This plug‑in offers the usual cutoff and resonance options but the main attraction is its step‑based pattern control of these parameters — this makes it super‑easy to add filter movement in real‑time. As shown in the screenshot, I programmed a cutoff pattern that includes some steps with zero values, essentially closing the filter. This chops the sustained guitar chords to create a rhythmic feel and adjusting the Glide control determines the strength of that rhythmic effect.
Many synth filters and filter plug‑ins include a drive control to spice things up a bit, and while StepFilter doesn’t you can insert one of Cubase’s distortion plug‑ins somewhere in your chain. I plumped for Distortion, and inserted it before StepFilter. With suitably high Boost and intermediate Feedback settings, this can generate a nice ‘growl’, without sounding too much like a distorted guitar amp. For Pro and Artist users, Distroyer could provide similar results while offering more options.
 MidiGate lets you superimpose complex rhythmic patterns upon your live audio signal.A more adventurous option for creating a rhythmic feel is to use MidiGate. Essentially, this is a noise gate that’s keyed by MIDI notes, rather than by the audio signal exceeding a threshold and it thus requires some configuration — but it’s well worth it! First, set StepFilter’s Cutoff and Resonance patterns to provide a continuous sweep (rather than rhythmic pattern) for the filter. Then insert MidiGate just before StepFilter. To trigger the gate you must create a MIDI track and route it’s MIDI note data to MidiGate’s MIDI input. You can then use the MIDI notes on this track to open and close the gate rhythmically. The notes can be from MIDI loops, recorded parts or a live input, but if you already have a MIDI drum track or bass track in your production, elements copied from these (try the hi‑hat or kick/snare) will often work particularly well, instantly locking the rhythm of your designed sound to other elements in the production.
The screenshot shows my MidiGate settings, which force the gate to open and close quickly. Note that because the three lower controls are all set to zero, the pitch of the MIDI note has no influence on the gate’s attack/release time and the note velocity doesn’t influence the volume of the sound passing through. But these controls are definitely worth experimenting with at some point.
Retrologue 2 Side-chain
Although StepFilter can be very effective, Pro and Artist users have a more powerful option still: Retrologue 2’s filter. Retrologue 2’s side‑chain input can receive audio from another track, and this could be a ‘live’ audio input if you wish. This audio is passed through Retrologue’s filter and effects sections and if you disable all of its oscillators, you’ll hear only this Retrologue‑processed audio.
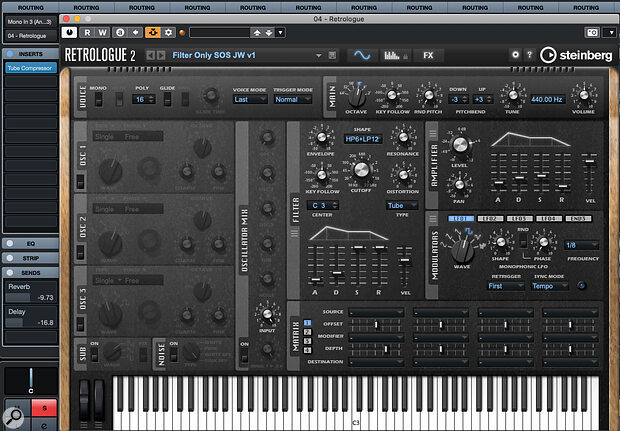
There are a couple of ways to route audio from your ‘live input’ audio track to Retrologue’s side‑chain. In this case, having enabled Retrologue’s side‑chain, an Input level control appeared in Retrologue’s Oscillator Mix panel. I then routed my audio track’s output directly to Retrologue’s side‑chain using the MixConsole’s Routing panel. This means my live audio input is first processed by the audio track’s plug‑ins (for example, my instance of Tube Compressor) before being sent to Retrologue.
 My audio input track has been routed (top left of the screen) directly to cRetrologue’s side‑chain input, so that I can apply the synth’s filter and effects processing to the sound.
Retrologue’s filter has plenty to offer: there are over 20 filter shapes, a filter envelope and a choice of distortion types. However, as with MidiGate, for Retrologue’s audio engine to be ‘active’ it must be triggered by incoming MIDI notes — even if all the synth’s oscillators are disabled. Your Retrologue track therefore needs a MIDI clip containing some MIDI note data. The upside of this requirement is that the MIDI note data can serve several functions...
First, the timing and lengths of the notes can be used to impose a rhythmic feel upon your live audio input; a single long note will allow you to hear your audio exactly as you play it, while a series of shorter notes will impart their timing on the performance. Second, some fun can be had with the pitch and velocity of your MIDI notes, which can influence both the filter’s Key Follow control and the velocity sensitivity of the filter and amp envelopes. The audio examples include a number of different MIDI note configurations that illustrate just some of the possibilities, from letting your audio dictate the dynamics (using long MIDI notes), through syncopated staccato patterns (short MIDI notes) and to pseudo‑reversed notes (using a slow attack time in the Amplifier ADSR), but you can get very creative with this.
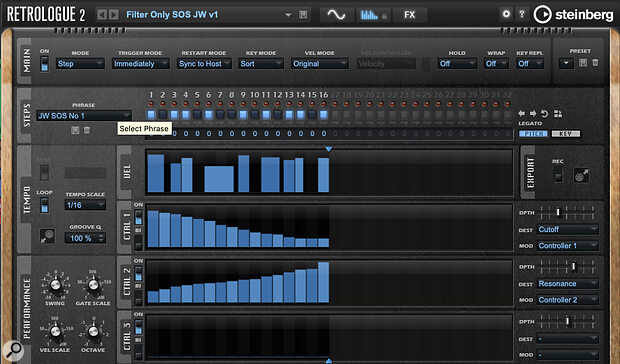
If enabled, Retrologue’s Arpeggiator features provide yet more rhythmic and modulation options. In the final screenshot, the Vel(ocity) lane is being used to create a rhythmic pattern and control the volume of each step, while I’ve set the first two Controller lanes to change the filter’s Cutoff and Resonance values. The tempo of the pattern (and, therefore, the speed at which your audio is modulated) is locked to your host tempo but can be adjusted with the Tempo Scale setting.
 Once your audio has been routed into Retrologue 2, you can exploit the Arp page options to inject some rhythm and movement into your sound.
More Processing
As with the sound engines built into most virtual synths, the processing options don’t stop at the filter; you can deploy a whole array of ambience, modulation and other effects to further enhance your sound. Cubase’s Stereo Delay, available in Elements, is a good starting point but the less conventional Multitap Delay (Pro and Artist) and ModMachine delay (Pro only) both offer something a little less conventional and they’re well worth experimenting with. When using Retrologue 2’s filter, the full suite of Retrologue’s effects panel is available including the suitably experimental Resonator section. I’ve included a number of examples of what’s possible in terms of ‘post‑filter’ processing in the audio examples.
Having built a processing signal‑chain for transforming your live audio input, make sure you save the configuration using either the Track or Insert rack preset systems (whichever works best for your particular configuration); when you want to try it with your didgeridoo as opposed to that DI’ed electric guitar, you’ll be ready to go in a flash.
Of course, you might also like to build a fully playable instrument or two from just a sample of that didgeridoo, and if you check back next month I’ll offer you some more ideas.
No comments:
Post a Comment