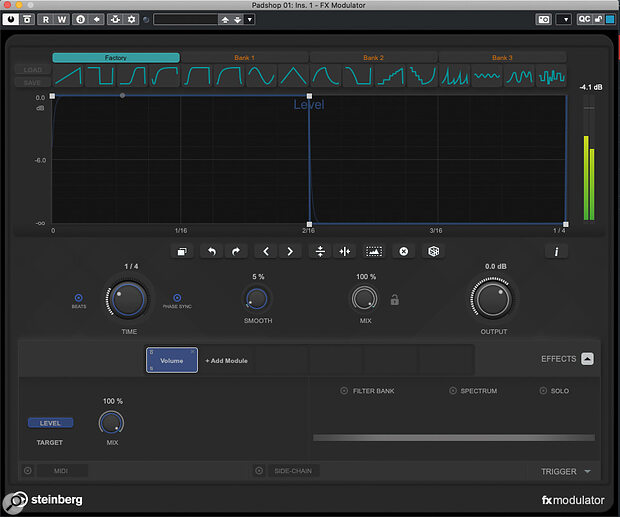
 Screen 1: A simple step on/off modulation curve to control Level within FX Modulator’s Volume module, made using the second Factory curve preset in the top row.
FX Modulator brings powerful new creative processing options to Cubase 12
Included with the Pro and Artist versions of Cubase 12, Steinberg’s FX Modulator is a multi‑effects plug‑in which takes an approach that’s reminiscent of Output’s Movement and Cable Guys’ ShaperBox. It comes with plenty of cool presets and these are well worth exploring if you want to find out what it can do, but it’s also a very approachable plug‑in that makes it pretty easy to design your own effects from scratch. This article will take you through some examples, and on the SOS website (https://sosm.ag/cubase-0822) you can find some audio clips that should bring them to life.
The Rhythm Method
FX Modulator has lots of potential uses but first we’ll look at creating rhythmic effects from a sustained sound. As my starting point, I’ve used Padshop’s somewhat anonymous‑sounding Mellow preset with the in‑built delay turned off — but the same principles could be applied to any source sound.
Screen 1 shows an instance of FX Modulator inserted on my Padshop track. Any combination of FX Modulator’s 14 individual effects modules could be modulated to create rhythmic effects, but I’ve picked the simple Volume module for this example. This module offers a single parameter for modulation: Level, as shown bottom‑left of the UI. We can create a modulation curve to control this parameter in the upper panel. Some modules offer multiple parameters: for example, the Filter module allows you to modulate both Frequency and Q (resonance), and you can create independent modulation curves for each parameter.
FX Modulator ships with a bank of Factory curve presets which you can’t overwrite, as well as three banks of empty curve preset slots for your own creations. In this example, I’ve simply selected the second Factory preset curve, which steps the Level between maximum and zero once over the timebase of the envelope. This timebase can be changed with the Time control and, in this case, I’ve selected 1/4 so, when I trigger a sound in Padshop, I get a (very!) simple quarter‑note rhythm, as FX Modulator follows the modulation curve over the selected timebase. Yay: job done!
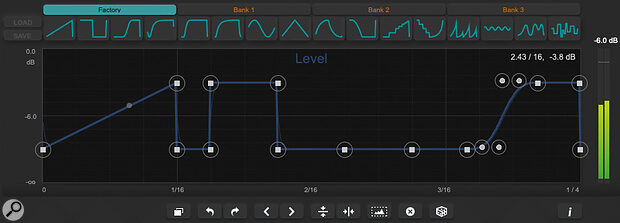
 Screen 2: More complex rhythmic patterns can easily be created by combining the Factory preset curves. In this case, the curve’s vertical range has also been compressed using the editing tools.
Curve Control
That’s the basic principle covered but we can, of course, get more creative with the modulation curves — and pretty easily too! Editing the curve follows the standard approach of double‑clicking to add/delete nodes and click‑dragging to reposition them (they snap to the grid, but you can defeat this by holding Shift). You can also create curves by dragging the line between two existing nodes; a ‘shape handle’ will appear when you do this.
Depending on the nature of your source sound, sudden switches in parameter values (as for Level in the first screenshot) can produce noticeable audio artefacts such as clicks. Setting the Smooth control into the 1‑5 % range softens the transitions around the nodes (a thinner curve is superimposed on the main curve to visualise what’s happening) and will usually take care of such artefacts. Larger Smooth settings can be used to easily transform a stepped pattern into a ramped one for a pulse‑like effect.
The tool buttons beneath the curve editing window control various useful functions and, as well as undo/redo buttons, these include the ability to flip the curve horizontally or vertically and shift the curve left or right (by one grid step in the display). However, you also get buttons to reset the curve (the ‘x’ button), generate a random curve (the dice button), ‘select all curve points’ (the little mountain range), and ‘duplicate curve’ (leftmost in the row). The last two in particular warrant further comment...
You can select multiple nodes for editing by dragging with the mouse within the display, and the ‘select all curve points’ is simply a shortcut for selecting everything. However, what’s useful is what you can then do with your selection: this includes dragging left/right or up/down and, even better, the option to scale/compress the curve’s range vertically if you hold the Alt key while dragging one of the selected nodes.
The ‘duplicate curve’ button takes the existing curve and places a copy of it next to the original. Interesting to note, however, is that this is done by time‑compressing the original curve, so if you leave the Time control unchanged your curve pattern will effectively play back at double speed. You can adjust the Time control to return the pattern to the original speed, though, and then make whatever edits you might like to your modulation curve to create additional variety to your now duplicated curve.
Curve Collector
Once you’re fluent with these editing tools, it’s incredibly easy to create custom modulation curves. In our Volume module example, this results in custom rhythmic patterns but a further editing trick can speed up this process. If you don’t have any nodes selected, and then click on any one of the curve presets displayed at the top of the display, that preset curve is copied to the editing window, replacing any existing curve, and filling the timeline. However, if you first select a range of nodes on your existing curve before clicking on one of the presets, the selected preset curve replaces only the selected nodes. This makes it trivially easy to combine the preset curves in new ways, generating more complex curve starting points for further editing.
 Screen 3: Creating your own curve building blocks within the user banks makes it easy to experiment with new rhythmic patterns.
Two further things arise from this feature. First, if you design a curve you like, and might want to re‑use it in another module, a separate instance of FX Modulator, or even another project, saving it into an empty preset slot in one of the three user banks (and then saving the bank using the Load/Save button on the left) is a good move. Simply click on an empty user slot and the current modulation curve will be copied to it for later recall.
Second, and putting these ideas together, we can create some simple step on/off patterns (like that shown in the first screenshot) but each with a different number of steps. The next screenshot shows an example in which I’ve created four such presets featuring 1, 2, 3 and 4 curve cycles of on/off respectively. These can then be quickly combined in any number of ways using the option just described to replace a selected range of nodes with the current curve. This makes it super‑easy to experiment with different rhythmic patterns via our Volume module modulation and, once you have a basic rhythm you like, you can apply further manual edits to fine‑tune the end result.
To Infinity & Beyond
I’ve used a simple example here for the purposes of demonstration, but even the most complex FX Modulator presets are built from these same tools; they simply use more modules and parameters. And even if we confine ourselves to the ‘rhythmic sounds from a static pad’ aim, once you have the basics in place it’s easy to suggest a few quick ideas to try next.
For example, if you engage the Filter Bank button you can constrain the processing of the current module to just a specific frequency range (drag the two node points to adjust). So we could, for instance, apply our rhythmic volume modulation to just the low frequencies and leave the higher frequencies untouched; play with two hands and it’s almost like the sound has two layers, one rhythmic and one sustained.
Second, while you can only use a single instance of any particular effects module within FX Modulator, you can easily process your sustained pad sound through two separate FX Modulator instances, each using the Volume module to create a different rhythmic effect. If you also automate the bypass options on these two instances, you can quickly switch between different rhythms for the same sound. However, with both instances active, you can let the rhythmic effects interact and, by automating the respective Mix controls, you can change the blend between the two rhythms. The results can get really interesting if your two instances use different Time settings!
 Screen 4: The Filter Bank allows you to constrain the frequency range that each effect module is applied to.
Finally, you can try adding in other effects modules. An obvious candidate to add to your volume‑based rhythmic effects is the Filter module with both Frequency and Q set to be modulated gradually over a number of bars; your rhythm then gets some classic tonal variations added to the mix.
There’s plenty of fun to be had with the Volume and Filter modules alone, but FX Modulator is capable of way more than just rhythmic effects. These further options will, however, have to wait for a future column.
While FX Modulator might not quite reach the dizzy sound‑design heights of something like Output’s Movement, it is much easier to master — so dig in, and you’ll soon by enjoying the fruits of your sound‑designing adventures.
No comments:
Post a Comment