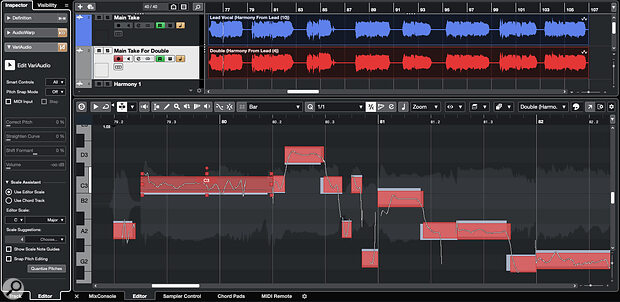
 It’s really easy to see the minor pitch differences between the lead and double vocal Segments: the red ones are those currently being edited.
Want to generate vocal doubles or harmonies based on a lead vocal? Cubase 12 has all the tools you will need.
Doubles and harmonies can add considerable impact to your vocal parts. For the best results you should really be recording those parts, but that’s not always possible. Usefully, then, if all you have to work with is a main lead vocal, Cubase can come to the rescue. In fact, if you make use of several different elements in its feature set, including some that arrived with Cubase 12, it’s possible for Pro and Artist users to create some pretty convincing doubled or harmony vocal parts. And even for those who want to sing harmony parts in, generating them in this way can provide a useful guide track.
Doubling Up
The first step is to create a copy of the original lead vocal audio clip and convert this to a ‘real copy’ (Edit / Functions / Convert To Real Copy) — the idea is that you can make edits to this copy without impacting on the original. To fabricate a double‑tracked vocal from this copy, you need to make changes to its pitch and timing.
For a quick and easy method, two steps might be all that’s required. First, ensure that AudioWarp quantise is enabled, select the vocal double audio clip and simply apply a 1/16th or 1/32nd note quantise. Second, open the copied vocal clip in the Sample Editor and go to the VariAudio panel. After Cubase has analysed your audio, select all the pitch Segments and then apply some global pitch changes using the Correct Pitch and Straighten Curve sliders. The combination of these timing and pitch changes should be enough to simulate a fairly tight ‘second take’ of the same performance.
However, manual edits to the time and pitch of the double‑track vocal, with the powerful VariAudio Smart Controls I described in last month’s workshop, offer much more flexibility, particularly in terms of how ‘tight’ the double is(n’t) to the original. If you prefer to work this way, a few specific VariAudio panel features are worth exploring.
First, a few menu settings need checking. Within the VariAudio panel, select the Show All Clips mode in the Display Mode drop‑down menu; the Edit Active Clip option in the Clip Editing Mode drop‑down; and the Event setting in the VariAudio Segment Colors drop‑down. Also, make sure you’ve chosen different colours for the original (lead) vocal clip and the copied (double) vocal clip in the Project window. You’ll almost certainly want your pitch editing to be fairly subtle for a double‑track effect, so it’s also useful to set Pitch Snap Mode to ‘off’ and to disable Snap Pitch Editing (both settings are in the leftmost VariAudio panel).
Then, open both the lead and double clips in the Sample Editor’s VariAudio panel, and select the double‑track audio clip in the Active Clip For Editing drop‑down. As soon as you start making edits to this clip’s Segments (in the screenshot, these are coloured red), you will gradually expose the Segments in the lead vocal clip (blue) in the background. This makes it incredibly easy to visualise the pitch and timing differences you’re creating between the two clips.
For timing, you can use the Warp End Smart Controls to adjust the relative start/end of each word and this can quickly inject some more ‘human realism’. For pitch changes, experiment with combinations of small vertical shifts of individual Segments as well as small edits with both the Straighten Pitch Curve and Pitch Tilt Smart Tools. Zoom in for a more detailed view as you make these sorts of edits. To get the best result, you need to make some sort of adjustment (pitch, pitch tilt, or timing) to every Segment in the double clip. Making such small changes across the complete performance does, of course, involve a fair amount of manual effort — but it’s worth it. The results can be very convincing.
Seeking Harmony
As with creating vocal doubles, Cubase Pro and Artist offer more than one way to generate harmony parts from a lead vocal. Providing you have a suitably populated Chord Track (the chord data is used as the basis for the harmonies), the easiest approach is to use the Generate Harmony Voices command (found in the Audio menu). All the dialogue box requires is that you select how many harmony parts you want (up to four). Once done, lower the volume of the generated harmony parts a few dB, apply a little pan, and perhaps nudge each track forwards/backwards a few milliseconds. As a starting point, try ±10‑20 ms using the Track Delay controls in the Inspector panel.
 Provided you have a well‑stocked Chord Track, the Generate Harmony Voices feature can make a decent stab at a four‑part vocal harmony, and all with a single click!
Ta‑da! Job done. Well, sort of. But unless your Chord Track is packed full of interesting and frequent chord changes, the harmonies generated can sound somewhat static. They might work perfectly in some musical contexts but, if you want to create something with a little more harmonic interest, it’s time to go back to VariAudio.
For this approach, a good first step is simply to create a vocal double exactly as described above so, let’s assume that’s done and that you’ve made a further duplicate of the double, to provide the basis for your harmony editing. You should then open both the original lead vocal and (soon to become) harmony vocal clips in the Sample Editor’s VariAudio panel. As before, you should be able to see the Segments for both clips already offset slightly because of the pitch and timing edits added when creating the double.
Now for the fun part; as mentioned last month, Cubase 12 added Scale Assistant functionality for audio to the VariAudio panel. There’s some powerful stuff available here, but it requires you to (a) check a couple of VariAudio settings before beginning, and (b) to use your ears to judge just how harmonious your harmony actually sounds! In the VariAudio panel’s Scale Assistant section, ensure the Use Editor Scale option is activated, and select the correct key/scale combination. It’s also sensible to start with Pitch Snap Mode set to Relative (those small pitch shifts you made when creating the vocal double are therefore preserved for extra ‘human‑ness’) and ensure that Snap Pitch Editing is enabled.
 The Scale Assistant, found in the Sample Editor, makes it very easy to experiment with new vocal harmonies.
Select all the Segments in the harmony clip and drag them up or down, and the Scale Assistant will ensure they all stay ‘in key’ regardless of where you drag and drop them. In the screenshot example, I simply grabbed one of the selected Segments originally on a C note and moved it up to an E (four semitones). All the other selected Segments followed in an upwards direction. But, as they were forced to snap to the scale, they haven’t all moved four semitones because in some cases a four‑semitone shift would have resulted in an out‑of‑key note. For example, while a C generally becomes an E (a four‑semitone shift), a D may become an F (a three‑semitone shift), though note that the exact shift seems to vary according to the detail of the pitch curve within each Segment.
 Cubase Pro 12 users can access the Free Warp feature when in the Project window.You can experiment with different global shifts and, for some melodies, this scale‑shifted harmony may be all you need — this is where your ears and ideas need to guide you. If you find some of the harmony notes simply don’t sound ‘right’ (for example, they might be notes that clash with the underlying chord), try shifting just those notes until you find a good fit. Indeed, feel free to get creative; harmonies that don’t always move parallel to the lead line can often be much more interesting and pleasing on the ear. Note that lowering the volume of the harmony part a dB or three can also help it sit better with the lead part. And if you notice any audio artefacts resulting from the pitch‑shifting, you can use your VariAudio skills from last month’s workshop to smooth things out with a little Smart Control pitch‑curve editing.
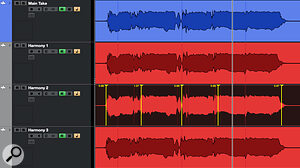
Having created one harmony part, simply repeat the process if you want a second or third. While the above method allows you to create harmonies at different pitches, you can add a further element of ‘human’ by making minor timing changes to each harmony line. This can be done by having all the harmony clips superimposed in the VariAudio panel and editing them one at a time, as described above. A new option exclusive to Cubase 12 Pro users is to make these timing adjustments using the Project window’s Free Warp tool. This has important applications beyond vocal editing but, as shown in the final screen, when adding small timing variations to our various harmony parts, it has the advantage of letting you see more easily what timing differences you’re creating between the various parts while you’re editing.
Hand Made By Machines
If you want to hear these approaches in action, check out the audio examples on the SOS website (https://sosm.ag/cubase-1022). OK, so the artificially generated double or harmony parts you craft using these approaches might not be on a par with those sung by a well‑trained singer. But, dropped into your arrangement in a suitably subtle fashion, they can certainly lend your productions a little more vocal impact.
No comments:
Post a Comment