Welcome to No Limit Sound Productions

Company Founded
2005
Overview

Our services include Sound Engineering, Audio Post-Production, System Upgrades and Equipment Consulting.
Mission
Our mission is to provide excellent quality and service to our customers. We do customized service.

Wednesday, January 31, 2024

Cubase 11: Vocal Rebalancing With SpectraLayers One

SpectraLayers One is a powerful vocal unmixing tool for Cubase 11 Pro and Artist users.SpectraLayers One is a powerful vocal unmixing tool for Cubase 11 Pro and Artist users.

SpectraLayers One allows you to tweak vocals that are ‘baked into’ a stereo mix!

Have you ever wished, when you don’t have access to the original multitracks, that you could have the ability to ‘unmix’ the different elements within a stereo file to gain access to individual parts — particularly the lead vocals?

Until recently this was rather like attempting to unbake a cake to access the eggs and flour, but the latest generation of spectral‑editing software makes it more viable and one such app, SpectraLayers One (from here SL One), is bundled with Cubase 11 Pro and Artist. SL One may be a cut‑down version of the separately available SpectraLayers Pro 7, but it does boast one of its bigger sibling’s eye‑catching features: stem unmixing. It can only create two stems (vocals and ‘everything else’), but that’s just what you need if you want to do some post‑mix vocal tweaking! In this workshop, I’ll explain what you can do with it, and you’ll find some accompanying audio examples on the SOS website (https://sosm.ag/cubase-0821). Alternatively, download the ZIP file of audio examples here:

Package icon cubase-workshop-0821.zip

You’re The One

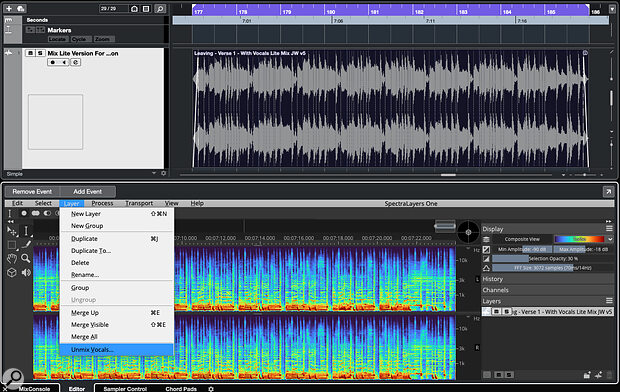
SL One can run as a standalone app or as an Audio Extension on a Cubase audio clip within. The first screen shows the letter, which allows you to combine SL One processing with further processing and effects in Cubase. Once the Extension is applied, SP One and its various tools appear in Cubase’s Lower Zone.

The unmixing process requires almost no user intervention and is very fast!The unmixing process requires almost no user intervention and is very fast!For our purposes, we require the Layer/Unmix Vocals option and, despite the under‑the‑hood complexity, it couldn’t be simpler to use: the only user‑defined control is the Sensitivity slider setting. The default ‘zero’ setting has generally provided the best results for me, but I’ve included an audio example (link above) to demonstrate the differences. Essentially, positive Sensitivity values put more audio into the vocal stem but may include more fragments of other mix elements too, while negative Sensitivity settings are less likely to place other instruments in the vocal stem but can leave more vocal trace elements in the ‘everything else’ stem. Depending on what you’re trying to achieve, either could be useful.

Once the processing is complete, it can take a minute depending on the length of the audio clip. The two stems appear in SL One’s right‑hand panel, with mute and solo buttons that allow easy auditioning of the results. This unmixing process is non‑destructive: if you play back both stems together without further processing, they’ll sum to deliver the original mix. Auditioned in isolation, the vocal stem will inevitably show some artefacts (unless you started with a particularly sparse mix, with few other sounds overlapping the vocal). These artefacts may be non‑vocal elements (eg. traces of drums) or ‘missing’ vocal information that remains in the ‘everything else’ stem. You can hear elements of both types of artefact in the accompanying audio examples.

Whether you consider the vocal separation successful will depend on just what you hope to achieve. But given that vocal extraction/isolation is often a last resort, because the original mix project is unavailable, ‘usable’ can almost always be considered a positive outcome — so, are these sorts of results usable?

Balancing Act

Using these two unmixed stems to modify the level of the vocal relative to the instrumental backing is likely to be the easiest trick to pull off. For example, if we wished to raise the vocal level by a dB or three, we can do this by adjusting the gain of the vocal stem. While that will also adjust the level of any artefacts in the vocal stem, they are often difficult to detect in the context of the ‘reassembled’ mix.

Once separated, the stems created can be dragged and dropped to the Cubase project window for further processing or editing.Once separated, the stems created can be dragged and dropped to the Cubase project window for further processing or editing.

When used in stand‑alone mode, SL One includes gain sliders for the two stems and these are not available when using the ARA2 plug‑in in Cubase. Instead, you can drag/drop each stem to a new Audio Track in your Cubase project. Not only does this allow you to rebalance them, but you can then apply further editing, audio processing, or automation to the individual stems, to improve the blend of your ‘rebalance’.

In my second audio example, gain changes ranging from ‑3 to +6 dB are applied to the vocal stem. Your mileage may vary, but to my ears all these rebalanced versions seem pretty effective and transparent. Rebalancing isn’t all that can be done though; as a final stage in this audio example, I’ve added a fresh dollop of both reverb and delay, just to show that more creative changes are also possible (so feel free to experiment!).

A second potential application of SL One’s unmixing facility is to silence the vocalist, to create a backing track. Such a vocal‑free backing track might be used, for example, for personal practice for a vocalist, as a karaoke track, or to generate an underscore music cue for film/TV use where the vocals might impinge upon dialogue. I’ll leave you to navigate any copyright implications, but as the third audio example demonstrates, SL One can take a good stab at this with minimum effort on the part of the user.

As the isolated vocal stem has revealed, the separation process is not perfect but, as a means of recusing an instrumental version from a full mix, the default results may well be acceptable in some contexts and a little additional editing can easily improve things further.

Ready (Re)Mix?

The Holy Grail of this unmixing process would be a perfectly isolated vocal track but unless your starting point is a very sparse mix, that’s an incredibly ‘big ask’. Yet, if your isolated vocal stem is intended for use in a remix or mashup project, in which it will be layered with a suitably busy backing track, then might SL One be up to the task?

The fourth example explores just how realistic this proposition might be...

SpectraLayers Pro can generate up to five stems from a stereo mix and, when used in standalone mode, both One and Pro offer gain controls for easy rebalancing of your stems.SpectraLayers Pro can generate up to five stems from a stereo mix and, when used in standalone mode, both One and Pro offer gain controls for easy rebalancing of your stems.

I’ve taken the default unmixed vocal stem from our earlier short ‘verse’ audio mix (artefacts included) and built a new backing track for this extracted vocal. In the audio example, I’ve gradually added layers of instrumentation with each pass through the performance. Layered with a single instrument such as a strummed guitar or solo piano, the artefacts are audible — this might still be useful as a scratch vocal to build a ‘vocal + guitar’ or ‘vocal + piano’ remix project, but it’s unlikely to cut the mustard in a release context without considerably more detailed editing work or a new vocal recording. Note, though, that many of the artefacts in the vocal stem appear to be drum related and once new drums and bass are added to a remix, the majority of them are masked.

At this point, it’s not such a stretch to think that even some modest spectral editing on the vocal stem might generate a very usable vocal part, and as more layers are added to the instrumental bed (the final few passes in the audio example include multiple guitars and a synth) the artefacts become even less obvious. So if your remix has a prominent drum beat and doesn’t leave the extracted vocal too exposed, SL One’s vocal unmixing may well prove very usable.

Cubase 11’s SL One can make something that used to be difficult into something remarkably easy.

Density Matters

As noted earlier, the success of this vocal unmixing process is very much dependent on the original mix. The one I’ve used for the audio examples is what I’d call moderately dense, and SL One has done a commendable job. But what if your source mix is busier?

As a final audio example, I’ve used an alternative version of my short ‘verse’ clip that contained additional instruments (an extra guitar, a keyboard part and some harmony vocals). It’s no surprise that the resulting vocal stem has more artefacts. But, even if it would be more difficult to use the isolated vocal stem in a remix context, the vocal rebalancing and backing track creation discussed above remain distinctly possible.

SL One doesn’t handle the obvious legal obligations of publishing works using stems extracted from commercial recordings, but it does make the technical side of the ‘unmixing’ process remarkably easy and efficient. And, of course, it’s a freebie for Cubase 11 Pro and Artist users. Whether it’s vocal rebalancing, backing track creation or, with a bit of luck, vocal isolation, Cubase 11’s SL One can make something that used to be difficult into something remarkably easy. 


Published August 2021

Monday, January 29, 2024

Cubase: Frequency 2’s Dynamic EQ

Screen 1. Frequency 2 combines powerful EQ and dynamics control in a single processor.Screen 1. Frequency 2 combines powerful EQ and dynamics control in a single processor.

In Frequency 2, Cubase 11 Pro has a powerful dynamic EQ.

Version 11 of Cubase Pro added dynamic functionality to the already excellent bundled Frequency EQ plug‑in, and in this workshop I’ll take you through some examples that demonstrate what you might look to achieve with it in your mixes. If you’ve not yet upgraded to v11, or aren’t a Pro version user, don’t worry: you can still follow the examples using a freebie dynamic EQ such as Tokyo Dawn Labs Nova and perhaps upgrade later. You’ll also find some accompanying audio examples on the SOS website: https://sosm.ag/cubase-0921 or download the ZIP file below.

Package icon cubase-dynamic-eq.zip

Control Freq

Let’s start with a simple example: an acoustic guitar track, whose lower‑mids we wish to ensure don’t get out of control. In Screen 1 above, I’ve toggled on Frequency 2’s SING (single‑band) view, so all controls for the selected band are visible. I’ve selected a Peak filter and, in the EQ section (on the left), applied a 12dB cut at 200Hz, with a Q (which dictates how wide the filter is) of 2. I’ve left the band in the default Stereo processing mode; there are also Left/Right and Mid/Sides options, but I’ll cover them another time.

Such EQ settings ought to remove some lower‑mid mud but a traditional static EQ cut also risks leaving the guitar sounding thin when the arrangement leaves it more exposed. By making this EQ band dynamic we can avoid that unwanted side effect. To do so, enable the Dynamics section in the middle, which will automatically enable the Side‑chain section in Internal mode and with Auto engaged. For reasons that will become clear, this is a good starting point generally and ideal for this example.

The Dynamics section offers the user a typical compressor’s control set (Threshold, Ratio, Attack and Release) alongside a less familiar Start knob. Leaving Start at 0dB for now, the Ratio control will influence the amount of gain reduction, lowering the Threshold will then eventually make some gain reduction occur, and the speed of the compressor’s response can be adjusted using the Attack and Release controls.

There are three key differences compared with a conventional compressor, though. First, the automatic gain reduction is frequency‑specific. Second, the Gain setting limits the maximum amount of gain reduction applied by the EQ band. And third, there’s that Start control, which I’ll get to in a moment.

Because our EQ cut is dynamic, it is only applied when those pesky lower‑mid frequencies get out of hand; the rest of the time, when the guitar’s tone is more balanced, the EQ leaves it alone.

When the Internal side‑chain mode is selected, the ‘compressor’ takes its queue from the main incoming audio signal, and with the Auto button engaged the internal side‑chain adopts the frequency and Q values set in the main EQ Band. In most cases, including our example, this is exactly what you’ll want: our guitar’s low‑mids will be compressed most when those frequencies are at their loudest. Meanwhile, other frequencies will remain unaltered.

Turn Auto mode off, though, and you can adjust this internal side‑chain’s Frequency and Q manually; you can use the Listen button to audition the control signal as you make adjustments. While it’s not pertinent to our example, you can imagine other situations where using a different trigger frequency could be useful: for example, you could duck a hi‑hat in a stereo drum loop during kick or snare hits. You can also turn a band’s Side‑Chain section off, so that the full, unfiltered input signal is its trigger signal.

Screen 2. Frequency 2’s dynamics section can be used for expansion as well as compression.Screen 2. Frequency 2’s dynamics section can be used for expansion as well as compression.

Start To Expand

The Start control enables you simultaneously to apply a static EQ cut and a further dynamic cut at the same frequency, without requiring two separate bands. As shown in Screen 2 for our ‘remove the mud’ acoustic guitar example, if we set the Start value at ‑3dB, the whole performance will have a static EQ cut of at least 3dB at 200Hz, but further gain reduction will be applied according to the Dynamics section settings, on top of this ‑3dB ‘starting point’. Again, the amount of gain reduction can be limited by the Gain setting in the EQ Band section.

The Start setting also makes frequency‑specific expansion possible. Imagine that with our acoustic guitar part, we wish to even out the dynamics of the upper frequencies (the ‘ching’ of the sound), making the quieter bits louder and the loud bits quieter. The settings for Band 8 in Screen 5 show an example configuration. Centred at 8kHz, the Start control has been set to add 6dB of gain. However, the main EQ Band controls are applying a 6dB cut. You can finesse the Threshold control so that, when these frequencies contain lots of energy, some downward compression will take place (to a maximum of ‑6dB, as defined by the Gain control) but, when there is less energy, some upward expansion can occur (up to the maximum of 6dB, defined by the Start control). The Attack and Release controls can then be adjusted to suit the tempo of the performance and ensure a natural result.

Chain Reaction

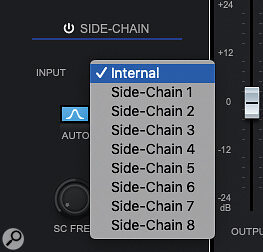
Screen 3. Frequency 2’s dynamics section can respond to several external signals.Screen 3. Frequency 2’s dynamics section can respond to several external signals.Frequency 2’s dynamics can also respond to an external side‑chain signal, activated by a button in the plug‑in’s toolbar strip. Indeed, click the Settings button and you can specify up to eight different external side‑chain inputs, each of which can have multiple audio sources, and use any one of these side‑chains for each of Frequency 2’s eight EQ bands (Screen 3).

In Screen 5, an instance of Frequency 2 is inserted on a synth pad. Typically, pads such as this will occupy a wide frequency range, and thus sometimes mask other sounds, but they’ll only play a simple supporting role in the mix, making them musically less significant than the other parts.

Here, three dynamic EQ bands have been activated, with each targeting the most important frequencies of a bass, a rhythm guitar and a lead vocal (80, 250 and 350 Hz, respectively). Three side‑chain inputs have been configured, one for each of these three instrument groups.

Screen 4. Selecting a side‑chain signal for a Frequency 2 EQ band.Screen 4. Selecting a side‑chain signal for a Frequency 2 EQ band.

This tactic can be really helpful in nudging pads out of the way of more musically important sources.

Screen 5 shows the settings used for the 350Hz EQ band. This uses the third external side‑chain input, which in this case is the signal from the lead vocal channel. The Dynamics section is configured to duck the pad by a few dB around this frequency only when the vocal is present. The other two bands, with the bass and guitar as the external side‑chain inputs, are configured in much the same way but target different frequencies and operate at different times. This tactic can be really helpful in nudging pads out of the way of more musically important parts: you can preserve clarity in the mix, without sacrificing a pad’s overall sonic texture.

Screen 5. In this example, a pad sound has three dynamic EQ bands controlled via external side‑chain inputs. EQ Band 4 is shown here in SING view and uses the lead vocal sound to duck the pad’s frequencies centred around 350Hz.Screen 5. In this example, a pad sound has three dynamic EQ bands controlled via external side‑chain inputs. EQ Band 4 is shown here in SING view and uses the lead vocal sound to duck the pad’s frequencies centred around 350Hz.

It doesn’t take much imagination to think up more applications for Frequency 2’s dynamic EQ facility. Whether you need to clean out the lower‑mids on busy guitar or synth parts, tame the splashiest excesses on a drum bus, combine de‑essing and plosive control on a vocal track, or combine frequency‑specific compression and expansion to add a little extra dynamics to your mix bus, the possibilities are considerable. Increasingly, I find I’m turning to Frequency 2 as a one‑stop alternative to EQ and compression, and this is definitely a topic to return to. Until then, have fun experimenting.


Published September 2021

Friday, January 26, 2024

Cubase Pro: Take Control Of Your Stereo Image

 By John Walden


Imager: up to four bands of stereo width control for Pro and Artist users.Imager: up to four bands of stereo width control for Pro and Artist users.

We show you how to take full control of your stereo image with Cubase’s powerful bundled plug‑in suite..

Cubase has long included stock plug‑ins for manipulating the stereo image and they all have a role to play, as I’ll explain, but the recently added Imager is particularly interesting. It allows you to process up to four different frequency bands and, as is so often the case with multiband processors, it’s a powerful tool that’s capable of great results in the right context — but it’s also fairly easy to screw things up if you don’t know what you’re doing! In this article, I’ll work through a few examples that show you what Imager has to offer, while noting some of the potential pitfalls. You’ll find some audio files to accompany each example on the SOS website at https://sosm.ag/cubase-1021.

Perhaps Imager’s most obvious application is as a mastering‑style processor, whether used on the stereo mix bus as you put the final touches to a mix, or to tweak a bounced stereo file. The first screenshot shows Imager as inserted in my main stereo bus processing chain, with a typical configuration for this kind of application that serves as a good starting point for exploring Imager’s control set.

I’ve used all four of the available bands here, but three could easily be enough in this context; you can specify the number of bands at the top‑left of the GUI. You can adjust the frequency of the filter crossovers between bands and in this case I’ve gone for 200Hz, 1kHz and 5kHz, to create low, low‑mids, high‑mids and high bands. Each active band has three controls. Leaving the Output and Pan controls untouched for now, I’ve adjusted only the Width in each band. As the control’s name suggests, it manipulates the stereo width of its band, with a value of 100 percent leaving the stereo image unchanged and higher/lower values making the image wider or narrower, respectively.

Moving from low to high, I’ve chosen values of 20, 125, 150 and 170 percent. This keeps kick and bass instruments firmly focused in the centre (generally a good thing) and gradually adds greater Width through the low‑mids, high‑mids and highs. There are no hard and fast rules here; you should judge things by ear. But I’m generally cautious about going beyond 150 percent in any band, as stereo enhancement can potentially produce unwanted side‑effects when the mix is heard on a mono playback system. Having checked the mono playback compatibility (as I describe below), I felt able to push the width a little harder than usual in this case, for a little extra high‑end ‘pop’.

SuperVision’s Multipanorama module before (left) and after (right) Imager’s processing of my worked example.SuperVision’s Multipanorama module before (left) and after (right) Imager’s processing of my worked example.

The screenshot above shows two instances of SuperVision’s Multipanorama module, one before and one after Imager, and these make the narrower lows and wider upper‑mids and highs easily visible. Check out the accompanying audio example — to my ears, the result is a subtle but rather pleasing widening of the stereo image, while the low end is kept nicely focused.

Package icon cubase-pro-stereo-image-audio-1021.zip

On The Buses

Imager doesn’t have to be used on a full mix; it can be just as useful on individual instruments or subgroups. There are plenty of possibilities, but a few simple suggestions should illustrate the potential.

If you need to give your lead vocal a little more space in the centre of the stereo image, try inserting Imager on your backing vocal group channel (bus) and using it to push the backing vocals a little further towards the sides of the stereo image. Unlike with simple panning or single‑band wideners, Imager’s multiband options give you control over how you spread the main frequencies of the backing vocals.

When you want to help a specific instrument peep out of the mix a little more clearly, Imager can also be a good alternative to a level change. By applying some subtle widening to a specific frequency band or two, you can place the sound more obviously at the edges of the stereo field, which will make it more noticeable to the listener.

For those who are very particular about their reverb treatments, another option is to insert Imager on your reverb’s FX Track. A three‑band approach that narrows the lows (so you don’t get low‑end reverb clogging your stereo image), gently widens the mids, and spreads the highs out wide can be fun to experiment with.

Finally, whether used on an instrument bus or your master bus, automating Imager can be useful in an ‘arrangement/production’ context. Whether by toggling Imager on/off or using automation to adjust key parameters, you can use it to apply a touch of widening to chorus sections, to give them an extra sonic lift. You could even try applying gradually more widening (while ensuring to check for mono compatibility) as the song progresses, to make each chorus feel slightly ‘bigger’ than the last.

Stereo Fakery

While Imager provides plenty of options to adjust the stereo image of a stereo source, it’s not designed to fake a stereo sound from a mono source. Thankfully, the MonoToStereo plug‑in (in Cubase Pro, Artist and Elements) has this task covered, and the audio files include an example based on a mono electric piano recording. As shown in the third screenshot’s second MultiPanorama, GUI MonoToStereo appears to achieve this fakery by applying the well‑established EQ‑based trick of panning narrow EQ ranges of the mono recording to opposite sides to the stereo image.

Faking stereo from a mono piano recording. Moving from left to right, the three Multipanorama displays show (a) the original mono signal, (b) the result of the MonoToStereo plug‑in and (c) combining both MonoToStereo and Imager.Faking stereo from a mono piano recording. Moving from left to right, the three Multipanorama displays show (a) the original mono signal, (b) the result of the MonoToStereo plug‑in and (c) combining both MonoToStereo and Imager.

You can use Imager for a particular type of mono‑to‑stereo fakery, though, and mono piano recordings are an obvious candidate. Stereo piano recordings usually convey the natural left/right balance of low to high notes. In a mono recording, you could simulate this effect to some extent by using the Pan controls for each Imager frequency band, panning lower frequencies (notes) to one side of the stereo image and higher frequencies to the opposite side, and use the Output controls to adjust the tonal balance. It’s difficult to get a truly convincing result on an exposed part, but combining MonoToStereo and Imager does have potential if you want to fake both stereo and the left/right note pattern from a mono piano recording that will be used in a busier mix.

Control Room allows you to send the mono output to just one of your monitors...

Mono Matters

Checking the mono compatibility of a stereo mix is always informative, but it becomes absolutely essential if you’re using stereo image processing, and widening in particular. Cubase’s Control Room allows you to switch between stereo and mono playback at the click of a button, but this feature is only available to Pro users. Artist and Elements users, then, need an alternative approach, and Stereo Enhancer allows just that.

With StereoEnhancer inserted on your master bus and the Mono Compatibility Check button engaged, the plug‑in’s bypass button lets you quickly switch between stereo and mono playback.With StereoEnhancer inserted on your master bus and the Mono Compatibility Check button engaged, the plug‑in’s bypass button lets you quickly switch between stereo and mono playback.This plug‑in includes a Mono Compatibility Check button (in the centre of the UI). If you insert an instance of this on your master bus, making sure it’s placed post any stereo image processing, and leave this button switched on (it lights up blue when engaged) you can use Stereo Enhancer’s main bypass button to switch between normal stereo monitoring (plug‑in bypassed) or mono compatibility monitoring (plug‑in engaged). Just remember to have it bypassed when bouncing your mix down to a stereo file!

It’s also worth pointing out that this simple workaround generates a phantom mono signal; you hear the same audio from both speakers, resulting in a ‘phantom’ signal that appears to sit in the centre of the stereo field. This is not quite the same as listening on a single mono speaker, where all sound emanates from the same place — and Control Room allows you to send the mono output to just one of your monitors. Workarounds are possible without Control Room, but I’ll leave that discusion for another time; until then, feel good that phantom mono is better than no mono compatibility check at all!

Finally, a potential drawback of Imager is that it can add some latency. This is not usually such an issue while mixing, but it can easily be distracting in a real‑time recording context if monitoring through Cubase. Thankfully, then, Steinberg have included a LIVE button (top‑centre of Imager’s UI), which engages a zero‑latency mode. It’s at the cost of some processing quality, but the results are certainly good enough if you suddenly find yourself needing to lay down a further live track or two in the middle of your mixing process.


Published October 2021

Wednesday, January 24, 2024

Cubase Pro: Mix Mastering With Multiband Tools

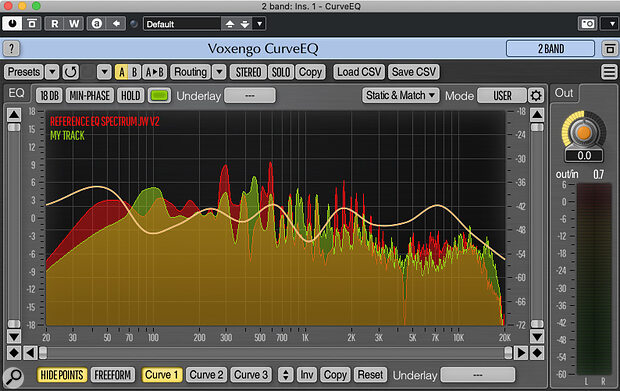
Voxengo’s CurveEQ plug‑in, bundled with Cubase Pro, allows you to compare the EQ spectrum of your mix with that of a reference track.Voxengo’s CurveEQ plug‑in, bundled with Cubase Pro, allows you to compare the EQ spectrum of your mix with that of a reference track.

We explore how Cubase’s multiband tools can help you master your own mixes.

In April 2021, I described a simple, single‑band signal chain for DIY mastering in Cubase. The approach followed the principles outlined by Ian Shepherd in his SOS Mastering Essentials video series (https://sosm.ag/mastering-essentials), and used stock plug‑ins that are available to all users of Cubase 11 Pro, Artist and Elements, as well as a couple of third‑party freebie metering plug‑ins. As mentioned in that article, though, Cubase Pro also boasts an impressive collection of multiband processors — so in this article, I’ll consider the pros and cons of using these powerful tools for our DIY mastering signal chain. To accompany the article, I’ve prepared a number of audio examples, which you’ll find in the 'Audio Examples' box.

Join The (Multi)Band

In my previous article, I followed Ian’s keep‑it‑simple approach and used a signal chain comprising Cubase’s StudioEQ, Compressor and Limiter plug‑ins. I also placed an instance of Brickwall Limiter at the end of the chain, just to catch any stray peaks, and used freebie VU and loudness meters to monitor the final level of my in‑progress master.

For my multiband signal chain, I substituted StudioEQ for Frequency 2 and Compressor for Multiband Compressor, added instances of Imager (for stereo image adjustments) and Quadrafuzz 2 (for saturation), and kept Limiter and Brickwall Limiter in place. For comparing the spectral content of my master with my reference, I used Voxengo’s CurveEQ, which is bundled with Cubase Pro. SuperVision provided loudness metering alongside Klanghelm’s VU Meter (my favourite third‑party option).

Compare The EQ

As in the April 2021 column, my first step was to use my VU meter and SuperVision’s Loudness module to adjust the channel gain in the Channel Settings dialogue, aiming to get the level of my raw mix to average/peak levels around 2‑3 dB below Ian’s suggested final targets (‑11dB on my VU meter and ‑10 LUFS for short‑term loudness).

I then used CurveEQ to compare the overall spectral balance of my as‑yet unprocessed mix and a reference track I’d chosen. Inserted on any track, this plug‑in can capture an EQ spectrum of the audio that’s passing through; this spectrum can then be loaded into another instance of the plug‑in, allowing direct comparison between two (or more) signals. CurveEQ can also calculate an EQ curve that makes the signal (in this case, my track) match the EQ spectrum of a reference track. I did not actually use CurveEQ to apply any EQ changes — Instead, I made my EQ moves manually using Frequency 2 — but it is a useful visual guide if you wish to nudge your own track in the direction of a reference.

In this case, comparing the frequency curves encouraged me to experiment with small boosts centred at 60Hz, 2kHz and 7kHz, while also applying small cuts at 125Hz, 1kHz and above 10kHz. I also applied high‑ and low‑pass filters to tidy up the extreme ends of the frequency range. In keeping with Ian’s advice, the changes were subtle but, to my ears at least, they both added weight and brought clarity to the mix, and I retained these EQ settings as the foundation for my subsequent multiband experiments.

CurveEQ can calculate an EQ curve that makes the signal match the EQ spectrum of a reference track.

Two-band Approach: Multiband Compressor + Quadrafuzz 2

The majority of Pro 11’s multiband plug‑ins offer four bands of processing. The new Imager plug‑in allows you to specify exactly how many bands you wish to use but in the older Multiband Compressor and Quadrafuzz 2, you cannot completely remove the unwanted bands; you can only disable them. Starting with a two‑band approach, my Multiband Compressor and Quadrafuzz 2 settings are shown in the screenshot. In an ideal world, I’d have the same band configuration as in Imager, with a low band and a high band, split at around 200Hz. As it is, the two ‘unwanted’ bands in both plug‑ins have been centred in the low‑mids and made as narrow as the GUIs permit. It’s a modest, pragmatic workaround, but there is therefore a narrow frequency range between about 200 and 300 Hz that isn’t being processed in this configuration.

The settings used for the key plug‑ins in my two‑band DIY mastering signal chain.The settings used for the key plug‑ins in my two‑band DIY mastering signal chain.

To arrive at the settings shown, I adopted the same approach as in the Cubase Techniques April 2021 article, but on each of the bands. So, for example, for the compression, I set moderate attack (20ms) and ratio (2:1) values and then simply dialled in the threshold until each band was applying a maximum of 3‑4 dB of compression. For Quadrafuzz 2, I soloed each band, selected the gentle Tube mode (Tape worked equally well when I tried it) and increased the Drive control until the effect was clearly audible, before gradually dialling it back; I wanted to ‘hear’ the effect but without it being too obvious. I used the two Imager bands to narrow the stereo image below and gently widen it above 200Hz, and also checked for mono playback compatibility. Finally, I used identical settings for the Limiter and Brickwall Limiter plug‑ins as in the April 2021 article.

In comparison to the unmastered mix, this two‑band mastered version is louder, but even with the perceived levels matched it seems to have a punchier low end, less muddy mids, a crisper high end and slightly greater stereo width. The differences are subtle, which hopefully suggests the processing hasn’t been overdone, but to my ears at least they seem beneficial: the two‑band mastered mix has more impact.

Three, Four, Testing

If we start by sticking to the same keep‑it‑simple principle, moving up from two bands to three or four doesn’t involve much more than deciding what crossover points to use and configuring the required settings within Multiband Compressor, Imager and Quadrafuzz 2 for the new bands. For my three‑band version, I used crossovers at 200Hz and 5kHz, while for the four‑band version the values were 200Hz, 2kHz and 10kHz.

More bands means greater control over fine details, provided you can avoid abusing the processing power available!More bands means greater control over fine details, provided you can avoid abusing the processing power available!

Whether the differences are audible in a specific case or not, in principle, splitting our compression across more independent bands ought to produce a smoother overall result, as each band is focused on, and only triggered by, a narrower range of frequencies. Peaks in the low mids should not, for example, trigger compression in the high mids, or vice versa. That said, there’s nothing to stop you making further adjustments in the different bands: you might, for example, experiment with higher compression ratios in your low band (for tighter control of the bass levels) or low mids (for keeping the mud at bay) if you feel your mix requires it.

However, using more bands for Imager and Quadrafuzz 2 is only really necessary if you wish to make use of different settings in the additional bands. I’ve done this with both plug‑ins, applying gradually more stereo widening in each of the mid/high‑frequency bands in Imager and, in general, applying a little more saturation in the lowest and highest bands than within the midrange in Quadrafuzz 2. Used in this conservative fashion, these extra bands feel to me like I’ve got just that little bit of extra control over details and the amount of ‘mastering fairy dust’.

If you wish, you can easily construct alternative mastering chains using some of the other plug‑ins bundled with Cubase Pro 11, but applying the same principles. For example, you could use an instance of Squasher to provide your multiband dynamics processing, or use Frequency 2’s dynamic EQ options to combine multiband EQ and compression in a single plug‑in. Just for fun, I’ve included audio examples based on both those approaches, but I’ll leave a detailed discussion of those tools for another day.

Mixed Up Mixes

So, what’s my own takeaway from this little experiment? First, while sensible (ie. subtle) single‑band mastering in Cubase Elements and upwards can easily give a solid mix a good nudge forwards, I think the benefits of multiband mastering are obvious. This might simply be the ability to control the dynamics of your low end more firmly, without squashing your mids and highs. But the option to add different degrees of stereo width and saturation sweetening to your high‑mids and highs provides useful additional control over the end result. And while you can do the same thing with third‑party tools, Cubase Pro 11 users have plenty of scope on this front using just their DAW’s stock plug‑in collection.

Do note, though, as Ian Shepherd makes clear in the SOS videos, that less is generally more at any single stage in your processing chain. It’s easy to get lost wandering through the options presented to you when working with more bands, and thus to take your mix backwards rather than forwards. You must focus on what the material needs, not simply what your tools can do to it! Bear in mind, too, that splitting audio into frequency bands introduces phase shift which may be audible, especially when you do it repeatedly.

Finally, don’t forget to audition the audio examples. As a small twist, I’ve randomised the order of the multiband mastered examples so that, if you want, you can audition them ‘blind’. After you’ve decided which you think is most effective, check the small print at the end of the audio file description for the running order!

Audio Examples

Cubase 11 Multiband Mastering Audio Example 01.mp3

For reference, this audio file contains the short musical example used in the single-band DIY mastering workshop from the April 2021 issue of SOS. The same song section is repeated twice as follows: (A) the unmastered mix; (B) the mastered mix using the simple, single-band, approach outlined in the April 2021 article.

Cubase 11 Multiband Mastering Audio Example 02.mp3

Based on the same short musical example, this audio file contains a number of different versions of the audio each subjected to a different multi-band mastering approach. The different versions are listed below (A to G) in the order that they are described within the text of the main article.

However, with the exception of the unmastered mix (which appears first), I’ve deliberately changed the order of playback in the audio file, so that you can audition them and decide which example you think is most effective before knowing which techniques were used. The running order of the clips is revealed at the very end of this description.

In the order described in the article text, the seven versions are as follows:

  • (A) The unmastered mix
  • (B) A gain matched version of the unmastered mix to allow easier comparison with the mastered versions.
  • (C) A version mastered using the two-band approach outlined in the main text.
  • (D) A version mastered using the three-band approach outlined in the main text.
  • (E) A version mastered using the four-band approach outlined in the main text.
  • (F) A version mastered using Squasher to replace the MultibandCompressor plug-in and provide three-band dynamics processing.
  • (G) A version mastered using Frequency 2 to provide both EQ and dynamics with MultibandCompressor removed from the signal chain.

Comments on versions C, D and E are provided in the main article. For version F, using Squasher for multiband dynamics has potential, but is perhaps more difficult to configure for the novice user (myself included as I’ve only tried using Squasher in this role on a small number of occasions) given the somewhat unconventional layout of the controls and the fast that it also offers upward compression as well as downward. I tried to use both here.

For version G, Frequency 2 was used to provide both EQ and dynamics (some of the active EQ bands were used in their dynamic mode). Like Squasher, configured correctly, Frequency 2 can provide both downward and upward compression, but the control set does require a period of some familiarisation to appreciate exactly how the various controls interact. Again, there is considerable potential here but I’m not sure that this example (my first attempt at using Frequency 2 in this role) will have entirely realised that!

Note: the actual running order of the seven clips (A to G) as they appear within the audio example is as follows: A, D, F, C, B, G, E. 


Published November 2021