Tuesday, April 20, 2021

Monday, April 19, 2021
Cubase: DIY Vocal Rider
Waves' ground‑breaking Vocal Rider plug‑in takes the pain out of vocal level‑automation, but if your budget can't stretch, you can get part of the way there using nothing more than Cubase 5's built-in processors.
 Here's you can see some suggested settings for Expander at the centre of this month's setup. Notice that the external side‑chain input (the orange button at the top) is activated.
I was intrigued to hear about the launch of Waves' Vocal Rider vocal-level automation plug‑in, because vocal micro‑automation is a regular part of my normal mixing process; particularly intrigued, in fact, because I'd already implemented a similar scheme using Cockos Reaper's dynamic parameter modulation. So when I noticed the plug‑in's price‑tag, my low‑fat cinammon frappucino almost spurted out of my nose! I'm sure that Waves' boffins have put some very whizzy technology under Vocal Rider's bonnet, but there's just something in me that rebels against parting with the cost of curry for 12 in return for something that simply adjusts gain, especially when I'm already pretty happy with my home‑brew alternative.
If you're wondering what the hell any of this has to do with Cubase, well, I'm also a Cubase user and, spurred on by memories of frappucino catastrophe, I recently began wondering if it would be possible to implement a similar automatic vocal‑riding scheme in Cubase too... and it turns out that it is! So here's how you do it.
Automatic Vocal Riding Basics
 In order to get the lead‑vocal Expander to respond to the backing track, you need to send to the plug‑in's side‑chain input. You can see roughly what it should look like in the drop‑down Send menu here.
In case you don't see the point of riding vocal levels, the basic concept is this: even if you compress a vocal heavily, its subjective level will nonetheless appear somewhat inconsistent because the backing track will mask the vocal more the louder it gets, and the amount of masking will change rapidly from moment to moment; a loud drum hit will mask the vocal more than a quieter acoustic‑guitar strum, perhaps. Because of this, a lot of effort goes into the micro‑automation of vocal levels in professional productions, and if you want to compete on that level, you can't afford to ignore the issue.
However, there is a way to take the sting out of this frequently tedious job, and that is to set up some processing that monitors the level of the backing track and then applies corresponding gain changes to the vocal track to compensate for the masking effects. In Cubase, the trick to managing this is to send signal from your lead‑vocal channel to a Group Channel with the VST3‑format Expander plug‑in inserted, and then configure that plug‑in to respond (via its side‑chain) to the level of the backing track. Once this is operational, you can mix in the expanded vocal signal alongside the unexpanded one to achieve the desired degree of automatic gain‑riding. When that loud drum hit comes along, the expander responds to it by letting more of the lead vocal through, thereby boosting the overall level of the vocal in the mix for that instant and defeating some of the drum's masking effect.
The Basic Setup
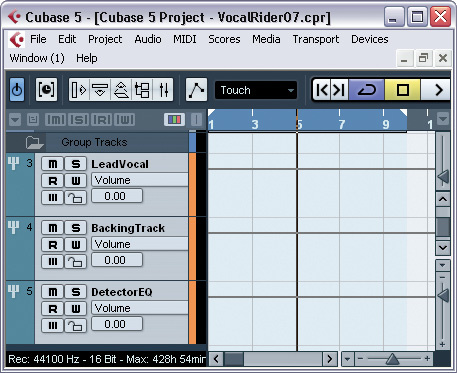 The final, refined setup: group channels for lead‑vocal and backing‑track signals, and another to enable equalisation of the lead‑vocal Expander's side‑chain signal.
Right, let's get onto the specifics. First of all, right‑click in the Track List and select Add Group Channel Track. To start with, you'll want two stereo ones, so adjust the pop‑up dialogue box accordingly. Label these two LeadVocal and BackingTrack, and then reassign all the tracks in your song, with the exception of your lead vocal, to the latter group channel track. You can save time by doing this in bulk: highlight a series of tracks and then hold down the Shift key while you select the required destination from the Inspector's top pane. To feed the LeadVocal group channel, select it from the lead‑vocal track's Sends menu, switching on the send and Control‑clicking its little fader to set it to unity gain (0.0dB).
Now pop Cubase's VST3‑format Expander plug‑in into the LeadVocal channel's top Insert slot, and set it up as shown in the screenshot above. It's a bit of an unusual‑looking setting, because it's a very fast‑acting and with a maximum threshold, so on its own it sounds rather odd and stuttery. However, you'll never hear it on its own, so this is not really a concern — it's what the expanded signal does in combination with unexpanded lead vocal that matters. Note that the Activate Side‑chain switch at the top of the plug‑in window is selected (lit orange), to show that the plug‑in is expecting an external side‑chain signal.
The next stage is to create a Send on the BackingTrack channel, routed to the Expander's side‑chain input. You're looking for something like 'Side‑chains — LeadVocal: Ins. 1 — Expander' in the Send's drop‑down menu. Again, make sure the send is switched on and set to unity gain. And that's it. If you now play back your mix, the vocal should hold a more consistent subjective level against the backing track.
Refining The Outcome
 Here are some suggested EQ settings for the lead‑vocal Expander's side‑chain signal. The processing needs to be applied to the DetectorEQ group channel in this month's setup.
As with a lot of mixing techniques, there's a fair bit you can do to refine the settings to achieve the best results. Indeed, the Waves plug‑in has a number of variable parameters as well, for this very reason. First of all, you'll almost certainly find that the additional vocal signal from the Expander track makes your overall lead‑vocal level appear too high. This is simply dealt with using your lead‑vocal track's fader, as you'd normally do — no need to tamper with any of the LeadVocal or BackingTrack group channel settings. The Vocal Rider plug‑in's output level fader serves a similar purpose.
Even with the vocal at the right overall level, you might feel that my suggested start‑up Expander plug‑in settings don't give the right amount of gain‑riding for you. Adjusting the level of the LeadVocal group channel helps here: the higher in level this is, the greater the range of the level riding. Bear in mind, though, that this will also affect the perceived overall level of the lead vocal in the track, so you may need to revisit your main vocal‑channel fader setting in tandem. If you're feeling confident, you could even adjust the response of the Expander, perhaps increasing the ratio for more extreme compensation, or tinkering with soft‑knee mode or Attack/Release/Analysis settings for a smoother outcome. These kinds of changes will give you some of the control you get from Vocal Rider's Vocal/Music Sensitivity controls, Fast/Slow switch, and Range sliders.
Apparently, Vocal Rider also automatically ignores background noise between vocal phrases, to prevent the plug‑in from riding this, and you can simulate that in this setup if you like, too: chuck a suitably configured Gate into an insert slot on the LeadVocal group channel, preferably before the Expander in the chain and triggered from the vocal signal, not the backing track. Finally, if you want to automate the vocal level manually, in addition to the automatic process, just ride your lead‑vocal fader as normal.
Bonus Points!
So far, we've primarily been offering Waves the sincerest form of flattery. However, because we've built our setup from first principles, we actually have some additional processing potential here: we can EQ the feed to the Expander's side‑chain input. Why would we want to do this? Well, if you think about it, the low frequencies of a bass sound are unlikely to mask a vocal as much as an electric guitar with lots of energy in the very 1‑5kHz range that's most important to vocal intelligibility, which means that EQ'ing the Expander's detector signal to reduce low frequencies and increase the 1‑5kHz range can help improve the subjective musicality of the automatic level‑riding. I'm guessing that Waves are already doing something akin to this within the code of Vocal Rider, but they don't give any control over it either way, whereas we can have full control of such an EQ if we refine our existing setup a little.
This is what we need to do. Create another group channel called DetectorEQ. It might as well be mono too, come to think of it, as this will give more preference to centrally panned backing‑track signals, which are also more likely to mask a typical lead vocal. Now reassign the BackingTrack group channel's send (it's feeding the Expander's side‑chain at the moment, if you recall) and route it to the DetectorEQ group channel instead. Then use the top pane of the DetectorEQ group channel's Inspector to assign its output to the Expander's side‑chain, in place of the default assignment (usually to Cubase's main mix buss). You can now EQ the side‑chain signal using the DetectorEQ channel's built‑in EQ. Check out the suggested settings shown in the screenshot on the left, and work from there.
Smell the curry...
Mike has prepared audio examples and a Cubase project file to accompany this article. You can download them from /sos/jun10/articles/cubasetechmedia.htm)
Published June 2010
Saturday, April 17, 2021
Friday, April 16, 2021
Cubase: Musical Cues For Video
 Defining your end point and working backwards can make the editing process easier for cues that require exact timing.
Just how do you write musical cues to match the length of a video in Cubase?
Sonic arguments aside, one of the undeniable advantages of working with a computer‑based DAW, as opposed to tape, is the ease with which projects can be reorganised to create new or alternative arrangements. While remixers make good use of such DAW‑based tools, they can also be useful to the media composer — when creating a cue for an advertising slot, for example.
Let's imagine you have a full‑length track an ad agency wants to use, but they require a version precisely 29.5 seconds long, to fit their 30-second ad (the slightly shorter length allows a fraction of a second's silence at both start and finish). Oh, and they want it within a couple of hours. How can Cubase help you meet that deadline?
Bar Music
There are a number of different ways to approach this sort of task, but if you're working from an existing project at a known tempo, the first job is to calculate the length of the required cue in terms of bars. You can just add a Ruler Track to your project and then see how many bars are required to reach the 29.5-second point. I find it more convenient, though, and more precise, to do the calculation using a simple spreadsheet. I've provided a version of my own Excel spreadsheet for download from the SOS web site. It simply requires you to enter the project tempo and the required cue length in seconds, then it calculates how many bars of music are required. In the example I'm using here, my project is at 125bpm, so a 29.5‑second cue ought to be 15.36 bars long — a rather awkward number of bars to work with, but not an untypical situation.
Working Backwards
When you're working out what will fill the required bar length best, it often helps to start at the ending and work backwards. As shown in the screenshotabove, having turned off the Snap button, I've placed the cursor at the exact end of my track (this track features a sudden stop ending but I've also allowed a little time for the reverb tail to fade). The Project / Set Timecode at Cursor option can then be used to enter a timecode of 29:13 for the cursor position. (This is timecode, so the last two digits are actually parts of a second measured in frames.) As I had this project set to 25fps, 12.5 frames is equivalent to half a second, and I just rounded up to 13 frames.
While you might get lucky and find that the last 29.5 seconds of the full‑length track works exactly, at least you'll know how many bars you can take from the end section if it doesn't, and so how many additional bars you're looking for from elsewhere in the arrangement. In my example track, working backwards from the ending, zero seconds does not magically fall on the first beat of a musically correct bar. Some rearranging of the materials is therefore required to create a cue of exactly the right length.
Blowing Chunks
It's perfectly possible to manually rearrange sections of your project to start piecing together what you need for your short cue. However, the Cubase Arranger Track provides a much more efficient way to experiment. Matt Houghton covered the use of the Arranger Track back in the March 2007 issue (/sos/mar07/articles/cubasetech_0307.htm) under its previous incarnation as the Play Order Track, so if you're unfamiliar with this Cubase feature, I'd suggest you read Matt's piece before continuing here.
 The Arranger Track can be used to identify some musically self‑contained sections of your full‑length track.
To get the best from the Arranger Track, you need to identify a number of self‑contained musical chunks from within your full‑length track, which you can then re‑sequence as required (generally, two- or four-bar lengths work best for this). One of these sections should also include your ending. I've done that for my working example and the 'ending' section consists of the last four complete bars of the original arrangement plus about half a beat of the next bar (4.12 bars in total) that contains the final chord. It is usually best to identify more sections than you think you might need, as this gives you flexibility to mix and match the sections as you experiment with the Arranger Track. Note that, for convenience, I also named each section with a descriptive label and indicated how many bars it contains. In this example, I've also been lucky enough to identify a one‑bar section that, in the original arrangement, formed a transition between two longer sections. If you can find such a single bar that works musically, this can be very useful where you require an odd number of bars in total.
 The Arranger Editor can be used to experiment with sequencing the short musical section, to find the arrangement that works best.
Having identified a number of short sections, it was then simply a case of using the Arranger Track (either via the Inspector or the Arranger Editor) to see how they could best be sequenced to get a complete piece as close as possible to the target number of bars. For this example, I sequenced two different 'verse' four‑bar sections and my one‑bar transition, followed by a two‑bar chorus section and my 'four‑and‑a‑bit' bar ending, giving me 15.12 bars in total.
Be Sharp, Go Flat
While this is close to my 15.36 bar target, it is not yet spot on, so some tidying up is still required. You can try to address any remaining issues within the existing project but, once you are generally happy with the new arrangement that you now have, these 'tidying up' jobs are often easier to deal with if you first use the Flatten option in the Arranger Editor to create a new project, containing a linear version consisting of just the components used in the new arrangement.
 The Arranger Editor Options dialogue allows you to create a new project when you Flatten your arrangement.
The Flatten function offers a number of useful options. For flexibility, I tend to use the 'New Project' one, which leaves your original project intact, although Undo can be used to 'unflatten' a project back to the full arrangement if you need to.
Tidy Up Time
Once you have a flattened version of the arrangement, you can then do any final tidying up that is required. For example, if the project contains any MIDI parts, you might need to ensure notes that ought to cross transitions in the various sections are still intact. Equally, you may need to add very short fades to audio parts that might have been split at a section transition.
Often, transitions can be smoothed out by the addition of some further minor parts. For example, inserting a cymbal crash at a section transition can often hide a minor glitch. Equally, if the performance includes a melody or lead line, re‑recording it over the new shorter arrangement can help smooth out the transitions.
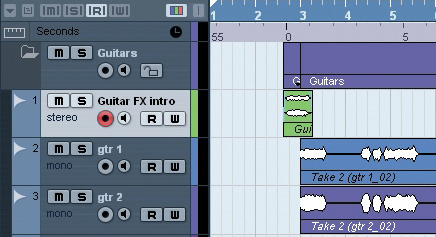 With my new arrangement in place, all that was required was a very short guitar 'FX' sound as an intro, to make the cue exactly the right length.
However, the key 'tidy‑up' task is often to get the cue length exactly right. In the example I'm using here, my new arrangement is about a quarter of a bar too short (15.36 bars required and 15.12 bars in my current arrangement). Time-stretching aside, there are two common approaches to dealing with this sort of problem: either extend your ending or add something at the start. In this case, I simply recorded a very short new guitar part — essentially a brief sound effect — to serve as an intro, but I could just as easily have added a short 'intro'‑style drum roll. Equally, I could have welded an extra power‑chord 'hit' onto the end of the arrangement. This kind of approach – adding a little extra flourish at the start or end of the cue — is a common trick and, providing it suits the musical context, can be used to ensure that your final cue is right on the required length. Job done!
Published July 2010
Thursday, April 15, 2021
Wednesday, April 14, 2021
Logical Editor
By John Walden
 The PLE preset for deleting events beyond the project cursor is about as simple as it gets.
I often find that in my rush to capture the creative flow before it dries to a trickle, my Cubase projects can end up in a bit of a mess, and although that's not a problem while the jumbled assemblage of tracks and parts remains fresh in the mind, it can be confusing and frustrating when returning to the project weeks, or even months later. What we need is something to help keep things organised without interrupting the creative flow. Cubase has a number of features that can help in this regard, the most powerful of which is the Project Logical Editor. This versatile tool is capable of far more than 'tidy up' tasks, but it can certainly be used to bring a little order to a complex project.
Analysis, Mr Spock?
 Identifying all muted audio and MIDI parts requires a more complex set of filter conditions.
At first sight, you'd be forgiven for thinking you need to be Mr Spock to use the Project Logical Editor (PLE), but if you invest a little time up front, it will pay dividends in pretty short order. Available from the Edit menu, the PLE window is dominated by two sections. The upper portion allows you to set up filter conditions — in other words, to specify a set of criteria to identify which objects in the project you wish to perform some operation upon. As you'll see in the examples, it's possible to combine several criteria using Boolean operators such as AND or OR. The lower portion of the window, including the Function setting (which can be toggled between Delete, Transform and Select), is where you specify the action(s) that you want to apply to the objects that are selected by your filter.
Imagine we want to do a combination of things to clean up the project: first, we'll delete any events that occur beyond the end of the song (I'll often drag groups of alternative takes beyond the end of my arrangement in the project window while I try something else), then delete all empty or muted tracks and/or elements, and finally rename and colour-code all the tracks belonging to each main instrument group. Cubase 5 includes PLE presets that are suitable for some of these tasks, and examining a couple will help illustrate how to roll your own.
Unwanted Events
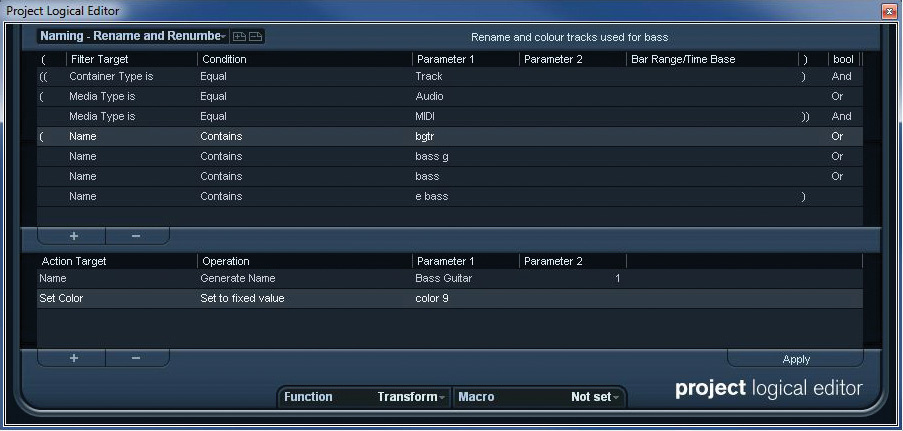 Example PLE settings for a preset to rename and colour-code all bass guitar tracks.
The 'Parts + Events — Delete Events beyond Song Cursor' preset provides a simple starting point. Only one filter condition is specified, and this finds all objects that lie beyond the project cursor's position on the timeline. The Function box is set to 'Delete', so no entry is required in the action list pane (I'll come back to this pane later). As long as you've correctly positioned the cursor prior to applying this PLE preset, any object that occurs beyond the end of your song will be deleted.
The 'Parts + Events — Delete muted elements' preset is more complex. The Function setting (set to Delete) and the action list pane both remain the same as in the previous example, but the filter conditions, shown below, are a little busier. There are three different conditions shown here, and they're 'nested' in the three sets of brackets. The first, which occupies the top two lines, identifies any media that is MIDI data AND held in a part (I'll stick with capital letters for the logical terms to avoid confusion). The second, on lines 3‑5, finds any media that is audio AND an event OR a part. The third, on the final line, identifies any object that has been selected by the first two conditions that is currently muted. Expressed in another way, the filter operates as follows: identify any MIDI part (condition 1) OR an audio event or part (condition 2) that is also currently muted (condition 3).
 The PLE provides plenty of options when renaming tracks.This ability to combine different filter conditions makes it possible to select all sorts of combinations of objects for processing within the PLE. As shown in the screen at top right, each of the main columns in both the filter conditions and action list pane features a drop‑down list, making it easy to experiment with the options. The 'Delete Empty Tracks' and 'Delete Muted Tracks' presets operate in a very similar fashion to the two we've just looked at, and a combination of these four presets provides a simple way of removing unused clutter from your project window.
The Name Game
 The PLE allows a number of different 'object' types to be identified within the filter conditions pane.
So what else can the PLE do to make our projects more organised? Track names obviously serve as useful memory-joggers when returning to an old project, and the PLE can help tidy things up here. The screenshot above shows one example, where the filter conditions are finding audio or MIDI tracks where the name contains any of my usual shorthands for 'bass guitar'. Again, the positions of the brackets and the use of the AND and OR terms are worth noting. In summary, this preset is identifying only items that are tracks (line 1) AND are either audio or MIDI tracks (lines 2 and 3 — this therefore excludes group channels or FX channels) AND have any of 'bgtr', 'bass g', 'bass' or 'e bass' in their names (lines 4‑7). You could, of course, customise or add to this list of shorthand names to suit your own needs for different instruments, and save these as a series of PLE presets.
In this example, the Function option is set to Transform, as we are going to change something about the objects identified by the filter conditions. Within the action list, the first action specified (line 1) simply generates a new name for every track that matches the filter conditions. These will all start with 'Bass Guitar' (entered in the Parameter 1 column) and then be numbered sequentially starting from 1 (as specified in the Parameter 2 column). As shown in the screenshot below left, Generate Name is only one of several naming options provided, so there is plenty of flexibility here.
Colour Me Bad
 PLE presets can be chained together into a macro, so that one key command can execute several at once.
Many Cubase users like to colour‑code tracks of different types, to provide an extra visual guide showing which objects and tracks contain which types of instrument. The eagle‑eyed amongst you will have spotted a second action specified in the screenshot for the renaming example. With filter conditions set to identify all my bass tracks, and having changed the track names (line 1), it is a simple task to add a second action (line 2) that specifies a certain colour.
The Right Key
You can, of course, make all these sorts of changes by hand, but once you've created some suitable PLE presets, it requires nothing more than a few clicks to do the bulk of the tidying up, no matter how large your project. Two small, additional steps can make it even quicker, though. First, PLE presets can be assigned to key commands, so each of your stored presets can be executed via a single keystroke. Second, as shown in the final screenshot, it's possible to combine multiple PLE presets into a single Macro — which means the whole lot can be executed via a single key command or via the Edit/Macros menu option. Very neat!.