 Defining your end point and working backwards can make the editing process easier for cues that require exact timing.
Just how do you write musical cues to match the length of a video in Cubase?
Sonic arguments aside, one of the undeniable advantages of working with a computer‑based DAW, as opposed to tape, is the ease with which projects can be reorganised to create new or alternative arrangements. While remixers make good use of such DAW‑based tools, they can also be useful to the media composer — when creating a cue for an advertising slot, for example.
Let's imagine you have a full‑length track an ad agency wants to use, but they require a version precisely 29.5 seconds long, to fit their 30-second ad (the slightly shorter length allows a fraction of a second's silence at both start and finish). Oh, and they want it within a couple of hours. How can Cubase help you meet that deadline?
Bar Music
There are a number of different ways to approach this sort of task, but if you're working from an existing project at a known tempo, the first job is to calculate the length of the required cue in terms of bars. You can just add a Ruler Track to your project and then see how many bars are required to reach the 29.5-second point. I find it more convenient, though, and more precise, to do the calculation using a simple spreadsheet. I've provided a version of my own Excel spreadsheet for download from the SOS web site. It simply requires you to enter the project tempo and the required cue length in seconds, then it calculates how many bars of music are required. In the example I'm using here, my project is at 125bpm, so a 29.5‑second cue ought to be 15.36 bars long — a rather awkward number of bars to work with, but not an untypical situation.
Working Backwards
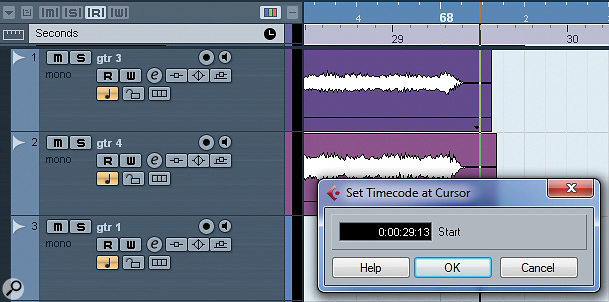
When you're working out what will fill the required bar length best, it often helps to start at the ending and work backwards. As shown in the screenshotabove, having turned off the Snap button, I've placed the cursor at the exact end of my track (this track features a sudden stop ending but I've also allowed a little time for the reverb tail to fade). The Project / Set Timecode at Cursor option can then be used to enter a timecode of 29:13 for the cursor position. (This is timecode, so the last two digits are actually parts of a second measured in frames.) As I had this project set to 25fps, 12.5 frames is equivalent to half a second, and I just rounded up to 13 frames.
While you might get lucky and find that the last 29.5 seconds of the full‑length track works exactly, at least you'll know how many bars you can take from the end section if it doesn't, and so how many additional bars you're looking for from elsewhere in the arrangement. In my example track, working backwards from the ending, zero seconds does not magically fall on the first beat of a musically correct bar. Some rearranging of the materials is therefore required to create a cue of exactly the right length.
Blowing Chunks
It's perfectly possible to manually rearrange sections of your project to start piecing together what you need for your short cue. However, the Cubase Arranger Track provides a much more efficient way to experiment. Matt Houghton covered the use of the Arranger Track back in the March 2007 issue (/sos/mar07/articles/cubasetech_0307.htm) under its previous incarnation as the Play Order Track, so if you're unfamiliar with this Cubase feature, I'd suggest you read Matt's piece before continuing here.
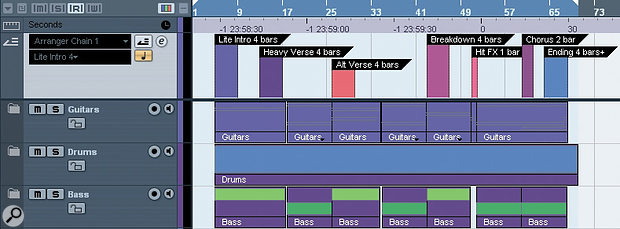
 The Arranger Track can be used to identify some musically self‑contained sections of your full‑length track.
To get the best from the Arranger Track, you need to identify a number of self‑contained musical chunks from within your full‑length track, which you can then re‑sequence as required (generally, two- or four-bar lengths work best for this). One of these sections should also include your ending. I've done that for my working example and the 'ending' section consists of the last four complete bars of the original arrangement plus about half a beat of the next bar (4.12 bars in total) that contains the final chord. It is usually best to identify more sections than you think you might need, as this gives you flexibility to mix and match the sections as you experiment with the Arranger Track. Note that, for convenience, I also named each section with a descriptive label and indicated how many bars it contains. In this example, I've also been lucky enough to identify a one‑bar section that, in the original arrangement, formed a transition between two longer sections. If you can find such a single bar that works musically, this can be very useful where you require an odd number of bars in total.
 The Arranger Editor can be used to experiment with sequencing the short musical section, to find the arrangement that works best.
Having identified a number of short sections, it was then simply a case of using the Arranger Track (either via the Inspector or the Arranger Editor) to see how they could best be sequenced to get a complete piece as close as possible to the target number of bars. For this example, I sequenced two different 'verse' four‑bar sections and my one‑bar transition, followed by a two‑bar chorus section and my 'four‑and‑a‑bit' bar ending, giving me 15.12 bars in total.
Be Sharp, Go Flat
While this is close to my 15.36 bar target, it is not yet spot on, so some tidying up is still required. You can try to address any remaining issues within the existing project but, once you are generally happy with the new arrangement that you now have, these 'tidying up' jobs are often easier to deal with if you first use the Flatten option in the Arranger Editor to create a new project, containing a linear version consisting of just the components used in the new arrangement.
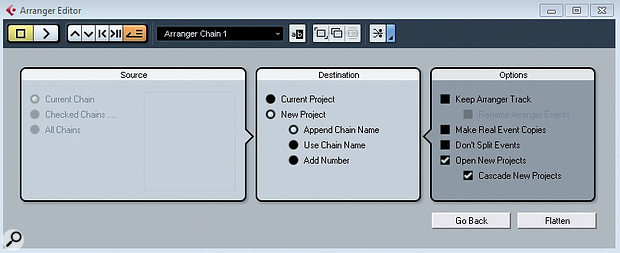
 The Arranger Editor Options dialogue allows you to create a new project when you Flatten your arrangement.
The Flatten function offers a number of useful options. For flexibility, I tend to use the 'New Project' one, which leaves your original project intact, although Undo can be used to 'unflatten' a project back to the full arrangement if you need to.
Tidy Up Time
Once you have a flattened version of the arrangement, you can then do any final tidying up that is required. For example, if the project contains any MIDI parts, you might need to ensure notes that ought to cross transitions in the various sections are still intact. Equally, you may need to add very short fades to audio parts that might have been split at a section transition.
Often, transitions can be smoothed out by the addition of some further minor parts. For example, inserting a cymbal crash at a section transition can often hide a minor glitch. Equally, if the performance includes a melody or lead line, re‑recording it over the new shorter arrangement can help smooth out the transitions.
 With my new arrangement in place, all that was required was a very short guitar 'FX' sound as an intro, to make the cue exactly the right length.
However, the key 'tidy‑up' task is often to get the cue length exactly right. In the example I'm using here, my new arrangement is about a quarter of a bar too short (15.36 bars required and 15.12 bars in my current arrangement). Time-stretching aside, there are two common approaches to dealing with this sort of problem: either extend your ending or add something at the start. In this case, I simply recorded a very short new guitar part — essentially a brief sound effect — to serve as an intro, but I could just as easily have added a short 'intro'‑style drum roll. Equally, I could have welded an extra power‑chord 'hit' onto the end of the arrangement. This kind of approach – adding a little extra flourish at the start or end of the cue — is a common trick and, providing it suits the musical context, can be used to ensure that your final cue is right on the required length. Job done!
Published July 2010
No comments:
Post a Comment