Tuesday, May 19, 2020

Monday, May 18, 2020
How To Integrate Modular Soft Synths With Ableton Live
 Screen 1: Freezing eight copies of a four-bar MIDI clip yields eight different four-bar audio clips from this U-he Bazille patch.
We show you how to integrate your modular soft synths with Live.
This month we'll take another look at modular synthesis in Live. In the May 2015 Live column, we covered the Max For Live modular system OSCiLLOT from Max For Cats. The December 2017 column dealt with how to implement modular techniques using just Live Racks, instruments and effects. This time we'll focus on getting the most out of the many virtual modular synths now on the market. You'll find a brief catalogue of what's out there in the 'Cable This' box.
The Hookup
Beyond the default setup for sending MIDI to and receiving audio from instruments in Live tracks, modular synths often require some special treatment. For one thing, they may have multiple audio outputs to which you can send different sounds from a single modular patch. For another, they may split their MIDI note inputs into separate gate, trigger, note number and velocity signals, allowing you to then cable those individually. Finally, they may provide ports for routing MIDI from their sequencers and CV modules to Live (LFOs, graphic mappers, trigger generators and so on). Exploring the in and outs is well worth the effort.
One of the best features of modular synths is their ability to generate evolving sounds that never or almost never repeat. Many synth plug-ins have control-voltage generators with aleatory modes such as Sample&Hold LFOs or sequencers with random step order, but a modular synth's ability to patch these wherever you want makes them much more useful. The downside is that once an aleatory patch generates something you like, it's gone. An easy workaround for that in Live is to route your modular synth track to a dedicated audio track for capturing the synth's output. Of the several ways to do that, I find it most convenient to set the synth track's output to 'Sends Only' (a substitute for 'Off') and to set the capture track's input to come from the synth track as shown at the top left of Screen 1 (above). Set the synth track's Monitoring mode to 'Auto' and the capture track's to 'In'. The synth will now play through the capture track, and you can record it by arming that track. Arming the synth track will allow you to play it from your MIDI controller. To record the MIDI input as well as the synth's output, arm both tracks (hold Control/Command while clicking the second Arm button).
You get three choices for the capture track's input: Pre FX captures only the instrument output, Post FX includes any effects placed after the instrument and Post Mixer captures effects as well as the track's volume and pan settings. I prefer Post Mixer because only that setting allows you to Freeze the synth track, which is often the fastest way to generate audio clips. If the synth patch is self-generating (no MIDI input required), you can simply use empty MIDI clips on the synth track —their length will determine the frozen clip length. For recording (rather than freezing), you may prefer the Pre or Post FX settings because they ignore the synth track's level and pan settings. To save this track setup for each of your modular synths, create a Track Group holding these two tracks and save it in your Live User Library.
The '3AM Random Riddim' Bazille patch at the top right of Screen 1 uses Sample&Hold to generate random rhythmic patterns that are processed by a delay effect. (Turn off the delay on Bazille's Tweaks & FX page for a less cluttered variation.) Single notes or short note phrases generate different rhythm sequences with a hand-drum like sound. At the bottom of Screen 1, eight copies of the same, single-note, four-bar MIDI clip are frozen to generate the eight audio clips shown below. Freezing all eight clips takes just a few seconds as opposed to the time it would take to record the eight clips.
Make It Your Own
 Screen 2: Eight controls from an Aalto patch are mapped to Macro knobs in an Instrument Rack. Individual Instrument Racks are then saved as different presets for that modular patch.One way to approach modular synth patches is to think of the cabling as defining a synth whose presets comprise different control settings. You can save these as standard plug-in presets, but I like to go a step further by configuring eight essential controls in the Live Instrument and then enclosing that in an Instrument Rack with the configured controls mapped to the Rack's Macro knobs. Individual presets then become separate instances of the Rack, as shown in Screen 2. With most plug-ins, configuring panel controls is simply a matter of clicking the Live Instrument's Configure button and then manipulating the relevant controls on the plug-in panel. Voltage Modular is an exception: to make a control configurable, you need to first right-click it and map it to one of 128 available automation assignments. Mapped controls are configurable as just described. That's common practice with modular instruments that allow you to add and delete modules.
Having multiple audio outputs and being able to add and remove modules in Voltage Modular or Softube Modular gives you a much larger palette. As with hardware modulars, the modules are arranged in horizontal rows, and in Voltage Modular you can save individual rows (called 'Cabinets'). Building up an inventory of Cabinets speeds up configuring full modular patches. For example, you might pair four note-generating cabinets with four sound‑module cabinets and feed them to separate Live tracks.
 Screen 3: The Euclidean Duel module steps the Random Task device to generate three‑note sequences while randomly changing the notes or note order. The output is captured in a Live MIDI clip (bottom).
Published May 2019
Saturday, May 16, 2020
Friday, May 15, 2020
Ableton Live now talks modular with CV Tools
10 new Max for Live devices allow integration of Live with CV-powered synths
 Ableton's CV Tools: integrating the worlds of modular CV-based creativity with computer-based composition.
 The main CV Tools screen in Ableton Live.
 Ableton's CV Tools: integrating the worlds of modular CV-based creativity with computer-based composition.
Ableton chose the Superbooth synth exhibition to announce the beta release of CV Tools, a set of 10 Max for Live instruments developed in conjunction with electronic music duo (and Max ninjas) Skinnerbox. The new instruments generate or receive pitch, control, clock and trigger CV, and can be connected to any analogue equipment capable of receiving or sending control voltages — although of course a hardware CV interface is required (and is not supplied with CV Tools).
 The main CV Tools screen in Ableton Live.
The CV Tools are designed not only to pass basic pitch and timing information between Live and a connected CV synth, but also to provide an interface between the deeper capabilities of CV-based and modular synth systems and Live’s software-based programming environment. So automation curves in Live can be converted to CVs with the CV Utility tool, and summed, multiplied or shifted as with CVs before leaving Live. The CV Shaper tool allows you to draw your own control curves in Live before outputting them to your synths, and the CV Clock In and Out modules enable a modular system to follow tempo changes in Live — or Live to follow tempo changes made on a modular system. Two of the new CV Tools also output MIDI, allowing the integration of non-CV-based hardware and software instruments.
Published 9/5/19 by SOS
Thursday, May 14, 2020
Wednesday, May 13, 2020
Ableton Live: Using BinkLooper
We look at a free MFL device that can breathe new life into tired loops.
This month we'll explore a real-time recording technique used in performance by the percussionist Frank Wienk (aka Binkbeats), as illustrated in a series of videos on the Ableton website (ableton.com/en/blog/binkbeats-in-and-out-loop). As the introduction clarifies, "It's not about looping," it's about "turning a perfect loop into a perfect song". The second video in the series explains how Binkbeats sets up Live for his performances. His Live Set has dozens of tracks, many of which use a Max For Live plug-in called BinkLooper to create and manipulate Live clips without ever stopping the music. BinkLooper is a free download from Binkbeats' website (binkbeats.com/binklooper), and it is a great tool for beginning a project or for getting unstuck when a project has stalled.
One Click
BinkLooper manages the recording of clips in Session view clip slots on the track on which it is inserted. You use it to record and manipulate clips without ever stopping the music. Without BinkLooper, recording a looping audio or MIDI clip entails arming the track, triggering a clip slot to record the clip and then retriggering the clip or disarming the track, either of which will start the clip playing. You can do that away from your computer with a few button presses on any Live-compatible button box. But what if you need a do-over or quantisation or just want the clip to record for a fixed length and then start playing on its own? In addition to arming, recording and playback, BinkLooper offers all these options and more with a single button press.
BinkLooper comes as both a MIDI and an audio plug-in. Use the audio plug-in on an audio track and use the MIDI plug-in on a MIDI track with or without an instrument. You can use BinkLooper by manipulating its various controls, but the point is to not have to do that. Instead, you use modulation envelopes on dummy clips (clips with no audio or MIDI content). For instance, you might set up envelopes to choose a Scene (and thereby a clip slot on your track), set the length of the loop you want to record, arm the track for recording, launch recording in the chosen clip slot and then play the clip after it has been recorded. Playing the dummy clip then does all of these things without further intervention. For the details on BinkLooper's controls and clip envelopes, see the box 'The Envelope Please.'
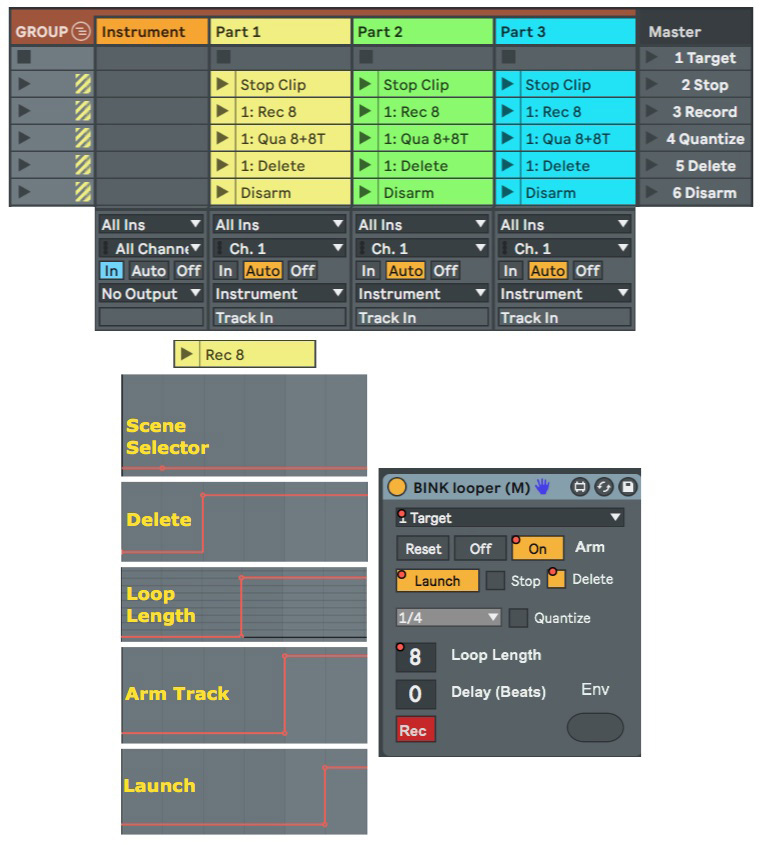 Screen 1: A Track Group template with an instrument track and three BinkLooper tracks for real‑time layering of MIDI tracks.Screen 1 shows a BinkLooper setup for recording multiple MIDI parts to play a single instrument. You might use this to create several percussion layers for a Drum Rack or to create melody and harmony parts for a pitched instrument.
Each of the MIDI-part tracks in Screen 1 holds an instance of BinkLooper, and the dummy clips on these tracks use modulation envelopes to control BinkLooper settings.
Each track receives and records external MIDI input and routes it to the instrument track. It takes a while to set up the envelopes in the dummy clips, but you can then save the clips in your User library and make only minor changes when reusing them. I like to save a Group holding all four tracks, as in Screen 1.
Alternatively, you can save a single MIDI track holding BinkLooper and any assortment of dummy clips you find useful. You would then drag the track itself into Live or drag its clips directly from Live's Browser to other BinkLooper tracks in your Set. The thing to keep in mind is that BinkLooper needs to be on any track to which you drag the clips in order for the envelopes to be preserved. If you're only creating one part, you can also put the instrument on the BinkLooper track.
There are a variety of ways to set up the modulation envelopes and the order of events is often important. For example, you want to select the desired Scene before deleting, quantising or launching clips. In the '1: Rec 8' clip envelope shown in Screen 1 (above), Scene 1 is selected, and if it holds a clip, that clip is deleted. This is necessary in order to record a new clip in the same slot. After setting the loop length to eight beats and arming the track, the Launch button is enabled. That will launch a clip for recording subject to the Set's launch quantise setting. When synchronising with other playing clips, it's important to trigger the BinkLooper clip with that in mind. This compact setup is good for triggering individual clips. If you prefer to use Scene triggering, the clips need to be spread across different Scenes. That is more convenient in performance because you can then also use BinkLooper clips to segment your performance by Scene.
I Bink, Therefore I Am
The setup for capturing audio is slightly different. For one thing, it uses audio tracks and therefore requires audio dummy clips. The audio you're capturing might come from acoustic or electronic instruments through your audio interface, from a tablet using a protocol such as MusicIO, or from other audio applications running on the same computer that use a utility such as Loopback or LoopBeAudio to send audio to Live. You'll find details on the latter two methods in the September and October 2017 Live columns. In all cases, you route the audio being captured to the audio track holding BinkLooper. The dummy-clip automation settings are the same as for MIDI, and you can save and load audio dummy clips from your Live User library as just described.
 Screen 2: Three BinkLooper audio tracks in Live capture the output from different external instruments.
Screen 2 shows a three-track example. A Roland Handsonic sends audio to a hardware audio input. Audio from Reason's Complex‑1 modular synth Rack Extension arrives from a Reason audio output port. Audio from the iPad Geo Synth application is received by the MusicIO VST audio effect plug-in on an audio track and routed from that track's output to a BinkLooper audio track for recording. The first Scene holds the recorded audio clips (brighter coloured) shown in detail at the bottom. The other audio clips hold the same BinkLooper envelopes as in Screen 1.
For clarity, all my examples record clips in the first Scene, and this is also how Binkbeats records audio and MIDI clips in his performances and videos. For sketching in an evolving Live Project, you may want to create alternative takes. To do this all you need to do is add a few more target Scenes at the top of the Set. This will automatically move the dummy clips down as necessary. You will then need to duplicate any dummy clips that have a Scene Selector envelope and edit that envelope in order for BinkLooper to target clip slots in each of the new Scenes.

Published June 2019
Tuesday, May 12, 2020
Subscribe to:
Posts (Atom)