Welcome to No Limit Sound Productions

Company Founded
2005
Overview

Our services include Sound Engineering, Audio Post-Production, System Upgrades and Equipment Consulting.
Mission
Our mission is to provide excellent quality and service to our customers. We do customized service.

Friday, December 29, 2023

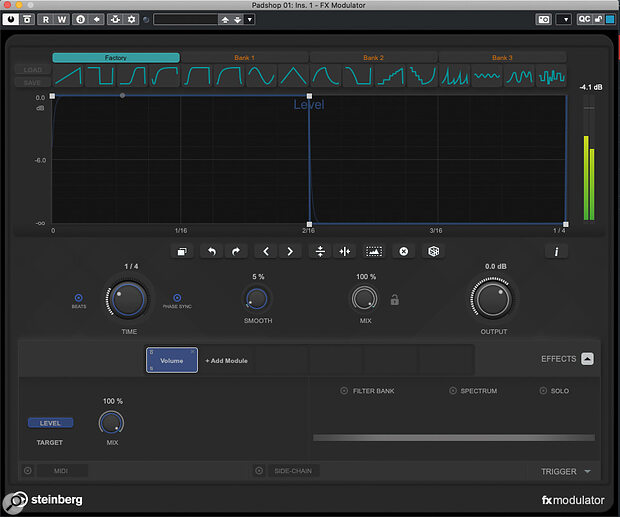
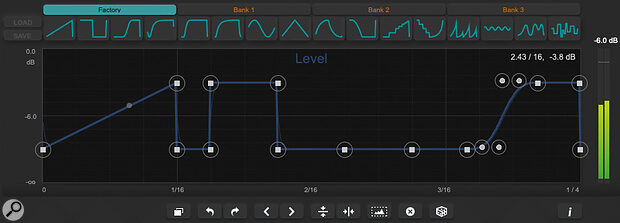
Screen 1: A simple step on/off modulation curve to control Level within FX Modulator’s Volume module, made using the second Factory curve preset in the top row.Screen 1: A simple step on/off modulation curve to control Level within FX Modulator’s Volume module, made using the second Factory curve preset in the top row.

FX Modulator brings powerful new creative processing options to Cubase 12

Included with the Pro and Artist versions of Cubase 12, Steinberg’s FX Modulator is a multi‑effects plug‑in which takes an approach that’s reminiscent of Output’s Movement and Cable Guys’ ShaperBox. It comes with plenty of cool presets and these are well worth exploring if you want to find out what it can do, but it’s also a very approachable plug‑in that makes it pretty easy to design your own effects from scratch. This article will take you through some examples, and on the SOS website (https://sosm.ag/cubase-0822) you can find some audio clips that should bring them to life.

The Rhythm Method

FX Modulator has lots of potential uses but first we’ll look at creating rhythmic effects from a sustained sound. As my starting point, I’ve used Padshop’s somewhat anonymous‑sounding Mellow preset with the in‑built delay turned off — but the same principles could be applied to any source sound.

Screen 1 shows an instance of FX Modulator inserted on my Padshop track. Any combination of FX Modulator’s 14 individual effects modules could be modulated to create rhythmic effects, but I’ve picked the simple Volume module for this example. This module offers a single parameter for modulation: Level, as shown bottom‑left of the UI. We can create a modulation curve to control this parameter in the upper panel. Some modules offer multiple parameters: for example, the Filter module allows you to modulate both Frequency and Q (resonance), and you can create independent modulation curves for each parameter.

FX Modulator ships with a bank of Factory curve presets which you can’t overwrite, as well as three banks of empty curve preset slots for your own creations. In this example, I’ve simply selected the second Factory preset curve, which steps the Level between maximum and zero once over the timebase of the envelope. This timebase can be changed with the Time control and, in this case, I’ve selected 1/4 so, when I trigger a sound in Padshop, I get a (very!) simple quarter‑note rhythm, as FX Modulator follows the modulation curve over the selected timebase. Yay: job done!
Screen 2: More complex rhythmic patterns can easily be created by combining the Factory preset curves. In this case, the curve’s vertical range has also been compressed using the editing tools.Screen 2: More complex rhythmic patterns can easily be created by combining the Factory preset curves. In this case, the curve’s vertical range has also been compressed using the editing tools.

Curve Control

That’s the basic principle covered but we can, of course, get more creative with the modulation curves — and pretty easily too! Editing the curve follows the standard approach of double‑clicking to add/delete nodes and click‑dragging to reposition them (they snap to the grid, but you can defeat this by holding Shift). You can also create curves by dragging the line between two existing nodes; a ‘shape handle’ will appear when you do this.

Depending on the nature of your source sound, sudden switches in parameter values (as for Level in the first screenshot) can produce noticeable audio artefacts such as clicks. Setting the Smooth control into the 1‑5 % range softens the transitions around the nodes (a thinner curve is superimposed on the main curve to visualise what’s happening) and will usually take care of such artefacts. Larger Smooth settings can be used to easily transform a stepped pattern into a ramped one for a pulse‑like effect.

The tool buttons beneath the curve editing window control various useful functions and, as well as undo/redo buttons, these include the ability to flip the curve horizontally or vertically and shift the curve left or right (by one grid step in the display). However, you also get buttons to reset the curve (the ‘x’ button), generate a random curve (the dice button), ‘select all curve points’ (the little mountain range), and ‘duplicate curve’ (leftmost in the row). The last two in particular warrant further comment...

You can select multiple nodes for editing by dragging with the mouse within the display, and the ‘select all curve points’ is simply a shortcut for selecting everything. However, what’s useful is what you can then do with your selection: this includes dragging left/right or up/down and, even better, the option to scale/compress the curve’s range vertically if you hold the Alt key while dragging one of the selected nodes.

The ‘duplicate curve’ button takes the existing curve and places a copy of it next to the original. Interesting to note, however, is that this is done by time‑compressing the original curve, so if you leave the Time control unchanged your curve pattern will effectively play back at double speed. You can adjust the Time control to return the pattern to the original speed, though, and then make whatever edits you might like to your modulation curve to create additional variety to your now duplicated curve.

Curve Collector

Once you’re fluent with these editing tools, it’s incredibly easy to create custom modulation curves. In our Volume module example, this results in custom rhythmic patterns but a further editing trick can speed up this process. If you don’t have any nodes selected, and then click on any one of the curve presets displayed at the top of the display, that preset curve is copied to the editing window, replacing any existing curve, and filling the timeline. However, if you first select a range of nodes on your existing curve before clicking on one of the presets, the selected preset curve replaces only the selected nodes. This makes it trivially easy to combine the preset curves in new ways, generating more complex curve starting points for further editing.

Screen 3: Creating your own curve building blocks within the user banks makes it easy to experiment with new rhythmic patterns.Screen 3: Creating your own curve building blocks within the user banks makes it easy to experiment with new rhythmic patterns.

Two further things arise from this feature. First, if you design a curve you like, and might want to re‑use it in another module, a separate instance of FX Modulator, or even another project, saving it into an empty preset slot in one of the three user banks (and then saving the bank using the Load/Save button on the left) is a good move. Simply click on an empty user slot and the current modulation curve will be copied to it for later recall.

Second, and putting these ideas together, we can create some simple step on/off patterns (like that shown in the first screenshot) but each with a different number of steps. The next screenshot shows an example in which I’ve created four such presets featuring 1, 2, 3 and 4 curve cycles of on/off respectively. These can then be quickly combined in any number of ways using the option just described to replace a selected range of nodes with the current curve. This makes it super‑easy to experiment with different rhythmic patterns via our Volume module modulation and, once you have a basic rhythm you like, you can apply further manual edits to fine‑tune the end result.

To Infinity & Beyond

I’ve used a simple example here for the purposes of demonstration, but even the most complex FX Modulator presets are built from these same tools; they simply use more modules and parameters. And even if we confine ourselves to the ‘rhythmic sounds from a static pad’ aim, once you have the basics in place it’s easy to suggest a few quick ideas to try next.

For example, if you engage the Filter Bank button you can constrain the processing of the current module to just a specific frequency range (drag the two node points to adjust). So we could, for instance, apply our rhythmic volume modulation to just the low frequencies and leave the higher frequencies untouched; play with two hands and it’s almost like the sound has two layers, one rhythmic and one sustained.

Second, while you can only use a single instance of any particular effects module within FX Modulator, you can easily process your sustained pad sound through two separate FX Modulator instances, each using the Volume module to create a different rhythmic effect. If you also automate the bypass options on these two instances, you can quickly switch between different rhythms for the same sound. However, with both instances active, you can let the rhythmic effects interact and, by automating the respective Mix controls, you can change the blend between the two rhythms. The results can get really interesting if your two instances use different Time settings!

Screen 4: The Filter Bank allows you to constrain the frequency range that each effect module is applied to.Screen 4: The Filter Bank allows you to constrain the frequency range that each effect module is applied to.

Finally, you can try adding in other effects modules. An obvious candidate to add to your volume‑based rhythmic effects is the Filter module with both Frequency and Q set to be modulated gradually over a number of bars; your rhythm then gets some classic tonal variations added to the mix.

There’s plenty of fun to be had with the Volume and Filter modules alone, but FX Modulator is capable of way more than just rhythmic effects. These further options will, however, have to wait for a future column.

While FX Modulator might not quite reach the dizzy sound‑design heights of something like Output’s Movement, it is much easier to master — so dig in, and you’ll soon by enjoying the fruits of your sound‑designing adventures. 


Published August 2022

Wednesday, December 27, 2023

Prepping Vocals In Cubase

To reap the full benefits of VariAudio, make sure you enable Show All Smart Controls.To reap the full benefits of VariAudio, make sure you enable Show All Smart Controls.

The latest iteration of VariAudio includes all the tools you need to get vocals in shape for mixing.

Cubase may not be able to guarantee a world‑class vocal performance, but it does provide all the tools you need to present recorded vocals in their best possible light. Once you’ve laid down or comped your best take and dealt with any unwanted noises, if you then bounce everything into a new audio clip, Cubase’s VariAudio is a powerful one‑stop editing shop that can be used for all the obvious level, timing and pitch adjustments that might benefit the part. We looked at this topic back in the May and June 2019 Cubase workshops, but Cubase has evolved since then and, for Pro and Artist users at least, Cubase 12 includes some further options — so let’s explore the possibilities.

One For All

We’ll start with a VariAudio refresher. When you first open VariAudio from the Sample Editor’s Inspector panel, Cubase will analyse your audio clip — it might take a few seconds for a longer clip — and then superimpose pitch Segments (rectangular ‘blobs’) over the waveform. Each Segment represents a portion of the audio that Cubase has identified as containing pitch variations that lie (mostly) within a single note (semitone) range. A continuous pitch curve indicates the pitch variation within each Segment, as well as any pitch transitions that occur as the vocal flows legato‑style between them. Segments are only created for those parts of the performance that contain definable pitch components: adjacent Segments never overlap, but there will be gaps in the display between Segments where there are non‑tonal sounds, such as breaths, consonant‑only sounds or rests. (Despite the visual gaps, the underlying audio is still there and being played back!)

Before starting work, a few settings are worth checking. First, ensure the Edit VariAudio button is active, so you can actually start editing. Second, enable the All option in the Smart Controls drop‑down menu, so you see the full set of controls. Third, note that the VariAudio tab header includes a ‘bypass’ button, so you can easily A/B compare your VariAudio edits with the unedited original.

The second screenshot (below) provides a reminder of the functions provided by each of the Smart Controls available on a Segment and, while many of these are focussed on various ways to manipulate pitch, you also have options for adjusting both volume and timing — the addition of these make VariAudio a much more efficient environment, since you can now perform most core vocal editing tasks in one place. By the way, note that while Smart Controls can be used to edit individual Segments, if you select multiple Segments for editing, adjusting a Smart Control on any of the selected Segments will apply edits to all of them.

A useful summary of the Smart Control functions.A useful summary of the Smart Control functions.

Split Sliding Away

A good first step is to inspect the Segments Cubase has created and consider whether manual adjustments might be useful. There are a couple of things to look out for. First, if the pitch curve within a Segment seems to contain an obvious step change (as distinct from pitch vibrato), consider splitting the Segment into two for greater control when editing. Simply hover the mouse cursor towards the bottom of the Segment where you wish to make a split, and a horizontal line will appear at the base of the Segment and the cursor changes to a pair of scissors; one click, and you’re done. Segments can also be glued together, if that’s required.

Second, if the length of a Segment doesn’t encompass all of the waveform that it should, hold the Alt/Opt key, and then drag the Warp Start (mid‑left) and Warp End (mid‑right) Smart Controls. Holding down the Alt/Opt key changes these Smart Controls to adjust the Segment length rather than warping the audio, but note that you can’t extend a Segment so that it overlaps with, or re‑sizes, an adjacent one when using this modifier key.

While you’re performing these edits, you can also consider the levels. Most vocals will benefit from at least some compression or volume automation when you get to the mixing stage, but you can often make that later stage easier with a first pass using the Volume Smart Control (located bottom‑right of the Segment). Simply looping playback through short sections of your vocal while you make any adjustments on individual Segments will soon let you even out any of the more obvious inconsistencies in volume.

VariAudio is an impressively flexible one‑stop shop for both corrective and creative editing.

Manipulation Of Time

If your vocals also need some timing tweaks, you could flip to the Sample Editor’s AudioWarp panel. But in VariAudio, without the Alt/Opt key modifier, the Warp Start and Warp End Smart Controls also provide AudioWarp functionality and could be all you need. As you make these edits, you see the underlying waveform being stretched/compressed and how any transients align with the Sample Editor’s musical grid. It’s powerful stuff and, once you’re familiar with how typical changes might affect the underlying audio, it’s an extremely easy way to tighten up vocal timing where required.

The AudioWarp algorithms are pretty robust, so the Warp Start and Warp End Smart Controls can be used for rather more than minor timing correction: you can also explore changing the underlying rhythmic phrasing of a vocal line. This might include shortening or extending a sustained note, compressing a phrase to fit a specific number of beats, or separating and shortening individual words to create a staccato‑style delivery. Yes, you can obviously push things to the point where the audible artefacts become obvious, but used with care it can be a great way to get creative with new phrasing ideas, and you can always undo the changes if something doesn’t quite work. The audio examples illustrate what might (and perhaps what should not!) be done.

Scaling New Heights

The pitch‑manipulation Smart Controls combine to make VariAudio a powerful tool for corrective and creative pitch editing, particularly if you learn to make best use of the Tilt/Rotate Anchor Point and the two Set Range For Straighten Pitch Curve controls; these allow you to finesse exactly which portions of the overall pitch curve your edits will be applied to. But in Cubase 12, VariAudio has been treated to the Scale Assistant system, which was previously only available in the MIDI Key Editor.

Providing you know the key/scale of your project, the new Scale Assistant features within VariAudio – and the option to colour‑code the Segments by Scale/Chords – makes both corrective and creative pitch editing straightforward whatever your level of music theory.Providing you know the key/scale of your project, the new Scale Assistant features within VariAudio – and the option to colour‑code the Segments by Scale/Chords – makes both corrective and creative pitch editing straightforward whatever your level of music theory.

The Scale Assistant won’t impact on your more detailed pitch‑curve edits, but when you’re editing the pitch of a whole Segment (manually, or via Snap or Quantize) you can now force those pitch changes to use only notes within a specific scale. You can configure this using the new Scale Assistant sub‑panel, where you can specify a scale or opt to follow the Chord Track. A couple of visual options can be enabled but perhaps the most useful is to select the Scale/Chords option in VariAudio’s Segment Colors drop‑down menu: Segments are colour‑coded (by default: grey in key, red out of key) so that anything initially lying out of key is really easy to spot. And if you enable Snap Pitch Editing in the Scale Assistant sub‑panel, when you move the pitch of any Segment only ‘in key’ notes are permitted. This combination makes pitch correcting your vocal parts quicker and, should you have a less‑than‑strong grasp of music theory, easier.

Scale Assistant isn’t useful only for pitch correction, though. It also makes it easy to experiment with creative pitch editing. For example, if you wish to re‑write the melody ‘after the fact’, you can explore moving Segments to different pitches, knowing that they’ll only snap to ‘in key’ notes. This can be a lot of fun to try and, while the results are obviously genre‑ and material‑dependent, it’s often surprising what you can get away with. Two things are worth noting. First, breaking a long Segment into multiple shorter Segments provides plenty more options for re‑working a melody. Second, I find that pitch‑shifting artefacts are often most easily noticed during the transitions between Segments. Adjustments to the pitch curve slope within the transition can improve the flow, and you can often achieve that by making slight timing changes to the Segments involved using the Warp Start and Warp End Smart Controls.

Ready, Steady, Mix

Cubase has various other options for making edits and polishing your vocal recordings, but sometimes it’s helpful to do as much as you can in one place — and VariAudio is an impressively flexible one‑stop shop for both corrective and creative editing. If this approach appeals to you, be sure to use the VariAudio Bypass button to check the edited version against your original starting point and, when you are finished, execute the Flatten Real Time option from the VariAudio panel’s Function drop‑down menu (located at the base of the panel), since this will avoid any possibility of your careful volume, timing and pitch edits getting accidentally lost. With that done, hopefully, your vocals will be ready for the typical mix processing that will make them the star of the show. 


Published September 2022

Monday, December 25, 2023

Cubase: Creating Vocal Doubles & Harmonies

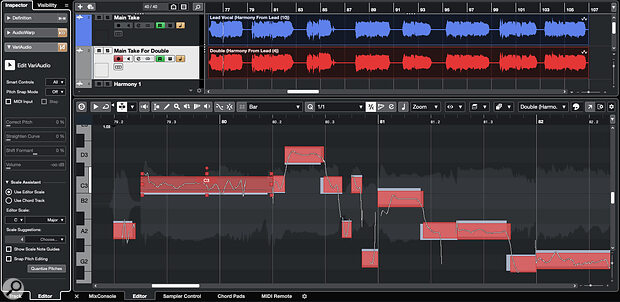
It’s really easy to see the minor pitch differences between the lead and double vocal Segments: the red ones are those currently being edited.It’s really easy to see the minor pitch differences between the lead and double vocal Segments: the red ones are those currently being edited.

Want to generate vocal doubles or harmonies based on a lead vocal? Cubase 12 has all the tools you will need.

Doubles and harmonies can add considerable impact to your vocal parts. For the best results you should really be recording those parts, but that’s not always possible. Usefully, then, if all you have to work with is a main lead vocal, Cubase can come to the rescue. In fact, if you make use of several different elements in its feature set, including some that arrived with Cubase 12, it’s possible for Pro and Artist users to create some pretty convincing doubled or harmony vocal parts. And even for those who want to sing harmony parts in, generating them in this way can provide a useful guide track.

Doubling Up

The first step is to create a copy of the original lead vocal audio clip and convert this to a ‘real copy’ (Edit / Functions / Convert To Real Copy) — the idea is that you can make edits to this copy without impacting on the original. To fabricate a double‑tracked vocal from this copy, you need to make changes to its pitch and timing.

For a quick and easy method, two steps might be all that’s required. First, ensure that AudioWarp quantise is enabled, select the vocal double audio clip and simply apply a 1/16th or 1/32nd note quantise. Second, open the copied vocal clip in the Sample Editor and go to the VariAudio panel. After Cubase has analysed your audio, select all the pitch Segments and then apply some global pitch changes using the Correct Pitch and Straighten Curve sliders. The combination of these timing and pitch changes should be enough to simulate a fairly tight ‘second take’ of the same performance.

However, manual edits to the time and pitch of the double‑track vocal, with the powerful VariAudio Smart Controls I described in last month’s workshop, offer much more flexibility, particularly in terms of how ‘tight’ the double is(n’t) to the original. If you prefer to work this way, a few specific VariAudio panel features are worth exploring.

First, a few menu settings need checking. Within the VariAudio panel, select the Show All Clips mode in the Display Mode drop‑down menu; the Edit Active Clip option in the Clip Editing Mode drop‑down; and the Event setting in the VariAudio Segment Colors drop‑down. Also, make sure you’ve chosen different colours for the original (lead) vocal clip and the copied (double) vocal clip in the Project window. You’ll almost certainly want your pitch editing to be fairly subtle for a double‑track effect, so it’s also useful to set Pitch Snap Mode to ‘off’ and to disable Snap Pitch Editing (both settings are in the leftmost VariAudio panel).

Then, open both the lead and double clips in the Sample Editor’s VariAudio panel, and select the double‑track audio clip in the Active Clip For Editing drop‑down. As soon as you start making edits to this clip’s Segments (in the screenshot, these are coloured red), you will gradually expose the Segments in the lead vocal clip (blue) in the background. This makes it incredibly easy to visualise the pitch and timing differences you’re creating between the two clips.

For timing, you can use the Warp End Smart Controls to adjust the relative start/end of each word and this can quickly inject some more ‘human realism’. For pitch changes, experiment with combinations of small vertical shifts of individual Segments as well as small edits with both the Straighten Pitch Curve and Pitch Tilt Smart Tools. Zoom in for a more detailed view as you make these sorts of edits. To get the best result, you need to make some sort of adjustment (pitch, pitch tilt, or timing) to every Segment in the double clip. Making such small changes across the complete performance does, of course, involve a fair amount of manual effort — but it’s worth it. The results can be very convincing.

Seeking Harmony

As with creating vocal doubles, Cubase Pro and Artist offer more than one way to generate harmony parts from a lead vocal. Providing you have a suitably populated Chord Track (the chord data is used as the basis for the harmonies), the easiest approach is to use the Generate Harmony Voices command (found in the Audio menu). All the dialogue box requires is that you select how many harmony parts you want (up to four). Once done, lower the volume of the generated harmony parts a few dB, apply a little pan, and perhaps nudge each track forwards/backwards a few milliseconds. As a starting point, try ±10‑20 ms using the Track Delay controls in the Inspector panel.

Provided you have a well‑stocked Chord Track, the Generate Harmony Voices feature can make a decent stab at a four‑part vocal harmony, and all with a single click!Provided you have a well‑stocked Chord Track, the Generate Harmony Voices feature can make a decent stab at a four‑part vocal harmony, and all with a single click!

Ta‑da! Job done. Well, sort of. But unless your Chord Track is packed full of interesting and frequent chord changes, the harmonies generated can sound somewhat static. They might work perfectly in some musical contexts but, if you want to create something with a little more harmonic interest, it’s time to go back to VariAudio.

For this approach, a good first step is simply to create a vocal double exactly as described above so, let’s assume that’s done and that you’ve made a further duplicate of the double, to provide the basis for your harmony editing. You should then open both the original lead vocal and (soon to become) harmony vocal clips in the Sample Editor’s VariAudio panel. As before, you should be able to see the Segments for both clips already offset slightly because of the pitch and timing edits added when creating the double.

Now for the fun part; as mentioned last month, Cubase 12 added Scale Assistant functionality for audio to the VariAudio panel. There’s some powerful stuff available here, but it requires you to (a) check a couple of VariAudio settings before beginning, and (b) to use your ears to judge just how harmonious your harmony actually sounds! In the VariAudio panel’s Scale Assistant section, ensure the Use Editor Scale option is activated, and select the correct key/scale combination. It’s also sensible to start with Pitch Snap Mode set to Relative (those small pitch shifts you made when creating the vocal double are therefore preserved for extra ‘human‑ness’) and ensure that Snap Pitch Editing is enabled.

The Scale Assistant, found in the Sample Editor, makes it very easy to experiment with new vocal harmonies.The Scale Assistant, found in the Sample Editor, makes it very easy to experiment with new vocal harmonies.

Select all the Segments in the harmony clip and drag them up or down, and the Scale Assistant will ensure they all stay ‘in key’ regardless of where you drag and drop them. In the screenshot example, I simply grabbed one of the selected Segments originally on a C note and moved it up to an E (four semitones). All the other selected Segments followed in an upwards direction. But, as they were forced to snap to the scale, they haven’t all moved four semitones because in some cases a four‑semitone shift would have resulted in an out‑of‑key note. For example, while a C generally becomes an E (a four‑semitone shift), a D may become an F (a three‑semitone shift), though note that the exact shift seems to vary according to the detail of the pitch curve within each Segment.

Cubase Pro 12 users can access the Free Warp feature when in the Project window.Cubase Pro 12 users can access the Free Warp feature when in the Project window.You can experiment with different global shifts and, for some melodies, this scale‑shifted harmony may be all you need — this is where your ears and ideas need to guide you. If you find some of the harmony notes simply don’t sound ‘right’ (for example, they might be notes that clash with the underlying chord), try shifting just those notes until you find a good fit. Indeed, feel free to get creative; harmonies that don’t always move parallel to the lead line can often be much more interesting and pleasing on the ear. Note that lowering the volume of the harmony part a dB or three can also help it sit better with the lead part. And if you notice any audio artefacts resulting from the pitch‑shifting, you can use your VariAudio skills from last month’s workshop to smooth things out with a little Smart Control pitch‑curve editing.

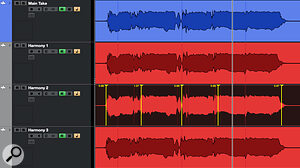
Having created one harmony part, simply repeat the process if you want a second or third. While the above method allows you to create harmonies at different pitches, you can add a further element of ‘human’ by making minor timing changes to each harmony line. This can be done by having all the harmony clips superimposed in the VariAudio panel and editing them one at a time, as described above. A new option exclusive to Cubase 12 Pro users is to make these timing adjustments using the Project window’s Free Warp tool. This has important applications beyond vocal editing but, as shown in the final screen, when adding small timing variations to our various harmony parts, it has the advantage of letting you see more easily what timing differences you’re creating between the various parts while you’re editing.

Hand Made By Machines

If you want to hear these approaches in action, check out the audio examples on the SOS website (https://sosm.ag/cubase-1022). OK, so the artificially generated double or harmony parts you craft using these approaches might not be on a par with those sung by a well‑trained singer. But, dropped into your arrangement in a suitably subtle fashion, they can certainly lend your productions a little more vocal impact. 


Published October 2022

Friday, December 22, 2023

Using MIDI Remote In Cubase 12

For every plug‑in window in Cubase 12, a dedicated Quick Control configuration panel can be opened.For every plug‑in window in Cubase 12, a dedicated Quick Control configuration panel can be opened.

Cubase 12’s new MIDI Remote features make it easier than ever to get hands‑on with your plug‑in effects and virtual instruments.

One of the most significant features introduced in all editions of Cubase 12 was the new MIDI Remote system. It’s intended to replace Cubase’s long‑standing Generic Remote system (for backwards compatibility, of course, that ‘legacy’ system remains) and makes it incredibly easy to configure almost any MIDI controller to work with Cubase. Let’s explore the possibilities.

Around & Around

A new Focus Quick Control (FQC) system provides similar functionality to the older Quick Controls (discussed way back in SOS July 2009), but Quick Controls were separate from Generic Remote — the FQCs are incorporated within the new, much slicker, MIDI Remote system. Any hardware controller which includes at least eight endless rotary controllers is a perfect candidate for assigning to this FQC system, and for the examples I’ll assume this is what we’re working with: an eight‑knob MIDI controller.

In this example, I’ve positioned the virtual encoders in two rows of four to reflect the layout of my hardware controller.In this example, I’ve positioned the virtual encoders in two rows of four to reflect the layout of my hardware controller.

Setting up a MIDI Remote and FQC combination system involves two main stages: each plug‑in has FQC slots and these must be mapped to the parameters in that plug‑in you wish to control; and, using Cubase’s MIDI Remote editing system, you must link your hardware MIDI encoders to the FQC system. You can configure these stages in either order, but I’ll take them in the order I’ve just listed them, because the first stage quickly demonstrates why doing the second is such a no‑brainer!

As before, every plug‑in, whether a bundled or third‑party one, has eight Quick Control slots available. For many plug‑ins, these will have key parameters pre‑assigned; click on the QC button (at the top‑right of every plug‑in window) and a Quick Control panel will display the current assignments. To edit/add a new assignment, simply click on the L button (Learn, far left), select the QC slot you wish to edit, and adjust a control somewhere in the plug‑in’s UI. In this instance of the plug‑in, that control will then be linked to the selected QC slot. That’s stage one done: so simple!

Remote Working

Now to link the hardware controls to Cubase’s FQC system. This takes more effort but, once configured, your hands‑on control of the FQC system should work in all Cubase projects. The configuration is performed in the MIDI Remote tab, in the Project window’s Lower Zone. Cubase already includes scripts for some popular keyboard controllers and if Cubase recognises your device you may be able to skip much of what follows. But let’s assume no such script exists, and you have to start from scratch.

As each control is moved, a new virtual knob will be added to the MIDI Controller Surface Editor window automatically, complete with the necessary connections.

Click on the large plus (‘+’) button to add a new controller to the system, then enter a suitable name/label and specify the MIDI ports associated with the hardware device. With that done, click the Create MIDI Controller Surface button — the MIDI Controller Surface Editor panel will appear, and this lets you lay out a virtual combination of rotary knobs, faders and buttons. To add the controller’s eight rotary knobs, all you need to do is select the Knob option (from the list at the left), and move each hardware knob in turn. As each control is moved, a new virtual knob will be added to the MIDI Controller Surface Editor window automatically, complete with the necessary connections (MIDI channel, MIDI CC number, and so on), and you can then move, re‑size or delete the virtual knobs as desired. While the virtual positioning of the controls isn’t critical (you’ll be using the hardware controls not the software ones, after all), a layout that approximates that of the hardware will make it easier to keep track later.

Having linked the hardware knobs to their MIDI Remote virtual representations, we can move on to the final step: mapping the virtual knobs to controls/parameters in Cubase. In this example, we want to map them to the Focus Quick Controls, so click the Go To Mapping Assistant button at the bottom‑right of the MIDI Controller Surface Editor window and two things will happen: in the MIDI Remote window, you’ll be presented with a different view of your virtual control surface; and the MIDI Remote Mapping Assistant window will open. Any configuration you do in the latter will be reflected in the former.

The button at the top‑right of the MIDI Remote Mapping Assistant window pops open a Functions Browser panel, which provides easy access to a list of Cubase commands for linking to the virtual hardware controls. In the screenshot, within that panel, I’ve popped open the Focus Quick Controls options. Linking one of the virtual knobs to any of the available options in the Functions Browser is simple: just select the virtual knob in the central portion of the MIDI Remote Mapping Assistant window and select the target parameter in the Functions Browser. Both selections will be displayed in the Mapping Assistant window’s top panel. Click the Apply Mapping button, and the link is established — repeat as required for the other controls (in our example, just linking our eight knobs to the eight FQCs) and that’s job done.

The Mapping Assistant and Functions Browser make it easy to link your hardware controls to specific parameters.The Mapping Assistant and Functions Browser make it easy to link your hardware controls to specific parameters.

Fine‑tuning

A couple more things are worth noting. First, a more detailed list of each configured link can be found in the Mapping Assistant window’s Mappings section. Second, at the base of the Mapping Assistant window, a Mapping Configuration panel allows you to fine‑tune the behaviour of the target parameter in response to movements of its associated physical control. There are a number of interesting possibilities, and two in particular are worth highlighting.

First, the large ‘G’ in the screenshot indicates that the currently selected mapping is Global, which means it will apply to all Cubase projects (this is the best choice for our FQC needs). The alternative setting is Project, which, as the name implies, means the mapping applies only to the current project. It’s useful to be able to specify this. Second, the Value Mod option is set by default to Jump. Other options include Pickup, Scale and Toggle, and these can be useful when configuring things like faders or old‑school pots (ie. non‑continuous rotary encoders), where the current position of the hardware control won’t necessarily reflect the position of a Cubase parameter to which it’s mapped. For the endless rotary encoder knobs in our FQC example, the Jump setting works just fine.

Exert Control

Having made all the required connections, once you’ve closed the MIDI Remote Mapping Assistant window those connections become active — you should now have hands‑on control of the eight FQC parameters in the currently active/in‑focus plug‑in. Switch to a different plug‑in, and your hardware controls should follow your selection automatically. If, at least initially, you leave the new QC panel open at the top of your plug‑in windows, you’ll have an easy reminder of which parameters your controller is tweaking.

You can specify whether the Focus Quick Controls will influence only tracks, only plug‑ins, or both.You can specify whether the Focus Quick Controls will influence only tracks, only plug‑ins, or both.One further setting is worth noting. In the Quick Control Focus section of the MIDI Remote window’s Toolbar, the Settings cog lets you choose between three ‘focus’ options. For our example, the default Track and Plug‑in Window Focus or Plug‑in Window Focus Only settings will work. The former allows your carefully crafted FQC mappings to work with both track‑based Quick Controls as well as with any plug‑in FQCs (it will control whichever item is currently selected, or in focus), while the latter provides FQC only for plug‑ins. The second option can be really useful while you adapt your workflow to take advantage of FQCs — it prevents inadvertent tweaks to track settings when you’re trying to change a reverb or synth parameter!

There is plenty more potential to explore in the MIDI Remote system, particularly in terms of controlling the MixConsole. But, as a starting point, the Focus Quick Controls are easy to configure yet could bring tremendous benefits in every Cubase session. Getting hands‑on control of Cubase has never been easier!


Published November 2022

Wednesday, December 20, 2023

Cubase: Stranger Things Synths With Retrologue 2

Retrologue’s oscillator and filter options provide plenty of scope for creating analogue‑style lead sounds.Retrologue’s oscillator and filter options provide plenty of scope for creating analogue‑style lead sounds.

Create retro sci‑fi soundtracks with Cubase’s Retrologue 2.

The use of songs by Metallica and Kate Bush may well have stolen the musical headlines for season 3 of Stranger Things, but the underlying synth‑based score remains hugely important to the show’s iconic retro sci‑fi ’80s vibe. In our March 2017 interview, composers Kyle Dixon and Michael Stein explained the influence of the likes of Jean‑Michel Jarre, Vangelis, Tangerine Dream, John Carpenter and Giorgio Moroder, and how the pair made use of their impressive collection of (mainly vintage) analogue synths.

For these sorts of sounds, it makes sense to start with the sine, saw or square oscillator waveforms typically used in vintage hardware synths.

If the idea of creating a similar sound in software appeals, the Retrologue 2 synth bundled with Cubase Pro and Artist (it can be bought separately too) can get you pretty close. For these sorts of sounds, it makes sense to start with the sine, saw or square oscillator waveforms typically used in vintage hardware synths, but that 2017 interview offered some other helpful pointers. These include: not being afraid to let the mix get a bit ‘murky’; using low cutoff frequencies (particularly for bass sounds) so things don’t get too ‘growly’; using EQ to keep high‑end fizz at bay; keeping filter resonance modest; using analogue‑style delay to add texture; and detuning notes to provide an unsettling or random dimension.

The score uses synth sounds in various roles, but in this workshop we’ll explore three prominent examples: arpeggiated leads, evolving pads and dark bass tones.

Repeat After Me

The first screen is a good, simple starting point for the kind of arpeggiated lead used in the Stranger Things theme tune. A pair of oscillators, both based on single saw waves, are set an octave apart for a slightly fatter sound. In the Voice panel, Mono mode is switched on and a very short Glide time provides a slight sense of pitch‑sliding between notes. In the Main section, the most important thing is a very low (not zero) Rnd Pitch setting, giving the pitch of each note a very small random offset.

Retrologue’s arpeggiator page makes those Stranger Things melodic lines easy to experiment with.Retrologue’s arpeggiator page makes those Stranger Things melodic lines easy to experiment with.

In the Filter section, note the low values of the 12dB/octave low‑pass filter’s Resonance and Cutoff. The Filter envelope is given only a modest amount of velocity response (as is the Amplifier envelope; lots of old‑school analogue synths didn’t have velocity sensitivity), and a touch of tube‑like distortion adds a little ‘warmth’.

The only entry in the modulation Matrix provides very subtle mod‑wheel control over the filter cutoff, so that you can gently open the filter for a brighter sound. In the Quick Control panel (at the top of the UI), I’ve linked the Master Volume control to my first QC slot, making it easy to add volume changes in real time or via automation. It’s not shown in the screen, but I also added a subtle touch of chorus in the Mod FX section, and then a quarter‑note ping‑pong delay with the High Frequency Damp set at its lowest value (1000Hz) for more of an ‘analogue tape’ effect. In the EQ section, you could opt for a high‑end shelving EQ here if you wanted to remove even more top end.

The next screen shows the Arpeggiator panel with a 16‑step note pattern and 16th‑note intervals. It’s similar to the pattern used in the Stranger Things theme tune — so be sure to create enough melodic or timing differences to make it original! I’ve not used any MIDI velocity variations or other controller patterns here.

Prime targets for further experimentation include the oscillator settings, using Multi waveforms (found in the Type drop‑down, these effectively turn a single oscillator into multiple oscillators, with the option to gently detune them for a fatter sound), and ring modulation. All these possibilities can help you create useful variations.

Theory Of Evolution

With the mod wheel set to modulate multiple parameters, you can give your pads plenty of sonic movement in real time.With the mod wheel set to modulate multiple parameters, you can give your pads plenty of sonic movement in real time.

The third screenshot shows the Retrologue configuration for a suitably analogue‑esque evolving pad, and a few differences between this and the lead sound are worth highlighting. First, I selected Poly mode in the Voice section to allow chords to be played. While I’ve again used two sawtooth waveforms, both osc 1 and osc 2 use more complex types (Cross and Multi), given their somewhat fuller/fatter basic tone. The sub oscillator has also been enabled to blend in a little extra low end. As with the lead sound, a low cutoff has been set using a 12dB/octave low‑pass filter type with no resonance applied, and a little tube‑based distortion added for extra warmth.

In the Matrix, a key difference is that the mod wheel is somewhat busier, acting as a ‘macro’ control by targeting multiple parameters, including adding a hint of detune to osc 2. The mod wheel therefore allows you to change the timbre of the sound in real time to add a sense of movement. The Arpeggiator is disabled while, in the FX section, I added a small amount (the Mix value is set at 25%) of quarter‑note ping‑pong delay. However, I’ve also added a gentle chorus in the Mod FX panel, with a slow Rate, shallow Depth (around 1), Feedback set to 10% and Mix to 50%; this adds some gentle movement and width.

If you want to get more experimental or aggressive, try introducing a square wave in osc 3 and experimenting with the Shape control, or engage the Ring Mod option in the Oscillator Mix section. Beyond that, move to the effects section and explore some of the ‘modulated’ presets for the Resonator; there are some cool starting points for creating sweeping sounds amongst these.

Heartbeat Bass

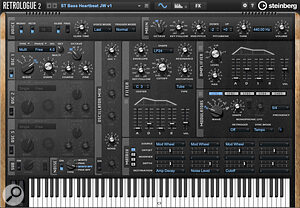
A simple combination of a square‑wave oscillator and some noise, with zero sustain, provides a bass sound that can also be used to add a rhythmic element.A simple combination of a square‑wave oscillator and some noise, with zero sustain, provides a bass sound that can also be used to add a rhythmic element.

If required, this pad sound can supply plenty of low end so, for my ‘bass’ sound, I decided to go for something that also offered a percussive element. The final screenshot shows the basic Retrologue configuration. This patch uses a single, square‑tooth‑based oscillator, although the type is set to Multi for a fatter sound and the Noise oscillator has been blended in for a bit of extra character. Again, a relatively low cutoff frequency has been chosen for the filter, with zero resonance and some tube distortion added. In the Amplifier panel, a fast Attack and zero Sustain setting has been used, providing a short percussive feel to the sound when played. In the Matrix section, the mod wheel is again serving as a macro control, changing the Amp Decay, Noise level and filter Cutoff.

The final element is within Retrologue 2’s FX section, where a ping‑pong delay has been set to 1/4D (dotted), along with 50% Mix and high Feedback (around 6) settings, to give multiple repeats — because these are dotted, they’ll provide a nice rhythmic contrast to the straight 16th‑note rhythm of the arpeggiated lead sound.

When it’s played at MIDI notes below C3 (note the Octave setting for osc 1), you’ll find that the sound seems to have very little pitch information, and provides more of a heartbeat‑style effect. But if played around C4 or above, the pitched element in the sound becomes much more obvious, allowing you to play a more conventional melodic bass line. As an additional option, you can add a second oscillator, based on a sine waveform and with Type set to Multi. This will fatten the bass further, as well as giving it a more obvious pitch over its full range.

One I Created Earlier

Does Retrologue supply the same degree of undeniable cool or compositional inspiration you might experience when working in a room full of classic analogue synths? Er... no! But neither does it come with the same price tag, maintenance costs, or space requirements. More important is how these Retrologue‑based patches actually sound. You can easily recreate what I’ve done, but if you just want a quick audition, check out the audio examples on the SOS website. These include a short example ‘cue’ that I created using these patches, and as with any sounds, you can feel free to massage them further with all sorts of EQ, compression and cool‑sounding effects. Retro sounds with Retrologue? Stranger things have happened...  


Published December 2022