 Cubase iC Pro: touchscreen remote control of Cubase (Mac & PC) from an iOS device.
Steinberg’s dedicated app can turn your iPad into a fine control surface for Cubase.
Touchscreen controllers offer a versatile alternative to conventional DAW control surfaces. There are both pros and cons but the potential is obvious. If you happen to have access to an iPad (or iPhone) then, whether you run Cubase on a Windows or OS X platform, Steinberg’s iOS-only Cubase iC Pro app ($16.99) provides a very creditable option. And, as the app has recently been updated (v.1.2.1 was released in July) to support some of the newer Cubase 8.5 features, maybe it’s time to explore your touchy-feely side?
Appy Days
Essentially, Cubase iC Pro provides a touchscreen remote control surface for Cubase. It includes virtual faders, record enable, mute/solo and automation read/write buttons, project navigation, transport controls and access to the key-command system. The app requires an Apple device capable of running iOS 7.0 or later and will support Cubase versions from v6 upwards.
Communication between the app and Cubase is wireless, and just requires your computer and iOS device to be on the same Wi-Fi network. This is undoubtedly one of the big benefits of using the app and, if your studio workflow means that you are sometimes both the engineer and the performing artist, being able to trigger recording and playback while sat in front of your instrument (rather than your computer) makes life a heck of a lot easier.
As well as installing the app on your iOS hardware, you also need to download and install the (free) Steinberg SKI Remote extension for your desktop system from the Steinberg web site. Once installed, this is activated via the Device Setup window from the Devices menu, by clicking on the ‘+’ icon to add a new device and then simply selecting the Steinberg SKI Remote from the pop-up list that appears. The authentication or password options can be ignored unless you work in an environment with multiple Cubase systems active. The SKI Remote extension is a free download from Steinberg’s web site.
With the SKI extension installed, and Cubase itself running, the first launch of the app should give you an initial prompt for iC Pro to connect to your computer. Subsequent launches ought to make a connection automatically but if you do get stuck, iC Pro has some built-in help to guide you through the process.
Incidentally, although the current version of iC Pro is iOS-only, Steinberg used to offer an Android version. This is still available as a public beta (it’s compatible with Android 5 operating systems) but, while this will still function with the right Android hardware/software combination, development is no longer active and it doesn’t support some of the newer features available in the iOS version.
Control Freak
The control features offered by iC Pro are divided into three ‘panels’; the Project (timeline), MixConsole and Key Commands panels. On the iPhone, you can see one of these panels at any one time as well as a pop-up transport panel. However, on an iPad, you get to see two panels (there are four different combinations available, accessed via the buttons located bottom-left), song position/tempo information, and transport controls, all at the same time.
The Project view provides a neat overview of your project timeline. You can use standard iOS touchscreen gestures to swipe left/right to move the cursor position (although, actually, the cursor stays fixed and the project scrolls behind it) and you can also pinch/stretch to zoom in/out along the horizontal (although not vertical; that’s fixed) axis.
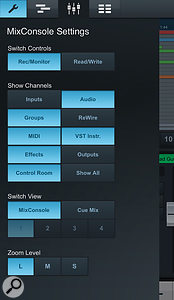
Cubase iC Pro also gives you access to, and the option to create, Markers or Cycle Markers (loop regions) in your project. This combination of scrolling, markers and transport controls makes it very easy to navigate around your project and, whether you are sat right in front of your computer, or on the other side of the room about to record a take, once you have trained yourself to reach for the touchscreen rather than the mouse, it is both simple and slick in use. The MixConsole Settings screen allows you to configure the mixer controls, including channel types and cue mix faders.
Console Yourself
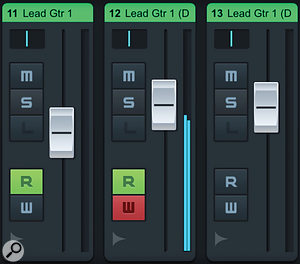
The MixConsole Settings page offers a number of ways to configure this panel. For example, three different zoom resolutions each provide access to different fader strip features. In ‘large’ mode you see eight faders on screen at any one time with track labels, chunky faders, level indicators, pan, mute and solo buttons. In this view you can also switch between seeing Record Enable or automation Read/Write buttons. If you opt for ‘medium’ view, then you get to see more faders but fewer controls per channel, abbreviated channel names, level meters and faders only. If you go for the ‘small’ view then you can see even more channels but you only see the level indicators; this view is “for information only”.
Swiping left/right allows you to scroll across the full range of your MixConsole channels. However, as with the MixConsole on the desktop, within the Settings screen, you can toggle on/off the display of specific channel types. And since the July update, this includes VCA faders.
There are a couple of further observations worth making. First, touchscreen faders are never going to be as tactile as physical faders. However, at both the large and medium zoom level, the faders are most certainly very usable and, as you can also enable automation when in large view, this is a very handy means of creating your initial mix moves.
Second, as regular iOS users will know, the touchscreen supports multi-touch functionality; provided your fingers are agile enough this is a system on which you can move multiple faders at the same time. For mixing tasks that’s potentially a big plus over using a mouse to adjust faders in the desktop MixConsole window. You can toggle between Record Enable buttons or automation Read/Write buttons (shown here) in the MixConsole.
Push The Button
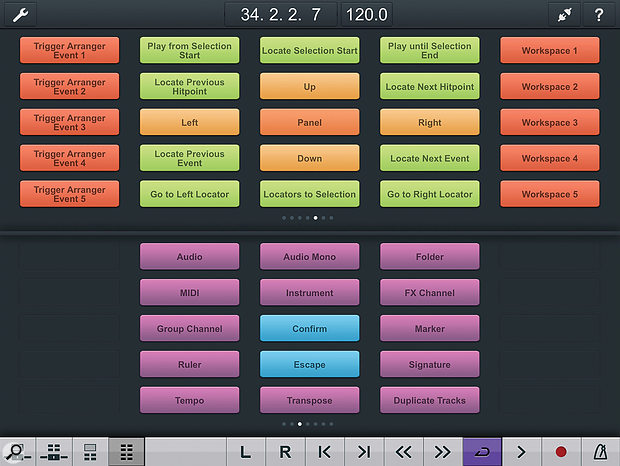
The Cubase key-commands system is something we’ve extolled the virtues of before (see SOS January 2012’s column). It’s a very powerful means of streamlining your workflow, but it does have one obvious issue: to get the best from it, you have to memorise the keyboard shortcuts themselves. Thankfully, the Key Commands panel of iC Pro not only presents you with a dedicated, fully editable set of your favourite key commands, but it also allows you to colour-code and label them. Yay — no more memory tests!
The app allows you to define up to 200 such key commands. These are organised into eight sub-panels of 25 and you can swipe left/right to move between them. And, if you pick the ‘Dual Key Command’ panel layout, you have your favourite 50 key commands all instantly available. Each slot is easily editable via the Settings screen.
 iC Pro allows you to see either one or two sets of 25 key commands at the same time, all labelled and colour-coded for ease of use.
It Takes Two!
There is one other significant feature of iC Pro to mention: it allows multiple iOS devices to connect to Cubase at the same time. This is particularly useful in two contexts. The first is pretty obvious; if you happen to have two iPads (perhaps of various generations if you have upgraded, or if your bandmate has one too), then you can use them simultaneously. An obvious configuration would be one iC Pro instance showing the MixConsole/Project panels and the other showing dual Key Commands panels.
However, the other feature of iC Pro’s MixConsole support is that, if you’re using Cubase Pro, it also caters for the Control Room’s Cue Mix system. The Settings page allows you to switch the view between the MixConsole and any of the four available cue mixes. If your musicians are being fed a cue mix to their headphones, providing they have access to the Wi-Fi network and an iPad or iPhone, they can configure their own cue mix directly from the touchscreen without having a back and forth dialogue with the engineer sitting in front of the computer; very neat indeed.
Cheap At Twice The Price?
Having used Cubase iC Pro for a couple of years, it’s become a highly valued part of my personal Cubase workflow. While there are some great external controller systems out there (including dedicated touchscreen systems), and although I’m always hopeful, as yet I’ve not quite found something that seems to offer (a) a perfect fit to my personal workflow preferences or (b) is within my personal budget. And, with iC Pro now so familiar, maybe I never will?
I’m not sure I’d go so far as to say I’d buy an iPad solely to run iC Pro (there are some other music apps that I might put in that category!), but if you happen to own an iPad then iC Pro is more than worthy of its price tag.
Published October 2016
No comments:
Post a Comment