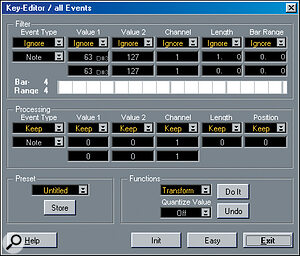
 Screen 1: The Logical Edit window in Easy Mode.
Continuing his in‑depth explanation of the Logical Edit functions of Cubase in Easy Mode, Paul Sellars looks this month at the role of the Processing stage settings, in conjunction with the Filter and Functions operations, before moving on to the greater complexities of Expert mode... This is the last article in a two‑part series.
Last month we looked at Logical Edit in Easy Mode (see Screen 1, below), concentrating primarily on the Filter and Functions settings in the top and bottom rows of the window. You'll remember that the settings in the Filter section control which kinds of MIDI events are allowed to pass through the filter and thus be affected by edits. The Functions section provides a choice of basic editing functions, including Quantize, Extract, Copy, Delete and Select.
Having explained Filters and Functions, it's time to look at the Processing settings, which occupy the middle row of the Logical Edit window. These allow us to change and manipulate the MIDI data that passes through the Filter in a number of other ways, before passing it on to the Functions stage as before.
The layout of the Processing stage is very similar to that of the Filter stage, although it uses different Operators. As with the Filter stage, the first column is labelled Event Type and contains two drop‑down menus. However, whereas in the Filter stage the uppermost menu offered a choice between Ignore, Equal and Unequal Operators (allowing us to either edit all MIDI data in a Part or Track, or filter certain events out according to their type), in the Processing stage the uppermost menu offers a choice between just two Operators: Keep and Fix.
Very simply, when the uppermost menu is set to Keep, the type of the various MIDI events passing through the Filter is unaffected. When Fix is selected, all MIDI events passing the Filter are changed into events of the type selected in the lower drop‑down menu in the Event Type column — the options are Note, Poly‑Press, Control Change, Program Change, Aftertouch and Pitch‑Bend.
Screen 2, therefore, shows how you could set Logical Edit (in Easy Mode) to take all note events with a velocity (Value 2) of less than 115 and transform them into pitch‑bend messages. Notice that the Value 1 and Value 2 columns in the Processing stage are set to their default, Keep. This means that, although they are Transformed into pitch‑bend messages, the original events keep the same numeric values for Value 1 and Value 2. Thus a note with a pitch of C3 (MIDI note number 60) and a velocity of 100 is transformed into a pitch‑bend message with a fine bend value of 60 and a coarse bend value of 100 (see Table 1 for a reminder of what Value 1 and Value 2 mean in the context of different event types).
Smooth Operators
 Screen 8: The scale in Screen 7 transformed using the edits shown in Screen 6.
 Screen 2: Transforming notes into pitch‑bend messages, retaining the velocity and pitch information as the coarse and fine pitch‑bend amounts.
In the Processing stage, the Value 1 and Value 2 columns can be set to any of the following Operators:
Screen 3 shows how Value 1 and Value 2 Operators might be used in the Processing stage. Notes with a pitch of C3 and a velocity of 127 are allowed through the filter, and are fixed as Controller messages. In the Value 1 column, 59 is subtracted from 60 (the original note number) to yield Controller number 1 (Modulation). In the Value 2 column, values of 127 (the original note velocity) are changed to 50. Thus, all instances of a middle C with a velocity of 127 are converted to Controller messages with a value of 50.
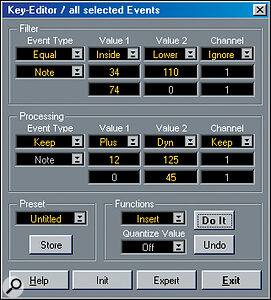
In Screen 4, all notes between A#0 and D4 (note numbers 34 to 74) with a velocity of less than 110 are transposed up an octave (plus 12 in the Value 1 column of the Processing stage) and have their velocities gradually faded out (a ramp from 125 to 45). This example also uses the Insert option on the Functions menu, which causes the filtered notes to be copied (not cut), processed and pasted back into the selected Part. This has the effect of adding a kind of harmony to the filtered notes.
Expert Mode
 Screen 3: Fix allows you to set the data coming through the filter to any value of your choice. Here, the notes allowed through are fixed as modulation controller messages.
Having more or less got the hang of the basics of Logical Edit, it's now time to complicate matters by switching from Easy to Expert Mode. Press the Expert button and the Logical Edit window is redrawn to include two extra columns (labelled Length and Bar Range in the Filter stage, and Length and Position in the Processing stage) plus a graphical strip, which is also labelled Bar Range — see Screen 5.
In the Filter stage, the new columns work as follows:
In the Processing stage, the Expert options are very similar:
In Expert Mode, the drop‑down menus in the Processing stage also feature a few new Operators, including Inverse (which inverts values so that higher numbers become lower numbers, and vice versa), ScaleMap (which is similar to Scale Correction — see Martin Walker's Cubase Notes in SOS November 2000) and Flip (which "inverts notes around an event which is set as the centre axis").
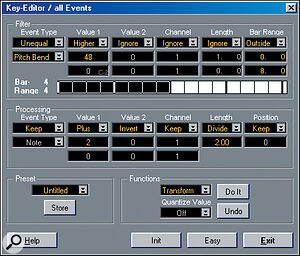
So, in our final example (see Screen 6), all incoming MIDI events which are not pitch‑bend messages, which have a Value 1 value greater than 48, and which occur after (Outside of) the first half of the bar, are allowed through the filter. In the Processing stage, 2 is added to the Value 1 value of the filtered events, while Value 2 values are inverted and their lengths halved.
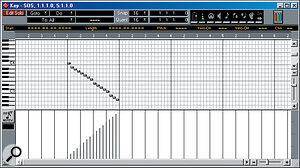
Screens 7 and 8 illustrate what effect these edits might have on a Part. In Screen 7 you can see a Key Edits‑eye view of a chromatic scale descending in 16th notes from C4, with note velocities fading‑in throughout the length of the bar. In Figure 8 you can see what effect the Logical Edit described above has had: the incoming note events (which, of course, are not pitch‑bend messages) occurring after the first half of the bar have been transposed up a tone (Value 1, plus 2) and have been shortened from 16th to 32nd notes. Notice also that the note velocities in the second half of the bar have been inverted, and now fade out rather than continuing to fade in.
A full description of what you can do with Logical Edit would take many, many articles, however, I hope this introduction will have encouraged you to experiment with it and discover some new tricks and effects of your own. In my experience, the results can range from the useful, to the surprising, to the inspiringly bizarre! Enjoy.
Stick With The Atari?
 Screen 5: Expert Mode adds two extra columns and a graphical interface to the Logical Edit window.
Many budget‑conscious home studio owners will still be running a version of Cubase on their trusty Atari ST, but may have plans to upgrade to VST on a Mac or PC. If you are in this position, ask yourself the following question: do you really need VST? If, like lots of sequenced music these days, your tracks tend to be constructed out of various looped and repeated sections, and do not require you to record extended live vocal or instrumental takes, you really might not need audio tracks at all. Few home studios are without some kind of sampler nowadays and, with sufficient sample RAM, it is quite possible to fly‑in hooks and choruses by triggering samples via MIDI. As far as MIDI sequencing is concerned, there is practically no difference between the capabilities of Cubase 3.1 on an Atari 1040ST and Cubase VST 5.0 on a G4 Mac. So, rather than upgrading to a perhaps unnecessarily powerful new computer, why not consider spending the money upgrading your studio with a new synth, effects unit, or monitors?
 Screen 4: Dyn can be used to generate a 'ramp' of, for instance, steadily increasing or decreasing velocities across a selected Part.
| Event Type | Value 1 | Value 2 |
| Note | Pitch (Note number) | >Velocity |
| Poly‑Press | Pitch (Note number) | Amount of pressure |
| CtrlChange | Controller number | Amount of change |
| ProgChange | Program number | (Not applicable) |
| Aftertouch | Amount of pressure | (Not applicable) |
| Pitch‑Bend | Fine bend value | Coarse bend value |
More Mix Power
 Screen 6: The Bar Range options in Expert Mode allow you to filter (and hence process) only data that occurs in a selected area of each bar — here, for example, in the second half.
Here's a tip for those who are using Cubase VST to record and mix audio. We've all had the dreaded Over light come on in the CPU performance meter when trying to do a complex mix within VST, leading to pops, clicks and often long periods of silence. When you write a final mix to a stereo file on your hard drive using the Export Audio command, however, Cubase carries out its calculations offline — so it's still possible to record a mix that is more complex than your CPU can handle in real time, provided you're not trying to incorporate signals from external sources such as MIDI modules or rack effects units at mixdown. If, for instance, a processor‑hungry reverb plug‑in is driving your CPU power over the limit, you could try switching it off (but leaving the channel and group sends to it on), and substituting a more modest reverb such as the good old Wunderverb while you adjust the balances and automation. When you're satisfied with the levels and you're ready to write your mix to stereo, simply switch your quality reverb plug‑in back on in place of the Wunderverb. Even if your mix is now too demanding to play back in real time, Cubase VST will happily write it to hard disk — quality reverb, automation and all. Sam Inglis
Screen 7: A chromatic descending scale with
steadily ascending note velocities.
Published January 2001

No comments:
Post a Comment