Welcome to No Limit Sound Productions

Company Founded
2005
Overview

Our services include Sound Engineering, Audio Post-Production, System Upgrades and Equipment Consulting.
Mission
Our mission is to provide excellent quality and service to our customers. We do customized service.

Monday, February 28, 2022

Logic Edit Function, Part 2

By Paul Sellars

Screen 1: The Logical Edit window in Easy Mode.Screen 1: The Logical Edit window in Easy Mode.

Continuing his in‑depth explanation of the Logical Edit functions of Cubase in Easy Mode, Paul Sellars looks this month at the role of the Processing stage settings, in conjunction with the Filter and Functions operations, before moving on to the greater complexities of Expert mode... This is the last article in a two‑part series.

Last month we looked at Logical Edit in Easy Mode (see Screen 1, below), concentrating primarily on the Filter and Functions settings in the top and bottom rows of the window. You'll remember that the settings in the Filter section control which kinds of MIDI events are allowed to pass through the filter and thus be affected by edits. The Functions section provides a choice of basic editing functions, including Quantize, Extract, Copy, Delete and Select.

Having explained Filters and Functions, it's time to look at the Processing settings, which occupy the middle row of the Logical Edit window. These allow us to change and manipulate the MIDI data that passes through the Filter in a number of other ways, before passing it on to the Functions stage as before.

The layout of the Processing stage is very similar to that of the Filter stage, although it uses different Operators. As with the Filter stage, the first column is labelled Event Type and contains two drop‑down menus. However, whereas in the Filter stage the uppermost menu offered a choice between Ignore, Equal and Unequal Operators (allowing us to either edit all MIDI data in a Part or Track, or filter certain events out according to their type), in the Processing stage the uppermost menu offers a choice between just two Operators: Keep and Fix.

Very simply, when the uppermost menu is set to Keep, the type of the various MIDI events passing through the Filter is unaffected. When Fix is selected, all MIDI events passing the Filter are changed into events of the type selected in the lower drop‑down menu in the Event Type column — the options are Note, Poly‑Press, Control Change, Program Change, Aftertouch and Pitch‑Bend.

Screen 2, therefore, shows how you could set Logical Edit (in Easy Mode) to take all note events with a velocity (Value 2) of less than 115 and transform them into pitch‑bend messages. Notice that the Value 1 and Value 2 columns in the Processing stage are set to their default, Keep. This means that, although they are Transformed into pitch‑bend messages, the original events keep the same numeric values for Value 1 and Value 2. Thus a note with a pitch of C3 (MIDI note number 60) and a velocity of 100 is transformed into a pitch‑bend message with a fine bend value of 60 and a coarse bend value of 100 (see Table 1 for a reminder of what Value 1 and Value 2 mean in the context of different event types).

Smooth Operators

Screen 8: The scale in Screen 7 transformed using the edits shown in Screen 6.Screen 8: The scale in Screen 7 transformed using the edits shown in Screen 6.Screen 2: Transforming notes into pitch‑bend messages, retaining the velocity and pitch information as the coarse and fine pitch‑bend amounts.Screen 2: Transforming notes into pitch‑bend messages, retaining the velocity and pitch information as the coarse and fine pitch‑bend amounts.

In the Processing stage, the Value 1 and Value 2 columns can be set to any of the following Operators:

  • Keep, which leaves all numerical values unaffected.
  • Plus, which adds the number specified in the lower drop‑down menu to the values of the incoming MIDI messages. If the incoming messages are notes, then Plus used in the Value 1 column has the effect of transposing the pitch upwards, by the number of semitones specified in the lower field.
  • Minus, unsurprisingly, does the opposite of Plus; thus it could transpose a note down by the number of semitones specified in the Value 1 column.
  • Mul, like Plus and Minus, is another mathematical Operator. It multiplies incoming Values by the amount specified in the lower field.
  • Div is just like Mul, except it divides incoming Values by the amount specified.
  • Fix simply changes the Values of incoming messages to a number you specify.
  • Value 2 (in the Value 1 column) and Value 1 (in the Value 2 column) — if you set the Value 2 Operator in the Value 1 column, all filtered events will have their Value 2 values copied to their Value 1 values. For example, a note's velocity (Value 2) would be copied across to become its note number (Value 1), so a note with velocity 90, for instance, would be given the new pitch of F#5. The Value 2 Operator in the Value 1 column does the same thing in reverse.
  • Dyn is short for dynamic and can be used to create a continuous ramp between one value and another — for example, to fade out note velocities in order to create a delay or echo effect. The two fields below the drop‑down menus are used to set the start and end values of the ramp. Ramping is usually applied across the length of a selected Part.
  • Random can be set in either the Value 1 or Value 2 columns, and replaces the corresponding value of each incoming event with a randomly generated number.

Screen 3 shows how Value 1 and Value 2 Operators might be used in the Processing stage. Notes with a pitch of C3 and a velocity of 127 are allowed through the filter, and are fixed as Controller messages. In the Value 1 column, 59 is subtracted from 60 (the original note number) to yield Controller number 1 (Modulation). In the Value 2 column, values of 127 (the original note velocity) are changed to 50. Thus, all instances of a middle C with a velocity of 127 are converted to Controller messages with a value of 50.

In Screen 4, all notes between A#0 and D4 (note numbers 34 to 74) with a velocity of less than 110 are transposed up an octave (plus 12 in the Value 1 column of the Processing stage) and have their velocities gradually faded out (a ramp from 125 to 45). This example also uses the Insert option on the Functions menu, which causes the filtered notes to be copied (not cut), processed and pasted back into the selected Part. This has the effect of adding a kind of harmony to the filtered notes.

Expert Mode

Screen 3: Fix allows you to set the data coming through the filter to any value of your choice. Here, the notes allowed through are fixed as modulation controller messages.Screen 3: Fix allows you to set the data coming through the filter to any value of your choice. Here, the notes allowed through are fixed as modulation controller messages.

Having more or less got the hang of the basics of Logical Edit, it's now time to complicate matters by switching from Easy to Expert Mode. Press the Expert button and the Logical Edit window is redrawn to include two extra columns (labelled Length and Bar Range in the Filter stage, and Length and Position in the Processing stage) plus a graphical strip, which is also labelled Bar Range — see Screen 5.

In the Filter stage, the new columns work as follows:

  • Length can be used to filter notes according to (guess what?) their length. All the usual Operators (Ignore, Equal, Unequal, Higher, Lower, Inside and Outside) are available.
    • Bar Range can be used to filter notes according to their position in the bar or bars to be edited. Ranges can be typed in the two fields below the drop‑down menu, or by clicking and dragging within the graphical strip in the Filter stage.

In the Processing stage, the Expert options are very similar:

  • Length allows you to apply the standard processing Operators (Keep, Plus, Minus, Multiply, Divide and Fix) to note lengths.
    • Position can be used to alter an event's start position in the selected Part or Parts. As with Length in the Filter stage, positions are specified in ticks. A number of Operators are available, including Keep, Plus, Minus, Multiply and Divide.

In Expert Mode, the drop‑down menus in the Processing stage also feature a few new Operators, including Inverse (which inverts values so that higher numbers become lower numbers, and vice versa), ScaleMap (which is similar to Scale Correction — see Martin Walker's Cubase Notes in SOS November 2000) and Flip (which "inverts notes around an event which is set as the centre axis").

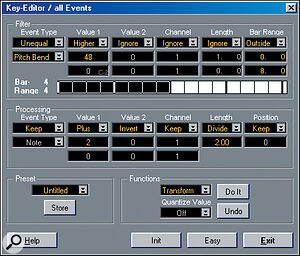
So, in our final example (see Screen 6), all incoming MIDI events which are not pitch‑bend messages, which have a Value 1 value greater than 48, and which occur after (Outside of) the first half of the bar, are allowed through the filter. In the Processing stage, 2 is added to the Value 1 value of the filtered events, while Value 2 values are inverted and their lengths halved.

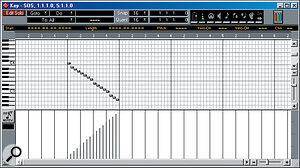
Screens 7 and 8 illustrate what effect these edits might have on a Part. In Screen 7 you can see a Key Edits‑eye view of a chromatic scale descending in 16th notes from C4, with note velocities fading‑in throughout the length of the bar. In Figure 8 you can see what effect the Logical Edit described above has had: the incoming note events (which, of course, are not pitch‑bend messages) occurring after the first half of the bar have been transposed up a tone (Value 1, plus 2) and have been shortened from 16th to 32nd notes. Notice also that the note velocities in the second half of the bar have been inverted, and now fade out rather than continuing to fade in.

A full description of what you can do with Logical Edit would take many, many articles, however, I hope this introduction will have encouraged you to experiment with it and discover some new tricks and effects of your own. In my experience, the results can range from the useful, to the surprising, to the inspiringly bizarre! Enjoy.

Stick With The Atari?
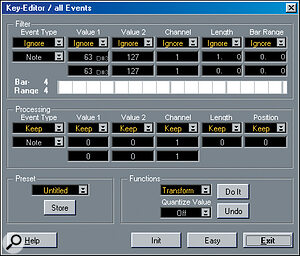
Screen 5: Expert Mode adds two extra columns and a graphical interface to the Logical Edit window.Screen 5: Expert Mode adds two extra columns and a graphical interface to the Logical Edit window.

Many budget‑conscious home studio owners will still be running a version of Cubase on their trusty Atari ST, but may have plans to upgrade to VST on a Mac or PC. If you are in this position, ask yourself the following question: do you really need VST? If, like lots of sequenced music these days, your tracks tend to be constructed out of various looped and repeated sections, and do not require you to record extended live vocal or instrumental takes, you really might not need audio tracks at all. Few home studios are without some kind of sampler nowadays and, with sufficient sample RAM, it is quite possible to fly‑in hooks and choruses by triggering samples via MIDI. As far as MIDI sequencing is concerned, there is practically no difference between the capabilities of Cubase 3.1 on an Atari 1040ST and Cubase VST 5.0 on a G4 Mac. So, rather than upgrading to a perhaps unnecessarily powerful new computer, why not consider spending the money upgrading your studio with a new synth, effects unit, or monitors?
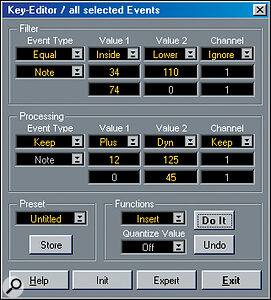
Screen 4: Dyn can be used to generate a 'ramp' of, for instance, steadily increasing or decreasing velocities across a selected Part.Screen 4: Dyn can be used to generate a 'ramp' of, for instance, steadily increasing or decreasing velocities across a selected Part.
Event TypeValue 1Value 2
NotePitch (Note number)>Velocity
Poly‑PressPitch (Note number)Amount of pressure
CtrlChangeController numberAmount of change
ProgChangeProgram number(Not applicable)
AftertouchAmount of pressure(Not applicable)
Pitch‑BendFine bend valueCoarse bend value

More Mix Power

Screen 6: The Bar Range options in Expert Mode allow you to filter (and hence process) only data that occurs in a selected area of each bar — here, for example, in the second half.Screen 6: The Bar Range options in Expert Mode allow you to filter (and hence process) only data that occurs in a selected area of each bar — here, for example, in the second half.

Here's a tip for those who are using Cubase VST to record and mix audio. We've all had the dreaded Over light come on in the CPU performance meter when trying to do a complex mix within VST, leading to pops, clicks and often long periods of silence. When you write a final mix to a stereo file on your hard drive using the Export Audio command, however, Cubase carries out its calculations offline — so it's still possible to record a mix that is more complex than your CPU can handle in real time, provided you're not trying to incorporate signals from external sources such as MIDI modules or rack effects units at mixdown. If, for instance, a processor‑hungry reverb plug‑in is driving your CPU power over the limit, you could try switching it off (but leaving the channel and group sends to it on), and substituting a more modest reverb such as the good old Wunderverb while you adjust the balances and automation. When you're satisfied with the levels and you're ready to write your mix to stereo, simply switch your quality reverb plug‑in back on in place of the Wunderverb. Even if your mix is now too demanding to play back in real time, Cubase VST will happily write it to hard disk — quality reverb, automation and all. Sam Inglis

Screen 7: A chromatic descending scale with steadily ascending note velocities.


Screen 7: A chromatic descending scale with 

steadily ascending note velocities. 


Published January 2001
Friday, February 25, 2022

Logical Edit Function: Part 1

By Paul Sellars

This month's Cubase tips column focuses on one of the sequencer's most powerful but under‑used features, the Logical Edit function. Paul Sellars begins a two‑part explanation of its operation.

Unlike the other Edit windows in Cubase, Logical Edit is quite difficult to learn by trial and error, and its intimidating appearance doubtless discourages some users from learning to use it at all. Over the next two issues, Cubase Notes will provide a basic introduction to Logical Edit, which will hopefully inspire you to explore its potential as both a labour‑saving device and a useful compositional tool.

The Basics

In earlier versions of Cubase, Logical Edit can be opened from the Edit menu, while in later versions it appears on the Functions menu. In all versions, the keyboard shortcut is Ctrl+L (Windows, Atari) or Command+L (Mac OS). When you select a Part and open the Logical Edit Window you should see something like Screen 1, below. By default, the Logical Editor opens in Expert mode. If you click on the button marked 'Easy' it switches to Easy mode (see Screen 2 (note that in very early Atari versions of Cubase, Logical Edit was laid out differently).

Logical Edit works in exactly the same way in Easy mode as it does in Expert mode, but has fewer options. It's a good idea to learn the basic concepts of Logical Edit in Easy mode, and then move on to Expert mode when you're ready to take advantage of the more advanced editing options.

Like Score Edit, Key Edit, Drum Edit and List Edit, Logical Edit can work on either Drum or MIDI tracks, and (like List Edit) can also be used to edit Mixermap events on Mix tracks. However, Logical Edit is different from the other Edit windows in that (to quote from my manual) "...it allows you to make changes to your music based on logical or mathematical criteria, rather than musical." To put it another way, Logical Edit allows you to alter notes and other MIDI events in a Part or Track systematically, according to a 'rule' or 'rules' that you define.

Imagine, for example, that you wanted to tell Cubase to delete all notes with a velocity value of less than 100 from a particular Part. Screen 3 shows how the Logical Editor (in Easy mode) could be set up to express this rule. Clicking on 'Do it' ('Perform' in some versions of Cubase) would delete the desired notes from the selected Part — or, if no Parts are selected, all Parts on the active Track.

While Logical Edit might seem puzzling at first, it is actually very easy to set up edits once you have familiarised yourself with the layout of the window. Look again at Screen 2. You'll see that the window is roughly divided into three rows, with Filter options on the top row, Processing options on the second row, and with Presets and Functions options on the bottom row. To set up an edit, you simply work from left to right and top to bottom, setting each required option as you go.

<h3>Opening Up The Filter</h3>

The Filter stage is used to select what data will be affected by your edits, and the Processing and Functions stages allow you to control exactly how it will be affected. The Presets section allows you to store useful settings for easy recall (presets can actually be accessed from the Logical submenu of the Functions menu without having to open the Logical Edit window at all).

Starting in the Filter stage, in the top left‑hand corner of the Logical Edit Window, the first option to set is the uppermost drop‑down menu in the Event Type column. This has three possible settings (known as Operators); Ignore, Equal and Unequal.

  • Ignore (which, in earlier versions of Cubase, was labelled 'All') instructs Logical Edit to allow all MIDI messages to pass through the Filter, regardless of their type.
  • Equal instructs Logical Edit to only allow MIDI messages of the type specified in the lower drop‑down menu in the Event Type column to pass through the Filter.
  • Unequal instructs Logical Edit to allow all messages apart from those of the type specified in the lower drop‑down menu in the Event Type column to pass through the Filter.

The setting of the lower Event Type drop‑down menu determines what meaning the Value 1 and Value 2 settings will have, as listed in Table 1 below.

After Value 1 and Value 2, the final option in the Filter stage is Channel, which refers to the MIDI channel number that is stored with each event, ie. the MIDI channel on which each event was originally sent. This, of course, might not be the same as the MIDI channel that is set for the Part or Track.

In addition to Ignore, Equal and Unequal, the Channel option can also be set to use the following Operators:

  • Higher allows only events with a value higher than that set in the field below the drop‑down menu to pass through the Filter.
  • Lower allows only events with a value lower than that set in the field below the drop‑down menu to pass through the Filter.
  • Inside allows only events with a value that falls between the values set in the upper and lower fields below the drop‑down menu to pass through the Filter.
  • Outside allows only events with a value that does not fall between the values set in the upper and lower fields below the drop‑down menu to pass through the Filter.

By setting the right combination of Operators you can control precisely which data is allowed through the Filter and which is not. Data that is allowed through the Filter will be affected by the edits you set up. Data that is not allowed through the Filter will be left unchanged.

Filters And Functions

As you will see, it is possible to perform a variety of simple edits just by setting up the Filter and choosing an appropriate Function from the drop‑down menu(s) in the Function stage — and without setting up anything in the Processing stage at all. Our first example worked in exactly this way: the Filter was set up to allow through only Note events with a velocity (Value 2, when Note is the selected Event Type — see Table 1 again) of less than 100, and Delete was selected in the Function drop‑down menu.

To perform other simple edits, the Function menu can be set to any of the following:

  • Quantize, which quantises note events passing through the Filter to the set in the Quantize Value menu (immediately beneath the Function menu).
  • Extract, which cuts the Filtered MIDI data from a Part and pastes it into a new Part on a new Track. (This option is only available if you enter Logical Edit from the Arrange window, rather than from another Edit window.)
  • Copy, which works in the same way as Extract, except that it copies and pastes the Filtered data instead of cutting and pasting it.
  • Delete, which deletes the Filtered data, as we saw in our first example.
  • Select, which selects the Filtered MIDI, so that it can be edited using any of the normal functions available in any of the other Edit windows. (This option is only available if you enter Logical Edit from one of the other Edit windows.)

Screens 4 and 5, above, show two more examples of what can be done using just Filter and Function settings. In Screen 4, all notes in the selected Part between (Inside) C3 and F3 (note numbers 60 to 65) with a velocity greater (Higher') than 25 are selected (using the Select option on the Function menu). The MIDI data is not altered in any way; it is merely selected, so that it can be edited using any of the normal editing functions in another Edit window. In Screen 5, all notes between F3 and A#3 (note numbers 65 to 70) with velocities between (Inside) 30 and 95 are cut and pasted (Extracted) to a new Part on a new Track (you may need to create a new track, set to the appropriate MIDI channel, for this to work). Try experimenting with different settings in the 'Filter' and 'Function' stages to see what other effects can be achieved.

Next month, I'll consider some of the more complex editing possibilities offered by the Processing stage, and work through some examples demonstrating the extra Operators available in Expert mode. See you then...

Naming Multiple Parts

If you're anything like me (and if you are, I sympathise), you'll find that an element that starts life in your track as one thing often ends up getting warped to the point where it effectively becomes something else. A bit of experimental pitch‑shifting here, a little over‑enthusiastic filter modulation there, and suddenly what you thought was a bass line has turned into some kind of burbling high‑pitched synth. This is all well and good — the creative process is often strange — but what do you do with the 40 or so copies of the original Part, all of which are now misleadingly labelled 'Bass'? Do you spend 20 minutes renaming each one individually? No. Instead, hold down Alt and double‑click on just one of the offending Parts. This will open the Part name dialogue box as normal. Now enter the desired new name and hold down Ctrl (Windows), Option (Mac), or Alt (Atari) while pressing Return. All Parts on the track will be automatically given the new name.


Event TypeValue 1Value 2
NotePitch (note number)Velocity
Poly‑PressPitch (note number)Amount of pressure
CtrlChangeController numberAmount of change
ProgChangeProgram number(Not applicable)
AftertouchAmount of pressure(Not applicable)
Pitch‑BendFine bend valueCoarse bend value

Copying Multiple Parts

When arranging a Song you will almost inevitably want to copy and paste the various Parts that make up your verses and choruses. This involves first selecting the Parts you wish to copy to the clipboard. There are several ways to make multiple Part selections in an Arrange window: you can click on a Part and then Shift‑click on subsequent Parts, you can click in empty space and drag a rectangular selection to cover the desired Parts, or you can double‑click in a gap between two Parts on the same Track to select all the Parts on that Track. Probably the most convenient way to select multiple parts, however, is to move the Left and Right Locators to either side of the desired Parts, and then choose Copy Locator Range (Copy Range in some versions) from the Structure menu. You can then paste copies of these Parts wherever they are needed.


 Published December 2000

Wednesday, February 23, 2022

Studio Module

A completed Studio Module setup in Cubase on the PC.A completed Studio Module setup in Cubase on the PC.

The Studio Module allows PC and Atari users to select configurations and patch names for their synths within Cubase. Paul Nagle guides you through the basics of creating a Studio Module setup.

The Studio Module was developed for Cubase back in its Atari ST days and has survived, little changed in functionality, in the PC version. On the Mac, however, the Studio Module was effectively (or ineffectively) replaced by Opcode's Open MIDI System, so the only part of this month's Cubase Notes relevant to Mac users will be the last section, where I'll discuss the new method of selecting patches — scripting — that was introduced with VST 5 on Mac and PC.

The Studio Module's job is to receive System Exclusive data from a wide range of MIDI equipment such as synths and effects units, store this data, and retransmit it when necessary. It can extract user patch names and display them, to allow easy patch selection within Cubase, and it is shipped with many (user‑tailorable) lists of ROM and expansion board preset names for popular synths. Despite being simple in purpose, the Studio Module is an area of Cubase that leaves many a brow furrowed. As it (usually) requires two‑way communication with MIDI devices, even a modest setup can result in a complex nest of MIDI leads connected to your computer via switching units, multi‑port interfaces or patchbays. My only advice in this area is to be meticulous, label your leads and plan things out on paper. Almost all problems with the Studio Module are related to MIDI interfacing errors.

Modules

The Studio Module 'sucks' patch names and data from your synths and stores them, allowing you to change patches from within Cubase.The Studio Module 'sucks' patch names and data from your synths and stores them, allowing you to change patches from within Cubase.

In terms of Cubase as a whole, modules are 'optional extras' — parts of the program you can choose to activate if you want. The Modules Setup menu lists all kinds of goodies: the arpeggiator, SysEx editor, AVI player, SMPTE display and more. Two settings, Active and Preload, determine whether each module should be activated for the current session or automatically each time Cubase loads. Find Studio Module in the list and set both Active and Preload to Yes. Now, assuming this is the first time you've used it, you must start by supplying some information about your gear.

First, you need to tell the Studio Module which devices you have in your studio. Select Studio Module from Cubase's Modules menu and choose its Setup option. The setup screen (the screenshot, left, shows a completed setup) looks pretty confusing at first, but it isn't so bad. As an example, let's assume our studio has a Roland XP80 workstation. To tell the Studio Module about this instrument, first click Add and navigate to the Library folder of your Cubase CD. This folder contains a subfolder called StudioModuleDrivers, which contains the drivers for all supported instruments. Now plunge into the folder named Roland, select XP80.DEV and click OK, and this instrument should now appear in your instrument list. (You may overtype the device name field if you wish; this name is what appears within Cubase when you select an instrument.)

The next bit is important: you must tell the Studio Module which MIDI connections to make to communicate with the synth. Do this using the pull‑down menus in the center of the Setup screen labelled Output and Input. One tip I'd recommend is to use the SetupMME program, which is installed along with Cubase to name each MIDI port according to the synths that are connected to it. Subsequent MIDI In/Out selection within Cubase becomes very easy if you do this.

Next, specify the MIDI channel(s) your synth will use, any device ID information necessary and you're almost done. If you are unsure of the device ID for your synth (your synth manual may refer to this as the 'SysEx ID'), try leaving it at the default setting.

MIDI patchbays can be useful for organising a growing hoard of MIDI gear, and if the instrument you just added is connected to one, there's an extra step to perform now. In the Setup option's Patchbay box, type in the program number Cubase should send (to the patchbay) so that two‑way MIDI communication is established. You should also enter a program number which will re‑establish 'normal' connections after any SysEx dump has taken place. Typically this would be the connection of your master keyboard to one of the MIDI inputs of the system. The Studio Module supports two patchbays simultaneously. If one or both of yours cannot switch connections via MIDI program changes, set the MIDI channel box to 'Man' and you will be prompted to make the switch yourself when necessary.

Beneath the MIDI Patchbay box is smaller box with just two pull‑down menus: Total Recall and Mask. The former is a name field you can use to categorise your data dumps, while the latter lists the available data types for the currently selected device. The XP80, for instance, has Patches, Performances, Rhythm and System data types as Mask entries. Ensure all these are ticked and create a Total Recall definition called 'All'. As you add new instruments, make sure all their data types are also ticked.

Congratulations, you've just assembled a complete Studio backup (and restoration) tool! If you prefer to work at patch level, you might create a second Total Recall definition just for patches. This will be far quicker in use because it gathers less data. If you edit sounds a lot, you'll probably find this more streamlined Recall very handy.

Using A Studio Module Setup

Updating the patch data for a single instrument within the Studio Module.Updating the patch data for a single instrument within the Studio Module.

OK, having set things up, it's time to test communication by sucking some patch data from your synths. There are several ways to do this; I'd suggest opening the Modules menu, selecting Studio Module and then choosing Total Receive. You'll be asked which type of dump to retrieve, which is where our Total Recall names come into play. Select All, and the Studio Module will request a filename to use when storing the data. Enter something meaningful and it should begin grabbing data from each of your synths in turn, storing the resulting file with an MEM file extension. The results should look something like the topmost screenshot. If everything is connected properly and the data is retrieved successfully, clicking on a track's patch name field should cause a box listing all your patches to appear. Good, eh?

You may wish to associate a particular patch or performance dump with a song. Let's suppose the song is called Wibble.all. Simply save the Total patch dump as Wibble.mem in the same directory as the song, and when you next load Wibble.all, Cubase will ask if it should load just the patch names or load the names and transmit the SysEx data to all devices. It's clever enough to recognise that a dump called def.mem (Cubase's default song is def.all) in the Cubase directory should always be 'names only', so it won't ask this question each time the default song loads. Finally, in the Data Dump Manager (see screenshot, above), you can load and save data from individual instruments rather than the entire studio. The data format is actually identical to that of the MEM‑format dumps. In the Data Dump Manager you may see an 'n' next to items in the Data Type list. This means that names are currently loaded into the Studio Module's memory but not the actual patch data. A '>' sign indicates that names and data are held in memory and can, if necessary, be transmitted to the synth.

Generic Drivers

Patch Name Scripting is a new alternative to the Studio Module.Patch Name Scripting is a new alternative to the Studio Module.

If no Studio Module driver exists for a particular piece of your gear and you don't fancy tackling the DMaker tool to create one (see DMaker box on page 248), Cubase provides alternate methods of patch selection and data gathering. Housed within the the Library section of the Cubase CD are several general‑purpose Studio Module drivers. Of these, 'Any_Dump' is intended as a receiver of SysEx data in cases where no specific driver exists. It happily receives any data you throw at it, storing it along with data from your other instruments. The Studio Module neither knows nor cares about the data format or the byte count in a dump of this type. A slightly more sophisticated driver, 'Generic', allows you to code a SysEx string (you'll have to work it out from your synth's manual) which is sent to your instrument as a request to spill out its patches. With this driver, you specify how many bytes the dump should be and Cubase treats it almost like a proper driver. The main limitation with the Generic driver is that no patch names can be automatically extracted. Finally, the List Driver provides straightforward name boxes for easy patch selection. Overtype the names as you want, then use the Function/SaveNames to update your copy of the driver (see Saving/Loading Name Files box on page 249).

Patch Name Scripting

You can even get patch names from ROM expansion boards into the Studio Module.You can even get patch names from ROM expansion boards into the Studio Module.

VST 5.0 introduced a new feature called Patch Name Scripting, which is designed to be easier to use than the List Driver. A Patch Script is a basic text file, which can be created with any text editor. If you want to use a Script file instead of a Studio Module driver, use the 'Setup Instruments' option when selecting an instrument for a track (see screenshot, below) and specify that the source is a Script file. These reside in the Cubase directory, in a folder called Scripts. If there is no script for the instrument you want, make up your own based on an existing example.

If you really want to, you can use program and bank change numbers instead of patch names, but I'm willing to bet that once you're used to the convenience of the Studio Module, you'll turn your nose up at any other method of patch selection. For me, this sets Cubase apart from all the other sequencers I've tried and I find it invaluable for quickly collecting and saving the correct sounds for each song. The Studio Module is a large topic, and I can't cover every aspect of it here — but fortunately it occupies about 100 pages of the electronic documentation, and this is definitely worth reading!

Create Your Own Drivers with DMaker

What if you have a synth which is not currently supported by the Studio Module? Well, included on the Cubase CD is a program called DMaker which is used to create drivers. Many people have complained that DMaker is too complicated but, in reality, it's the variety and complexity of synthesizer SysEx data that makes it a tough nut to crack. Few people understand SysEx well enough to create a driver themselves and, since each synth has its own data format, patch name location within the data, and so on, each driver must be approached seperately. Explainging DMaker would take an article (or two) by itself. All I'll say here is that if you are really confident, the source of all the existing drivers is on the Cubase CD and, by studying the driver of a synth as similar as possible to yours, you might start to understand how DMaker works. Good luck!

Saving/Loading Name Files

A question I'm asked quite often is "I have an expansion board in my JV1080. How do I get its names into the Studio Module?" If you look at the screenshot above, you can see that selection of ROM sounds is an important part of the Studio Module's agenda — so how do you load names of your own into it? Don't worry, it's pretty easy. First, back up your synth's internal sounds. Then use the synth's own copy function to copy the sounds from the expansion slot or ROM card to internal memory. Next, receive this data into the Studio Module by clicking Data Dump/MIDI/Receive. In the Studio Module's Patch Selection screen, click Function and then Save/Update Names. Type a filename and save the patch names. Next comes the clever part: click the appropriate expansion slot within the Studio Module's Patches display, click Function and this time choose Load Names. Load in the file you just saved, and all the names should now be correctly entered into the driver. Repeat this for as many expansion cards or ROM banks as you have. When you've finished, choose Save/Update Names from the Function menu, and this time take the Update option to update your version of the driver. It should now contain appropriate names in the locations that match your synth's expansion board patches. When you have everything set up as you want it, save your default song and (this is very important!) back up both Cubase's def.all song and studio.dat folder. In fact, back them up twice. Or more. That way, if you need to ever reinstall Cubase, you can simply copy these back into the Cubase directory and Cubase will look and behave as it always did.

Other Functions

The Studio Module is also handy for renaming patches in your synth. Hold down Alt and double‑click a patch name, and you can then overtype it. Hold down Ctrl and click, and the patch will be sent to the synth. This is probably easier than naming patches on the synth itself. Even with devices such as the Waldorf Pulse and Korg DW8000, which have no names on board, you can give their patches names for convenience using this method if you wish. A Find command on the Function menu is useful to perform a patch name search through your banks.

Several Studio Module drivers include a Macro Editor, which typically consists of a few on‑screen sliders designed to tweak some aspects of the patch. If a Macro Editor exists for your instrument, it is opened by double‑clicking a patch name. 


Published February 2001

Monday, February 21, 2022

Manipulating Note Lengths

The key to a smooth performance is the Legato function, which works well with both monophonic and polyphonic parts. The upper window shows the original part, and the lower one shows the part after the Legato function has been applied.The key to a smooth performance is the Legato function, which works well with both monophonic and polyphonic parts. The upper window shows the original part, and the lower one shows the part after the Legato function has been applied.

The facilities that Cubase offers for manipulating note lengths may not be amongst its most exciting features, but as this month's Cubase Notes demonstrates, they can prove to be invaluable.

The subject of MIDI note lengths may not sound very exciting, but knowing how to make the best use of Cubase functions related to this topic can make your life a lot easier, by cleaning up your mix, reducing CPU overhead, and even preventing hanging notes. Some of the functions under discussion here have been in Cubase for ages, but others have only just appeared in version 5.0, so you may need to upgrade to take full advantage. Remember also that in Cubase 4.0 and beyond you can create your own keyboard shortcuts — the ones mentioned here are the default settings only.

Since Cubase still only provides one level of Undo, it's safest to apply all these functions from inside an editor — in most cases this will be the Key Editor, since this displays note lengths in the most easily understood form. You can then apply as many separate edits as you want: if you like the end results, pressing Enter will fix them permanently, whereas using the Esc key lets you ignore the lot and return to the original unedited version.

However, don't forget that Undo can also be used to see what changes a given function has made. When you use the Ctrl–Z Undo shortcut (or Command‑Z for Mac users), any notes that have been altered or deleted will not only reappear in their original form, but are also automatically selected. You can then repeatedly press Ctrl‑Z to toggle between Redo and Undo, viewing the changed and unchanged versions, and this will not only make it obvious which notes have altered, but how.

Fixing Your Lengths

The sustain pedal data shown along the bottom of the upper part can mislead you. After the 'Pedal to Note Lengths' function has been applied, generating the sequence in the lower window, it's far clearer how both parts will actually sound.The sustain pedal data shown along the bottom of the upper part can mislead you. After the 'Pedal to Note Lengths' function has been applied, generating the sequence in the lower window, it's far clearer how both parts will actually sound.

The first and easiest function to understand is 'Fixed Length' (keyboard shortcut Alt‑T for PC or Apple‑T for Mac). As its name suggests, this forces every selected note to the same fixed length, chosen by the current Quantise value, but leaves its start position unaltered. You can select this length using the mouse and drop‑down menu options, but most musicians find it quicker to select using the number keys on the main keyboard (not the ones on the numeric pad). Keys 1 to 8 select quantise and snap values from whole notes right through to 32nd notes, and you can also enter dotted and triplet values using the full stop (.) and T keys respectively.

I find 'Fixed Length' particularly handy in making ad hoc drum and percussion parts more legible, since many drum sounds play to their end regardless of how long the note is. There's also a 'Length Size' function, which leaves the note start positions unaltered, but this time quantises the length of the note to the nearest quantise value. I've yet to come across an occasion to use this one.

A Smooth Performance

Manipulating Note Lengths

The Cubase Inspector also offers a Length parameter, with options ranging from 25 to 200 percent. At 25 percent all notes are played at a quarter their actual length, and at 200 percent, twice their actual length. This function operates in real time without permanently altering the data in the selected Track or Part, and is a quick and useful way to convert existing lines into short staccato stabs or smooth legato performances. If you want the latter, however, there's also a dedicated MIDI Legato function, which is far more intelligent. It looks for gaps where no notes are playing, and extends the nearest note (or notes) to fill them.

Legato also has an optional overlap parameter. If you leave this at the default setting of zero, notes will be extended to exactly fill any gaps, but by entering a positive value you can force every note to overlap the start of the next one, which might be useful with some synth patches, to avoid entering the release phase. Entering negative values forces a gap between every note of this length, which might sometimes be needed to ensure that a synth retriggers its envelopes properly.

Most musicians tend to use legato on monophonic lines such as lead or bass, but for the most realistic woodwind and brass parts don't forget to leave an occasional gap for your 'players' to take a breath! The Legato function can also be useful on polyphonic parts like strings. The only complication here is that the algorithm extends only the note that starts nearest to the gap, so if you've left a polyphonic part in unquantised form, only one note in each chord is likely to be altered. The way around this limitation is to apply Note On quantise first, and then the Legato function. You can use the Undo Quantise functions afterwards if you wish to return to your original timing.

Back Pedalling

If you record your MIDI parts using a keyboard equipped with a sustain pedal, every time you press the pedal you'll generate a Sustain On message, and each time you release it a Sustain Off. However, during subsequent editing it's easy to accidentally delete one or other of this pair of MIDI controller messages, either cutting notes off shorter than intended or, which is far worse, leaving them to drone on for ever. The new 'Pedal to Note Lengths' option in Cubase 5.0's list of MIDI functions lets you replace all pedal data by extending the note lengths to the next pedal off position, and then deleting the associated MIDI Controller 64 data.

This makes parts easier to read, especially for non‑keyboard instruments such as strings, and when the pedal data has been replaced, you may find that the resulting data shows lots of overlapping notes on the same key. These can cause note‑robbing even in apparently simple parts, and can also confuse a few synths that expect a Note Off command before the next Note On. You can remove these using the 'Delete Overlaps (mono)' function, to make the most of your polyphony.

The 'Delete Overlap (poly)' function is rather more drastic, since it cuts the length of all existing notes at the point where each new one starts. This is perfect for monophonic parts such as woodwind and synth lead lines where only one note should sound at a time, although you can get the same result with many synths by restricting polyphony for such instruments in the synth itself.

'Delete Overlap (poly)' isn't as useful for tidying up polyphonic parts, since each new note played will chop off all the others already sounding in a chord. However, it can be used to convert moving chord shapes into an arpeggiated sequence. Overlaps with simple block chords will also be cleaned up nicely, as long as all the notes in each chord have exactly the same start position. You can use the same trick as for Legato, by Note On Quantising them first and then applying the 'Delete Overlap (poly)' function.

Exploiting Polyphony

The 'Restrict Polyphony' function that first appeared in Cubase 4.0 on the Mac lets you reduce the maximum number of simultaneous notes in any track or part to any one of a selection of 15 options, ranging from one to 32 voices. This can be particularly useful for those using soft synths, since the CPU overhead of soft synths tends to rise with the number of notes. Given that exceeding around 70 to 80 percent of the maximum CPU power available will cause your computer's audio output to glitch, it's wise to cap the number of voices to a suitable number within the synth itself.

Even when you've done this, however, or if you are using one of the many hardware analogue synths with a restricted number of voices, choosing the same number using the 'Restrict Polyphony' function will ensure that you get no nasty surprises with notes cut off in their prime. Most synths operate on 'most recent note' priority, so that the oldest note gets chopped when polyphony runs out, but this type of note‑robbing can often prove frustrating and unpredictable in practice. If you ensure that your parts never contain more than the desired number of voices, you should never experience note–robbing.

The same function may also help when using a multitimbral synth across multiple tracks — in the past I've occasionally had a vital bass line cut off in mid‑note when a busy string part on another track reached the maximum polyphony of the synth and grabbed the voice the bass was using. By restricting the polyphony of the actual tracks, you can keep control over which notes are played.

By the way, you won't find descriptions of any of these functions in Cubase's electronic documentation, but you will find them included in the help file, in the MIDI Functions section of the Functions menu, which you can find in the final Menu Reference section.

Missing Notes

Some MIDI synths may respond slowly to MIDI information, and if you play lots of short, repeated notes, may miss a few. Cubase 5.0 normally avoids this possibility by forcing a short gap between Note Off and Note On commands on the same MIDI channel, but you can alter the length of this gap in the Playback section of MIDI Preferences if you still have problems with a particular synth. Older versions of Cubase have the similar Length Correction parameter, which can be found in the MIDI Setup window. Martin Walker

Cubase 5 On The Mac

By the time you read this, Cubase v5 should be generally available on the Mac platform as well as for Windows PCs. Although version 5 was a huge step up for PC users, many of its new features were already available in the Mac version 4, released late in 1998 (see Martin Walker's review in SOS September 2000 for a full run‑through of version 5). Nevertheless, upgrading to the new version still reveals some striking differences. The most obvious are in the look of the program: the Arrange page has adopted an understated, blue‑grey appearance more than a little reminiscent of the new look that was introduced in Emagic's Logic v4, while the virtual mixers and effects racks have also been redesigned. Personally, I like the new layout a lot, and find it both more ergonomically satisfying and easier on the eye than earlier versions.

There are new bundled effects, including plug‑in dynamics and a useable reverb at last, while the default plug‑in interface has been modified, with the new version allowing you to see every parameter at once. The EQ window has also changed, and now allows you to draw in EQ curves with the mouse.

Operational changes include the addition of dithering algorithms for mixing down 24‑bit files to 16‑bit masters and InWire support for collaboration over the Internet using the Rocket Networks server, but the one that is likely to be of most importance to most users is the addition of a new method of keeping track of synth patches. Patch Name Scripting (see last month's Cubase Notes) might, at last, mean the end of Cubase users' forced reliance on Opcode's increasingly dated Open Music System. Sam Inglis 


Published March 2001