Tuesday, February 9, 2021

Saturday, February 6, 2021
Friday, February 5, 2021
Smoother Groover
By John Walden
 Groove Agent ONE's main display.
Software may be great for programming sample-based beats, but recreating the sound and feel of a good drummer playing an acoustic kit can be quite a challenge. The good news is that Cubase puts all the tools you need at your disposal, and in this article I'll explain how to use them to program acoustic drum tracks with a genuinely human feel.
There are three main things to consider: constructing a realistic virtual acoustic drum kit; creating suitable MIDI parts to trigger the drum samples; and what you can do at the mixing stage. Groove Agent ONE (GAO) can help with the first of these, and that's what I'll focus on here. As it's a large topic, we can look at the programming and mixing stages next month.
Preset Pains
The first step in building your perfect kit is to get some samples organised in GAO. While you could start with an existing preset (the Hard Rock Kit Dry and Maple Kit are the best of the supplied acoustic presets), this approach has limitations, as GAO doesn't make it easy for you to mix and match drum sounds from different presets. For example, you can't access the individual samples that make up the presets, drag and drop a drum pad's settings between two instances of GAO, or duplicate a pad within a single instance (you can only move or swap between pads). Fingers crossed that Steinberg have these issues on a 'to do' list for improving the user workflow.
Roll Your Own
 If you have recorded your own drum-hit samples, the Sample Editor can be used to divide them into audio regions.
Things get more flexible — and more interesting — if you build your own GAO instrument from scratch. When you first load an instance of GAO, all the pads are empty, so to build our kit we'll need to find some samples. Ideally, multiple samples of each drum are required, ranging from soft to forceful hits, allowing you to use GAO's sample layers to mimic the tonal changes in a drum when it is hit with different stick velocities. There are plenty of places to find samples, including free online libraries (if you're happy with mono sounds, I can recommend Analogue Drums' Big Mono at www.analoguedrums.com/details-bm.php), but if you have any acoustic drum-loop libraries in your collection, some might also include single-hit samples that you can use. Alternatively, if you know a friendly drummer, you could always record your own — it's not too daunting a task, given that you're only going to need to record one drum at a time via a single mic. Do record plenty of hits, though, as while GAO only allows eight velocity layers for each pad, some extra alternative hits can come in handy, as I'll explain below.
High Velocity
 Multiple audio regions from an audio clip can be dragged and dropped from the Pool on to a single GAO pad.
Once you have your multiple samples for each drum, they can be dragged and dropped to a GAO pad. I find that this works best when dragging from Cubase's Pool, but a little care is needed. If you are using individual samples, perhaps imported from a third-party sample library, these will be listed individually (each represents an audio clip) in the Pool's Audio section. You can select multiple clips and drag and drop these to an individual GAO pad. All of which is great… but if you recorded each drum in turn directly into Cubase, each clip is likely to contain multiple hits, and to be able to drag and drop the individual hits, you'll need to open each clip in the Sample Editor, add Hitpoints to mark the start of each drum hit and then press the Create Regions button. This will turn each drum hit into a separate audio region and, as shown in the screenshot, a list of these regions will be viewable in the Pool underneath the clip to which they belong. You can then select multiple regions and drag and drop these to a single pad, where they'll automatically be converted to sample layers.
Once they're placed on a pad, you can change the order of the layers by clicking and dragging in the Pad Edit window. By selecting an individual layer, you can adjust its overall playback volume, as well as the MIDI velocity range that triggers it. A little bit of work will be needed here, but the key aim is to achieve a smooth transition between the layers as you move up through the MIDI velocities, so that the transitions between the layers don't jump out during playback as 'there's a new sample' moments to the listener.
You can, if you wish, also adjust the Filter and Amplifier controls. These operate at the pad level (ie. they apply to all layers in the pad), but can be useful if you want to tweak either the overall EQ or the Amplifier Release control as a quick means of reducing any unwanted room ambience on the tails of your samples — although this, of course, could also be done when editing your samples, if you're not using regions as described above.
The Clone Wars
 Layers can be edited within the Voice section of the Pad Edit display where you can also adjust the 'Mute Gr' and Output settings for the pad.
Creating duplicates of all (or just the key) drum pads is useful, as it allows you to use two hardware keys or pads when programming your drum parts. You can't duplicate a pad in GAO, though, so this is a little labour intensive, as you have to build each pad twice, but it's still well worth the effort. However, there's another way you can use multiple pads for particular drums to improve the realism of the performance, and it works particularly well with a snare, which I'll use as my example...
Eight sample layers give you useful tonal and dynamic variability, and a pair of identical pads improves playability, but you can add further subtle variations by building an 'alternative' snare pad from a different set of samples which, on playback, can be blended with the main snare pad. For what I have in mind, it's best to build this second snare from medium and hard hits only, and with somewhat different tones to the main snare pad(s). Having placed these alternative snare samples onto a separate pad, set the Amp Mod setting (in the Amplifier section) to zero percent, so that MIDI velocity no longer adjusts the volume of the sample playback, but will still dictate which sample layer is triggered. You might be able to guess where I'm heading with this, but we'll cover how to put this to use next time, when we look at performance programming.
Kit Completion
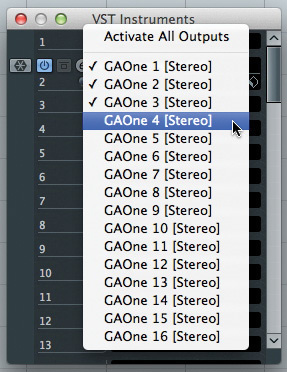 You can activate any of GAO's 16 stereo outputs via the VST Instruments panel.
Two other steps are required before we can save our new kit as a GAO preset. The first helps to ensure that playback realism is maintained by placing particular kit pieces (pads) into Mute Groups. GAO only allows one pad in such groups to be played at any one time. This is particularly useful for sampled hi-hats, because you might have several pads assigned for different performance options (closed, part-closed and open, for example) but, of course, a real drummer could not play more than one of these sounds at any one time. Assigning a pad to a Mute Group is done via the Voice page in GAO; just edit the Mute Gr setting so that all pads in a group share the same number. Up to eight Mute Groups are available.
The second step is to assign your various pads to different GAO outputs. By default, all pads are routed to GAO's main stereo output (ST1), but you can change this via the Output setting in the Voice page. You'll also need to activate the outputs via the VST Instruments panel (click on the little box/arrow icon just to the left of the plug-in name). Any activated outputs will appear in the main Cubase Mixer, and as GAO supports 16 outputs in total, the most flexible approach is to have a separate output for each kit piece. If you've used multiple pads for some drums (the hi-hat, for example), make sure all these pads are assigned to the same output — although if you created the alternative snare as described above, make sure you give that its own dedicated output.
Pack & Go
Having put a lot of work into creating your new virtual drum kit, make sure you save it! You can use the standard preset menu, but it is also a good idea to create a GAO archive (this has a GAK file extension). This archive has the advantage of including all the samples required to recreate the kit, so you can move the file to a different computer system if required. To create the GAK file, simply click on the Export button in the Exchange section, pick a file name and location, and the job is done.
Next month, then, I'll explain how you can put your new instrument to good use in the programming/performance and mixing stages of your production to create something that sounds like a real drummer.
Published October 2012
Thursday, February 4, 2021
Wednesday, February 3, 2021
Lock Tight Super Groove
By John Walden
If you want to overdub programmed parts to a performance that varies in tempo, Cubase has all the tools you need.
Playing  The first stage is to create a 'tapping' track that follows the varying tempo of the performance.to a click is not always the most musical thing to do, and when a band gets into full swing, subtle (and sometimes not-so-subtle) tempo variations can form an important part of the musicality of the performance. These tempo variations can make it difficult if you then want to overdub programmed MIDI parts. However, if you can capture the variations on Cubase's Tempo track, so that its bar/beat grid matches what the musicians actually played, you'll be free to program and edit without damaging the vibe of the original performance.
Tempo Tools
In the 'full fat' version of Cubase, there are two different tools that can help with this task. First, the Merge Tempo From Tapping command allows you to create a Tempo track from a track on which you've tapped in notes in time with the initial tempo-varying performance. Second, the Time Warp tool allows you to stretch or compress the Cubase beat/bar grid (rather than the audio itself) to match the timing of the recorded performance. In both cases, Cubase automatically adds suitable tempo events to the Tempo track, which can then be manually refined if required.
While either tool can be used on its own, I find that the quickest and most effective approach is to start with the more straightforward Merge Tempo From Tapping tool, using the Time Warp tool for any final adjustments.
Tempo On Tap
 If you record your DIY click track using audio, you can convert it to a MIDI track in the Sample Editor. Here, the louder first beat of each bar has been identified but a lower Threshold setting would capture every beat if required.
Before you can apply the Merge Tempo From Tapping function, you need to record either a MIDI or an audio track where you tap along, keeping time with the original performance. In principle this is a straightforward task, but there are a few pointers worth considering that can help smooth the process.
1. Before you start, set the Cubase tempo to something memorable (120bpm will do). If you need to repeat any of the steps described below, it's useful to be able to return the beat/bar grid back to its initial starting point.
2. If you're using MIDI notes for this task, tap for each beat of the bar but use a different MIDI note for the first beat of each bar.
3. If you have any drum skills, try using MIDI drum pads or a MIDI drum kit rather than a standard MIDI keyboard: you may feel more comfortable and therefore produce a better result.
4. If it feels easier, record an audio track rather than a MIDI track. This can mean tapping on a desktop or playing along with a drum kit, but make sure you use sounds with a well-defined attack (no flappy kick drums) such as a hi-hat, rim click or snare.
5. Finally, don't be afraid of recording several passes; you might find you lock a little more firmly into the groove once you have played through it a few times.
If you've recorded an audio track, before going further, open it in the Sample Editor and then adjust the Hitpoint Threshold to add a hitpoint at the attack of each hit. If you then click on the Create MIDI notes button, this will then generate a track with a MIDI note at each hit point. Incidentally, if you use a louder sound for the first beat of each bar, you can then adjust the Threshold setting to catch just these louder hits. In some cases, this makes the next stage a little easier.
Test Your Tapping
 Once the 'tapping' MIDI track is recorded, the Edit In Place option makes it easier to line up the MIDI events to obvious transients in the audio.
The next step is the most important: you need to listen to, and carefully edit, your DIY MIDI 'click' track to ensure that the timing is as tightly aligned as possible with that of the original performance. While there's no real short cut, it can be done more quickly if you're only trying to edit the MIDI notes that correspond to the start of each bar, rather than those on every beat. Unless there are some very complex tempo changes, this usually provides sufficient information for Cubase to calculate the tempo.
There's no place for timing quantisation here, but prior to editing, it can be useful to quantise the note lengths. Open the part in the MIDI editor and, using the Quantize panel, set the Grid to either half or eighth notes (for 'first beat' or 'every beat' MIDI tracks respectively) and apply Quantize Lengths. While these note lengths will have no relationship to the current beat/bar grid, having each note the same length provides a useful visual clue as to the evenness of their timing during the manual editing stage that will follow. Also, turn the Snap function off — you don't want your DIY MIDI click track notes to snap to the current grid, which does match your original recording!
It's then a simply a question of doing any manual editing to fine-tune the MIDI note timing. If your rhythmic skills are good, this probably won't involve much work, but take your time to get this right. Using the Edit In Place option can be useful, as it allows you to view the MIDI notes alongside the target audio performance in the main project page. Zooming in both horizontally and vertically can also help if the audio contains strong rhythmic elements, as you can check the visual alignment between waveform transients and MIDI notes.
Tempo Extraction
 The Merge Tempo From Tapping dialog box generates a series of tempo events on the Tempo track that, hopefully, follow any tempo variations in the original freeform performance.
Once you're happy that your MIDI click track follows the variable performance as accurately as possible, select the Merge Tempo From Tapping command (from the MIDI / Functions submenu) which will extract the tempo data. The dialogue box allows you to specify the tapping frequency you've used, and whether the first bar should start with the first beat (usually best engaged). Once executed, the function creates a tempo event at each MIDI note position and, if you add a Tempo track to your project, you can see all the shifts in tempo alongside your original audio.
Finally, you need to check that the Tempo track provides an accurate reflection of what's in your original recording. The easiest way to do this is to activate the Tempo track and set your favourite virtual drum instrument playing a simple snare/kick/hi-hat pattern alongside it. Hopefully, if you took your time with the MIDI editing, things should already be pretty well locked but, if not, you can note any problem areas that still need further attention.
Get Warped
If there are still one or two spots where the Tempo track doesn't feel quite right, you have two options. First, you can step backwards and do further editing to the DIY MIDI click track before repeating the Merge Tempo From Tapping process. Alternatively, you can dip into the second set of tools offered by Cubase: the Time Warp functions.
While I personally find the Merge Tempo From Tapping approach much more straightforward than using Time Warp when creating a full tempo track, Time Warp can be very useful indeed for tidying up the odd spot. Once you engage the Time Warp tool via the Project window toolbar, the timeline changes colour and all your tempo events are displayed along it. If you then choose a suitable zoom level, you can focus in on any problem areas. If the beat/bar grid doesn't quite match the transients in the audio, then you can simply grab a grid line and drag it left or right as required. The tempo events will adjust accordingly. This tool does need using very carefully, as you can easily create quite dramatic tempo changes with what seem like relatively small adjustments, so keep it very subtle or go back to the Merge Tempo From Tapping stage.
Follow You, Follow Me
 The Time Warp tool can be useful for any final editing required.
Freeing yourself from your sequencer's fixed tempo is a liberating experience. It is obviously not appropriate for some dance-based genres but, for more organic forms of music — guitar bands, singer/songwriter types and so on — it can be the difference between capturing the performance vibe in the studio or letting a metronomic click track kill it. Capturing the tempo variations in the original performance then allows you to make the most of Cubase's MIDI editing tools as you overdub other parts. It does require some initial effort but the rewards can be well worth it. Let Cubase be a slave to your rhythm rather than the other way around.
Published December 2012
Tuesday, February 2, 2021
Monday, February 1, 2021
The Tempo Trap
By John Walden
Learn how to march to a different beat in Cubase, by locking a tempo-varying performance to a fixed beat — and vice-versa.
 The Tempo Detection Panel can create a map of tempo changes within an audio performance with a single click — but the results are not always as good as with a DIY approach.
In last month's Cubase workshop, I explained how to create a tempo track that follows a 'freeform' performance — by which I mean one where the tempo varies because it was not recorded to a click track. The idea was to show you how to keep the feel of the original performance, while leaving you free to program and edit MIDI parts that will lock tightly to its groove.
This time around, we'll look at an alternative and, in theory, quicker way of creating the same sorts of 'tempo maps' to follow tempo-varying audio performances. But we'll also consider the problem from the opposite point of view. In other words, we'll take a time-varying part and figure out how to make it lock to a fixed-tempo grid.
Watching The Detectives
The approach described last month used a combination of Cubase's 'Merge Tempo From Tapping' and Timewarp features. I'm a fan of this approach, because (a) it relies on me to tap out the required tempo variations by following the performance, and (b) providing I can play in time with the performance (or edit my tapping to tighten up the match), it pretty much always works. However, there's another tool in Cubase 6 which promises to do this task automatically: the Tempo Detection Panel (TDP). To use this, first select the audio recording that contains the tempo-varying performance. Then, from the Project menu, select Tempo Detection. The panel that opens has a number of options but, at this stage, all we need to do is press the Analyse button. As if by magic, after a few seconds of 'processing', a new Tempo track should appear, containing all the tempo events required to map the tempo variation in the original performance.
 If the TDP thinks it has found a significant tempo change, you might need to split the audio file and process it in sections. Note also that a Signature track has been added to the project.I imagine you're wondering why, if the TDP approach is so easy, I bothered with the DIY approach last month. There are a few reasons. First, the Tempo Detection Panel only works reliably when your audio contains a strong rhythmic component all the way through. Drums from start to finish will usually be fine, but if your original performance was a few piano chords and a lead vocal, the TDP will struggle, even though you can easily tap along in time to the performance. Second, the TDP algorithm can stop mid-flow if it thinks there are large tempo changes. In these cases, a warning message is displayed and only a partial tempo curve generated. You can force the algorithm to continue by splitting the audio file at the point of the last tempo node created and then running the detection process again on the unmapped portion of the audio. In most cases, this resolves the issue. Third, the TDP algorithm doesn't seem to handle gradual tempo changes very well. If, for example, your original performance includes an ending where the players play at an ever-slower tempo over the last few bars, last month's DIY approach is the way to go.
Another reason is that the TDP can create some odd tempo events prior to, and immediately after, your source audio event, and these require tidying up. Make sure that with any such tempo nodes prior to the start of your audio you use the Delete bars action in the Process Bars dialogue box (accessed via the Signature Track in the Track List or via the Tempo Track editor), as this generally does a cleaner job of removing everything prior to the start of your key audio part.
Finally, after running the tempo detection process, you'll notice that a Signature track has been added and a 1/4 time signature set. As explained in the PDF Operation Manual, the TDP does its magic based upon beats rather than bars. While you can edit this, it's a shame that the Panel doesn't include the option to specify the time signature.
Despite all these issues, the TDP approach can be useful. Once the tempo-detection algorithm has done its stuff, Timewarp mode is engaged by default and, as with the DIY approach, you might find that some further Timewarp editing work is required to tighten up any timing issues not caught by the automated tempo process.
Needing A Fix
 The Process Bars dialogue box can be used to clean up any unwanted tempo data prior to the start of your audio.
Hopefully, I've persuaded you of the virtue of allowing musicians to record without a click to guide them — but I'm now going to go in reverse, by converting a tempo-varying performance back to a constant tempo!
There may well be situations where doing that is useful. For example, you might decide that there's a little too much tempo variability in a performance, or perhaps you might want to take a vocal and a key instrument or two from a tempo-varying performance and rework it in a club-friendly dance format, layering new locked-tempo loops or instrumental parts alongside.
The process requires two stages and, as you'll see, Cubase makes the second one very easy if you get the first one right. Fortunately, the first stage is creating the Tempo track to match the tempo variations in the original performance — which is exactly what we did above and last month, so I don't need to explain this further.
For the second stage, select the audio parts you wish to force to a constant tempo and open the Set Definition From Tempo dialogue box, via the Audio/Advanced menu option. Then simply click OK. The Elastique Pro Time time-stretching algorithm in Cubase will use the information in the Tempo track to process the selected audio so that it can be played back at any tempo. If you disable the Tempo track and specify a fixed tempo in the Transport Panel, the audio parts will follow that.
Obviously, any time-stretching process of this sort will, if pushed to extremes, start to reveal itself with audible nasties: how far you can move away from the original tempo depends on the source material and how prominent the stretched version is going to be in your project. For example, if you take a strummed guitar performance, you can generally shift the tempo between -15 and +20 bpm and get away with it, particularly if it will be placed in a mix of other instruments (that haven't been time-stretched in the same way!). Other sources, particularly exposed solo instruments or lead vocals, will usually benefit from more subtle treatment. Note, though, that you generally get more leeway going higher in tempo than lower, as time-compressing audio is less technically challenging than time-stretching it.
Control Your Tempo
 The Set Definition From Tempo dialogue: one click and your audio can become as malleable as MIDI.
By this stage in the process, your original tempo-varying audio can (audio artifacts permitting) be played back at any fixed tempo. However, just because the audio can be played back at constant tempo, that doesn't mean it has to be. In other words, you can add back tempo variations if you want to. This might sound like a counter-intuitive thing to suggest, but it can be very useful. If you just want to kick up the chorus by a couple of bpm, for instance, or perhaps add a 'slow down' (ritardando) at the end of a song, you can.
While you can draw tempo changes into the Tempo track, the tempo recording slider in the Tempo track provides a better option. Before doing this, delete any existing Tempo track data points and then, using the mouse (unfortunately, at present, there's no easy way to link the slider to a hardware controller), 'ride' the tempo recording slider during playback to create new tempo variations.
 Riding the Tempo Recording Slider allows you to create subtle (or not so subtle) tempo changes during playback.As is always the case when using tempo variation in a performance, unless you're aiming for an obvious and dramatic effect it's best to be subtle. I find it helps to work in stages, as the display of your tempo data and the audio can get a bit out of sync if you add a lot of tempo changes in one pass. Add each tempo shift individually, stopping playback after you have entered a tempo transition and checking that it sounds alright on playback before moving on.
Slave To The Rhythm
It's all too easy to start every recording project by finding a tempo that feels suitable, setting it and then forgetting it. However, as the techniques shown by these two workshops show, Cubase has the tools to free you from this constraint. Whether you want to ignore a fixed tempo altogether and let the speed of your musician's performance ebb and flow as they see fit or you want to reign in some of those tempo variations after the fact and lock everything to a fixed grid or a tempo pattern of your own making, the choice is yours.
Published January 2013