Welcome to No Limit Sound Productions

Company Founded
2005
Overview

Our services include Sound Engineering, Audio Post-Production, System Upgrades and Equipment Consulting.
Mission
Our mission is to provide excellent quality and service to our customers. We do customized service.

Tuesday, May 23, 2017

Q. Do you have any soldering advice?

I have a vast amount of mic cable and a load of three-pin Neutrik NC3FX female connectors ready for soldering (there is no need for male connectors as the other ends are going to my patchbay). I've done a limited amount of soldering in the past and just wondered if there were any handy tips? I've got all the tools, including a 'desolderer' and a multi-clamp to hold things in place.
SOS Forum Post
It always helps to tin any wires before soldering joints. Use a little solder on the twisted strands to lightly coat the wire. 
It always helps to tin any wires before soldering joints. Use a little solder on the twisted strands to lightly coat the wire.

 Make sure that your connector is securely fastened in a vice or clamp to stop any movement while you solder. 
Make sure that your connector is securely fastened in a vice or clamp to stop any movement while you solder.

 Leave any mistakes to cool before using a desolderer to clean the joint of any old solder, and then start again. 
Leave any mistakes to cool before using a desolderer to clean the joint of any old solder, and then start again.  

Technical Editor Hugh Robjohns replies: Wiring XLRs is one of the easier DIY challenges to tackle once you have a little experience under your belt. The solder contacts are large and fairly tolerant of over-heating, while cable trimming and dressing aren't too critical either. It's a good way for novices to get started and build their confidence in soldering and cable preparation.

The first step is to thread the cable through the strain-relief collar. It's immensely frustrating to have to unsolder a perfect connection just to put the collar back on, so don't forget! If you're planning to use slide-on cable identification markers, then put these on before the collar.

With the cable threaded through the collar, strip off the outer sheath and prepare the individual wires. It's best to use a proper wire stripper for this, and it's a good investment to buy the best self-adjusting type you can find. Using the wrong tool could damage the insulation and/or nick the wires. The former risks short circuits, the latter risks breakages and open circuits.

With the wires trimmed to an appropriate length and stripped, it helps to 'tin' them. Twist the strands tightly together, heat each wire, and feed in a little solder so that it flows and coats the metal. Don't get it too hot, though, as the insulation is likely to melt or shrink.

It's good practice to then introduce some insulation sleeving over the screen wire, to prevent short circuits inside the connector body. You can buy bags of pre-cut rubber sleeves that make the job neat and tidy, and they also allow for easy re-working if you need to repair the connection at a later stage. Heat-shrink sleeving can be used, but makes the job of repairs slightly more difficult. Also, at this stage, decide which of the two core wires will be denoted as 'hot' and which as 'cold' — make a decision and stick to it!

Next, fix the connector into a small vice or multi-clamp in such a way that allows you to access the three pins, and then tin each of them. If you don't have a vice or clamp, then you could use a cable tester, or a similar device (the heavier the better to stop things moving around too much while you are working), as long as the connectors are fitted somewhere convenient. Also, I find it helps to point the female end of the connector slightly uphill, otherwise the solder disappears inside the terminal!

Identify the pin numbers (these are usually embossed beside each pin on both the inside and outside of the connector) and remember that the male and female connectors are mirror images of each other. For that reason, it makes sense to wire all the connectors of one sex first, and then all those of the opposite sex. If you alternate between wiring male and female connectors, it is inevitable that you will end up wiring at least one backwards!

Once you have correctly identified each pin, offer the 'cold' wire from the cable to pin 3 (it's the the one in the middle). Hold it steadily in place while you heat both the wire and the terminal, and then feed in some solder. As soon as the solder melts, remove the heat and hold everything still until it cools and the solder sets — it should be just a few seconds.

The key is to be be as quick, clean and precise as possible. Don't keep jabbing at the solder joint. If it isn't right, do the next joint and come back to any problem later once it has cooled. Use the solder-sucker (desolderer) to clean the joint of any old solder and start again.

Repeat the process for the 'hot' wire on pin 2, and then the screen wire on pin 1. I don't recommend linking pin 1 to the connector shell as it usually causes more trouble than it's worth, but there is a central tag for that purpose if you should require it.

If you're happy with the solder joints, fit the plastic insulation and cable clamp sleeve. Slide the whole thing into the metal shell (being careful to align the rib and notch), ease the release button into place and screw the end-gland up tight. Always test the cable to make sure that it's wired correctly (with particular attention to pin 1/pin 3 reversals). In the case of patchbay wiring, it pays dividends to label the cable ends in some meaningful manner, making it easier to replug things later.


Published June 2008

Saturday, May 20, 2017

Q. Can I spray-lube my crackly pots?

I've got a problem with one of the gain knobs and both of the bass knobs on my Rane TTM56 DJ mixer. They've been used quite a bit over the last couple of years and have recently started crackling whenever I adjust them in any way. Usually, if I'm getting bleed or crackle from a fader I'll use some sort of spray lubricant, like WD40, but I'm not sure if this will work with EQ knobs. I've often heard people mention contact cleaner for use with connectors, so I assume this kind of thing could work for my pots? Has anyone had similar problems, and if so could you offer any advice?

SOS Forum Post
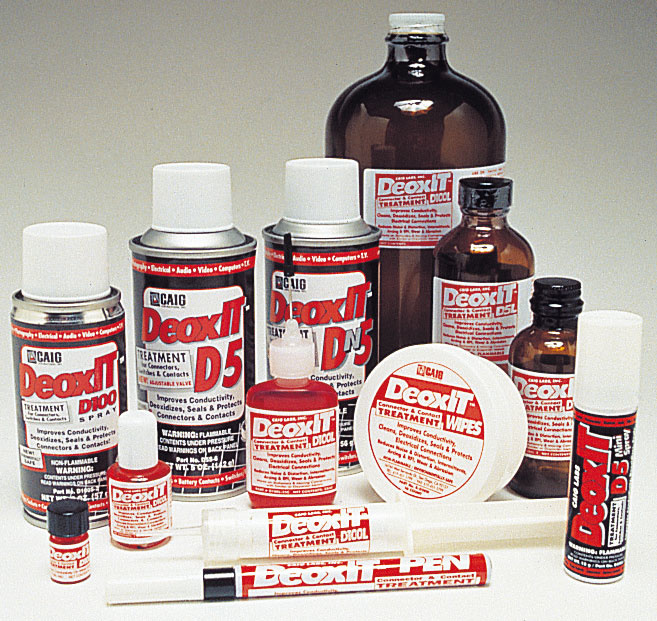
Caig's Deoxit D5 is a contact enhancer that's an excellent choice for cleaning connectors, as it improves conductivity and — unlike many other lubricants — doesn't leave a sticky film. Deoxit can also be used on crackly pots, and while it won't actually restore them to full health it could buy you some time while you look for a replacement pot. 
Caig's Deoxit D5 is a contact enhancer that's an excellent choice for cleaning connectors, as it improves conductivity and — unlike many other lubricants — doesn't leave a sticky film. Deoxit can also be used on crackly pots, and while it won't actually restore them to full health it could buy you some time while you look for a replacement pot.  

Editor In Chief Paul White replies: We get a number of enquiries as to the best way to clean faulty socket contacts or crackly pots, and there are many commercial contact cleaners available. However, you should be aware that most ordinary contact cleaners have a greasy base and tend to leave an oily film on the surface being treated. So, although you may notice an improvement in the short term, you often find that dust builds up on the sticky surface and may eventually make the problem even worse than before. Most connector contacts can be cleaned to some extent by repeatedly inserting and removing the connector (Studiospares market an abrasive dummy jack plug that does the job more effectively), although the normalising contacts found in patchbay and insert point TRS jacks aren't in direct contact with the plug, so they don't tend to respond to this treatment. My preferred treatment for awkward connectors is to use Caig's Deoxit D5 spray, a contact enhancer that reacts with the metal surfaces of the connectors to improve conductivity, but without leaving a sticky film. You can also use it, sprayed onto a cloth, to wipe jack plugs clean as part of your routine maintenance. Avoid getting it near the capsules or internal electronics of capacitor mics, though, as it can compromise the operation of the extremely high impedance circuitry used there. Almost every large music store in the US stocks Deoxit, but in the UK you may have to order it from a studio supply company or track it down on the Internet.

Compressed air can sometimes remove dust that may be causing a pot to be crackly. However, the problem may not be dust: most pots have a carbon-based resistive track, and the action of the metal wiper contact eventually wears away some of the carbon, which can also generate crackling. If you use a cleaner/lubricant spray on a badly worn pot this carbon can mix with it, to create a greasy carbon-dust sludge. In the long term, replacing the pot is your best option, but a spray of Deoxit D5, or even off-the-shelf contact cleaner, may buy you some time. You need to be able to get to the back of the pot and spray into it where the three contact lugs exit the casing, so the flexible tube that comes with these sprays is useful here. Don't try to spray the top of the pot, hoping some will run down the shaft and into the mechanism, because that part of any pot is pretty well sealed.

Finally, a lot of dust-related problems can be avoided by covering mixing consoles and patchbays with cloths when not in use.


Published July 2008

Thursday, May 18, 2017

Q. What is the best way to record Guitar and Vocals at the same time?

I do a lot of recording and music production with acoustic musicians. If a piece of music has acoustic guitar and vocals, the musicians often like to do the singing and playing together in the same take, rather than separately record the guitar track and then overdub the vocals. Doing it this way does keep the live and natural feel but I always get vocals bleeding into the guitar channel, however carefully I position the mics. I use an SE large-diaphragm mic for the vocals and an AKG C1000 with a cardioid pickup pattern for the guitar. I love the sound of the C1000 — but is there a similar small-diaphragm condenser that is hypercardioid, to reduce the amount of bleed?
John Ablitt
An omnidirectional mic with an absorber behind it, placed slightly beneath and to the right of an acoustic guitar (from the player's position) can produce good results on singing guitarists, with minimal spill from the vocal mic. 
An omnidirectional mic with an absorber behind it, placed slightly beneath and to the right of an acoustic guitar (from the player's position) can produce good results on singing guitarists, with minimal spill from the vocal mic.  

Editor In Chief Paul White replies: Hypercardioids can be useful but are quite critical on positioning and tend to be less forgiving if the player moves around when performing, so I try to avoid using them in the studio whenever possible. They also have a vulnerable spot directly at the rear, where they can pick up unwanted sounds, so you must be careful where you aim the back of them.

I record a lot of acoustic players who want to sing at the same time, and providing the level of spill is low enough to allow you to get a good balance, it isn't usually a problem — as long as the spill isn't too coloured by the room sound. Hanging improvised acoustic absorbers around the playing area can help, the ubiquitous duvet being an obvious budget solution.

I'll often use an omni mic with an absorber behind it to capture the guitar sound — usually with the mic position below and in front of the the guitar body to the right of the player. Imagine the guitar is a Fender Strat and you're aiming the mic to look right down the jack socket from nine inches away and you won't be far off. The benefit of an omni mic is that the positioning is less critical, there's no bass boost if you work close up, and any spill comes across as more neutral sounding. That said, a cardioid can also produce perfectly acceptable results when used in much the same way.

Small-diaphragm condenser models generally work best for the guitar and large-diaphragm models for the vocals. You can still use your usual condenser mic for the vocals, ideally hung inverted just above the singer's mouth level and fitted with a pop shield. Try to get the singer to work fairly close up — six to nine inches or so — as this will keep the level of spill to a workable minimum. I find that this method still leaves you with some guitar spill in the vocal mic, but the guitar mic tends to pick up less spill from the vocals, as the position below the guitar puts it at a reasonable distance from the singer's mouth. This particular miking method also puts both mics at roughly the same distance from the guitar strings, so you shouldn't suffer any significant phasing when the two mic signals are mixed.

The other classic approach is to use figure-of-eight mics for both guitar and voice. The benefit of a figure-of-eight mic is that it is completely 'deaf' 90 degrees off-axis, so if you set up each mic so that the side axis points directly towards the sound source to be rejected, you'll get good separation — with the caveat that you have to take care to reduce unwanted sound getting into the rear of the mic. Duvet screens can help with this and commercial screens such as the SE Reflexion Filter also work well behind figure-of-eight and omni mics — as long as you don't get them too close to the mic. In all cases, maximising the physical distance between the mics as much as possible will reduce spill.


Published August 2008

Monday, May 15, 2017

Q. Do I need a Neumann?

If microphones tend to suit some voices better than others, do I really need a high-end vocal mic rather than a much more affordable mid-priced model?

I've noticed that many people mention how any given microphone will suit some voices and not others. However, they seem to make such comments more readily about the budget range of microphones, and I don't see big names like Neumann getting tarred with that brush. Is there an element of brand snobbery here? Or are mics such as those made by Neumann and Microtech Gefell designed so that they flatter everyone's voices?
 
SOS Forum Post
 
SOS contributor Mike Senior replies:
Q. Do I need a Neumann?You may find that the Rode NT1A  (left) sounds as good as a Neumann U87 on your voice.  But it may not, so it's important that you try before you buy. 
You may find that the Rode NT1A (left) sounds as good as a Neumann U87 on your voice. But it may not, so it's important that you try before you buy.

I've done quite a few multi-microphone shoot-outs for workshop sessions that I've run, and I think that my experiences might shed some light on your question. What I've found is that vocal mics roughly divide into three categories. In the lowest band are the mics that actually sound pretty ropey on every voice. These are mostly in the sub-£150 range, and in my opinion you need to step very carefully if that's your budget, to avoid getting your fingers burnt. It's not that there aren't any respectable mics in this price range, it's just that there are many dodgy ones too.

Then there is the second category. This comprises mics that sound passable on many things, great if the mic happens to suit the instrument or voice you're recording, and pretty horrid if it doesn't. This describes most of the mid-price mics I've tried, and even some of the more expensive 'character' mics. What is characteristic of this category of mic is that its sound is usually tailored in some way, either deliberately for a specific recording application, or because of design shortcomings. If you buy a mic in this category, you need to be prepared for it to sound terrible on some occasions and simply respectable for a fair amount of the time. However, if you're just recording one singer and it happens to sound fantastic on them, then you've obviously got yourself a bargain. This is why we so often recommend experimenting with various different vocal mics when you start working with a new singer. You also need to be careful when using 'category two' mics in any situation where you're likely to pick up appreciable levels of off-axis sound (room ambience or spill from other instruments), because these mics often give an undesirable tonality to off-axis sounds.

The third category of mic doesn't so obviously tailor the sound, instead capturing it fairly neutrally. This is where I'd put mics like the Neumann U87 or the B&K 4000 series, for example. The technical demands of producing such mics generally make them pretty expensive. The thing about mics in this category is that they tend to sound only 'very good' (if that makes sense) when the original sound source isn't stellar. In multi-mic shoot-outs, for example, I've found that at least one less expensive mic will usually out-perform the 'category three' mics (according to audience consensus). This is because the category two mic will happen to change the character of the sound source in flattering ways — perhaps compensating for that sound's inherent deficiencies. However, what I've also found over time is that category three mics never deliver an unacceptable result. Category two mics, in contrast, tend to appear at all positions in the hierarchy, from first choice to last, depending on the particular combination of sound source and room being used. To my mind, one of the most important things you're paying for with a high-end mic such as the U87 is that they will reliably give you very good recordings every time.

If the sound source you're recording already sounds fantastic, then the category three mic will tend to perform better when compared with the category two mic — it is likely to get closest to that glorious sound within the room. Furthermore, premium mics benefit from a great deal more engineering, partly developed to even out the off-axis sound. So if you're recording in a situation where spill may get into the vocal mic off-axis, then the differences between categories two and three begin to become much more apparent. There are now a lot of affordable mics that will give you a reasonable close-miked vocal recording when you work on-axis, and with a bit of acoustic treatment. However, if you put most of these mics out in the middle of an ensemble, their off-axis colorations can quickly let them down by compromising the effect of the other instruments with dodgy-sounding spill.


Published May 2008