 A little bit of creative MultiTap Delay can turn even the most basic of drum patterns into something groovy.
Looking for creative inspiration? Tap into Cubase's new MultiTap Delay...
Steinberg have seriously improved Cubase's stock plug-in collection in recent years, and among the new options for Pro and Artist users in v10.5 is the modestly named MultiTap Delay. It offers emulations of both modern and vintage delays, up to eight taps (repeats), and very flexible configuration and modulation options. I'll provide a very brief overview of the key features before illustrating some options via a specific example: spicing up a drum part to generate new rhythmic ideas.
MultiTap Delay's GUI is split into three sections. The central portion, with larger knobs and graphic display, is where you configure the number of taps, their relative timing, level and pan, feedback, and other settings that fine-tune the balance between the original and processed signals. Above this, in the Character Panel, you choose between four styles of delay (Digital Modern, Digital Vintage, Tape and Crazy) or pop open the full panel for more detailed adjustments to 'colour' the broad sonic character of the repeats. The options range from pristine, through lo-fi vintage/tape effects, to special effects territory. The bottom strip contains three more pop-open panels (Loop, Tap and Post) which focus on additional effects that can be applied to your delay line. Each provides a six-slot effects chain and there are 14 different effect types available. The three panels differ in terms of where their processing occurs in the signal path, with effects placeable in the effects loop, on individual taps or at the plug-in's main output. The effects include various modulation choices, filtering, pitch-shifting, panning, reverb and, as if eight taps with feedback weren't enough, an additional delay.
Fun With A Drum
For all the potential trickery, this is also a really good, all-purpose, delay plug-in — but its more creative aspects make it stand out from the crowd. So let me take you through a fun exercise with a drum sound.
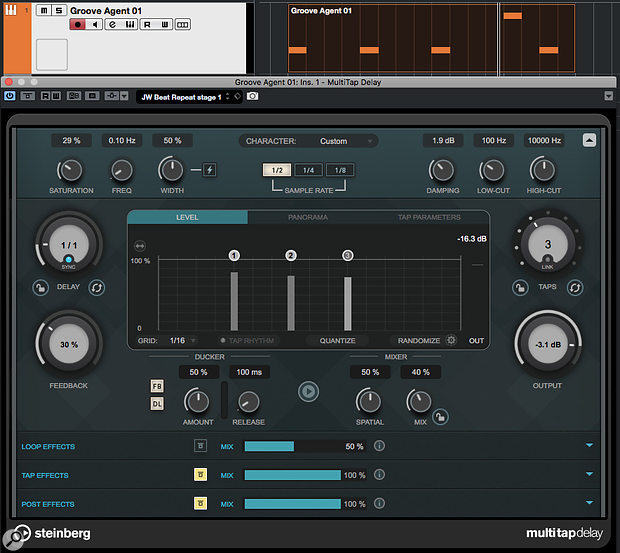
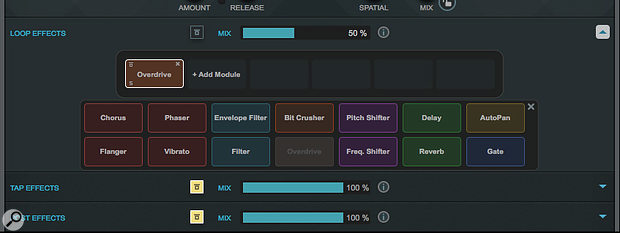
Our starting point is a simple four-bar Groove Agent acoustic tom pattern, with an instance of MultiTap Delay inserted on the GA Instrument Track. You could use the delay as a send effect, but for the automation options described below the Insert route is easier to configure, so I've done that here and set the delay plug-in's Mix control to 40 percent. I chose the Tape Character preset and tweaked the settings from there (more Saturation and picking the half-sample-rate setting), and added a touch of Overdrive in the Loop Effects panel for extra crunch. This combination means that, as well as adding rhythmic interest, MultiTap Delay will vary the sonic texture with each repeat.
 While I've only used a touch of overdrive in my example, MultiTap Delay's effects options provide plenty of interesting possibilities.
In the main panel, I've configured three taps with slightly decreasing volumes, and adjusted the Feedback to taste (30 percent) so the pattern of repeats is fed back to the delay line but (in this case) at a relatively low level. You can manually edit the position, level and pan of each tap or, via the Tap Rhythm button, position the taps by playing the rhythm that you require. Tap positions can be snapped to a grid resolution or moved without a grid. You also have Quantize and Randomise options (the latter is fun for a 'lucky dip' approach!). However, the key thing to understand is that the Delay setting determines the length of the tap grid. In this example, I've engaged the Sync option and set Delay to 1/1, so the tap grid represents one bar of time. A Decay setting of 2/1 makes the tap grid two bars in length, gives half a bar, and so on. Once you've grasped this, the logic behind laying out a pattern of taps becomes clear. (Without Sync engaged, Delay is set in milliseconds, but the same principle applies.)
Finally, I've engaged the clever Ducker controls — the repeats are ducked (in this case, their volume is lowered by 50 percent) whenever there's a signal at the input to the plug-in. This can be used to duck both the feedback and the delay line, and ensures that your original sound doesn't get masked by the repeats.
Tap Tweaker
As the audio examples at the end of this article show, we now have something more rhythmically interesting than our original drum pattern. Depending on the musical context this might be all you require, but if you're looking for more complexity, or to add variations during the performance, we can do plenty more.
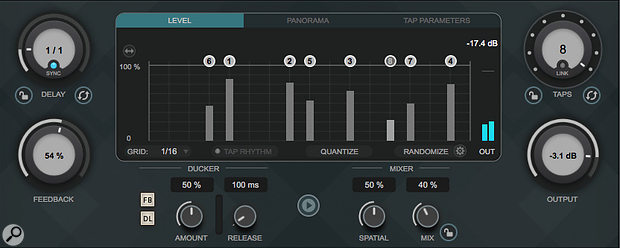
 As you adjust the Taps control, your additional taps do not have to appear sequentially along the grid timeline.
Effects aside, the two simplest tactics are (a) to add more taps and (b) to adjust the Feedback level. As it's super-easy to assign both the Taps and Feedback controls to the Track Quick Control system (right-click on the control to access the pop-up menu), automating both is a great way to change the intensity of the delay processing on the fly. Adjusting the Feedback level is straightforward, but for the Taps control you'll need to pre-configure each additional tap (position, level, pan, etc). It's worth noting that while you're allowed up to eight taps, and each is assigned a number, their position along the grid's timeline doesn't have to be numerically sequential — tap 7 can be positioned before tap 3, for example — so, as you automate the Taps control, you can add repeats with shorter or longer delays, as you prefer.
Double Delay
Again, if you check out the audio examples, you should hear that our very basic drum pattern has been transformed into something much more interesting, and it's possible to vary the intensity of the 'performance' with some simple automation moves. But you don't have to stop there. Why not add a second instance of MultiTap Delay, so you have a second set of eight taps to exploit in your quest for rhythmic variation?
 MultiTap Delay's parameters can easily be automated via the Track Quick Control system.
At this point, whether you use Insert (as here) or Send effects makes more of a difference. With Inserts, the repeats created by the first instance of MultiTap Delay become the inputs to the second instance and are then subject to processing; things can get quite busy very quickly! However, if you use two Send-based instances of MultiTap Delay, they're independent of each other; both are fed directly by your source track. On the flip side, real-time automation of your two MultiTap Delay instances is much easier when both are used as Inserts on the same track; you can use one set of Track Quick Controls to change the settings for both plug-ins. Real-time control is trickier to do with two independent Send effects.
Anyway, as a starting point for this 'double delay' effect (heard in the final audio example), I've configured two instances of MultiTap Delay as Inserts on my Groove Agent track, using the same simple drum part. To make this easy to replicate, on the first instance I selected the Alt Beat Counterpart preset, while on the second I used Snare Trap Groover. I then set the Feedback, Taps and Mix controls for both instances as Track Quick Controls. The Feedback and Taps controls can be used as before (although lower settings, especially of the Feedback controls, are best unless you want things to get really trippy). However, the two Mix controls are well worth playing with, as they allow you to blend the two delay lines or, by turning either Mix control to zero, effectively remove the delay processing of one plug-in or the other.
I've only really scratched the surface of what's possible with MultiTap Delay and, bar a little overdrive, not even started on the creative options provided by the various effect panels. Perhaps I'll explore that side of things in more depth another time!
No comments:
Post a Comment