The latest Cubase update connects Steinberg’s DAW to the cloud, but also brings plenty of improvements for earthbound users.
It doesn’t feel that long since Cubase 8 was launched, but Steinberg seem to be committed to an annual upgrade schedule where major integer releases are alternated with ‘point five’ updates. December 2015 was the occasion for one of the latter, so it’s to be expected that it offers fewer big new features than those introduced in a full integer version. That’s not to say there aren’t any big new features — far from it — but this release is more about refinement, offering a large number of workflow improvements. Most apply to both Cubase Pro and Cubase Artist, and in this review, references to ‘Cubase’ will include both unless otherwise stated.
Hopping On The Transit
The big new feature in Cubase 8.5 is VST Transit, which allows you to upload and download project data to and from the cloud, and is intended to make collaboration easier than ever before. To whet your appetite for this new way of working, VST Transit comes with 500GB of free storage and 1GB free traffic (the amount of data you send to and from Steinberg’s servers) per month. This doesn’t sound like much to me, especially on the traffic side, so it’s no surprise that Steinberg intend to offer premium accounts with increased storage and traffic, although these had yet to be announced at the time of writing.
In order to use VST Transit you’ll need to have a full 8.5 licence associated with your MySteinberg account — VST Transit is not available if you’re running a trial version, which is a shame. To get started, select VST Transit from the VST Cloud menu (which also contains the VST Connect sub–menu that’s been relocated from the Project menu). The VST Transit window often takes a moment to appear while it downloads the latest version, and when it does you’ll be prompted to log into your MySteinberg account. After this, you’ll choose a VST Transit user name and accept Steinberg’s privacy policy, which I clicked on out of curiosity and found to be mercilessly brief.
The policy sets out what Steinberg are offering and essentially absolves the company of any liability to any “indirect and consequential damages” you might suffer by having your data stored via the service. This is all fairly standard stuff, although the line I found most intriguing (and not uncommon for cloud services) was that “Steinberg guarantees availability of the service for 98 percent of the year”. This means there might be around a week of time over the course of the year when the service might not be available.
The VST Transit window contains three basic pages, and the first one — Profile — is where you’ll enter your location, the languages in which you’re able to converse, skills, instruments and genres you’re able to contribute to, as well as a short description of yourself. You can also upload a representative 30–second audio clip and specify whether other VST Transit users will be able to view your profile.
Cloud Noises!
Now, let’s say you’ve been working on a piano sketch of a musical idea and you want to share it with somebody else to flesh out the instrumentation. To upload this to VST Transit, you select the Projects page in the window, which lists all of your cloud–based projects. The status of different projects is illustrated by a colour bar next to the name: cyan for private projects that haven’t been shared with anyone, magenta for projects that you have shared, and orange for projects that have been shared with you.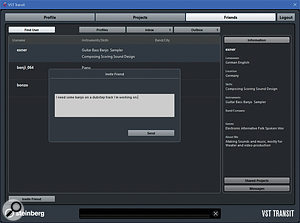 I was looking for a banjo player and, what luck! VST Transit has been able to track one down for me in Germany.
To add the project currently open in Cubase (which must be saved locally before it can be uploaded), simply click Create Project. VST Transit will think for a moment, add your project to the list, and then begin uploading all of the assets from your project to the cloud.
At this point, you can now invite a so–called Friend to have access to this project, although before you do this, of course, you’ll need to invite some fellow VST Transit users to become your Friends. The Friends page is where you manage such connections, and consists of three sub–pages: Profiles, Inbox and Outbox. The Profiles page shows your list of Friends, while the Inbox and Outbox show incoming and outgoing communications with your Friends.
By clicking the Find User button on the Profiles sub–page you can search for users you know — by typing in a user name — or users you don’t, by typing in the name of an instrument that another user might play. A list of users matching your search will be displayed, along with information from their Profile; and when you find a suitable user, simply select them and click the Invite Friend button. A dialogue will appear where you can enter a greeting and click Send to invite that user to become a Friend. It’s all very social media.
After the invitation is sent, that user will see your username in orange on their list of profiles on the Friends page, and the request will also be visible from the Inbox sub–page. With the username or message selected, the other user can click either Accept Invitation or, perhaps more temptingly, Decline. If the other user accepts the friendship, they can enter a reply and click Send to consummate the new relationship.
Back in the VST Transit window, you’ll get a message in your Inbox to say that the friendship has been accepted, and you can now share your piano sketch with your new Friend by selecting the project on the Projects page and clicking Invite Friend to Project. A list of Friends will appear to the right of the window, and you simply select the appropriate one and click Invite Friend. Once again you get the opportunity to enter a message before clicking Send. It’s also possible to control which tracks will be visible to your Friend, by toggling the ‘visible’ tick box for each track in the State column when a project is expanded, before sending the invitation.
To Me... To You...
Your Friend will receive a message in their Inbox to indicate that you’ve shared a project with them, and this will now show up in their list of projects. All they need to do is select it on the Projects page and click Open Project. Cubase will ask them to create a new project (if one isn’t open already), and a folder track named after your username will be created in the new project, containing your piano track. The events and parts on the tracks within such a folder track are locked in such a way that they can’t be unlocked, although it is possible to duplicate them so you can use and manipulate the material. The VST Transit Projects page shows a list of projects. Here you can see I’ve added my piano sketch and shared it with a user who is listed under Project Members. The blur is of my doing rather than Cubase’s!
When your friend has worked on something and wants to send some ideas back to you, all they have to do is have the appropriate project selected in the VST Transit window and click Sync Project. Now, when you click Sync Project, a folder track will be added to your project containing the tracks that your has Friend been working on. In order to keep track of the status of a project, the VST Transit Project page has a State column where you’ll see up and down arrows for each project. If the up arrow is highlighted, it means there are edits you’ve made that have yet to be uploaded to the cloud; whereas, if the download arrow is highlighted, you’ll need to synchronise the project to download the latest updates from your Friends.
One important point to mention is that despite Cubase projects and VST Transit projects both using similar nomenclature, they are not the same, meaning that VST Transit projects do not contain all of the data from a Cubase project. This results in some slightly confusing language in the manual, such as “upload and download the media data of a project” — exactly what “media data” are we talking about? But help is at hand on Steinberg’s web site, where you’ll find a list of features supported by VST Transit. At the time of writing, the service supports audio, instrument, MIDI and folder tracks, Steinberg VST3 instruments, fader and pan controls, event volume and mute, note velocity, fixed tempo, and the sample rate and resolution of a project.
On the whole, VST Transit works surprisingly well, and keeping the collaborations organised within folder tracks is a neat idea. However, as with any new feature of this nature, I did notice a number of quirks along the way. Despite the claim that VST3 instruments are supported, the first time I downloaded my piano track in another project as another user, the piano preset wasn’t carried over and the default sound was used instead. The second time I tried this in another project, everything worked fine. Also, when using the Mac version, I accidentally managed to pick the Delete Project command by right–clicking on a project in the VST Transit window, and the resulting alert asking me if I really did want to delete the project contained only a Yes button, which was rather alarming. And furthermore, the VST Transit interface itself seemed sluggish at times, although I’m not sure how dependent its snappiness is upon the quality of available Internet connectivity.
Overall, VST Transit is less ambitious than previous attempts made by Steinberg and other companies at integrating collaboration features, or even more contemporary examples, such as Avid’s forthcoming Cloud Collaboration for Pro Tools. However, I would venture that this is probably a good thing, at least for a first iteration.
Track Addition
While it might not seem particularly titillating, Steinberg have made a number of improvements to the process of adding tracks to a project. To begin with, when creating audio–based tracks, you can now select an output to which the added track (or tracks) will be assigned; and for FX Channel tracks, you can now specify whether the track(s) will be created inside the FX Channels folder or not. The Add FX Channel Track window also gains the naming field found on similar windows, so you can override the default naming. So far, so good.
A more interesting improvement concerns the Media Bay, which, until now perhaps, I must confess that I’ve hardly ever used. However, Cubase 8.5 introduces to the Media Bay something called Media Racks, which can be displayed in the project window, providing a quick way to add VST instruments and content to a project. The Media Bay in the project window now features a Home view that shows Media Rack icons for Instruments and Loops & Samples; there’s also a ‘More’ icon that takes you to a page providing access to track, VST FX, FX Chain, and Strip presets, as well as Pattern banks. I don’t why these couldn’t be included on the home page, since there’s plenty of space.
Clicking Instruments takes you to a list of icons representing all the installed VST3 instruments that support this feature. Clicking on one of these takes you to a new page showing installed content for that plug–in. In the case of Groove Agent SE, for example, this included four content packs: AM Signature Drums, GA SE Factory, Rock and Pop Tool Box, and Studio Kit SE. Clicking one of these brings up the more traditional Media Bay view showing the list of available presets, which you can now drag to the Track List to add an instrument track with the desired instrument and preset to the project. Being picky, it seems a shame you can’t drag an instrument to create an instance without having to first choose a preset.
Last but not least in the Media Bay Rack is that it’s now possible to drag loops onto the track list as well as the Event Display. Previously, you could only drag loops onto the Event Display, either onto an existing audio track or in an empty spot below, to create a new audio track where the loop would be placed. Now you can drag the loop anywhere in the Track List to create a new track at the desired location in the list, with the loop conveniently placed at the project cursor position. Nice! (Although it made me wonder why I couldn’t do the same when creating tracks based on presets, as discussed in the previous paragraph.)
Universal Import
The track–related feature users will likely welcome the most is Import Tracks from Project, which makes it possible to import tracks from a project file without having to open the other project, or perform the Import/Export Track Archive ritual. An earlier version of this command — Import Audio Tracks from Project — debuted in Nuendo 7, although it was limited, as its name suggests, to importing only audio tracks.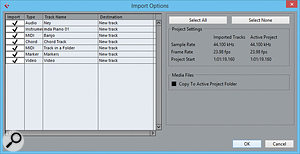 The new Import Tracks from Project window allows you to import certain tracks from other projects without having to open the project directly.
It’s now possible to import a greater variety of tracks, but not all of them. Folder tracks can’t be imported, and although the tracks contained within them can be, you obviously lose the hierarchy of your track structure. Other track types that can’t be imported include FX Channel, Ruler, Signature, Tempo and Transpose tracks; while I don’t care about Ruler tracks, it’s kind of a shame that FX Channel tracks can’t be imported. Also, since you can already export and import Tempo tracks between projects, it seems strange that you can’t import Tempo tracks using this new command.
Project Window
There are also a number of smaller tweaks to the project window in Cubase 8.5. Although the first improvement may seem small, it’s actually huge: namely the ability to scale Tempo events on the Tempo track in the same way you could scale automation events in previous versions. When you select a number of Tempo events, a rectangle highlights the events and you’ll see the familiar four handles to tilt or compress left and right, scale or move vertically, stretch, and scale around the absolute or relative centre.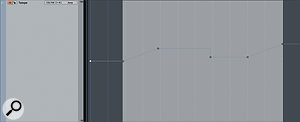 You can now manipulate a selection of Tempo events in the same way as automation; note the four handles around the selected area.
If you’re working with video this feature is going to be amazing, especially since Cubase now also keeps the project cursor at its current musical time position when the tempo is changed, rather than the current linear time position as before. This means that as you scale the tempo (or indeed make tempo changes), you can see exactly what frame a musical position will hit if you have the video window open. I did however manage to break this feature at one point, with Cubase reverting back to the behaviour where the project cursor was locked to linear time, though I’m still trying to figure out if this is a bug or if I hit a key command I shouldn’t have.
This feature only works on the project window and isn’t available in the Tempo track editor itself, although I’m not sure how big a deal this is since I don’t think people use that window much these days. However, I would still like it if the Tempo track (and indeed other tracks, such as Time Signature and Marker) could be available in the editor windows, not just the Project window.
Moving automation could previously be a bit of pain, since you could only drag a selection of automation events as far back as the previous event before the selection, and as far forward as the next event after the selection. Not any more! In Cubase 8.5, you can now move a continuous selection of automation events anywhere you like, and Cubase will shuffle the existing events accordingly. (Interestingly, though, this is one feature that doesn’t work for moving events on the Tempo track.)
Another handy editing improvement is the addition of a Duplicate handle to parts and audio events. Rather than using the Duplicate command to duplicate the current selection along the timeline, you can now drag a handle that appears to the right (centred vertically) of the selected parts or events.
The final tweak to the project window is the introduction of what Steinberg term Edge Zones. Edge Zone pop–ups appear when the mouse is hovering near the edge of the project or Mix Console windows, allowing quick access to toggle the visibility of certain user–interface aspects. Previously, when you wanted to toggle the visibility of different areas of the window, such as the Inspector or Status Line, you’d click the Set Up Window Layout button (or use the key command) and specify which areas of the window should be visible. This option still exists, but now you can hover near the edge of the window and a pop–up will appear to toggle the visibility of areas relevant to that part of the window. For example, if you hover the mouse near the top of the window, just underneath the title bar, you get the options to toggle the visibility of the Status, Info and Overview Lines.
I’m not sure I personally care for these Edge Zones, since they only really work well on single–monitor systems like laptops where getting to the edge of a maximised window is easy. If you work with maximised windows on a system with multiple displays, it gets a little tricky to find the appropriate place to hover the mouse. However, I’m sure some users will find them handy, and Steinberg have also implemented them in the Mix Console window as well.
It’s All In The Double–Click
In addition to the editing–related improvements to the project window, Steinberg have also made some pleasant enhancements to the MIDI editors. For example, it’s now possible to double–click in the Key or Drum editors to create a note without having to use the pencil tool (or holding down Alt/Option), which is handy. And, if you keep the second click held as you’re creating the note, you can drag vertically to adjust the velocity of the note. Dragging horizontally has different behaviours in the different editors: if you drag horizontally in the Key editor whilst creating a note, you adjust the length as you would have previously when using the draw tool. However, in the Drum editor, this same gesture will create additional notes based on the current quantise value. Also in the Drum editor, you can double–click existing notes to delete them (which obviously doesn’t work in the Key editor, as this is the way you open the Note Expression editor).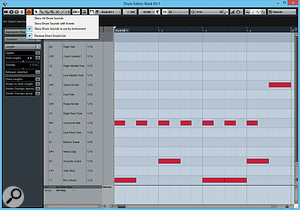 The improved Drum editor now offers Drum Visibility Agents, and here you can see that I’m showing only the drum sounds in use by this particular Groove Agent SE preset. I’ve also reversed the order, which I’ve found actually makes it easier to read. Also, notes can optionally be displayed as rectangles, allowing you to see the length of a note.
While I’m on the subject of double–clicking, it struck me as a shame that Steinberg didn’t also make it possible to double–click in a MIDI track on the Project window to create a MIDI part — especially since you can double–click in the Track List to add a track. Oh well, I guess I’ll have to stick with the Alt/Option key for the moment.
Getting back to the Drum editor, Steinberg have also added a Length Display Mode that allows you to view the length of notes, much as you can in the Key editor. When enabled, the notes are no longer displayed with the familiar diamonds, but as rectangular blocks where the width represents the length, and this can be adjusted in the familiar way.
The Drum editor also gains Drum Visibility Agents in Cubase 8.5, which work in a similar way to the Track Visibility Agents added to the project window in version 7.5, allowing you to configure which drum sounds you see in the editor. Click the new Drum Visibility Agents button on the Drum editor’s toolbar, and you’ll see three basic options: Show All Drum Sounds (the default and previous behaviour), Show Drum Sounds with Events, where only the drum sounds containing notes will be shown, and Show Drum Sounds in use by Instrument. This last option is quite interesting, as it will query a VST instrument as to what drum sounds are assigned to which MIDI notes, and then build a corresponding Drum Sound List. For this to work, a plug–in must support this aspect of Steinberg’s latest VST3 specification, and you can see how useful this can be with the included Groove Agent SE.
A fourth Visibility option is also available that can be used in conjunction with the other three — Reverse Drum Sound List — which, as you might predict, reverses the order in which the drum sounds are shown.
Finally, another handy editing improvement is the ability to temporarily suppress Snap mode by holding down Ctrl or Command whilst dragging an event. This works in the Key, Drum and List editors, as well as for parts and events on the project window.
And Finally...
Rounding off Cubase 8.5 are a number of small improvements that don’t really fit under any collective heading other than miscellaneous. The first of these caused something of a frisson, I must admit: Steinberg have finally added sensible hover controls to insert, send and EQ slots, instead of those stupid, anonymous dots that have plagued recent versions. So rather than seeing dots when you hover over an insert on the Mix Console window, for example, you’ll now see more recognisable icons to represent the bypass, editor and select controls. Also, Steinberg have added a new double–height view that enables you to see a row of controls above the plug–in’s name without having to hover thouse mouse over it at all — and this is the same view that’s now used in the Audio Inserts Inspector Section as well.
However, you can’t always have an improvement without a regression, because while it used to be possible to bypass an insert with a single click, now you have to Alt/Option–click the bypass control on Mix Console or the equivalent Inspector Section. Why?! Even more bizarre is that the control to toggle whether a send is active can in fact respond to a single click. Oh well.
Cubase 8.5 includes version 3 of zPlane’s Elastique algorithms for time–stretching and pitch–shifting, which has improved transient processing and reduced memory use. And if you’re a fan of Retrologue, the virtual analogue synth plug–in Steinberg include with Cubase, you’ll appreciate Retrologue 2, which adds a third oscillator, double the number of filter types, two additional LFOs and an independent envelope generator, an arppegiator, and a greatly enhanced effects section that now includes a three–band resonator.
Last but not least, the Export Audio Mixdown Naming Scheme window has been updated to the same format introduced by Nuendo 7’s Render Export function. You can now define a naming scheme by dragging and dropping various attributes, specifying a separator character that should be used between them. A preview of how the exported file will be named is displayed, and you can store and retrieve any naming schemes that you create. One slight oddity is that the Naming Scheme window didn’t offer the Counter attribute, yet it did provide the controls to offset the counter and specify the number of digits it should use. Referring to the manual, there’s a screenshot on page 969 that does indeed show the Counter Attribute, along with another attribute named Mixer Index, which I assume was an earlier name used for ‘ChannelNumbr’. So I’m guessing this is a minor oversight soon to be rectified.
Point Break
There’s a great deal to like about Cubase 8.5; Steinberg have taken what was already a very strong and comprehensive release and made it — as you would hope with an upgrade — even better. It will be interesting to see if VST Transit sees wide adoption amongst Cubase users, though I remain sceptical about just how useful this sort of functionality is in the real world, and, more importantly, if people will pay for the additional storage and traffic that will be required.
For those who will be using Cubase offline, the editing improvements in the both the editor and project windows will be appreciated, not to mention the ability to import tracks from a project file. Given that Cubase 8.5 can be installed alongside 8.0, there’s really no reason for existing users not to take the plunge, since you can explore the new features before committing to the new version, and Retrologue 2 will be available in the older version.
However, as is to be expected with any significant upgrade, you may experience teething troubles. For example, I’ve had several friends complain about plug–in incompatibilities when loading up their existing templates. And if you’re not already using Cubase, the pace of its annual upgrade program — not to mention its ever–increasing sophistication — must be making Steinberg’s ‘Advanced Music Production System’ look more than a little tempting.
Pros
Cons
Summary
Steinberg have once again pushed Cubase forward with a host of refinements while also dipping a toe (or should that be poking a finger?) into the cloud.
Information
Test Spec


No comments:
Post a Comment