By John Walden
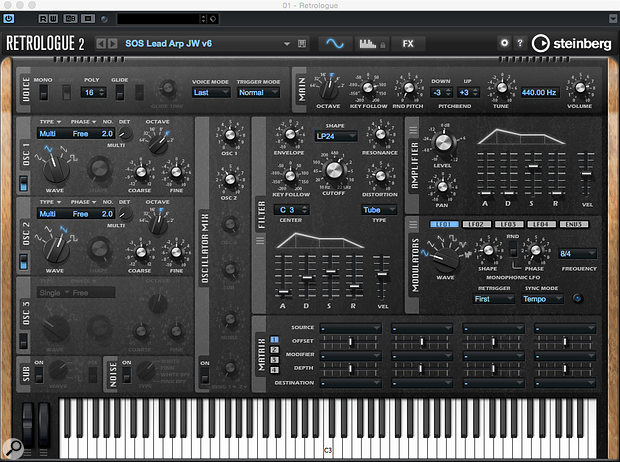
 Screen 1: Fat, but not too fat for an arpeggiated lead sound. You’re probably best keeping things fairly simple in the oscillator and filter section.
Learn to make the most of Cubase 8.5’s Retrologue 2 synth.
Last month (http://sosm.ag/cubase-0516), I introduced you to patch creation in Cubase’s Retrologue 2 synth. This time, we’ll explore some of its more advanced features. We’ll start with the same vanilla patch as last month (the ‘Init Retrologue 2’ preset). Step by step, we’ll morph that into an arpeggiated lead patch, exploring four key areas of the synth along the way: the oscillator section (with which we can create more harmonically complex starting points for our sounds); the modulation matrix (via which we can add interesting timbral changes); the arpeggiator (perfect if your keyboard skills are as limited as mine!); and the effects section (for some additional sonic seasoning).
Fat Or Thin?
Start by setting up a dual-oscillator sound (see Screen 1) using a combination of triangle and sawtooth waveforms. To make the oscillators sound a little richer, select the ‘Multi’ option (each ‘oscillator’ actually comprises two oscillators), and use the Detune controls for each oscillator to lend the sound a little extra thickness. For this example, I also tweaked the filter section and the amplifier envelope, as shown, to arrive at the basic tone I wanted. There aren’t really any rules to follow here — you just have to understand how an envelope control works.
The result is a fairly warm lead synth tone with some subtle tonal variations created by the filter and its associated envelope. Note the very short R (release) time in the amplifier; at higher tempos, arpeggiated parts will get a bit messy if notes are allowed to sustain. As you’ll see, though, there are ways to control note lengths within the arpeggiator itself.
We could go fatter still, for instance by adding more oscillators and ring modulation — the subtle pitch and timbral differences between each ‘part’ add to the harmonic complexity of the patch in a way that’s not dissimilar to double tracking a vocal or instrument. However, we’ll stay on the ‘thin’ side here, because busy arpeggiator parts often need a bit of space in which to breathe; if the basic sound is too rich the part can sound a bit bloated or congested.
Repeat After Me
Retrologue 2’s arpeggiator is split into a number of sections, and it goes way beyond the ‘notes up/down’ and ‘1, 2 or 3 octave’ options provided by most basic arpeggiators. I can’t cover all the details here, but let’s look at some of the options I’ve used (see Screen 2).
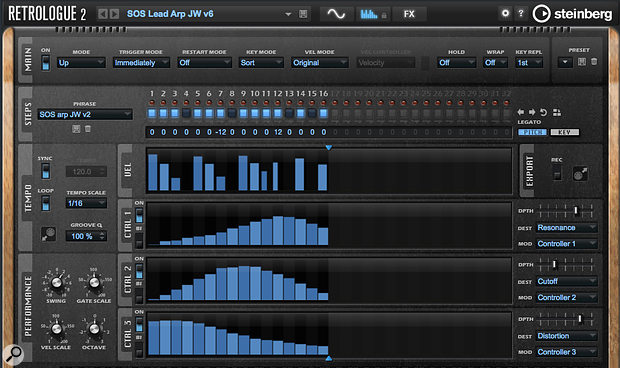
 Screen 2: Retrologue’s arpeggiator is very well featured and includes (far-right) a ‘mini’ modulation matrix.
At the top, the Main strip includes a number of ‘master’ settings. For example, you can toggle the arpeggiator on/off, set the mode (this is where the up, down, random, note-order options are accessed) and set the trigger mode (I chose ‘immediately’ but the arp can be set to wait before responding to new notes until the next beat or the next bar if you prefer). I also chose ‘original’ in the Vel Mode option. This uses the MIDI velocity specified in the arpeggiator’s Vel lane but, if you choose Vel Controller, the next Main strip item allows you to use incoming MIDI velocity data or another MIDI CC. I switched Hold off — choose ‘on’ if you want be able to release the keys and have the arpeggio continue to play. Screen 3: The main Modulation Matrix provides a huge set of source, modifier and destination options.
The Steps lane allows you to define a step-based pattern of up to 32 steps and configure whether the steps are on (a note in the arpeggio plays) or off. Beneath the step buttons, you can also set a step to play legato (the note will sustain over multiple steps until the next note plays) although, as we’ll see in a minute, there is an alternative way to control the note length for each step via the Vel lane.
Beneath the Legato lane, a further lane can be toggled between Pitch and Key modes. In Pitch mode, this allows you to set pitch offsets for each step (in semitones). The pitch shift is relative to the triggered note within the chord being held down so, unless you really know your stuff in terms of keys/scales, octave shifts (±12) are the safest options for adding interest to the pattern. In Key mode, you can control which key (from those held down on the keyboard) is triggered at each step. The Key mode setting (in the Main strip) plays a role here, but it’s worth noting that you can select ‘A’ for a step and this plays ‘all’ the keys, giving you a full chord on the specified step.
The Vel lane allows you to specify the note velocity used for each active step in your arp pattern, adding a sense of ‘groove’ via volume dynamics. However, you can also adjust the note lengths here; if you grab the right edge of any velocity bar (the edge becomes highlighted), you can drag left/right to change the length of the note to create whatever combination of shorter or longer notes you require.
There are features I haven’t the space to mention, but even this brief introduction should give you a feel for what a powerful tool Retrologue 2’s arpeggiator is; it allows you to seriously spice up the rhythmic element of any arpeggio pattern.
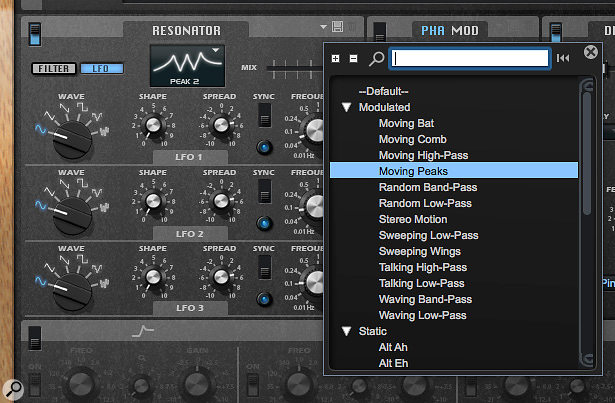
 Screen 4: Via the Effects section, I added a bit of delay and a dose of the Resonator to spice things up.
Enter The Matrix
We touched on the Modulation Matrix (Screen 3) last month: it allows you to use the value of one (source) parameter to modulate (change) the value of another (destination) parameter. You can also modify the values of the source by specifying a modifier. Modulation sources can include Retrologue’s own LFOs or envelopes, note velocity, or pitch and external controllers such as pitch and mod wheels or aftertouch. The list of destination parameters is extensive — if it moves in Retrologue, the odds are you can modulate it.
With 16 slots in the Matrix, there’s a probably more modulation potential than you’ll ever need, and there’s certainly plenty of scope for creating very dynamic sounds with lots of sonic changes. This sort of thing will generally yield more satisfying results on sustained sounds rather than the short, sharp notes typically used in an arpeggiated pattern. But even so, it’s worth exploring the options.
 Note that many of Retrologue’s sub-sections (including the Resonator shown here) feature their own preset systems.
As last month, we could start working in the Matrix itself, but the three Ctrl (control) lanes are worth investigating too, as they’re incredibly useful for designing modulation settings specifically for use with the arpeggiator. Switches allow you to toggle each lane on or off, and you can draw in values for each step within each lane, just as you can with note velocity in the Vel lane. To the right of each lane is a ‘mini’ modulation matrix, where you can link each Ctrl lane to a destination parameter. Obvious targets are filter resonance and frequency, and distortion, but there’s nothing to stop you experimenting with other parameters in this way; the Ctrl lane data ensures these parameters change in sync with the arpeggiator pattern.
Final Touches
Our arpeggiator-based patch is already pretty dance-music friendly, but a quick visit to Retrologue’s Effects page provides ample opportunity to make it even more ear-catching. I added just a touch of tempo-sync’ed ping-pong delay, with low Feedback and Mix levels so the repeats don’t create too much clutter. I also rolled off some high-end on the repeats via the High Freq control.
Finally, I engaged the Resonator section (Screen 4), which provides various additional filter types. There are some good presets for the Resonator (as there are for many of Retrologue 2’s sections) to get you started. Having auditioned a number of them, I simply picked the ‘Moving Peaks’ preset, which seemed to add a nice sense of additional motion to the sound.
You can get as creative as you like with the rest of the effects. You can even change the effects order by dragging and dropping elements in the signal-chain graphic at the top of the Effects page. For this example, I felt it was a case of ‘less is more’ — our arpeggiated lead patch sounds ready for dance-anthem action!
Between this workshop and last month’s, I’ve only really scratched at the surface of what’s possible using Retrologue 2, but hopefully my examples will have given you a feel for how to make the most of this powerful and complex synthesizer. Despite its sophistication, you don’t require a PhD in synth programming to move beyond its generous list of presets.
Published June 2016
No comments:
Post a Comment