Thursday, July 17, 2025

Wednesday, July 16, 2025
Cubase: Vocal Delay Treatments
 MonoDelay with the side-chain input activated. The second send is routed to the MonoDelay side-chain input to create a ducked delay effect.
Are delays suffocating your vocal parts? Cubase has the answers!
In pretty much any song-based production, the vocals take centre stage, and while a well-recorded killer vocal performance is a great start you can often enhance it. Reverb and delay treatments, or a combination of both, can be part of that, but reverb often seems to move sounds ‘back’ in a busy mix, and in many contemporary styles, especially pop and EDM, the vocals need to remain up front if they’re to stand a chance of competing with everything else. Judicious use of delays can help you here, so let’s consider how you might best use Cubase’s bundled delays to add a little space and spice to your vocals, while keeping everything up front and personal.
The Cubase range features a number of delay plug-ins: MonoDelay (included in all Cubase variants); PingPongDelay (in Cubase Elements and upwards); StereoDelay (Cubase Artist and Pro only); and ModMachine (Cubase Pro only). They all have their uses. The last three are more obviously of a ‘creative’ variety, but even if you only have MonoDelay a few easy workarounds will have you teasing out some lovely creative effects.
Duck, Duck, Gone!
In a busy mix, a generic wash of spatial processing on a lead vocal adds to the wall of sound, and can make the mix as a whole feel muddled. This is where the classic ‘ducked delay’ treatment comes in: instead of applying a delay to the whole vocal, a ducked delay only makes its presence felt where there’s the ‘sonic space’ for it to do so — for instance, in the gaps at the end of one vocal phrase before the next phrase begins. During these gaps, the listener can hear the delay effect clearly, but the level of the delay is suppressed during the singing, so as not to obscure the all-important vocal part.
 StereoDelay, with the send automated to add delay only at the ends of phrases. Different delay timings are used on the hard-panned left and right channels to enhance the stereo effect.
If you’re using Cubase Artist or Pro, MonoDelay features a side-chain input that can create this ducked delay effect automatically. First, create an FX Channel and insert MonoDelay on it. Dial in some suitable settings (for starters, try a quarter-note sync’ed delay) and switch on its side-chain input, which glows orange when enabled. Now, on your lead vocal track, set up two sends (post-fader, which is the defult). The first sends the vocal to the MonoDelay effects bus — if you just enable this, you’ll simply get a delay across your whole vocal. Then add a second send from the lead vocal, this time to MonoDelay’s side-chain input. The delay will now only kick in during pauses in the lead vocal part; all you’ll hear is a delay effect applied to just the end portion of each vocal phrase.
If you’re lucky, this can sound pretty cool. Why luck? Well, more often than not, you can generally get more musical ducked-delay results via a DIY approach that uses automation data and is very easy to setup, albeit somewhat time-consuming to execute. As above, create your FX Channel with MonoDelay and enable a send from your lead vocal channel. Don’t engage the side-channel input this time but instead add an automation lane on your lead vocal track that points at the send level to the delay plug-in. All you need to do is create automation data that increases the send level to the delay at the end of each vocal phrase where you want the delay effect applied. This is more laborious, of course, but I often find I can achieve this more efficiently by draw the send envelope for my first ‘spot’ of delay and copying and pasting that data to the other spots where I want the effect applied. The upside is that you get much more precise control over the effect.
 If your version of Cubase lacks StereoDelay you can use two instances of MonoDelay instead.
Delay Out The Way
As a lead vocal is usually panned to the centre of the stereo image, a further way to ensure that the delay doesn’t step on the toes of the vocal is to pan the repeats. Artist and Pro users can simply replace MonoDelay with StereoDelay in the arrangement described above to explore this and, as shown in the screenshot, you can use StereoDelay’s pan controls to send the left/right delay lines as far to the edges as you wish. It’s a good idea to apply different delay times to each side, to separate the left/right repeats somewhat and create a nice stereo effect for the listener. If you don’t make the left and right sides different they’ll simply combine to form a phantom centre image, which rather defeats the point of using a stereo delay!
 ModMachine can add some interesting filter and distortion options to the delay effect.If you don’t have StereoDelay you can use this trick with MonoDelay. First, create an FX Channel with MonoDelay inserted. Duplicate this so you have two identical MonoDelay FX Channels. Route a send from your lead vocal track to the first FX Channel, and another to the second. If you’re building on the ducked delay example, open a further automation lane for your vocal track, set the second FX send level as its target and copy any send automation data you created for the first MonoDelay and paste it here. In the MixConsole, opposite-pan the two FX Channels containing MonoDelays, putting one hard left and the other hard right. Finally, tweak the settings of the two MonoDelay plug-ins to ensure the left and right delays have different characteristics so that you get a true stereo effect.
Colouring In
In all the earlier screenshots, I’ve used the filter options in the delay plug-ins to roll off both high and low frequencies in the delay sound. This can sound quite cool but it also helps in keeping the delay ‘further back’ in the mix — out of the lead vocal’s way, without pulling the lead vocal itself back with it. But EQ’ing the delay in this way is not the only way you can add sonic spice, and ModMachine provides more such options. Although ostensibly a delay plug-in, it also provides filter, drive and modulation options that can be varied using its LFO (via the Rate Mod setting). For example, the Width control sets the amount of modulation applied to the delay and can take you from a vibrato through to a chorus, while the Drive controls adds distortion to the feedback loop. If you apply lots of feedback (lots of repeats) then they’ll gradually get more distorted over time, which can sound great.
While ModMachine makes this sort of thing easy, you can, again, achieve similar effects using MonoDelay by inserting some additional plug-ins on the FX Channels before or after MonoDelay itself. For example, if you’re limited to using MonoDelay, adding an instance of AutoPan can get your delays moving across the stereo image, without having to use two delay sends.
 MonoDelay can be combined with other stock Cubase distortion or modulations plug-ins to achieve similar results to some (but not all) ModMachine patches.If you want to get a little closer to what ModMachine delivers, a combination of a distortion plug-in and a modulation plug-in make a good starting point. In the screenshot below, I’ve gone back to basics with a combination of Distortion (left), DaTube (right) and Chopper (left and right), all of which are included from at least Elements upwards. The contrasting distortion plug-ins on the left/right MonoDelay channels added some extra spatial interest, and I also applied different settings to the two Chopper instances, both of which were used to create a sort of vibrato sound on the delay lines.
There are some limitations when working in this way — there’s no way to insert plug-ins into a delay plug-in’s feedback loop, and the internal routing in Cubase seems to prevent a workaround — but there are probably more creative options to explore here than you’ll ever need. Just to illustrate the key ideas I’ve explored here, there are some example audio files on the SOS web site for you to check out (http://sosm.ag/dec16media). So next time you’re presented with a great vocal recording, why not experiment with delay to make it even better?
Tuesday, July 15, 2025
Monday, July 14, 2025
Q. Can I split Cubase tracks into different frequency bands?
 Blue Cat's MB7 Mixer plug-in.
In Ableton Live, I used to use a plug-in to split a channel so that I could do multiband processing. I’m now using Cubase Pro 8.5 and it doesn’t seem to work — I can only have a mono or stereo channel. So my question is, what’s the best way to do multiband processing in Cubase?
Jamie Gibbons via email
SOS Reviews Editor Matt Houghton replies: It’s worth mentioning that Cubase has a number of multiband plug-ins: a compressor, an expander and an envelope shaper, as well as the Quadrafuzz v2 multiband distortion/stereo widener. But if you want to split the channel into different bands so that you can insert your choice of plug-ins on each Cubase has some limitations, and so you’ll either have to invest in a third-party multiband-capable plug-in host, or route the track in question to different channels and apply bracket filtering to each (effectively creating your crossover), and routing them in turn to a Group channel so you can process the whole signal afterwards.
In terms of multiband plug-in hosts, DDMF Metaplugin, which is supplied with multiband splitter and mixer plug-ins and offers intuitive drag-and-drop routing, is worth a look. Another excellent option is Blue Cat’s MB7 Mixer (shown above), which has a more familiar-looking approach to routing, but includes some useful additional features.
Saturday, July 12, 2025
Friday, July 11, 2025
Cubase's MIDI Drum Editor
 Cubase’s Drum Editor, with a simple drum pattern that’s been ‘humanised’ via a little velocity editing and some subtle timing tweaks via the Quantize panel.
Don’t take Cubase’s dedicated MIDI Drum Editor for granted — it’s a gem!
Longstanding Cubase users might take it for granted, but the humble MIDI Drum Editor has long been the subject of envious looks from users of other DAWs, and if you’re new to the wonderful world of drum programming, or perhaps feel you don’t have the drumming chops to build your own patterns from scratch, the Drum Editor can help you in lots of ways — it’s well worth learning your way around it. This month, then, I’ll help you get the drums rolling with a couple of examples.
Starting Grid
Let’s start with a few basics. Once you’ve configured a suitable drum-based virtual instrument track (for example, one loaded with Groove Agent SE, which comes bundled with Cubase — and which I’ll come back to below) and created a short, initially empty, MIDI clip on the track (use the Draw pencil tool to do this), you’re ready to get started. Double-click on the clip and it will, by default, open in the Key Editor, so instead you must choose ‘Open Drum Editor’ from the MIDI menu. If you use the Drum Editor to create new parts often, you’ll want to assign this a shortcut key.
The Drum Editor is similar to the Key Editor in many ways, but the differences make it much more drum-friendly. The most obviously useful feature is the list of drum names that replaces the piano keyboard as the vertical axis of the editor grid. The kit-piece names are based on a ‘map’ of the drum sounds to specific MIDI notes. If you find the default doesn’t match your chosen virtual instrument, you can create custom Drum Maps (as described in SOS February 2009: http://sosm.ag/cubase-0209). The default GM layout will suffice in many situations, but it’s worth noting that once you’ve assigned a drum map to your track, the Drum Editor will become the default editor for that track — just double-click the part in the Project page and the drum editor will open automatically. Unlike the piano keyboard the ‘notes’ don’t have to appear in chromatic order and can be clicked and dragged to reorder them; I’ll often bring the kick, snare and hi-hat to the top, to make it easier to program basic beats.
In the Drum Editor’s toolbar, the Pencil tool is replaced by the Drumstick, which you use to ‘draw’ drum hits into your MIDI clip and remove them with a single click. Alternatively, double-clicking with the normal Object Selection tool achieves the same thing, and holding Alt (PC) or Option (Mac) while using the Object Selection tool temporarily switches you to the Drumstick. By default, all notes added in these ways are given the MIDI velocity that’s defined in the Drum Editor’s toolbar. As you add notes, another difference between the Key Editor and the Drum Editor becomes apparent: drum hits are presented as ‘diamonds’, with their colour indicating note velocity. This is generally a much cleaner way of viewing a drum pattern than the elongated note format used in the Key Editor. Be aware that, despite the default one-shot appearance of these notes, these diamond-shaped drum notes can have a note length, as I’ll explain later.
Human Touch
Even using just this basic subset of the Drum Editor’s tool kit it’s easy to add (or delete) drum hits, but if your track genre requires something other than a metronomic (machine-like) drum pattern, how do you make things a little more ‘human’? Well, a useful starting point is to add some MIDI velocity variation. This velocity editing is made easier in the Drum Editor because clicking on an individual drum sound in the drum list selects that lane in the editor. As a result, only the note velocities for notes within that lane appear in the controller lane at the base of the editor. Even when editing manually, then, turning a drum robot into something closer to a drum human becomes trivially easy.
The main screenshot (above) shows a simple kick/snare/hi-hat pattern with some additional kick/snare hits added in bar four and a 16th-note hi-hat pattern. Most drummers would emphasise the hits on the whole bar and beat divisions so, as shown in the screenshot, I’ve tweaked the velocities of the hi-hat accordingly. Also, aiming to create a sort of ‘ghost note’ effect (as opposed to a drum roll) with my extra kick and snare hits, I’ve significantly lowered the off-beat note velocities for these kit pieces.
The other main ‘human’ element to drumming is timing, and the Drum Editor’s Quantize panel can help here. A full discussion of swing and groove is a topic for another day, but if you apply both a very small amount of swing and set the Randomise value to something other than zero ticks (but do start low unless you want to it to sound like a bad drummer!), then pressing the Quantize button will create just enough timing variation to take you from robot to something vaguely human. If you don’t like the effect, simply undo it and repeat it but with different settings. Oh, and if you really want to get into some subtle MIDI randomisation of note positions and velocities, the Logical Editor is a better place to go — if you are feeling brave enough!
 EDM snare roll anyone? This is easy to create with the Drum Editor toolset.
That’s all useful for a basic groove, but what if you want to create rolls for a little extra flourish? Adding a set of notes as a starting point for a drum roll is easy. When adding notes, simply hold the mouse button down and drag horizontally along a lane — this automatically adds hits at regular intervals, which are determined by the current quantise setting. Pick a suitable quantise value and you can easily generate EDM-friendly snare rolls. All that’s then required is a ramp in velocity values and the job’s done.
Special Agent
As you might expect, the Drum Editor includes features designed to make it easy to work with Groove Agent SE. This includes the option (added in v.8.5) to toggle the display between the standard Drum Editor diamond symbols and a Key Editor-style note-length display (via the ‘Show Note Length’ button) which allows you to edit note lengths.
 The Show Note Length button allows you to toggle between a Key Editor-style display (shown here) and the standard ‘diamond’ note display, shown in the other screenshots.
As mentioned earlier, the ‘diamond’ drum notes do have a note length and it’s value can be set within the Note Length section of the Drum Editor’s toolbar. On most occasions, the note length information might not be important, as the virtual instrument just needs the ‘Note On’ message — the length of the drum sound is governed by the virtual instrument itself, often simply by the length of the original sample being triggered.
 The ‘Create Drum Map from Instrument’ option will interrogate your VSTi and attempt to populate your Drum Map with a full list of the drum sounds in the current preset.However, Groove Agent (including GA SE) now includes lots of presets that don’t just contain conventional drum sounds — there are also loops, such as synths, guitars and bass samples that are part of the ‘kit’ and can be triggered via a MIDI note. These loops might be many beats or bars in length, so the Drum Editor’s default of short note lengths, and no ability to see the note length, can be a problem when programming by hand. Switching to the new Note Display option solves that.
Another Drum Editor feature that works well with Groove Agent SE is the Drum Map. Having loaded your GA SE preset, if you open the Drum Map pop-up menu at the bottom of the drum list, you can choose the ‘Create Drum Map from Instrument’ option. While this can, of course, be used with any third-party virtual drum instrument, it works particularly well with GA, and the result is a drum list that matches all the samples in the currently loaded GA kit, including any loops or sound-effects samples.
The downside is that the drum list can become quite long, which can be annoying given that in any particular pattern you’ll probably only use a few of these drum sounds. Thankfully, another Drum Editor feature introduced in Cubase 8.5 can help: the Toolbar now includes a Drum Visibility Agent (the orange button on the first screen’s toolbar), which allows you to select different levels of detail in the drum list display. For example, the ‘Show Drum Sounds With Events’ option limits the display to just those lanes where you currently have note data present. This really helps to simplify the Drum Editor display, allowing you to focus on just those sounds that are integral to the current pattern.
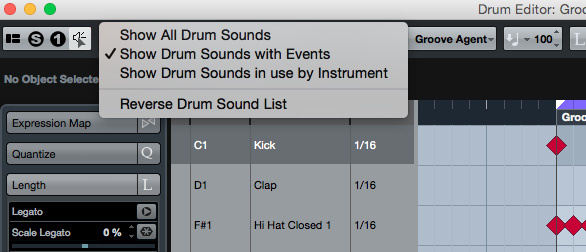 If your drum pattern only uses a few sounds, the ‘Show Drum Sounds with Events’ option can tidy up the Drum Editor display considerably!
Diamonds Are Forever
Of course, the above examples only scratch the surface of the Drum Editor’s feature set and the integration possible with Groove Agent (SE or the full version). For the less confident drum programmer, one further GA SE feature worth exploring is the Style Player with its Performance Section. This allows you to take the predefined patterns and generate new patterns in the same style but with different levels of complexity. These patterns can then be further edited via the Drum Editor. This can be a great source of fresh ideas... and it would make a wonderful topic for a future Cubase workshop!