Tuesday, October 22, 2024

Monday, October 21, 2024
Groove-quantise, Part 1
 The groove from my two‑bar drum loop is captured and becomes available in the Quantize Panel.
Back in this column in SOS March 2012, I explained how Cubase 6 allows you to apply grid‑based quantisation to multitrack drum recordings. However, as I mentioned briefly at the end of that piece, Cubase also allows you to quantise to a groove, where you take the rhythmic feel of one music performance and nudge other parts to more closely match it. The end result allows you to keep some of that magical 'swing' or groove in the overall performance, while still getting that 'locked‑in' sensation between the key rhythmic instruments in your arrangement.
Cubase 6 includes features that allow groove‑based quantisation of both MIDI and audio performances, and this month and next I'll look at each of these in turn. To illustrate the process, I'll use a typical example; extracting a groove that I like from a two‑bar drum loop and applying that groove to other key elements of the arrangement, such as a bass line and rhythm guitar part.
Feeling Groovy
 Grooves can be accessed, saved, deleted or renamed via the Quantize panel's drop‑down menu.
Defining the term 'groove' is not so easy, but most people would agree that a groove (good or bad!) results from the rhythmic variations a performer introduces into their playing compared to a regular, grid‑based performance of the same notes, and that those rhythmic variations are repeated as a regular pattern. The sense of 'groove' can be increased when the player also emphasises (accents) some notes within the pattern.
In essence, then, to obtain the 'groove' of a performance we need to extract its regular pattern of both timing (and, in particular, timing that doesn't fit the regular musical grid that might be set by a metronome) and playing dynamics.
Capture The Feel
When it comes to capturing a groove from a MIDI performance in Cubase, you actually have very little control over the process: you simply select the MIDI part you want to take the groove from and choose the Edit/Advanced Quantize/Create Groove Quantize option. If you then open the Quantize Panel (Edit/Quantize Panel), you'll see your freshly captured groove in the drop‑down list of available grooves at the top of the panel. Note that, by default, this new groove is given a name to match the name of the MIDI part from which it was taken, but you can edit this to create a more meaningful label. Also note that when you first capture a groove, the name has an asterisk (*) character beside it to remind you to press the save preset button (located next to the drop‑down menu).
Although you can't change the mechanics of the extraction process itself, there are two significant things you can do prior to the extraction that influence just how groovy your captured groove will be... First, you need to decide where exactly you'll extract the groove from. If you only have a short MIDI performance as your source (two or four bars, for example), the choice is simple, but if you have a longer performance (for example, a complete drum performance generated from an electronic kit), you need to decide whether to use all of it or just a selection. Given that one of the key elements of establishing a groove is its repetition, selecting the 'grooviest' few bars is probably the simplest starting point.
When you extract a groove from a MIDI part, MIDI velocity and note-length information are also extracted, and, as we'll see in a moment, you can then choose how much of the MIDI velocity pattern is applied when you superimpose the groove onto another MIDI performance. If you think the original MIDI performance lacks a little something in terms of volume dynamics, then, it's a good idea to go in and tweak the MIDI velocity data a little, or use the Functions/Velocity options to expand the MIDI velocity range, prior to extracting the groove.
Groove Application
 If required, the Functions/Velocity menu option allows you to adjust MIDI velocity dynamics prior to groove capture.
Applying a groove preset that you've created to other MIDI parts is very simple and — unlike the extraction process — you get some user control. If you select the MIDI part to which you wish to apply the groove preset, and then open the Quantize Panel, you can select your new groove preset from the drop‑down list. You can then tweak the various Quantize panel controls to adjust just how 'hard' you apply the groove quantise to this MIDI part. These controls are described in the Cubase Operation Manual, so I won't go into too much detail here, but the key starting points are Position and Velocity.
A Position setting of zero percent means that the MIDI notes within the part aren't affected by the timing of the notes in the groove preset. By contrast, 100 percent means that notes are moved to match the groove exactly. Clearly, you can adjust this setting to taste, depending on how tightly you want the various performances to lock together, and I find that a value of 70 percent is a good starting point for a tighter feel, without taking away all the natural variation within the original performances.
Velocity is also expressed as a percentage value and behaves in a similar fashion; zero percent means that the velocities of the groove preset aren't superimposed on the MIDI part, whereas 100 percent produces a close match in terms of playing dynamics. Again, adjust to taste. The Max Move setting allows you to place a limit on how far notes can be moved by the quantise process, and the Randomize setting can be used to add just a touch of 'human' variation: both are well worth experimenting with.
 The Quantize Panel allows you to control how 'hard' the groove is applied to other parts. All of these controls are also available via the Quantize tab of the MIDI Editor window.
Once you've adjusted these settings, pressing the Quantize button applies them, but you also have the option of engaging the Auto button, which means that settings will be applied automatically as you make changes. Both note‑start positions and velocities will be adjusted. Because the quantise process is non‑destructive, you can make further changes and repeat this process as often as you wish: you can undo all of the effects of the quantisation by pressing the Reset button, located at the bottom‑left of the Quantize Panel. If there are times when you want to commit to the applied quantise, even if only to reduce the likelihood of resetting your perfectly locked groove by accident, Edit/Advanced Quantize/Freeze MIDI Quantize will do the trick.
These bread‑and‑butter groove‑transfer techniques are useful, but the same tools can also be used for more advanced tasks. For example, it's well worth experimenting with applying a short fragment of extracted groove to the remainder of the longer MIDI performance from which it was taken, to see if it helps (by making the groove feel more consistent) or hinders (by killing the natural variation in overall feel created by the musician). Alternatively, you can choose just to use a short section of the performance for the various instruments (as I've done in my example), and then loop that section, or to retain the whole performance and apply the groove to all of it. Both can work, the former giving greater potential for an ultra‑tight end result, while the latter may produce something with a more natural flow.
Final Thoughts
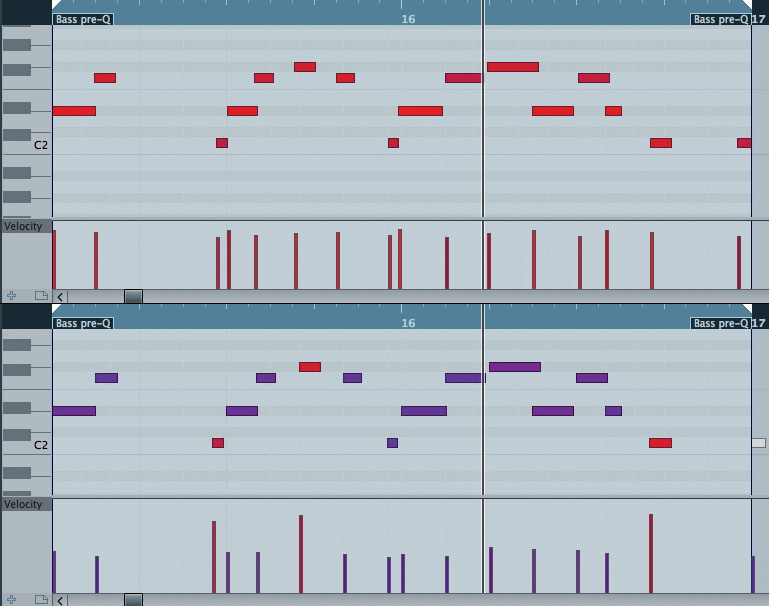 The two‑bar bass line without (above) and with (below) the groove applied. Note the subtle shifts in the starting points of some notes in the lower version and how the Velocity setting has been (deliberately over) used so that three notes are now heavily accented to mirror beats which had emphasis in the drum loop that formed the source of the groove
The example I've used to illustrate the MIDI groove-quantise process is deliberately a simple one: a two‑bar drum loop provides the groove that's applied to other two‑bar loops for bass and rhythm guitar parts, both of which are MIDI based. In a full production, though, things will usually be rather more complex. For example, even if you take the most simple of verse‑chorus song structures, you might experiment with one groove applied to all the song sections or a separate groove applied to each key song section. This is, of course, a creative decision, but Cubase has all the tools you need to do the required experimentation easily and quickly.
Finally, of course, we've been working only with MIDI here, but most of us now work with MIDI and audio alongside each other — so next month we'll look at how you can get both of these locked nicely into the same groove.
Saturday, October 19, 2024
Friday, October 18, 2024
Amp It Up!
 The VST Amp Rack includes seven amp/cab models, covering a wide range of possible tones.
Guitar players, myself included, often argue over the tonal merits of real amps relative to virtual ones. But whatever your views on plug-in guitar-amp simulations, you can't deny that they present some very useful possibilities, not all of which are confined to guitars. So this month we'll explore a few examples of how the VST Amp Rack, which was introduced in Cubase 6, can be put to good use.
To use the VST Amp rack for guitar tones, you'll first need to get a DI signal from your guitar into Cubase. Most modern audio interfaces have an input or two that can work quite happily with a direct guitar-level signal, but if yours doesn't, you'll need a DI box that can send one signal 'thru' to your amp and another to your interface's mic input. You can choose to record this DI signal alongside the output from an amp or hardware modeller, in which case the DI and amp signals should be recorded on separate Cubase tracks, to give you flexibility later.
Dial In Tones
The VST Amp Rack's primary function is, of course, to create some decent guitar tones. You have seven amp and six cabinet choices which, as hinted at by the graphic styling, include models based upon three Fender classics, a couple of Marshalls, a Vox and a Mesa Boogie. You can combine the different amp and cab types to give you quite a wide range of tonal starting points.
All the amps are capable of decent clean tones, but the best choices are probably the Fender- and Vox-based models. For super-clean, back off on the gain settings or, for a bit more twang (via the Tweed amp) or grit (for example, via the Vox amp), start with the gain about halfway and adjust to taste. With a little more gain, or the addition of an overdrive pedal in a pre-effects slot, you can create a range of 'just breaking up' tones — perfect if blues is your thing. The Plexi model can also do this at lower gain settings, while for straight 'rawk', both Plexi models can do the business. For a more saturated overdrive, the Plexi Lead and Diamond (Mesa Boogie) models are your best bet.
You also get a decent selection of emulated stomp-box effects that can be placed pre- or post- the amp/cab modelling, a choice of microphone type and position and a 'master' section with EQ, a tuner and master output level control. In short, for a bundled plug-in this is a pretty decent package!
So that you can hear the differences between the various models, I've created some short audio examples, and these are available via the SOS web site (/sos/sep12/articles/cubasemedia.htm) for you to audition. In addition, there are audio examples to illustrate each of the VST Amp Rack applications described below. Hopefully, listening to these while reading the text will give you a better idea of what can be achieved.
Reamp At Mixdown
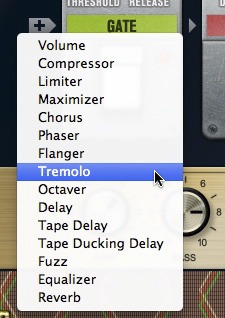 For both corrective and creative applications, there's a good selection of virtual stomp boxes.
It's one thing creating the perfect tone for while you're playing the guitar, but at mixdown you might find that your chosen sound is inappropriate. For example, you might decide the original sound requires more or less gain in order to sit well in the mix. In a traditional recording environment, a DI signal is often recorded alongside the miked amp so that, at mixdown, this DI signal can be fed back to the same or a different amp, the tone tweaked to best fit the mix, either by tweaking the amp settings or changing and moving microphones, and then re-recorded to replace the original. While the results can sound great, this technique can be a bit of a faff — and one of the key advantages of plug-in amp-sims like VST Amp Rack is that they make the process a breeze to perform: you already have your DI'ed guitar part, so you just change the Amp Rack settings to suit the mix.
Layer Take
Another common traditional recording technique is to layer several guitar sounds using different amps, blending the sounds as desired at mixdown to create a fuller tone. With VST Amp Rack, the same effect can be achieved very simply by duplicating the track containing the DI'ed recording and adjusting the amp settings on each track to taste. There's nothing (other than computing power) to stop you from layering as many tones together as you want, if it gets the job done, although usually things will start to sound mushy if you stack more than three or four parts.
While a 'wall of sound' is one application of this approach, a subtler one might be to blend a cleaner sound with an overdriven or fuzz-style sound. When using a heavily overdriven tone, the part as a whole might leap out of the mix, but you pay a price, in that note definition can often be lost. Blending in a cleaner tone can provide the transient information that helps listeners pick out each note without compromising the overall tone.
For example, if you were using a high-gain Diamond amp for your main sound, you might blend in a much cleaner Plexi-based amp tone to add some clarity. The second tone needn't be ultra clean for this to work, just clean enough to have better note definition; and it only needs to be blended in quite subtly, otherwise it becomes obvious that there are two very different tones in use. A further trick is to quite aggressively filter the low frequencies out of the cleaner tone, so that it's only providing aural cues that notes are being picked, but without intruding on the frequencies that define your fuzz tone.
An alternative — or complementary — technique is to insert an instance of Cubase's Envelope Shaper after the Amp Rack on the more distorted sound, which will help emphasise the attack portion of the cleaner sound.
Faking It
 As described in the main text, the Envelope Shaper can be used when blending a cleaner tone with a more distorted one.
The VST Amp Rack can also be used very effectively to fake double-tracked guitar parts. Again, copy the DI part to two tracks, pan each hard right and left respectively, and insert an instance of VST Amp Rack on each. The two tracks can be given different guitar tones, to create the illusion of two different guitars playing exactly the same part. You can create radically different sounds if you want, but the differences can also be quite subtle. For example, try simply swapping the default speaker cabinet model for one of the alternatives. If you also apply just a little nudge to the Inspector's Track Delay for both tracks (perhaps bring one slightly forward in time and the other slightly back) you can create a much more convincing impression of two guitars being played. Just make sure that the sound works when listening in mono, if you do this.
In a similar vein, it's also possible to take a section of your guitar performance, move it to a different track, and treat it to a completely different guitar tone. A typical example might be to transform a part that is overdriven (try the ZZ Bottom preset) for the majority of the track into something much cleaner or with some sort of 'ear candy' type special effect (the heavily flanged 'Purple Gain' preset, for example) for use in a breakdown section of the song. This kind of marked contrast can add interest for the listener.
This Means Wah
 The sine waveform line tool is great for creating automation data for the wah pedal.
All the VST Amp Rack's parameters can be automated, most easily using Cubase's Quick Control system, so you can vary your tone in different song sections if required. An obvious target for automation is the Amp Rack's wah pedal. Unless you have a MIDI volume pedal that can be used to send controller data while you are playing, you have to resort to adding suitable controller data after recording the DI signal. This actually works quite well, and provides plenty of control. However, for a funky auto-wah effect, you can use the sine waveform line tool to create automation data first (in the screenshot, this has been drawn with a quarter-note grid setting so the wah syncs with the song tempo) and then record your performance while Cubase controls the wah pedal for you. There are, of course, other automation tricks you might use such as varying the amp gain between different song sections, to help create dynamics in the production.
The Guitar Is Not The Star
 The VST Amp Rack can also be used as a send effect alongside your more usual reverb or delay processors.
In record production, guitar amps regularly get used for more than just guitar duties: almost any sound source might be processed through a guitar amp to add a little warmth or overdrive. Obvious candidates are keyboard sounds (such as rock organ) and vocals, to give a little grit. A plug-in virtual amp like Amp Rack makes this sort of experimentation quick and easy. There are two approaches you can adopt. First, if you want a full-on effect, simply place the plug-in as an insert effect on the track (or on the audio output channel if it is a software instrument you want to process), just as you would with a guitar.
The second approach, which will often yield more pleasing results, is to set up VST Amp Rack as a send effect. You can then use a parallel-processing approach to blend in just as much (or little) of the amp processing as required, and automate the send level to create any variations you might like in different song sections. This can, for example, be a great way to add just a tiny amount of edge to a vocal to lift it out of a busy chorus section mix. The key here is to experiment with various sources to see what effect you can achieve, and you might be surprised — I've even had good results using amp sims in parallel to add body and sustain to a wimpy snare drum, blending it with the original sound that provided the transient which identifies the sound as a snare.
Thursday, October 17, 2024
Wednesday, October 16, 2024
Smoother Groover
 Groove Agent ONE's main display.
Software may be great for programming sample-based beats, but recreating the sound and feel of a good drummer playing an acoustic kit can be quite a challenge. The good news is that Cubase puts all the tools you need at your disposal, and in this article I'll explain how to use them to program acoustic drum tracks with a genuinely human feel.
There are three main things to consider: constructing a realistic virtual acoustic drum kit; creating suitable MIDI parts to trigger the drum samples; and what you can do at the mixing stage. Groove Agent ONE (GAO) can help with the first of these, and that's what I'll focus on here. As it's a large topic, we can look at the programming and mixing stages next month.
Preset Pains
The first step in building your perfect kit is to get some samples organised in GAO. While you could start with an existing preset (the Hard Rock Kit Dry and Maple Kit are the best of the supplied acoustic presets), this approach has limitations, as GAO doesn't make it easy for you to mix and match drum sounds from different presets. For example, you can't access the individual samples that make up the presets, drag and drop a drum pad's settings between two instances of GAO, or duplicate a pad within a single instance (you can only move or swap between pads). Fingers crossed that Steinberg have these issues on a 'to do' list for improving the user workflow.
Roll Your Own
 If you have recorded your own drum-hit samples, the Sample Editor can be used to divide them into audio regions.
Things get more flexible — and more interesting — if you build your own GAO instrument from scratch. When you first load an instance of GAO, all the pads are empty, so to build our kit we'll need to find some samples. Ideally, multiple samples of each drum are required, ranging from soft to forceful hits, allowing you to use GAO's sample layers to mimic the tonal changes in a drum when it is hit with different stick velocities. There are plenty of places to find samples, including free online libraries (if you're happy with mono sounds, I can recommend Analogue Drums' Big Mono at www.analoguedrums.com/details-bm.php), but if you have any acoustic drum-loop libraries in your collection, some might also include single-hit samples that you can use. Alternatively, if you know a friendly drummer, you could always record your own — it's not too daunting a task, given that you're only going to need to record one drum at a time via a single mic. Do record plenty of hits, though, as while GAO only allows eight velocity layers for each pad, some extra alternative hits can come in handy, as I'll explain below.
High Velocity
 Multiple audio regions from an audio clip can be dragged and dropped from the Pool on to a single GAO pad.
Once you have your multiple samples for each drum, they can be dragged and dropped to a GAO pad. I find that this works best when dragging from Cubase's Pool, but a little care is needed. If you are using individual samples, perhaps imported from a third-party sample library, these will be listed individually (each represents an audio clip) in the Pool's Audio section. You can select multiple clips and drag and drop these to an individual GAO pad. All of which is great… but if you recorded each drum in turn directly into Cubase, each clip is likely to contain multiple hits, and to be able to drag and drop the individual hits, you'll need to open each clip in the Sample Editor, add Hitpoints to mark the start of each drum hit and then press the Create Regions button. This will turn each drum hit into a separate audio region and, as shown in the screenshot, a list of these regions will be viewable in the Pool underneath the clip to which they belong. You can then select multiple regions and drag and drop these to a single pad, where they'll automatically be converted to sample layers.
Once they're placed on a pad, you can change the order of the layers by clicking and dragging in the Pad Edit window. By selecting an individual layer, you can adjust its overall playback volume, as well as the MIDI velocity range that triggers it. A little bit of work will be needed here, but the key aim is to achieve a smooth transition between the layers as you move up through the MIDI velocities, so that the transitions between the layers don't jump out during playback as 'there's a new sample' moments to the listener.
You can, if you wish, also adjust the Filter and Amplifier controls. These operate at the pad level (ie. they apply to all layers in the pad), but can be useful if you want to tweak either the overall EQ or the Amplifier Release control as a quick means of reducing any unwanted room ambience on the tails of your samples — although this, of course, could also be done when editing your samples, if you're not using regions as described above.
The Clone Wars
 Layers can be edited within the Voice section of the Pad Edit display where you can also adjust the 'Mute Gr' and Output settings for the pad.
Creating duplicates of all (or just the key) drum pads is useful, as it allows you to use two hardware keys or pads when programming your drum parts. You can't duplicate a pad in GAO, though, so this is a little labour intensive, as you have to build each pad twice, but it's still well worth the effort. However, there's another way you can use multiple pads for particular drums to improve the realism of the performance, and it works particularly well with a snare, which I'll use as my example...
Eight sample layers give you useful tonal and dynamic variability, and a pair of identical pads improves playability, but you can add further subtle variations by building an 'alternative' snare pad from a different set of samples which, on playback, can be blended with the main snare pad. For what I have in mind, it's best to build this second snare from medium and hard hits only, and with somewhat different tones to the main snare pad(s). Having placed these alternative snare samples onto a separate pad, set the Amp Mod setting (in the Amplifier section) to zero percent, so that MIDI velocity no longer adjusts the volume of the sample playback, but will still dictate which sample layer is triggered. You might be able to guess where I'm heading with this, but we'll cover how to put this to use next time, when we look at performance programming.
Kit Completion
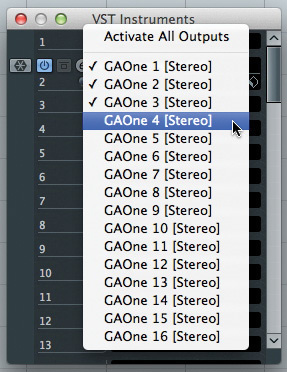 You can activate any of GAO's 16 stereo outputs via the VST Instruments panel.
Two other steps are required before we can save our new kit as a GAO preset. The first helps to ensure that playback realism is maintained by placing particular kit pieces (pads) into Mute Groups. GAO only allows one pad in such groups to be played at any one time. This is particularly useful for sampled hi-hats, because you might have several pads assigned for different performance options (closed, part-closed and open, for example) but, of course, a real drummer could not play more than one of these sounds at any one time. Assigning a pad to a Mute Group is done via the Voice page in GAO; just edit the Mute Gr setting so that all pads in a group share the same number. Up to eight Mute Groups are available.
The second step is to assign your various pads to different GAO outputs. By default, all pads are routed to GAO's main stereo output (ST1), but you can change this via the Output setting in the Voice page. You'll also need to activate the outputs via the VST Instruments panel (click on the little box/arrow icon just to the left of the plug-in name). Any activated outputs will appear in the main Cubase Mixer, and as GAO supports 16 outputs in total, the most flexible approach is to have a separate output for each kit piece. If you've used multiple pads for some drums (the hi-hat, for example), make sure all these pads are assigned to the same output — although if you created the alternative snare as described above, make sure you give that its own dedicated output.
Pack & Go
Having put a lot of work into creating your new virtual drum kit, make sure you save it! You can use the standard preset menu, but it is also a good idea to create a GAO archive (this has a GAK file extension). This archive has the advantage of including all the samples required to recreate the kit, so you can move the file to a different computer system if required. To create the GAK file, simply click on the Export button in the Exchange section, pick a file name and location, and the job is done.
Next month, then, I'll explain how you can put your new instrument to good use in the programming/performance and mixing stages of your production to create something that sounds like a real drummer.