Thursday, May 25, 2023

Wednesday, May 24, 2023
MIDI Dynamics
Controlling your synth's dynamics using MIDI, rather than audio plug-ins, can offer you greater flexibility and good results. Here's how you do it.
As well as straightforward louder/softer velocity tweaks, the Cubase MIDI Velocity Tool can be used to compress, expand and limit your performances. Here you can see the original MIDI performance at top left, with the corresponding audio export file beneath it, while at top right 70 percent MIDI compression has been applied. You can see how both the MIDI velocity and resulting audio file are more controlled throughout.

If you can hear a few recorded MIDI notes in your song that are noticeably softer or louder than their neighbours, the obvious solution is to open up the Cubase Key Editor, grab the offending velocity value in the lower pane and tweak it up or down as appropriate. However, when it comes to more general compression, expansion, or limiting of MIDI performances, many musicians still reach for an audio plug-in — largely, I suspect, because that is what they tend to do with vocals, guitars and drums.
However, there's no need. I rarely, if ever, use compression on MIDI sounds, simply because you can get all the same effects by manipulating the MIDI data. This approach is beneficial because it takes little or no processing overhead, and can't compromise your audio quality with pumping effects or increased background noise. MIDI compression can make your keyboard performances punchier if required, while MIDI limiting can deal with occasional notes that stick out of the mix without you having to check through the entire song.
However, it is not all about tweaking existing performances. I've often resorted to MIDI compression afer changing a synth sound to better suit the song I'm working on, only to discover it has completely different dynamics and requires all the note velocities to be radically tweaked (some presets scarcely alter in level over the entire velocity range, while others may be wildly dynamic). Similarly, if you end up layering sounds (playing the same notes on several instruments simultaneously to achieve extra thickness or realism), you'll probably find each duplicated track requires different MIDI dynamics.
There are, however, still a few occasions when audio compression is the only answer to unruly dynamics. So let's explore the different Cubase options for massaging MIDI dynamics, and see where you really do have to reach for an audio compressor plug-in.
Direct Manipulation
As with many Cubase functions, there are various ways to tweak MIDI dynamics: you can directly manipulate the MIDI data inside individual Parts, apply Cubase MIDI plug-ins to the entire track, or, in some cases (depending on which Cubase version you're running), use features built in to the Inspector. One of the simplest approaches is to use the MIDI Velocity tool, which you can find from inside any of the MIDI-based editors, or after selecting one or more MIDI parts in the Project window, by right-clicking and choosing the 'Velocity...' option from the Functions menu.
 If you only have a few notes louder than the rest, MIDI limiting may be more appropriate than compression. Here, the original performance has its top velocity limited to 85, which brings down the loudest five notes, while, with the lower limit at zero, the remaining quieter notes remain unaltered.I use the Velocity tool a lot because you can apply it to a single MIDI part that sounds a little wonky, to a group of adjacent MIDI parts when you want to modify a section of your song, to an entire track's worth of MIDI parts, or to any combination of MIDI parts across any number of tracks (just select the ones you want before opening the tool). I've assigned the Shift-V keyboard shortcut to this tool, because I use its Add/Subtract velocity function so often for fine-tuning the levels of different MIDI parts on the same track, that may have been played in at different times.
I generally start or loop playback before opening the MIDI Velocity window. Have the Add/Subtract setting at +4 or -4 and then you can keep applying this subtle change using Shift-V followed by Return; the usual Ctrl-Z Undo shortcut will remove it again so you can A/B the differences in real time.
Many musicians seem to miss the Velocity tool's Compress/Expand and Limit options. Once you select Compress/Expand, the middle dialogue box becomes 'Ratio'. With this parameter at 100 percent your selected notes will remain unchanged, but as you reduce it below this figure they will gradually get more compressed, with the most extreme zero percent value forcing them all to exactly the same velocity. I rarely use values over 100 percent for expansion, as the results are invariably more extreme than I'd like, but regularly find 80 percent a useful starting value; using the Shift-V/Return key sequence just mentioned, you can gradually apply gentle velocity compression until you hear the results you want.
If you select the Limit option, a third box becomes available, so that you can enter both Upper and Lower limits for your MIDI velocities. The Upper limit is useful if you want to largely preserve the dynamics of your performance, but need to cap some of the louder notes, while I've found the Lower limit useful with some patches that don't make any sound at all once the velocity drops below a certain value, by forcing the quietest notes to a preset 'quiet' value.
Velocity Tool Or MIDI Plug-in?
The MIDI Velocity tool provides far more flexible selection options (any combination of notes or complete parts across any combination of tracks) compared with the global effects of a MIDI track plug-in. Also, because the tool's changes are made directly on your MIDI data, you can see exactly what is happening to your MIDI velocity values, whereas with MIDI plug-ins you get no such direct visual feedback of the changes, apart from the MIDI channel meter.
On the other hand, the dynamic functions of MIDI plug-ins leave the original velocity data intact and modify it in real time, which gives them the advantage that you can change these settings at any time while working on your song, just like an audio plug-in, whereas the Velocity tool makes permanent changes to your data (although you can back-track to some extent using the Undo function). A MIDI plug-in is therefore ideal if you've changed instruments mid-song and need to quickly alter an entire track's dynamics, but not when you're fine-tuning sections of a song.
MIDI Plug-in Complications
Before we discuss the Cubase MIDI dynamic plug-ins, a few words of explanation. When it comes to applying effect plug-ins to VST Instruments, many new Cubase users get incredibly confused, because the VST instrument normally requires both a MIDI track (for the note data) and an audio track (for the synth's audio output). If you want to pass the instrument's sounds through an audio plug-in you need to insert that plug-in on the appropriate audio track/mixer channel, while if you want to add a MIDI plug-in you must do so on the associated MIDI track or mixer channel.
Cubase 4 does simplify this procedure slightly, with its introduction of the Instrument track — a single track/mixer channel containing both MIDI and audio features. You lose MIDI send functions and only get a single stereo audio output, and you also lose the Inspector's MIDI fader (although, since this uses MIDI Continuous Controller 7 Volume data, you can still set or automate the MIDI volume using the appropriate controller lane inside the MIDI editors).
For dynamics purposes you need a MIDI insert, which you can use either with a standard MIDI track or with an Instrument track if you have Cubase 4. Just select the desired channel, click on its MIDI inserts option in the Inspector, and then load the desired plug-in into one of the effect slots.
Timbre Tweaking
There are some things you can do with MIDI dynamics that would be almost impossible to do with any compressor, and altering timbre is one of them. Whether analogue or digital in nature, most synth patches alter a host of parameters other than output level as you change their MIDI velocity, filter frequency, filter or amplifier envelope settings. In the case of multisampled sounds, velocity changes can be used to switch from one sample to another.
So if a particular MIDI instrument in your mix sounds too hard or too mellow, don't automatically reach for the EQ or plug-in effects. Instead, why not try fine-tuning its timbre by globally raising or lowering its MIDI velocity values — part by part, using the info line in the Project window, using the MIDI Velocity tool Add/Subtract option, or (for the entire track) using Velocity Shift in the Track FX plug-in. Once you're happy with the sound, you can then reduce or increase the output level to compensate, using the mixer channel faders (or in the case of hardware MIDI synths, using MIDI Controller 7). This will allow you to make most MIDI sounds harder/softer, faster/slower, or brighter/mellower, without affecting their volume, timing, or the dynamics of your original performance.
This approach can also be extremely useful if you're happy with an existing MIDI performance but want to change the MIDI patch/instrument. If you find a replacement sound that is perfect, except that it's slightly too brash or too mellow, you just need respectively to globally lower or raise the MIDI velocities, and then tweak the instrument's audio level to compensate.
The Compress Plug-in
The Cubase MIDI Compress plug-in has just three simple controls (Threshold, Ratio, and Gain) that will be familiar to anyone who has used an audio compressor. Although the Threshold and Gain parameters refer to MIDI velocity rather than audio level, the analogy works quite well, since only velocity values above the Threshold setting are affected, while the Ratio control provides 10 settings ranging from 8:1 compression, through a 1:1 setting (where the velocity is unaltered), down to 1:4 expansion. Meanwhile, Gain adds or subtracts a fixed value from all track velocities, and can thus be used to compensate for a drop in overall level after compression, or an increased level resulting from expansion.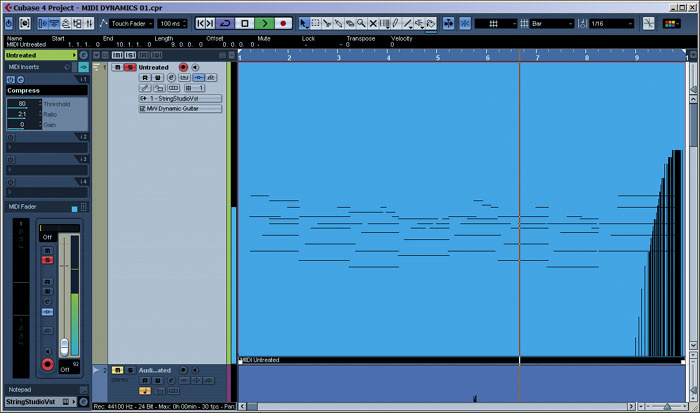
The Cubase Compress plug-in can be loaded into a MIDI channel insert in the Inspector, as shown here. This time a more traditional Ratio control is provided, and notice that the MIDI Fader displays velocity and peak velocity values.
It's tricky to suggest typical settings, because these will depend so much on the original dynamics of your track. However, if you're applying them to a standard MIDI channel you can monitor the resulting velocities on the MIDI channel's 'meter'. If you leave this at its default 'Off' setting it will directly display velocity values from 0 at the bottom to 127 at the top, and even show the peak velocity value below the meter.
Sadly, the meter display (but not the peak velocity value) is modified by the setting of the MIDI Channel level control if you alter it from the Off position (although this is in charge of MIDI controller #7 and nothing to do with velocity). However, if you pull this up to its maximum 127 value, the meter will return to an unadulterated MIDI velocity display. However, it is the audio results that are more important: remember that the Gain control will not only change level but also timbre (have a look at the 'Timbre Tweaking' box above for more details).
Out Of Control: A Job For Audio Compression
 If you do need to use a traditional audio compressor to deal with occasional Hi-Q synth filter peaks, here are some suitable settings as a starting point. For the most transparent results, make sure that the gain-reduction meter only shows activity when there's a peak.As versatile as the various Cubase MIDI dynamic tools are, sometimes you will have to resort to using an audio compressor plug-in. One classic scenario is when using a synth filter sweep (especially at high resonance settings) at the same time as other effects such as phasing/flanging, since occasionally, with some notes, the output level may suddenly shoot up. You can minimise the chances of this happening by carefully tempo-sync'ing your effects so their peaks never 'collide', but audio compression is still a safer bet here.
In situations like this, you're generally trying to alter the basic sound as little as possible and deal with very occasional jumps in level, so use Cubase 's Compressor, with a Ratio setting of perhaps 2:1, to squash the unwanted peaks. Set the Attack control to the fastest setting possible without making the compression too obvious (10ms is probably a good starting point) and the Release control to Auto, so that it adapts itself to your material. Start with the Threshold setting at 0dB and slowly reduce it until you start to see a little activity in the gain-reduction meter, then back it off a little. The idea is that the output level is only reduced when you get a louder peak than normal.
Cubase 4 owners will probably find its Multiband compressor produces more transparent results, since it will control the peak in whatever band it might be, while leaving the other bands largely unchanged. If you want to know more about setting up the Multiband Compressor, look no further than John Walden's April 2007 Cubase workshop column, which explores this and other audio dynamics plug-ins in greater depth.
The Track FX Plug-in
For years I used the Cubase SX Track Parameters section of the Inspector to apply global but real-time tweaks, such as Transpose, Velocity shift, Velocity and Length compression, plus a useful selection of Random and Range functions, to entire tracks. When I upgraded to Cubase 4 I was initially frustrated to find that these Track Parameters had disappeared from the Inspector, but eventually tracked down an identical set of parameters in Cubase 4 's Track FX MIDI plug-in, along with additional Scale functions (which you can also find in the Transpose tool). I was then amazed to discover that exactly the same MIDI plug-in had always been available in SX3, and that you can use either approach.
The Track FX Velocity Shift setting produces exactly the same result as the Add/Subtract function of the MIDI Velocity tool, but with the Velocity Compression parameter we're once again onto new ground. This time Steinberg abandon the percentage setting of the MIDI Velocity tool, and the Ratio setting of the Compress plug-in, in favour of a factor setting offering separately adjustable numerator and denominator settings, so you can use the increase and decrease buttons or directly enter any numbers you like.
The Track FX plug-in provides plenty of real-time tweakable MIDI parameters. Here is a suitable starting point for compression, with a Velocity Compression value of 3/4 and a Velocity Shift of +10 to bring the average level back up after the velocity values are compressed. Notice also the drop-down box for the Random selection, which includes Velocity, so you can add dynamics to a robotic sequence.
There is no threshold parameter setting at all, so you have to use Velocity Compression in conjunction with Velocity Shift. For instance, if you enter 3/4 for Velocity Compression, all velocity values will end up at three-quarters of their previous values, and therefore cover a smaller range (and be compressed). Then you can use the Velocity Shift parameter to push all velocity values back up en masse, to end up with a similar average level but a small spread of velocity values — in other words, compression!
This approach will delight any mathematicians amongst you, but will leave many musicians scratching their heads trying to work out what the results will be and how to combine these controls. Suitable starting points for compression are 3/4 for Velocity Compression and +10 for Velocity Shift, while for subtle expansion you could try 5/4 and -10 respectively. Once again, you can monitor the resulting MIDI velocity on your MIDI channel meter, and once you've got the hang of it exactly the same approach is used for the Length Compression parameter, so you can turn your legato parts into staccato ones and vice versa.
In the Range section of the Track FX plug-in you'll find Velocity Limit and Velocity Filter options. The first is identical to that of the standard MIDI Velocity tool, while the latter excludes all notes with velocities outside the specified range (handy for dispensing with stray notes at low velocities, for instance).
While you're using the Track FX plug-in you really should investigate its two Random slots as well, each of which can introduce random offsets to note position, pitch, velocity or length, to help you add some instant life to a robotic sequence. You just set the minimum and maximum amounts of randomness in the two associated boxes and Cubase will tweak them slightly differently during each playback. I've found these a great help after duplicating tracks on different instruments where, as you slowly increase random note positioning and note lengths, the rigid, layered sound will suddenly turn into the sound of several musicians playing in unison.
We've provided some audio files illustrating the techniques used in this article, so you can hear the differences for yourself. Go to: www.soundonsound.com/sos/aug07/articles/cubaseaudio.htm.
Published August 2007
Tuesday, May 23, 2023
Monday, May 22, 2023
Time-stretching
Cubase is packed with as much functionality as Doctor Who's TARDIS for bending the laws of time, and while the basics are easy, it pays to explore a little deeper.
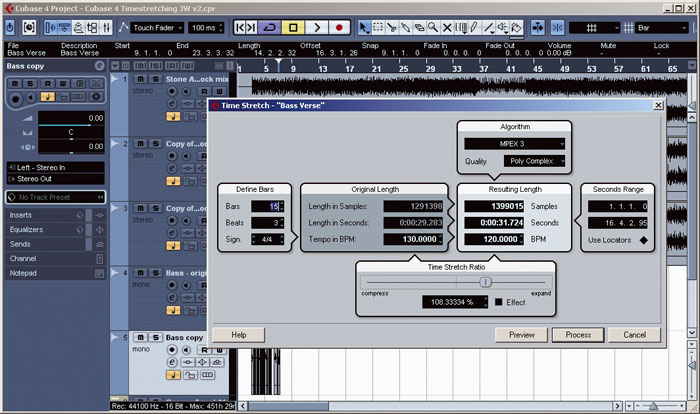 The Time Stretch function is not as scary as it looks!The ability to tempo-match audio loops in real time using modern audio editing and recording software is now something we take pretty much for granted. However, there are occasions when a more 'hands-on' approach is required to manipulate the timing of audio recordings. In these cases an off-line process can be required — Cubase includes the very useful Time Stretch audio-processing function for just such an occasion. As described below, such processing might have both corrective and creative uses. Time to get flexible...
Time For Change
The Time Stretch function allows you to change the length of a selected piece of audio without altering its pitch. The function, which is accessed via the Audio / Process / Time Stretch menu option, will operate upon the currently selected audio clip in the Project window. It can also be used with a whole clip in the Sample Editor window or, if required, a sub-section of a clip selected in the Sample Editor. If you find yourself using the function a lot, then it is worth assigning it a dedicated Key Command (it does not have one assigned by default).
At first glance, the Time Stretch dialogue can look a little complex. However, for routine tasks, only one or two settings might need adjustment. That said, the various controls do provide considerable flexibility, making a variety of different tasks easier to complete. Many of the controls also interact. For example, adjusting the Time Stretch Ratio slider will automatically change the settings under the Resulting Length section. These controls simply offer different ways of specifying the degree of time-stretching to be performed.
Whether you have selected a whole clip in the Project window or a sub-section of a clip in the Sample Editor, the Define Bars section (see the screenshot above) will automatically calculate the length of the original audio in terms of beats and bars. This assumes a 4/4 time signature so if you are working in 3/4 time (or something more exotic), then this will need to be adjusted (via the small arrowheads on the Sign control) for the bars and beats to be correctly calculated. It is also worth noting that the Beats value is shown rounded up to the next whole beat (fractions of a beat are not displayed).
The absolute length of the selected audio is displayed in both samples and seconds in the Original Length section. By default, the Project tempo is specified, but if you know the loop was originally recorded at a different tempo (as might be the case if you are importing a drum loop, for example), this can be adjusted. If adjustments are made here, the tempo setting in the Resulting Length section will also change in order to maintain the existing Time Stretch Ratio setting.
Providing the original audio was recorded at the same tempo as the project, the Define Bars and Original L
 A number of different stretching algorithms are available.ength settings will take care of themselves, and it is the Resulting Length settings that will need to be adjusted. Changing any of these settings will automatically produce adjustments in the other two but, in most cases, the Seconds and BPM settings are easiest to work with, as users often have a target length or tempo in mind.
Both the Time Stretch Ratio and the Seconds Range settings provide alternative ways of defining the desired degree of stretching. The Time Stretch Ratio slider allows you to compress (shorten) or expand (lengthen) the selected audio by a percentage compared with the original. When un-ticked, the Effect tickbox constrains the stretch range between 75 and 125 percent, and this ensures that the audio quality is maintained (although more extreme settings will undoubtedly introduce some audio artifacts, particularly with exposed elements of a mix, such as vocals). When this tickbox is ticked, a larger degree of stretching is allowed and this mode is intended mainly for the deliberate abuse of the original audio — in other words, for special effects. The Seconds Range section can be useful if you know you need the audio to be stretched to a particular length. Usefully, the Use Locators button allows the required length to be set via the Project window locators, which makes it very easy to stretch the selected audio to fit a Project window section (or, for example, an exact number of bars).
Algo-rhythms
The final setting that requires some user intervention is which stretching algorithm to use. Two options are available: MPEX (Minimum Perceived Loss Time Compression/Expansion, based on Prosoniq technology) and Realtime. The former probably provides a more sophisticated approach and is therefore likely to give more natural results. The latter uses the same processing algorithm as the real-time time-stretching provided by the Audio Warp functions in Cubase. As this is optimised for use in real time, processing speed is a higher priority than absolute audio quality.
 As described in the main text, adjusting bass or drum loops to the Project tempo is a breeze with the Time Stretch function.Both the MPEX and Realtime modes offer a range of different quality settings. However, as processing time is not really a significant issue for off-line processes, we will stick with the MPEX options here and, of these, there are three that offer higher quality results. Solo Musical provides the best results with monophonic sources, such as bass or vocals. Poly Musical provides similar results for either monophonic or polyphonic material, so it can also be used on more complex sources, such as drum loops or full mixes. To go that extra mile with polyphonic sources, there is also the Poly Complex setting, which is more processor intensive but is intended to give better results. For example, on my own test system, processing a full mix from 120 to 100 bpm (quite an extreme change) using Poly Musical takes almost as long as the track lasts, but it takes just over twice as long in Poly Complex mode. In my experience, the differences between these two modes are very much programme-dependent, and for some material, including vocals or exposed acoustic instruments, the results with Poly Complex do seem to be worth the extra processing time.
Tempo-matching
 Adjusting the fade-out length of the final note of a cue to get it to fit an exact timing is easily done via the Sample Editor. Here, the final note has been selected for processing, and a loop region set for auditioning.There are all sorts of corrective and creative applications for the Time Stretch function so, having got to grips with the key controls, let's now turn to some of these. Perhaps the simplest application is tempo-matching a pre-recorded loop to the Project. Cubase offers other ways of tempo-matching loops via its Time Warp and Hitpoint options (a topic I'm sure we will return to in a future column). However, if you just have one or two loops to process and know the original tempo they were recorded at, in most cases Time Stretch can achieve a perfectly acceptable result. For example, suppose we have a two-bar bass loop, originally recorded at 100bpm, which we wish to use in a Project at 110bpm. Once the loop has been imported into the Project window and selected in the Time Stretch dialogue, only three settings will need adjusting. First, within the Original Length section we need to set the Tempo In BPM to 100 (the original tempo the loop was recorded at). Second, the BPM value in the Resulting Length section should be set to 110 (the Project tempo). Finally, we would select MPEX and Solo Musical in the Algorithm section. Exactly the same process would be used with a drum loop, although the Poly Musical or Poly Complex modes would be more appropriate. Whatever type of loop we are processing, this method takes just a few seconds to complete.
Make Your Pitch
A number of the more creative applications of the Time Stretch function also require the use of pitch-shifting. For example, extreme pitch-shifting can be used in sound design to radically transform a sound, while matching the pitch of a vocal from one track with the backing from another is required when constructing a 'mashup' (unless, of course, you are deliberately going for an out-of-key 'punkmash' sound). Cubase does, of course, have an equivalent off-line Pitch Shift function and, as this includes both pitch-shifting independent of length changes and the ability to preserve formants (avoiding chipmunk or robotic 'Barry White' results with vocals), the results can be very good. The Pitch Shift function also includes an envelope tool, allowing the degree of pitch-shift to be varied throughout an audio clip. Of course, this is not a replacement for pitch-correction software such as Melodyne or Auto-Tune, but it does provide some useful corrective and creative possibilities.
The Right Time
 The Pitch Shift function can be used alongside time-stretching for creative effects.As I mentioned earlier, the Time Stretch function can also be effective as a corrective tool. One such application is forcing a piece of music to a particular duration. You might, for example, need to do this in order to make a pre-existing track fit the length of an advertising slot precisely. Only very small adjustments (perhaps less than half a second longer or shorter) may be necessary but, depending upon the material, you can approach the task in a couple of ways. If the track comes to a dead stop, with no last-note fade-out or reverb tail, then it is usually easiest to process the whole track. In this case, it is often easier to use the Sample Editor to highlight the exact start and finish points. This defines the original length exactly when the Time Stretch dialogue is opened. All that you then need to do is adjust the Seconds setting in the Resulting Length section, and choose the correct algorithm mode (Poly Musical or Poly Complex for a full mix). However, if the piece has a well-defined final note with a bit of a fade on it, then an alternative approach can be used. The bulk of the piece can be left unstretched but this final note can be lengthened or shortened as required. In this case, just the final note is selected in the Sample Editor for processing and, providing the stretch is not too excessive, this can work very well. A loop can be set up in the Sample Editor to audition the end result and spot any audio artifacts between the stretched and unstretched sections.
Another corrective use of Time Stretch is tightening up individual notes in a performance. While most of us would agree that it is preferable to get a performance right at source, there are times when this just doesn't happen — whether it is down to running out of time, not spotting the occasional bit of sloppy timing during the recording session or where subsequent changes in the performance of one instrument require some editing of parts recorded earlier. In these cases, a little post-performance editing can help sharpen things up. For example, this can work well with bass guitar lines or guitar parts (although it does depend upon the style of playing — constantly strummed chords are more difficult to treat, whereas parts that feature chords that do not always run directly into one another can sometimes be tweaked successfully).
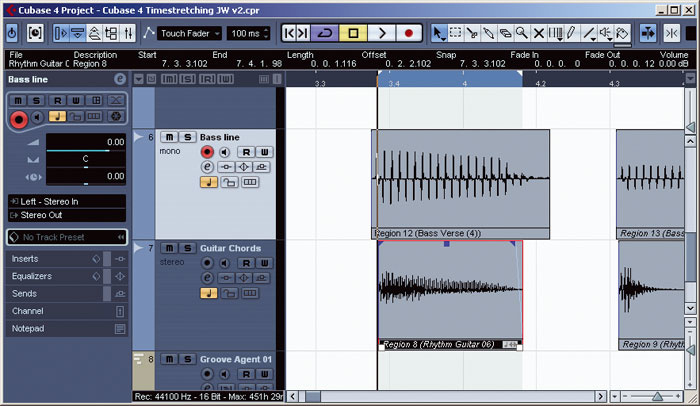 The Locators have been set around the exact length of a guitar chord. The corresponding bass note can now easily be adjusted to the same length, via the Time Stretch function's Use Locators button.A simple example is shortening or lengthening individual notes in a bass line so that the note endings match more tightly with other elements within the piece, such as guitar or keyboard parts. This is obviously going to involve some quite detailed, note-by-note editing, and if the performance is really sloppy, then re-recording may prove more efficient. However, if only a few notes are problematic, or if sections of the bass line can be edited and then looped, time-stretching is a viable option. This process is most easily achieved if the bass line is first split into individual notes. Where there are distinct gaps between notes, the Detect Silence function (Audio / Advanced / Detect Silence) can do this very efficiently. Where notes do run directly into one another, then some manual splitting at the start of each new note might be required, using the Scissors tool in the Project window. Once separated, individual notes can then be corrected. When trying to match the length of the note to that contained in another track, the Use Locators option comes in very handy. First, the Project window Locators can be set exactly around the note in the other part to specify the correct length. The bass note requiring correction can then be selected and the Time Stretch dialogue opened. Finally, with the appropriate algorithm settings made, clicking on the Use Locators button will time-stretch the selected bass note to match the length defined by the Locators. If you devote sufficient editing time, you can achieve some very tightly locked performances.
There are similar potential applications, such as in audio post-production work, where Time Stretch can be used to fine-tune automatic dialogue replacement (ADR). Much like the bass guitar example above, individual words within the replacement dialogue track can be time-stretched to produce a tighter lip-sync with the visual material.
A Long Stretch
It isn't all about precision and correction: the Time Stretch function can also be a great tool for creating special effects, as part of a sound design process. For example, try making a recording of something innocent, like a small child laughing, and then time-stretch it, pitch-shift it down a couple of octaves (see the 'Make Your Pitch' box elswhere in this article) and apply some dramatic reverb — just promise me you won't play it back to the small child in a darkened room! Here, the whole point is to make the audio sound different, so preserving the original audio quality is less of an issue, and more extreme settings can be used. If you want to take this further, it is worth experimenting with multiple stages of time-stretching or pitch-shifting, perhaps with different effects applied in between.
Another creative use of the Time Stretch function might be to match the timing of two different recordings when creating a 'mashup' — where two separate songs are woven together in a remix. Some pitch-shifting might also be required, but the results can be surprisingly effective.
There are a number of ideas here that I don't have the space to explore in this article, but perhaps they'll form the basis of future Cubase columns. Until then, have a good stretch!
Published September 2007
Saturday, May 20, 2023
Friday, May 19, 2023
Using Reverb & Delay
Reverb and delay are vital tools for mixing. We explain how to get the best from Cubase's bundled plug-ins.
Reverberation is crucial to our perception of the spaces we inhabit. Close your eyes, and your ears will tell you plenty about the space around you; the sound might be bright or dark, washed in echoes or dry — or anywhere in between. When these clues are removed, as in a dead room or anechoic chamber, the results can be disconcerting. So, although we often record vocals or instruments dry to avoid capturing an undesirable room sound, we usually add ambience back in at the mixing stage using reverbs or delays. But although it is easy to slap a reverb on an individual track and make it sound nice, getting reverb to work in the context of a mix is another story. In this article, we'll look at Steinberg's bundled reverb and delay plug-ins, and how best to exploit them within the Cubase mixing environment.
Tools Of The Trade
Since SX3, Cubase users have had access, in the form of Roomworks and Roomworks SE (the latter is a cut-down version of the former), to much better quality reverb than previously. When you're first confronted with Roomworks, there appears to be a bewildering number of controls, but they're actually quite straightforward. The plug-in is helpfully divided into five sections, each with a descriptive title. The Input filters allow you to apply high or low shelving EQ to the signal coming into the reverb. It is often a good idea to filter out some of the lower frequencies, for the same reason that low-frequency instruments such as kick drums are rarely treated with much reverb other than a short ambience: to avoid your mix sounding muddy and clouded. The high shelving filter is similarly useful if, say, you have a particularly sibilant source sound: adding reverb can exacerbate sibilance problems, so cutting high frequencies can help to avoid out-of-control 'S' and 'T' sounds in a mix. As higher-frequency reflections tail off before those lower down the spectrum, rolling off the high end is also a good way of pushing the sound further 'back', to get a greater sense of depth.
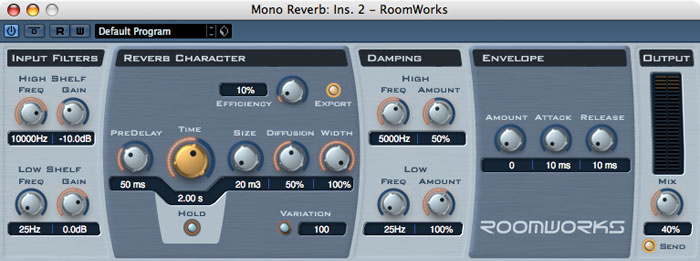 Since SX3, Cubase users have had, in Roomworks, a much better and more versatile reverb plug-in than previously.When we hear a sound, we perceive it as having three separate stages: the direct sound that reaches us before any reflections, the early reflections (the first few reflections coming back from nearby surfaces), and the reverb tail (the wash of sound made up of myriad complex reflections that have bounced off multiple surfaces before reaching our ears).
The five dials across the middle that make up Roomworks' Reverb Character section give you some control over the most crucial reverb parameters. Increasing the PreDelay value makes the space feel larger, as it mimics the effect of soundwaves travelling further before we hear the first reflections. A sufficiently long pre-delay can also help you separate out the source sound from the reverb sound, which helps to keep your mix clean. Another way to control the perceived size of a space is, unsurprisingly, to alter the Size control, which alters the spacing between the early reflections. The Time control is equally self-explanatory, adjusting the duration of the reverb tail (in milliseconds). Diffusion controls the extent to which the reflective and absorbent qualities of the surfaces within the simulated space disperse the sound. Finally, Width is used to set the stereo width of the reverb signal at anywhere between zero percent (mono) and 100 percent (full stereo).
The Reverb Character section includes some nice-to-have, though not essential, features. The Efficiency facility can reduce the strain on your computer, and if you ensure the Export button is lit, you'll still have the full quality of reverb on mixdown. If you're into creative sound design, the Hold control allows you infinite sustain of the reverb signal, which can yield some interesting sounds.
Moving on, the Damping section offers further control over the tonal character of the reverb. Increasing the level of damping at a particular frequency reduces the amount of time it takes that frequency band to decay, which allows you to mimic the effects of different materials within a space.
The Envelope section gives you a simple envelope (with attack and release controls, but not sustain or decay) which can be used to shape the reverb. So, for example, you could have your reverb fading in gradually after a percussive sound, which gives you an alternative to pre-delay for separating the source and reverb sounds, with the reverb building up, rather than hitting you head-on after the delay period. Should you be that way inclined, this control is also a candidate for some serious creative abuse!
Finally, the Output section allows you to adjust the wet/dry mix. The Send button overrides the Mix control and sets the mix to 100 percent wet, and the peak meter warns you if Roomworks' output is clipping.
Delays
I'll move on in a moment to some different ways in which you can use Roomworks in your mix, but first let me touch on delays. You probably already know that many of the famous 'reverbs' used in commercial tracks are actually not reverbs, but delays. This is particularly the case with electric guitars, but also a common technique for vocals and many other instruments. Why? Well, delay and reverb aren't a million miles apart — they both result in a delayed signal (or delayed signals) playing alongside the source sound. But whereas reverb produces a relatively indistinct wash of sound, delays typically produce individual, audible repeats which are more obviously related to the source signal. As a result, delays can often yield a more spacious, open sound than reverbs.
When it comes to delays, Cubase has more options than for reverb. There are four delay plug-ins in Cubase 4: MonoDelay, StereoDelay, ModDelay and PingPongDelay. The last two are more obviously useful for creating weird effects than as substitutes for reverb. For that, we need to keep things simple, which means using MonoDelay or StereoDelay. Both are very simple plug-ins which give you control over delay time, feedback (the amount of the output signal that is recirculated to the input, to create repeated delays) and wet/dry level, plus the ability to shape the sound using simple high and low shelving filters.
Now we've covered the tools and parameters, let's consider how you can put them to use in a mix.
Making Spaces
For those who've used nothing but Cubase or similar computer-based setups — that is, those who've grown up in blissful ignorance of hardware mixing consoles, processors and effects — the 'insert or send' question can be confusing. Reverbs and delays are almost always used as send effects, as this allows you to route different amounts of several different channels to the same effect, while having one fader available to control the overall level of the effect. Compared with using multiple reverbs as insert effects, this conserves CPU power and makes it easy to place multiple sources in the same virtual acoustic space. Just remember that send effects should be set to 100 percent wet. To set up a send effect in Cubase, insert a plug-in on an FX or Group Channel —preferably an FX Channel, as you're not able (without something like the Senderella plug-in described in December 2006's Cubase workshop) to send the signal from a Group Channel to another Group Channel that was created before it, whereas you can send the Group signal to any FX Channel.
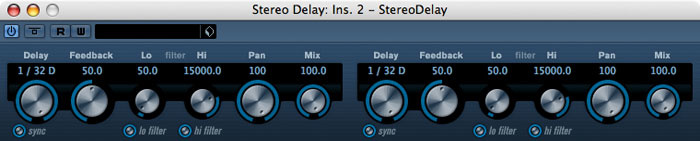
 Cubase contains plenty of options for delay, but sometimes it pays to keep things simple and use MonoDelay or StereoDelay.In general, I find that it helps to think of your stereo mix as a three-dimensional space, consisting of a left-to-right stereo field, which you can control though panning, a 'vertical' frequency spectrum, which you can control via EQ (and by writing suitable parts for suitable instruments!), and front-to-back depth, which is constructed mainly with reverb- and delay-based effects (often combined with a bit of EQ).
A useful starting point for a mix (which is worth creating as a Project template in Cubase) is to set up somewhere between three and six FX Channels, each for a different delay and/or reverb. For example, I have a template that includes six send effects channels. These include a short reverb providing mainly early reflections or 'ambience', a mid-length reverb and a longer reverb, and a parallel configuration for delays — one very short, with little or no feedback, one more noticeable, maybe with a touch of feedback, and another rather longer one, with feedback that I'll change from song to song as required. I might choose to use some further, 'special' reverbs and delays later, but this is often my basic starting point. I can use these FX Channels to place sounds at different points on the front-to-back axis, by sending varying amounts of the different channels to them. If you haven't tried this approach before, give it a go — it can be really effective and can save you a lot of time making parts work together.
When you use the sends to route a signal to an FX Channel, it defaults to sending the signal post-fader — that is to say, it's only the signal as it sounds following EQ, insert effects and the volume fader that goes to the effects. But you can opt to send the signal before any of the processing or volume settings, which means that you get the unprocessed signal going to the FX Channel. To do this, you just click the pre-fader button next to the send enable button in the Cubase mixer. This can be useful when you've had to compress the source signal to fit it in a particular place in the mix, but want to retain a livelier, more dynamic reverb on that signal.
As well as the amount of signal you send to which reverb or delay, don't forget that you can also use EQ to push things backwards or bring them up-front, as I mentioned when discussing the shelving facilities on the Roomworks plug-in: reducing high frequencies places things further back, while brighter sounds will feel more 'present'. On the delays, you can use the filter after the Feedback control so that each repeat seems progressively more distant.
A Question Of Time
Unless they're very short, I tend to keep my delays sync'ed to Project tempo. You don't have the option of tempo-sync'ing a reverb such as Roomworks, but once you have the project tempo set, and a strong rhythmic part (like a snare or hi-hat) going, it is easy enough to adjust the pre-delay and reverb times to get things working with the groove. For example, you can send the snare to the relevant FX Channel, solo the snare (so that only the snare and the FX Channel are playing) and then adjust the timing of the pre-delay so that the reverb is just distinct enough from the snare. Then tweak the reverb time so that the reverb tail dies off just before the next snare-hit. You'll have the big, long reverb sound you were after, but without the reverb tail getting in the way of the snare hit that triggered it, or the one that follows.
Digging Deeper
Timing and the front-to-back axis give you the basic tools to set up your spaces, and there's more control available thanks to the ability to pan your reverb and delay sends. If you haven't already investigated these routing options for send effects, which are rather well hidden, it is well worth doing so. To access them, you need to open the Channel Settings window for your source track and right-click (Control + click for Mac) on the grey background area. Choose Customise View and you get lots of options (as shown above). Select Send Routing and a new panel will be added to the Channel Settings Window, which (assuming your FX Channels are stereo channels) allows you to control the panning of the send separately from that of the source, and this feature is well worth playing with.
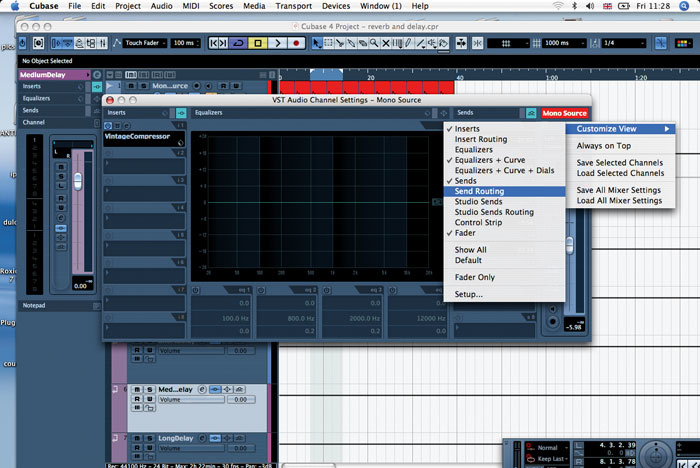
 Key to experimentation with reverb and delay is the Send Routing facility on each track's Channel Settings window. By default this is hidden but it is only a right-click away.(If you want to explore the FX Channel itself in more detail, you're unable to access this directly from the Channel Settings window of your source tracks — to do detailed tweaking of the FX Channel you have to open it via the Arrange or Mixer window.)
As with timing, one of the primary aims in panning the reverb is to achieve separation between the source sound and the reverb, so that you hear everything distinctly, with the source sound remaining focused, rather than being submerged in a wash of reverb. There are no rules as to where to pan reverbs (any more than there are rules about where to pan the source sounds), but I'd suggest that you try anything other than hard left, hard right, or the same position as the source. So, for example, take a mono acoustic guitar part that's panned somewhere left of centre, and change the panning of its Send Routing control slowly across from hard left to hard right. You'll find that the sound changes as you move things, and there'll usually be a spot or two that sounds better than others. Of course, doing this with the track soloed will help you understand the effect, but you really need to do it also in the context of the full mix, as everything else will interact with it.
You can do the same with delays, but there's plenty of scope for harder panning techniques here too. A very short delay on an electric guitar that's panned hard left, with the Send Routing panned hard right, can give you a big, spacious, sound. It can work even better if you slightly detune the delay by adding a pitch-shifting plug-in of some kind (there's none within Cubase but there's a useable freeware one by MDA, available from http://mda.smartelectronix.com/). This, in effect, gives you a very basic sort of Automatic Double Tracking. Use automation to modulate the detuning, or add some other subtle modulation effect after the delay, and you can make things sound richer still.
A further example of adding processing to the FX Channel track is to use compression or expansion: if you add a compressor after the reverb on the FX Channel, you can push the reverb down a little in relation to the source sound when the source gets louder, which has the effect of making the source sound more 'in your face' during loud passages of the track. If you've compressed the source sound, placing an expander before the reverb can (like the pre-fader send discussed earlier) give the sound back a bit of life, but still leave the source signal anchored where you want it in the mix. Another trick is to add a de-esser before or after your reverb, to make the reverb really bright without over-emphasising any sibilance.
Of course, for all that I've encouraged you to experiment, you should remember to take stock regularly and keep things in perspective — if you've achieved a great, distinctive sound, you may just get a better result by using it in moderation, automating the send control to bring it in at key points of the song. Happy reverbing!
Published October 2007