Saturday, August 21, 2021

Friday, August 20, 2021
Write In Cubase, Mix In Pro Tools
By Sam Inglis
 Here, I've placed Markers at the left and right locator positions, and we can see that the song is 89 bars long.
If you like Cubase's sequencing capabilities but prefer to mix your projects in another application, there's a hurdle to overcome: getting your soft-synth parts from one to the other.
It pains me to say this in an article aimed at Cubase users, but I don't really like mixing in Cubase. It doesn't offer side-chaining, the mixer is hard to navigate, the bundled plug-ins are mediocre and I find it difficult to work with a large mix on my laptop screen. I prefer mixing in Pro Tools, especially as PT gives me access to some great plug-ins that aren't available in VST format.
That's fine when I'm working with a project that's predominantly based on multitrack audio, such as a band session. However, a lot of the music I work on is generated from the ground up using MIDI and soft synths, and when it comes to sequencing, my preferences are the other way around. Pro Tools won't let you edit multiple MIDI parts in one window, and more importantly, doesn't work well with several of my favourite soft synths. My ideal compromise, therefore, is to get MIDI backing tracks together in Cubase, before exporting them to Pro Tools for mixing. Similarly, if you ever want to give a Cubase Project to someone else to mix, you'll probably need to turn it into a set of multitrack audio files first.
However, doing this can be a colossal pain in the arse, because Cubase really doesn't make it easy to export individual soft-synth parts as audio files. There's no way to incorporate soft-synth parts in an OMF dump, for example; nor is it possible to use the 'Bounce Selection' command on MIDI parts. What's more, the Freeze function works on entire Instruments, rather than channels or MIDI tracks, so it offers no way to export multiple MIDI Parts routed to a single VST Instrument as separate files. Instead, you're faced with having to solo each MIDI track individually, select 'Export Audio Mixdown' from the File menu, choose a meaningful filename, decide whether it needs to be stereo or mono, and then wait for it to bounce before going on to the next one. Unless, that is, it's possible to automate the process...
You Just Keep Me Hanging On
To my mind, the really tedious thing about the track-by-track method I've just described is that you can't just leave the computer to get on with it. Every track has to be named manually, so you have to be watching your computer for the entire time you're creating the export files. After some experimentation, I found that if you don't mind a little extra work at the start and end of the process, there is a way to eliminate this particular bugbear.
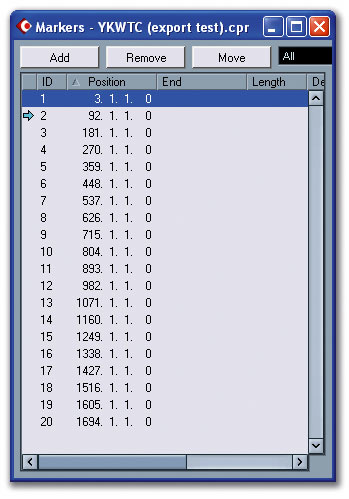 I want to export around 20 Parts, so I've created 20 Markers, each 89 bars apart.As you might expect, this involves a slightly tortuous use of Cubase's Macro function. This can't be applied to things like entering filenames, so it's not possible to automate the track-by-track export process; instead, a bit of lateral thinking is required. It might not be possible to automate the export of a different file for each track, but it is possible to automate the export of a single file containing all the Parts in a song. The idea is to automatically copy every MIDI Part in the song forward to a space of its own on the Project window, thus 'stringing out' all the MIDI (and audio, if you wish) Parts one after another. A single 'Export Audio Mixdown' will then create one long stereo file with all the Parts in, which can be chopped up and re-sync'ed in Pro Tools, or any other editing and mixing application.
As I said, this does require a little preparation. First, we're going to use Cubase's Markers to tell it where to place all the parts on the Project window, so you'll need to delete any Markers that already exist in your song. Second, you'll need to make sure that all the tracks you want to include in the export are visible and adjacent to one another on the Project window — the method I'm proposing will work with both MIDI soft-synth and audio tracks, but you don't want them separated by Group tracks, and you don't want to include the tracks that represent the audio outputs from soft synths. Third, you'll need to hide any automation tracks by choosing 'Hide All Automation' from the Project menu. Fourth, set the left and right locators to the start and end of the song. The process is made much easier if you set them both exactly at bar divisions (which is easily done if you have Snap to Grid turned on). Fifth, delete or mute any unwanted Parts on tracks to the right of the song (I often use this area as a holding bay for unsuccessful takes and so forth).
Now, set the Project Cursor to the position of the left locator and hit Ctrl+M to open the Markers window. Click Add to add a Marker at that position, then set the Project Cursor to where the right locator is and add another marker. If you have set the locators to precise bar divisions, you should now easily be able to work out the length, in bars, of the gap between left and right locators. Write it down, it's going to come in very useful!
 Once you've created a Macro, it will appear in the Macro group of commands (upper window), where you can assign a keyboard shortcut to it.From this point on, the basic idea is to create a further Marker for each additional MIDI track you want to export, and have each Marker separated by the figure you have just written down. So if, for instance, your first Marker falls on the first beat of bar three, and the second Marker on the first beat of bar 83, that makes your song 80 bars long, and you'll need to create additional Markers at the starts of bars 163, 243, 323, 403 — and so on. The easiest way to do this is to hit the Add button on the Marker window and manually enter the bar number by double-clicking in the Position column.
If your song has tempo changes, you'll need to do some additional editing to the tempo track, copying the tempo map between the left and right locators and duplicating it rightwards as many times as you have Markers.
The final stage of preparation is to ensure that every track has an Event that begins exactly at the position of the left locator — otherwise, the Paste command won't take account of any empty space at the start of the track, and things will get out of sync. Set the Project Cursor to the left locator again, and choose Split at Cursor from the Edit menu to split any Events that start before the left locator. Where you have MIDI tracks with space at the left locator, you'll need to either drag the bottom left-hand corner of the first Event back to the left locator to enlarge it, or create a blank MIDI Event at the left locator position. If you do the latter, it's easy to copy and paste the same Event to multiple MIDI tracks.
Macrobionics
To summarise: at this point, you should have a set of Cubase Markers, each separated by the length of your song; a set of MIDI tracks adjacent to one another on the Project window, all containing at least one Event that starts exactly at the position of the left locator; and a large area of blank space to their right. OK, we are now in a position to write the Macro that will place each element of your song into its own area of blank space on the Project window.
 In order to stop the tracks going out of sync when they're copied, I've created empty Parts and used the Split at Cursor command to ensure that they all contain Parts that begin exactly at the left locator.The basic idea is that we begin by selecting the topmost MIDI track we want to include in the file export. Our Macro will select all the Events on that track, copy (or cut) them, skip to the next Marker, and paste them. It will then move to the next track and repeat the procedure; and because each Marker is separated by the length of the song, each track's MIDI parts will be pasted into a song's-length space of their own. A single Export Audio Mixdown will then create a long file with all the parts rendered separately.
Begin by opening the Key Commands window from the File menu and click Show Macros. Hit New Macro and name it as you see fit. The Macro itself needs to contain five commands. The first two are Select All on Tracks and Copy, both of which are found in the Edit group of commands. Next up is Locate Next Marker, from the Transport group, then Paste from the Edit group, and Down from the Navigate group. Finally, you'll want to assign an unused key command to this Macro; in my example, I've used Alt+E.
To try this out, make sure that Cubase's transport is rewound to the left locator and, in the Arrange window, select the topmost of the group of tracks you want to export. Now press Alt+E, or whichever key combination you've chosen for your Macro. You should see everything on that track between the left and right locators duplicated at the right locator position, and the selection will move to the next track down in the list. Press Alt+E again, and you should see everything on this track duplicated, this time further to the right. Press it again, and the contents of the next track down will appear still further to the right, and so on for as long as you have tracks and Markers to play with.
 Here, I've used my Macro on the first four tracks. Pressing Alt+E (the key command I've given it) again will copy the contents of the Kick track to the empty space to the right of the arrangement.When you've gone through all the tracks you want to export, set the right locator to the new end of the Project (this will now be a scary number in the thousands of bars!). Unless you want to export the rough mix as well as the individual files, move the left locator to the place where the right locator was (ie. the second Marker in the Project). You can now choose Export / Audio Mixdown from the File menu. Even if you don't tick the Real-time Export box, Cubase will take a fair while to export such a long file, but at least you can just leave your computer to get on with it. Bear in mind that if you're exporting to Pro Tools in particular, it's a good idea to use split stereo format, because otherwise PT will have to convert it at the input stage.
Slicing & Dicing
This isn't a Pro Tools workshop, but I'll quickly describe the method I use for importing and chopping up the resulting file. It's marginally less convenient than just using Import / Audio to Track to bring in a load of separate audio files, but still fairly painless, and I'm sure that something similar can be achieved in other mixing applications of choice.
 Chopping up all the elements within Pro Tools is easy as long as you know the exact length of the song...
First, open a new Pro Tools Session, choose Import / Audio to Track and import the file you've just created. Now set the tempo in Pro Tools to match that of the Cubase Project (if your Cubase Project used tempo changes, it's best to export a MIDI file from Cubase containing the tempo map and import that into Pro Tools). Create as many new stereo audio tracks in Pro Tools as there were Parts in your Cubase Project — this can be done in one go using the Ctrl+Shift+N (Mac: Command+Shift+N) shortcut. Now switch on the Keyboard Commands Focus in Pro Tools and put it into Grid Editing mode.
Remember that number of bars we wrote down earlier? Let's continue to imagine that it's 80. Place the edit cursor on the long audio region you've imported at bar 80 and hit 'B' to divide it. Now put Pro Tools into Shuffle Edit mode, grab the song-length region of audio to the left of that divide and drag it down to the empty track below. You'll see that the remainder of the long audio region snaps back to bar one, and the shorter region you've chopped out remains highlighted. Press 'P' to move the edit selection back up to the long region, press 'B' again, and you should have another song-length region to deposit onto another track. Repeat until everything has been distributed onto its own track, and you should be ready to mix, with only the niceties such as naming tracks to worry about.
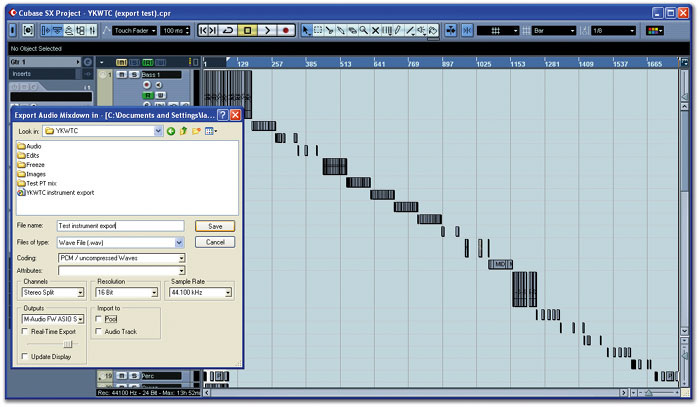 The entire Project ready to export.
One drawback with this method is that it can be rather wasteful of tracks (which are always at a premium in LE versions of Pro Tools), because everything is exported in stereo. When you export tracks individually from Cubase, you can choose to make them mono; if you can be bothered to do this, it does make for a more economical export. However, you can always throw away half of the stereo file in Pro Tools if you don't need it, and doing it in stereo means you no longer have to click endless warning dialogues when you export as mono. The method I've outlined also has one big advantage over the more obvious alternative. It does involve a lot of preparation, but once you've done this work — making sure that every Part starts in the same place, setting up the Macro and positioning all your Markers within a Project — repeating the export procedure is a doddle. This is very handy if you later decide that the song tempo needs a slight tweak, or you find that it's in the wrong key for your singer.
Published April 2006
Thursday, August 19, 2021
Wednesday, August 18, 2021
DIY Mastering
By John Walden
While mastering in a home or project studio is unlikely to produce the very best results, Cubase SX does have some basic tools for those who want (or have) to adopt a DIY approach.
The 'mastering shootout' article in the March 2006 issue of Sound On Sound — with the audio files contained on the DVD accompanying the magazine — certainly seems to have been a hit with the SOS readership, and has also sparked some considerable debate on the forums. As I write this column, I've just finished my own comparison of the different mastered versions of the three tracks and, like many readers, I was interested in turning my own hand to mastering the same tracks. A commercial mastering facility or one or the more popular dedicated hardware or software mastering packages may be a non-starter for those on a tight budget. So if Cubase SX is the only professional audio tool you have available and you are dependent upon the plug-ins supplied with SX, can you still do a little bit of DIY mastering?
 When mastering a single track, the effects can be placed as Inserts on the Stereo Output Bus.
Master The Basics
Those readers who devour their monthly SOS fix from cover to cover will have seen Paul White's February 2006 Logic Technique column, where he applied a combination of Logic's own plug-ins for basic mastering tasks. Paul suggested that a combination of multi-band compression and EQ would represent a very common processing chain for general mastering proposes. As I've commented before in this column, the one area in which the current version of SX is perhaps not so well blessed as Logic is in the provision of audio plug-ins. However, SX does provide both functional multi-band compression and EQ, so let's start with those two and see how we get on.
If attempting to master a single song, I tend to insert SX's Q four-band EQ (from the Filter plug-in group) and Multiband Compressor (from the Dynamics plug-in group) as insert effect on the main stereo output of the mixer. I can then monitor through these effects during the final stages of mixing, switching them in and out, as I both fine-tune the mix and listen to how the 'master' processing is working. By default, I usually place the EQ first and follow it with the multi-band dynamics, but the order in which the two plug-ins are placed can obviously be varied if required.
Join The Q
The Q plug-in provides four bands of EQ and, while the option of a couple of extra bands would be useful for those occasions when some narrow-band corrective EQ is required, Q is generally sufficient for our 'mastering on a budget' approach. The low and high bands can be switched between shelving filters or fixed-gain high/low-cut filters. As shown in the screenshot below, one possible starting point is to set the low band to Cut mode (press the Cut button to make this active) and use it to roll off the very low end — although bear in mind that you should perhaps set the corner frequency a little lower than you might think necessary, as the slope of the filter means that some cut is applied to frequencies above this. Rolling off the bottom end in this way can help clean up a mix — for many musical styles, much of what we hear as 'bass' is actually in the 50 to 100 Hz range and rolling off below this simply removes some low-frequency energy that can clog up your headroom but add little to the musical content.
 A typical choice of EQ settings to roll off some bass, cut a little mud and harshness and add a little air.At the top end, the high band can be used to provide a little 'air' EQ by using the shelving filter mode and adding a little gain from about 14 to 15 kHz upwards. This does need to be subtle, though, and 2 to 3 dB is usually plenty. The amount of gain can be experimented with by simply increasing it until it is obviously too much and then backing off until you think you can't hear it. Toggling Q's bypass button on and off will provide a useful A/B listening test, and this ought to be done on a regular basis, as the ear soon becomes accustomed to changes in EQ. Bypassing the changes you have made helps your ears regain their perspective.
Q's two mid-bands offer standard parametric-type EQ with centre frequency, gain and bandwidth settings (the latter are labelled in octaves). Unless you are using the EQ to fix a problem at a very specific frequency (and, if you are doing a DIY mastering job, this shouldn't be necessary as you would be better off resolving this by re-recording the problem part or doing a remix), fairly wide bandwidths and modest gain settings will produce the most natural results for mastering purposes. When describing general tonal problems with a mix, we often use the terms 'muddy', 'boxy', 'warm', 'nasal' or 'harsh', and these characteristics are often associated with particular frequency bands (see Bob Katz's excellent book Mastering Audio: The Art And The Science for a useful summary of these descriptive terms). For example, cutting a couple of dBs between 100 and 300 Hz can remove some of the 'mud' from a mix, while the same level of cut between about 1to 3 kHz can take out some of the 'harshness'.
Of course, two bands of mid-EQ might not always be enough. It is perfectly possible to insert a second instance of Q to provide a couple of additional bands. Some care is needed if you have to resort to this, as the EQ bandwidth settings are generally quite wide for mastering purposes, so it is possible for the bandwidth ranges of two bands to overlap and the respective settings to interact with each other. However, as long as you are aware of this possibility, a second dose of Q can be used if required.

Squeeze Me, Please Me
While Q might best be described as 'basic' for a mastering EQ, SX's Multiband Compressor plug-in is a little more sophisticated. This offers up to five separate bands of compression and expansion, with the user being able to specify the frequency range that each band operates over. For each band used, the gain can also be set over a range of ±12dB. In this sense, multi-band compression also has an effect on the tonal balance, as you can independently raise or lower the gain for each individual frequency band. Changing either the frequency range or gain for a band is simply a case of grabbing and dragging the small diamond-shaped anchor points — although note that it is the input gain to each band that you are adjusting, so the anchor points can be used to drive the signal harder or softer into the compression stage as required. New bands, up the to maximum of five, are created by dragging the right-hand frequency anchor point for the highest frequency band to the left — the new band then automatically appears to fill the gap created.
 A three-band Multiband Compressor with the compression kicking in for each band at -40dB.
The compression characteristics of each band are set in the graphic display that dominates the bottom of the plug-in window. This display shows the input level along the bottom of the graph and the output level along the right-hand side of the graph. Note that both are shown in dB and that a non-linear scale is used to give greater resolution above 18dB. As explained below, this is perhaps not ideal for mastering purposes but is easy enough to work around. Selecting a particular band in the upper part of the display makes that line active in the lower part of the display. Breakpoints are created by clicking on the line and existing breakpoints can be grabbed and dragged as required. A breakpoint can be deleted by holding down the Shift key while clicking on it. For new users, setting the compression characteristics using this graphical display is not the most intuitive process. This is not helped by the lack of any traditional compressor-type controls such as threshold and ratio settings, nor by the various presets supplied with the plug-in, as the majority of these feature both expansion and compression and are designed for use with individual instruments rather than a full mix.
 Above the -40dB threshold, setting the amount of gain reduction for a 0dB input allows you to control the compression ratio.
As with EQ, for mastering purposes, subtle use is the name of the game. For initial experiments with Multiband Compressor, therefore, it is best to ignore the expansion possibilities offered by the plug-in and stick with some gentle compression. This usually means low ratios of the order of 1.2:1 and low thresholds. In his February Logic column, Paul White suggested a threshold in the -30 to -40 dB range — the range that is so squeezed into the bottom left corner of the graphic display! Fortunately, as you click and drag the breakpoints, a small window opens that displays the input and output gain at that particular point. An example is shown in the screenshot on the previous page, with a breakpoint positioned at the -40dB input level. As this is also positioned at the -40dB output level, no gain reduction is taking place up to that input level. Creating a second breakpoint at the 0dB input, -6.7dB output position then sets a compression ratio of approximately 1.2:1 above -40dB. A ratio of 1.2:1 operating on 40dB of input produces total gain reduction of 40-(40/1.2) = -6.7dB).
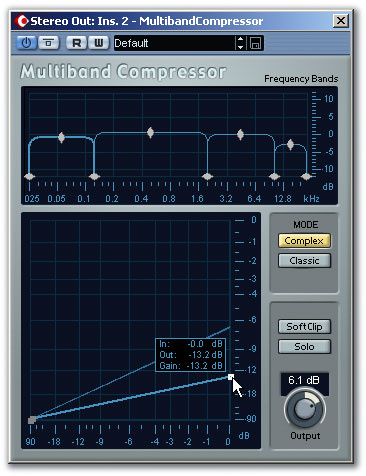 In this example, four bands are being used, with a higher compression ratio set for the low band to give a little firmer control on the bass.Paul also suggested starting with three bands for mastering purposes, with the band splits at around 120Hz and 5kHz. This effectively gives you a separate compressor for each of the low, mid and high bands, and adjusting the gain of any of these will therefore also alter the tonal balance. If you are feeling more adventurous, you could try using four bands with splits at 120Hz, 2kHz and 10kHz. This also offers a decent starting point, giving low, low-mid, high-mid and high bands for a little additional control — although it adds an extra layer of complexity and the potential to destroy a decent mix if you do anything too drastic.
In setting both the gain of the individual bands and the Output Gain (bottom right) on the Multiband Compressor plug-in, keep an eye out for clipping on the stereo output buss. The Softclip button can be engaged to help control the occasional peak; as the name suggests, this attempts to add a little 'tube-like' warmth to thse peaks. As described below, however, there is perhaps a better option if you want a touch of analogue-style warmth. Finally, the Classic/Complex mode switches toggle between fixed attack/release times (Classic mode) and automatic settings (Complex mode) where the attack and release adapt to the audio. I've always found the latter to work well enough, but a quick A/B comparison is always worth a try.

The Rest Of The Chain Gang
With a combination of Q and Multiband Compressor, you should now have a mix that is both fine-tuned tonally and, hopefully, in a gentle way, a little hotter in terms of overall signal level. There are, however, a number of further options that you can add to this processing chain. One possibility is to insert an instance of the SX Dynamics plug-in after Multiband Compressor, but to engage only its Limiter stage. This would allow you to drive Multiband Compressor a little harder, with the limiter catching any major peaks to avoid clipping. However, while the SX Dynamics limiter seems to work reasonably well within the context of a single channel, its performance as some sort of 'loudness maximiser' leaves a little to be desired.
 Magneto — for a nice warm punch, and a little extra volume!An alternative approach for squeezing a few more dBs out of your mix is the Magneto plug-in. This attempts to simulate the saturation effect of analogue tape and can add both warmth and a little punch to either individual sounds or an entire mix. The display on the VU meters can be toggled between the Input, 'On Tape' or Output signals. The first and last of these should not exceed 0dB and can be adjusted via the Input Level and Output Level controls. However, with sensible use of the Drive control, additional 'tape saturation' can be added to send the 'On Tape' signal into the red. The Characteristics knob changes the tonal character of the tape effect, and further control over the high-frequency content is available via the HF-Adjust control, so you can add a little high-end sparkle. There is also a Tape Speed control to emulate the difference between 15 and 30 inches per second tape speeds. How accurate Magneto is as a true tape emulation is a matter of debate but, as an effect, on some material it works very well and it can be used to add both warmth and level to a mix.
A final process that is occasionally used in mastering is reverb. A small amount of 'global' reverb applied to the whole mix can, on occasions, just help to add that final bit of glue that make the whole production seem like it was recorded in the same acoustic space. This certainly doesn't suit all types of material, but can work well with some orchestral or small ensemble performances where the intention is to create the illusion of a real performance for the listener. SX is far from being blessed with the most sophisticated of reverb plug-ins but, as ever, the golden rule here is 'be subtle': only the smallest amount of additional reverb is usually required and, for those without access to something better, RoomWorks can do a reasonable job in this capacity.
Leave It To The Master?
It is worth repeating that, with all the processing described above, the most natural results will be obtained by keeping things as subtle as possible. If you do find yourself having to do too much processing at the mastering stage, it probably means the original stereo mix needs revisiting. With all the processing elements in the mastering signal chain, plenty of use of the Bypass switch is called for so that you get a clear perspective on what you are adding.
Of course, you should not expect miracles. SX is not designed as a 'mastering suite' and it is difficult to get that commercial 'sheen' without access to both high-quality stereo mixes and a range of more sophisticated mastering tools. That said, for those on a budget or new to mastering, the possibilities provided by SX are well worth exploring. And if all your experiments teach you is that some professional advice and help is required to master your stereo mixes, this is a useful lesson in itself.
Tuesday, August 17, 2021
Monday, August 16, 2021
Automation Tips
By Mark Wherry
 All the parameters that can be automated on a track are displayed and edited in independent Automation Sub-tracks which, rather neatly, are displayed with the data from the parent track in the background.
When Cubase VST became Cubase SX, one of the big improvements was a better automation system for audio-based tracks and channels. This month, we show you how to make the most of this newer system.
When you're working with a mixer, such as the one built into Cubase, there will probably come a time when you find yourself moving the mixer controls and thinking 'Wouldn't it be great to record these movements as part of the performance?' Indeed it would. And that's one of the great advantages of computer-based mixing systems (no matter whether implemented with a hardware surface or purely in software): the ability to record and play back the movements of various mixer parameters, which we refer to as automation.
Automation 101
The basic operation of working with automation in Cubase is fairly straightforward. For example, say you have an audio track and you want to automate the volume fader. To do this, simply click the track's [W] Write Enable button, press play, move the fader to taste, and then press stop. In a nutshell, once a track's Write Enable button is active, any parameters that can be automated on that track will be 'armed' for automation so that when the transport is active (which is to say you either pressed play or record), any adjustments made to armed parameters will be stored at the appropriate time location.
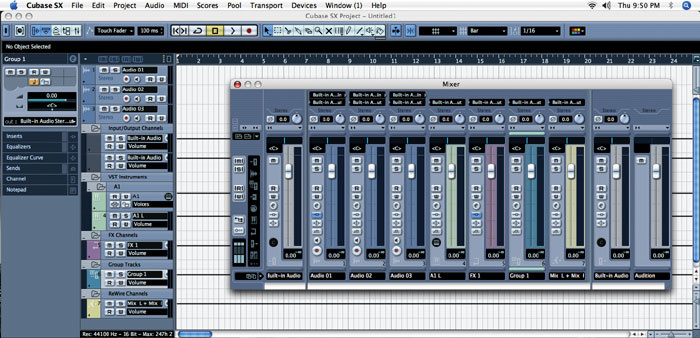 Cubase represents mixer channels that don't play back Audio Events as Automation tracks on the Project window's Track List, and automatically organises them into folders by channel type.Once you've written automation data to a track, it's a good idea to deactivate the Write Enable button to avoid any accidents, and then, for the automation data to play back, you need to make sure the track's [R] Read Enable button is activated. You can toggle the Read and Write Enable buttons for all tracks simultaneously by clicking the 'All Automation to Write/Read Status' buttons at the very top of the track List (labelled [|W|] and [|R|]).
So once a track is armed for automation, what parameters are actually recorded? In the case of audio-based tracks, you can automate Volume, Pan and Mute, the built-in channel EQ parameters, and Level and Enable parameters for each send. Any parameters for insert plug-ins you're using on the track that's being enabled to write automation are also included. You'll notice that plug-in windows also include Read and Write Enable automation buttons, and these can be used independently of the track or channel on which the plug-in is used. For example, if you have an insert plug-in on an audio track and enable the track's Write Enable button, the plug-in's Write Enable button will also become active. However, the reverse isn't true, so enabling a plug-in's Write Enable button doesn't activate automation for all the parameters on the appropriate track.
As an aside, it's important to stress that in the current version of Cubase, when a track's Write Enable button is active, the movements of all automatable parameters are recorded — it isn't possible to arm only certain parameters for automation (with the exception of plug-ins, as we've just discussed).
Getting On The Right Track
In the same way that MIDI Events are used to record MIDI data in Cubase, Automation Events are created to store automation actions, such as dragging a fader. And since MIDI Events are recorded onto MIDI tracks, it therefore makes sense that Automation Events are recorded onto Automation tracks — or, to be more precise, Automation Sub-tracks. When you automate a parameter on a track, the Automation Events created get stored on Automation Sub-tracks within the actual track whose parameter is being automated. And, to make life simpler when you're trying to edit Automation Events, each parameter that can be automated on an audio track (including plug-ins) has its own independent Automation Sub-track for Automation Events.


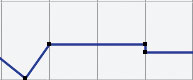 Here are three Automation Events. If the last two were deleted with the Object Selection Tool, the events depicted in the top screen would be the result. However, if you selected a Region containing the last two Events with the Range Selection tool, third screen down, and pressed Backspace, the results would be as shown in the bottom screen.To see an Automation Sub-track in the Track List on the Project window, simply click the relevant track's 'Show/Hide Automation' button in the track List (which is the little '+' symbol in the bottom-left corner of the track). By default, the first Automation Sub-track revealed is for Volume, although you can change this, as we'll see in just a minute. You can see more Automation Sub-tracks by clicking the Append Automation track button (the '+' symbol at the bottom of an Automation Sub-track). You'll notice that the '+' symbol changes to a '-' symbol on the main track once Sub-tracks are being displayed.
Clicking the '-' symbol on the main track hides all Automation Sub-tracks currently being viewed for that track, but the good news is that when you click '+' again on that track, all of the previously visible Automation Sub-tracks are displayed again — you don't have to add them one at a time. To hide individual Automation Sub-tracks once they've been appended, simply click the '-' Hide Automation track symbol on the Automation Sub-track you want to hide. It's important to note that hiding and showing Automation tracks only affects what you see: it isn't the case that only Automation tracks that are visible are played back.
Before we go any further, I want to mention some important exceptions to the operation of Automation Sub-tracks for audio-based channels that don't contain any Audio Events, such as Input/Output channels, Group, FX, Rewire and VST Instrument channels. With these channels, the track you'll see on the Project window is actually an Automation track representing the appropriate channel on the mixer, and Cubase will automatically organise these Automation tracks into different folders based on channel types. So if you want to find the Automation track for a Group channel, you'll find it in the Group Channels folder in the Track List.
For VST Instruments, there are always at least two Automation tracks created: one for the actual Instrument (useful for controlling the plug-in's parameters), and additional tracks for each output of the Instrument, for adjusting levels and output settings. You'll notice that Cubase organises the VST Instrument Automation tracks into Sub-folders so that Automation tracks for different VST Instruments remain separate.
With the exception of Input and Output channels, Automation tracks for all channels appear in the Track List as they're created. Although at least one pair of Input and Output channels always exists on the mixer, the appropriate Automation tracks are not added to the Track List until an Input or Output channel's Write Automation button is activated for the first time. For example, you'll see Automation tracks for the Input and Output channels appear on the Project window if you click the 'All Automation to Write Status' button.
Working With Automation Tracks
Automation tracks (or Sub-tracks) generally show Volume Automation Events by default, but you can change this by clicking on the name of the current parameter (such as Volume) and selecting More from the pop-up menu. You'll notice the pop-up menu itself offers a choice of parameters, but when you click More, the Add Parameter window will be displayed, allowing you to see (and choose) any of the parameters for that track that can be automated. If you want to quickly see Automation tracks for every parameter within a track for which Automation Events have been recorded, you can simply right-click (or Control-click on Mac) on the track in question and choose 'Show Used Automation'.
You'll notice that each Automation Sub-track has its own set of Read and Write Enable buttons, but unfortunately, as mentioned earlier, these don't work independently in the current version of Cubase. Although you can't enable automation to be written only for certain parameters, however, it is possible to prevent automation from being played back on certain parameters. Automation tracks offer a handy Mute Automation control, and when this button is enabled, as you might expect, Automation Events on that Sub-track will not be played back.
Automation tracks offer a graphical representation of Automation Events that have been recorded, and you can edit these Events (or create new ones if you have no pre-recorded automation and want to create some from scratch) just like any other Events in Cubase. Each Event is represented as a black point, and you'll notice that Cubase automatically interpolates between Automation Events, so that a fade-in requires just two points — a start point and an end point — leaving Cubase to smoothly fill in the transition. Note that Read Enable must be active on a track for Automation Events to be edited — otherwise, the automation data appears as a grey line.
 The parameter windows for audio tracks show which parameters can be automated. If any insert plug-ins were used on a given track, the parameters for these plug-ins would show up in this window when you were adding parameters to be automated for that track.With the Object Selection (arrow) Tool, Automation Events can be edited by simply dragging them around: once selected, they turn red, and can be deleted by pressing Backspace. More than one Automation Event can be selected and edited (and deleted) simultaneously, and you can create new Automation Events by clicking on the blue line that joins the Events. You can also draw in multiple Automation Events with the Draw Tool, or use the various shapes accessible from the Line Tool.
One Tool that comes in extremely handy when you're editing Automation Events is the Range Selection Tool, which we've discussed in Cubase technique articles in the past. Unlike some Events in Cubase, Automation Events can't be Alt/Option-dragged to copy them (even when many are selected), so the Range Selection Tool is especially handy as a way of copying a range of Automation Events. Once you've dragged out a range, you can either move the entire block, or copy it by dragging with Alt/Option held down.
You can also delete the block by pressing Backspace, and the result achieved will differ slightly from deleting a selection of Events made with the Object Selection Tool. Imagine you have three Automation Events and you select the latter two with the Object Selection Tool, then press Backspace. The Events are deleted as if they never existed, and the value of the first Automation Event is carried forward, even during the timeline where the other Events previously existed. However, if you selected the same latter two Automation Events with the Range Selection Tool and pressed Backspace, Cubase would automatically add Automation Events at the start and end of the Range Selection points, to preserve the value of the automation data that previously existed at these two points before the Events within the Range were deleted (see the illustrations on the previous page for a pictorial explanation).
One final issue to be aware of when you're working with Automation Events is that Cubase has an option called Automation follows Events, in the Edit menu, which is enabled by default. This means that if there's an Event on the main track, such as an Audio Event on an Audio track, any Automation Events that fall under that Audio Event will also be moved when you move the Audio Event. This behaviour applies to both copying and moving. Therefore, if you want to ensure that Automation Events are dealt with independently of any Events on the parent track, you'll have to disable the 'Automation Follows Events' option.
That's all we've got space for this month, but next month we'll continue our exploration of automation and look at the different modes for writing automation in Cubase SX, using hardware control surfaces, and looking at the issues you'll face if you use both MIDI Controller and automation data on MIDI tracks simultaneously.
Published June 2006