Tuesday, July 27, 2021

Monday, July 26, 2021
Track Presets
 Cubase 4 provides a range of Audio Track Presets.
Track Presets might not add anything to the sonic possibilities offered within Cubase 4 but Steinberg have been very keen to blow this particular marketing trumpet. So just what can Track Presets do for you?
As regular SOS readers will be aware, Sam Inglis had some reservations about Cubase 4 in his December 2006 review of Steinberg's new release. However, he was clearly impressed by the potential of the new Track Preset system. Given that this feature doesn't actually make any noise (unlike the new VST instruments) or offer the ability to process existing noise (unlike the many new or re-worked effects plug-ins), it would be easy enough after installing Cubase 4 to move swiftly on without really exploring what Track Presets have to offer. This would be a shame for a number of reasons.
The most obvious benefits are likely to be in improved workflow: if the technology works more efficiently, it's less likely to get in the way of the creative process. For those new to the professional end of the DAW world Cubase 4 's Track Presets bring a second benefit: an extensive library of Track Presets supplied by Steinberg that cover a whole range of recording tasks. These can provide a very useful starting point if you are unsure about which effects to combine (and in what order) for a particular recording or mixing job.
Track Preset Types
Cubase 4 features four types of Track Presets: Audio, Instrument, MIDI and Multi. The last simply represents a multi-track version of any of the first three types, in any combination that might be required. For most users, it will be the Audio and Instrument Track Presets that have the most to offer, so I'll concentrate on these here.
 The Browse Sounds dialogue provides one route by which all Track Presets can be viewed.Track Presets for audio tracks include features such as insert effects, EQ, volume, pan and phase — but not the settings associated with any sends to FX channels. Instrument Track Presets are best thought of as all the settings needed to configure a single sound from a VST instrument (VSTi). As such, an Instrument Track Preset includes both a MIDI track and an audio track associated with the VSTi, as well as the individual settings associated with both those tracks. Interestingly, when an Instrument Track Preset is used, the audio track and MIDI track are automatically created but, while the appropriate VSTi is loaded and assigned to the MIDI track, it does not appear in the familiar (well, at least it will be familiar to Cubase SX users) VST Instrument window. While this window can still be used to add a VST instrument, as in SX, this still requires an additional step where the MIDI channel is assigned to the VSTi, so I found that the new Track Preset approach was much more efficient in this regard.
In one sense, Instrument Track Presets are at the heart of quite a fundamental change in approach to VST instruments from Steinberg in this release of Cubase. Instrument Track Presets are primarily designed to represent a single sound (for example, a 'warm pad', 'ambient nylon guitar' or a 'bright electric piano') and Steinberg are trying to encourage users to think about the sound they are looking for, when searching Instrument Track Presets, rather than the particular VSTi that might be required to make that sound. Of course, this approach works best when you're dealing with monotimbral (as opposed to multitimbral) VST instruments, Unlike the full version of Halion 3 (which is 16-part multitimbral), the new Halion ONE sample playback VSTi is monotimbral, as are the other new instruments introduced with Cubase 4.
Audition For The Part
 Track Presets can also be accessed via the Soundframe Browser.Steinberg have included an excellent range of audio and Instrument Track Presets with the initial Cubase 4 release. Accessing a Track Preset can be done in a number of ways. As in SX, the 'Project / Add Track' menu option can be used to add a specific track type (and the same selection is provided by the pop-up menu when you right-click on the Track List in the Project window). However, the dialogue that then appears now includes a Browse Presets button, and selecting this opens a further dialogue where search criteria can be used to locate the desired Track Preset. Both of the menus mentioned above also include a 'Browse Sounds' option, which opens the (surprise, surprise) Browse Sounds dialogue. This offers more flexibility, as it allows you to search for any of the four Track Preset types (Audio, Instrument, MIDI or Multi). Of course, the third route is via the 'Media / Open Soundframe Browser' menu option, from where Track Presets are one category of media items that can be searched. In essence, all three of these routes offer slightly different views on the same database of Track Presets, so it just comes down to personal choice as to which you prefer to use.
Perhaps one of the most useful features of the Audio and Instrument Track Presets, however, is the ability to preview the sound of the Track Preset from within these Browser dialogues — in fact, it is only when you're doing this that the creative potential of Steinberg's new approach to finding 'the right sound' can be properly appreciated.
 When creating your own Track Presets, careful use of the Tag Editor will make them much easier to find at a later date.For Audio Track Presets, the easiest way to do this is to create a standard audio track and enable its monitor button, so that (providing you have a system that is capable of suitably low latency) you can audition your audio as processed by any Insert effects or EQ settings included in that track. If you then right-click on the track and select 'Apply Track Preset' from the pop-up menu, selecting a suitable Track Preset (for example, the Guitar/Plucked Presets are shown in the screenshot) within the Browser allows you to monitor the audio through the combination of Insert effects and EQ settings contained within the Preset. Using the mouse (or arrow keys) to select a different Preset in the list then allows you to audition a different sound without leaving the Browser — and you just keep going until you find something that best suits the job in hand. Once you've found it, clicking the OK button applies that Preset to the selected audio track.
If auditioning audio Track Presets gives a taste of what this new feature can bring, doing the same for Instrument Track Presets bashes it home with a hammer. Auditioning an Instrument Track Preset can be achieved from any of the Browser options described above (although this is done slightly differently in each Browser, and in the Soundframe Browser you need to have the Scope section active in order to see the button that activates MIDI Input). For example, if you are looking for a bass sound, selecting the Bass category displays a list of all the bass sounds currently held in the Cubase 4 database system, regardless of which soft synth might be required to create that sound. This ability to think about finding the 'sound' you need rather than the soft synth you need (only to load it and, after browsing what it has to offer, discovering that none of its sounds quite fit the bill) is a much more logical way of approaching sound selection, and Track Presets are an essential part of that process. A little time spent browsing some of the Instrument Track presets also demonstrates the potential of the new Cubase 4 VST instruments — but that is perhaps something for a different column.

Getting Creative
Of course, if you create your own track configurations for particular tasks, these can be saved as new Track Presets for later re-use — simply right-click on the appropriate track and chose the 'Create Track Preset' option from the pop-up menu. This will produce the Save Track Preset dialogue. Aside from entering a suitable name for your new Preset, it's a very good idea to make full use of the Tag Editor to identify the characteristics of the Preset and what it can be used for. The more detail you can enter here, the more likely it is that you will be able to find it again through the search filters within the various Browser windows.
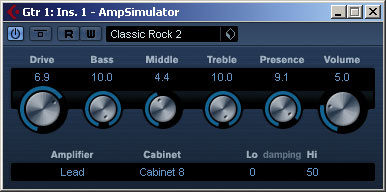
Aside from providing an efficient means of finding the sounds you're after, Track Presets have a number of obvious applications. For example, a Track Preset could be created that contains the series of Insert effects and EQ settings that suit a particular vocalist or vocal treatment. These settings can then be recalled for the different songs in a project and used as a basis for achieving a more consistent vocal sound across the various songs. Alternatively, the various electric guitar Track Presets might be used while recording, with a view to re-amping the sounds to better fit the song when the mixing stage is reached (see the 'Pod Killer' box for some further guitar-related comments).
 Insert effects can be readily copied to and from audio channels to Group or FX channels, providing a clumsy but useable workaround for the lack of Track Preset support for Group or FX channels.When it comes to soft synths or samplers, it is quite common to apply additional effects plug-ins to the audio output from a VST instrument. In such a case, the basic patch in the VSTi does not capture the whole 'sound' being used. However, saving the sound as an Instrument Track Preset allows the VSTi, the chosen patch and any additional processing options to be stored as a single 'sound' — making it much easier to recall this exact sound later.
Group & FX Channels
Most users who explore the Track Preset system will soon begin to appreciate the workflow benefits that it has to offer. However, as Sam noted in his review of Cubase 4, the current Track Preset system does not extend to Group or FX channels. While it is easy to see why Steinberg avoided making the Send settings part of the Audio or Track Preset specification (how could you be sure that all the necessary FX channels would be in place within the Project?), it is a shame that, as yet at least, Track Presets cannot be created for individual Group or FX channels.
Of course, if you regularly use the same Group channel or FX channel configurations, it is easy enough to build these into a Project Template, as could be done in SX. However, there is a workaround for this current limitation of the Track Preset system — albeit a rather clumsy one — as Cubase 4 includes the ability to copy Insert settings between tracks. For example, Group channels for drums, guitars or vocals often feature a particular combination of Insert effects. If you create such a combination that you think might be useful in later projects, each insert effect can simply be copied from the Group channel to an empty audio channel within the Mixer (hover the mouse over the number of the Insert to be copied, hold down the Alt key and then drag and drop the effect into the required slot of the audio channel). The audio channel that now contains the copies of the Group channel's Insert effects can then be used to create an Audio Track Preset — and when you want to re-use that Preset in a different project, a new audio track can be created from it and then the Insert effects copied back into an empty Group channel. While the copy/paste system in Cubase 4 does not (yet?) extend to the standard channel EQ settings, if you use one of the Insert-based EQ plug-ins (such as the Studio EQ) instead of the standard channel EQ, then any custom EQ settings can also be stored in your Track Preset and dragged and dropped in the same way.The same processes can also be used with FX channels, which is one area where prseets could be really useful, and although it is not a very elegant solution, it does work!
Published January 2007
Saturday, July 24, 2021
Friday, July 23, 2021
Q. How do I adjust Velocity values of drum sounds in Cubase?
By Mike Senior
 Cubase's Drum Editor allows you to edit velocity values for any individual instrument within a drum kit MIDI part, without affecting the velocities of the other instruments.
I'm using Cubase and have I just bought the BFD plug in. I've programmed in all the MIDI notes for the drum part, but I now want to draw in the velocity for each note by hand (hi-hats, kick, snare, and so forth). When I go to draw, my actions affect the velocity for every MIDI note on that beat, even if I have only selected one note. I have been told that it possible to hold the Shift key in Pro Tools to draw in velocity values just for selected notes. Is there anything like that for Cubase?
SOS Forum post
SOS contributor Mike Senior replies: It sounds like you're trying to edit your drum parts using Cubase 's Key Editor, and this does indeed respond in the way you describe, when you 'draw' in the Velocity Controller Lane with the pencil tool. However, if you open up your drum part in the Drum Editor instead (right-click the MIDI region and select Drum Editor from the shortcut menu's MIDI submenu), the Velocity Controller Lane will only show velocities for notes of one MIDI pitch at a time.
Assuming that you're wanting to tweak just the hi-hat dynamics, all you have to do is select any hi-hat note in the main window using the pointer tool. This brings up only hi-hat values in the Drum Editor's Velocity Controller Lane, and you can then edit these with the drumstick tool. I tried this in Cubase SX2 and it worked fine.
Published February 2007
Thursday, July 22, 2021
Wednesday, July 21, 2021
Designing Cubase Synth Pads
 A simple pad sound created using a single oscillator in Embracer.
Creating your own synth patches is one way to add a unique element to your music projects. This month we look at how can you can get started designing your own pad sounds using the VST Instruments supplied with Cubase.
Given that Cubase users now have access to some very capable software synths straight out of the box, it is a shame not to make good use of them. While the Steinberg documentation includes a Plug-In Reference manual (supplied as a PDF), this provides a technical description of the VST Instruments and their various controls but is perhaps not a very effective introduction to programming your own sounds. So how can the synth programming novice get started with the Cubase VST Instruments? Let's introduce this topic by looking at the creation of synth pad sounds (which can have a place in a wide range of musical styles) in one of the Cubase virtual synths. For two reasons, Embracer provides an excellent starting point for this; first, it is available to the many users who have not, as yet, upgraded to Cubase 4, and second, as virtual synths go, it is not so complicated that DIY programming requires a PhD in sound design!

Gentle Embrace
In fact, Embracer is designed with pad sounds in mind and, despite its relative simplicity, it is capable of some excellent results. There is little point in describing all of Embracer 's controls in detail, as this information is available in the Plug-in Reference PDF supplied with Cubase, but I'll run over the basics. Embracer is a synth that can be used in stereo (which we will concentrate upon here) or surround projects and its range of sounds are, in essence, controlled by the user's choice of waveforms for the two Oscillators. Twelve different waveform types are available and these range from the subtle (for example, Carpet, Soft Wave or Digi Pad) through to more obviously synthetic or metallic (for example, Submerged or Metal Phase).
 Using a negative Attack Velocity in Steinberg's Embracer VST Instrument creates longer attacks for high-velocity notes.Pads can often be 'big' sounds, filling a lot of musical space, but sometimes a smaller sound works better for a particular task or musical mood. Creating a more subtle pad sound is also the best place to begin when creating your own sounds in Embracer as it means just using a single Oscillator. As an example, configure an instance of Embracer as shown in the screenshot above. This uses the Carpet waveform for Oscillator 1, and has Oscillator 2 switched off. Playing a single low note on your keyboard produces a fairly soft drone-like sound, and by tweaking the Tone control (which acts as a combined high-pass/low-pass filter, depending upon which way you move it relative to the 12 o'clock position) it is possible to introduce a sense of tonal movement into the sound. There is nothing too dramatic here and, if anything, more extreme Tone settings simply make the sound more subtle, by narrowing the range of frequencies generated. As with any individual sound, bigger is not always better, and in certain musical contexts (for example, music being used under a dramatic film sequence, where the mood requires just a hint of tension, or in a busy mix, where a full, complex pad sound might crowd out other details), a more constrained pad sound is exactly what is required.
Of course, it is very easy to add a little further expression to this subtle pad. For example, setting both the Attack and the Attack Velocity controls to around 3 o'clock means that notes fade in quite slowly, with longer fades for higher velocities — and adjusting the Tone control during this fade-in again gives a sense of the sound evolving. Experimenting with the Attack and Level controls can produce some further interesting effects. For example, set up an instance of Embracer as shown in the second screen shot, right, then play a low note with high velocity. The high Level and Level Velocity settings mean that, eventually, the note will become quite loud. However, the negative Attack Velocity setting (float the mouse over this control and you can see the exact value appear in the small information line beneath the Steinberg logo) creates longer Attack phases for high-velocity notes. This can be very effective if a single, low-pitched, high-velocity note is held underneath some higher-pitched, low-velocity notes. The latter fade in much more quickly (perhaps playing some menacing chords or a subtle melodic phrase), while the lower note gradually increases in volume to add a further sense of foreboding. Stick this kind of thing under a suitable film scene and the audience will just know something horrific is about to happen, or you might use it as a short introduction to lull your listener into a particular mood before you hit them full-on with wall-to-wall nu-metal guitars...
In the two examples above, the Width control has been set to zero, which confines the pad sound to the centre of the stereo panorama. By increasing the Width control you can spread a sound across the stereo image, and if you then select the modulation wheel from the drop down menu under the Width Control setting, adjusting the mod wheel while playing can add further 'movement' to the sound — from a subtle, small sound that occupies the centre ground to a 'bigger' sound that fills more of the stereo space.

It Takes Two
Activating the second oscillator provides additional options. By combining the two oscillators and shifting the emphasis of the sound between the two as a note or chord is held, you can open up plenty of possibilities for developing evolving pad sounds. The choice of oscillator waveforms controls how dramatic those shifts might be: if a subtle approach is required, then combining something like the Sing Sing and Soft Wave waveforms can work well; in contrast, when more extreme sound shifts are required, something like Sing Sing can be combined with the more metallic Phase Strings.
 Combining two similar oscillator waveforms can creates the potential for greater movement within your pad sounds while still keeping things subtle.With both oscillators active, the possible options for sound shifting are increased. The two Level controls can, of course, be automated. But you can also design sounds that evolve on their own, using different Attack times or opposite Velocity responses for Attack times. This can work really well, as the sounds from the two oscillators will fade in at different rates. Clearly, the other suggestions described above for a single oscillator — automating the Tone and Width controls — can be effective here as well.
The final option, with both oscillators working, is to use the Coarse and Fine tuning controls provided with Oscillator 2 to detune the two sound sources. The Coarse tuning control provides ± two octaves, which is great for letting one oscillator add either low-end rumble or high-end sparkle, whereas the Fine tuning control can be used to slightly detune the two oscillators, creating a fatter sound.
Tonic For The Troops
Of course, if you want to explore some further possibilities to your Embracer pad sounds, it is always possible to apply some additional processing using VST effect plug-ins. An obvious candidate for this is Cubase 's filter plug-in Tonic. Once you are familiar with Embracer itself, an interesting next step is to return Embracer to a simple one-oscillator-type pad and then insert an instance of Tonic into the Embracer audio channel within the Mixer. Tonic is a great plug-in, and would justify a 'techniques' column all on its own, but it is worth offering a few basic pointers here, as it is particularly effective at adding an extra dimension to your pad sounds.
 The Tonic filter provides further options for adding movement to an Embracer pad sound. Try these settings over a low droning pad from created in Embracer.As a simple example of what can be done, play a single low-note drone via a basic Embracer pad sound, with the Tonic controls set as shown in the screen shot to the right. This introduces some further movement to the sound. The key settings to note here are that the Tonic filter is operating in band-pass mode and that the band is being swept by the LFO at a fairly slow Rate setting. How extreme the effect is depends upon a combination of the LFO Depth setting (which controls the amount off LFO modulation of the filter cutoff level) and the filter Mix control (which controls the balance between the 'dry' signal from Embracer and the 'wet' signal processed by Tonic). If the Mix control is set at 100 percent, then at high Depth settings, the change in the sound will be quite dramatic. However, more subtle effects can be achieved by lower Depth settings or lower Mix settings. It is worth experimenting with both, as the results are somewhat different.
As indicated at the start of this column, Embracer is a not a complex synth to program. This has its positives (Embracer is easy to get to grips with) and its negatives (more demanding users may feel their creative options are a little limited). The new VST Instruments included with Cubase 4, however, provide more detailed control of filter settings, which gives you additional creative options when designing evolving pad sounds. This might provide a suitable topic for us to return to in another Cubase Techniques column, when a few more SOS readers have taken the plunge and upgraded to Cubase 4. Until then, happy padding!
Published February 2007