Tuesday, January 26, 2021

Monday, January 25, 2021
Steinberg Cubasis
By Mark Wherry
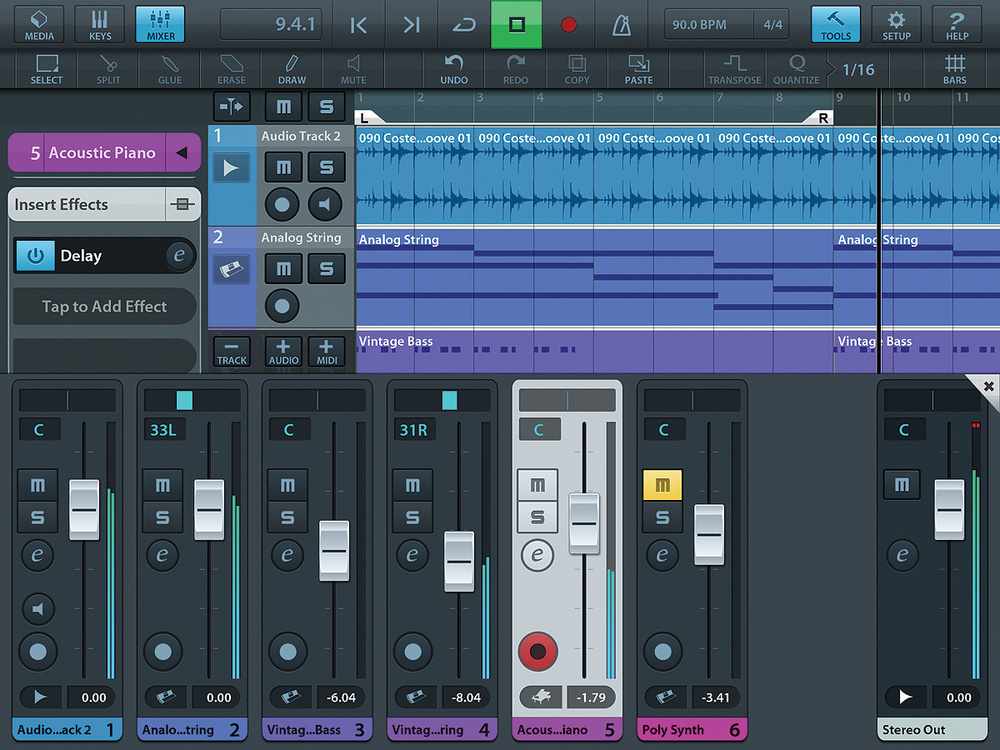 Cubasis in all its Cubase-inspired glory. Here you can see the Project View, along with the Tools panel (top) and the Mixer.
In the dim and distant past, Cubasis used to be one of the names Steinberg reserved for junior versions of Cubase, but now they've resurrected the Cubasis name for a new app that brings Cubase-inspired functionality to your iPad. This isn't the first time Steinberg have dabbled with mobile applications, of course. In addition to the Cubase iC controller app and LoopMash for iOS, Steinberg collaborated with Siemens, back in 2003, on Cubasis Mobile for the latter company's M55 mobile phone. However, where Cubasis Mobile was little more than a novelty ringtone generator, Cubasis for iPad is a surprisingly-capable audio and MIDI sequencer.
Much of Cubasis's look-and-feel has been borrowed from Cubase (including, surprisingly, the old, pre-Cubase 7 transport icons), but the interface has been designed very much with touch in mind. The main component of the interface is the Project View, shown above, which presents a Cubase-style arrange window, complete with the familiar Inspector. Complementing this View are a number of sub-views (for want of a better description) that slide in and out to provide access to a piano keyboard, drum pads, the mixer, various editors, and so on.
Projects can consist of either audio or MIDI tracks, and Steinberg claim you can create an unlimited number of tracks, depending on the capabilities of your iPad. Cubasis offers the ability to record on multiple tracks simultaneously, meaning that it's possible to use the app as a multitrack recorder with hardware such as RME's FireFace UCX. However, only 16-bit audio resolutions are currently supported, and you can only output a Project via a single stereo output.
To help you create your MIDI tracks, Steinberg supply a selection of over 70 virtual instruments based on Halion Sonic, and these can be selected from the MediaBay (where most aspects of Project management take place). A preview button is provided to audition each instrument, and you can double-tap to select it (or, if an audio track is selected, add a new track with that instrument). I would describe the quality of these instruments as no more than adequate, especially when compared with offerings from other apps.
Full Core MIDI Support
In addition to triggering the built-in instruments, you can play other apps from Cubasis, as Steinberg have implemented full Core MIDI support. In the MIDI Connections Inspector Section, you can set a MIDI input and output port and channel, which will either be hardware sources and destinations (if you have any MIDI devices plugged into your iPad), a Core MIDI Network Session, or virtual alternatives. Cubasis itself creates a virtual port, and I found I had more success using this, and assigning other apps to use Cubasis as an input, than using another app's virtual port from within Cubasis.
MIDI support in Cubasis is currently slightly lacking in one or two areas: you can't send MIDI clock to other running apps, and there didn't seem to be an elegant way to disable the virtual instruments on a MIDI track if I was using Core MIDI instead. My workaround was to turn the volume down to infinity on a given track, but even then I couldn't be sure if Cubasis was still wasting unnecessary CPU cycles on these now-silent instruments.
 The Cubasis keyboard with the Analog Bass instrument selected.Editing functionality in Cubasis is provided via the Tools panel, which appears just below the main toolbar and includes the familiar Cubase tools, although these behave a little differently in Cubasis. For example, rather than selecting the Erase tool and tapping the Parts or Events you want to erase, you instead select the appropriate objects (using the select tool to rubber-band multiple objects) and then tap Erase to erase the selection. This works pretty well, although I missed GarageBand's use of multi-touch to select multiple objects.
When you tap to select a Part or Event in the Project View, a number of handles become visible, just as in Cubase, allowing you to resize the object, or apply fade-ins and fade-outs and make overall volume adjustments. Double-tapping a Part or Event opens it in either the Key or Sample Editor, depending on the type of the object. The Sample Editor is pretty simple: you can set selection points, and then perform a few basic processes on the selected material, such as reverse, normalise, and fade in and out. The Key Editor is a little more sophisticated, although it seemed very sensitive to my touch and it often felt as though my fingers were having an argument with Cubasis.
If you don't want to start from a blank canvas, Steinberg provide over 300 audio and MIDI loops to use in your Projects. However, it would be more precise to say drum loops, since there don't seem to be any other instruments covered; and, perhaps more disappointingly, the audio loops aren't able to follow the Project's tempo. This means you have to look at the tempo referenced in the loop's name and then set your Project's tempo accordingly, which makes you feel like you're back in the '90s again, and is a surprising oversight given that other iOS apps (cough, GarageBand) do have this ability.
Effects
Cubasis includes 11 effects that can up used as inserts (up to three per track, including the master output) or in one of three send slots. The selection covers all the bread-and-butter effect types you would expect — reverb, chorus, delay, compression, EQ, and even a guitar-amp simulator — and each effect has its own graphical editor, which appears modally in the centre of the interface when opened. A nice touch is the inclusion of a Preview button. If the Project isn't playing, you can press this to trigger a note or play some audio from the appropriate MIDI or audio track, so it's easy to make changes without having to keep opening and closing the editor.
One limitation of the effects is that the amount of control you have over them is often quite restricted. The EQ, in particular, is like an '80s car stereo, providing just two controls for treble and bass. Another slight weirdness is that the sends on a track seem to be 'sent' before any insert processing has taken place. So if you put a filter on a track as an insert and use one of the send slots on that same track to send to a reverb, the signal going to the reverb will be unfiltered.
Once you've finished a Project, you can perform a 'Mixdown' to render your work as either a WAV, MPEG4 or plain old MIDI file. The resulting file can then be shared via email, Dropbox, AudioCopy or SoundCloud, or opened via another application on your iPad that supports a given format. For example, it's perfectly possible to create a MIDI file that can then be opened in Notion to let you see the Project in musical notation.
It's also possible to share the .CBP Cubasis Project file (via email, Dropbox or iTunes), which can then be imported into Cubase after you download the appropriate extension from Steinberg's web site. This is great, since you can start with some ideas in Cubasis when you're on the go, and then load those ideas directly into Cubase once you get back to your main studio. The only slight down side is that imported Projects sound markedly different (especially if they're based mostly around MIDI tracks), and when the Project is imported, by default Cubase insists on opening the editor for every instrument and plug-in used by the Project. To prevent this happening, you need to disable 'Open Effect Editor After Loading it' in the VST-Plug-ins Preferences in Cubase when importing a Cubasis project.
Perhaps the most contentious aspect of Cubasis is its $49.99 price tag. While $50 isn't that expensive in the grand scheme of music technology — it's cheaper than most plug-ins — it is a princely sum in iOS terms. This places Cubasis at the high end of the fiscal spectrum for iOS music apps, alongside WaveMachine Labs' Auria (which is arguably more sophisticated for audio work, though lacking MIDI features), and most likely restricts Cubasis to a smaller group of buyers that will probably be a subset of existing Cubase users. This is a shame, since Cubasis is a very promising mobile music-making tool that could shine if Steinberg iron out the initial quirks and bugs and keeps the app up-to-date.
Information
Saturday, January 23, 2021
Friday, January 22, 2021
All Mixed Up
By John Walden
 A compact layout of the Mix Console set up for typical mixing tasks, with group tracks fixed in a zone to the left, and effects tracks and the master output channel docked to the right of the mixer, leaving various other channels scrollable across the middle of the mixer. The panel on the left and the drop-down Channel Types panel both provide tools for showing and hiding different tracks, or types of track. Note that this is the first version of Cubase that lets you configure the mixer to show both inserts and sends in the same mixer view.
Cubase's main mixer window underwent a radical overhaul in version 7. In addition to the obvious visual changes, the new Mix Console boasts plenty of novel features, including Channel Racks, the Channel Strip, the Meter Bridge and a new graphical interface for EQ editing. It's far more powerful and configurable than the mixer in previous Cubase versions, but it also has the potential to become very cluttered, particularly on smaller screens. To get the most from Cubase 7, then, it's important to know how to arrange it to display only the elements you need.
Break It Down
The process of getting to grips with the Mix Console can be broken down into three stages. The first is to learn what Mix Console components are available and how they can be configured. Next, you need to figure out which configurations work best for your various composition, recording and mixing tasks. Finally, it's well worth learning how to recall different Mix Console layouts swiftly and efficiently, so that navigating the mixer becomes second nature.
It's worth noting here that there's no right or wrong way of configuring the mixer. What works best in any given situation is going to be a matter of personal taste and how much screen space you have available. Whatever your preferences, though, the likelihood is that you'll end up with several different views that you want to be able to recall swiftly as and when required. As an example, during tracking I might find myself wanting to see metering and fader levels, along with the Control Room. At mixdown, by contrast, I might wish to see an overview of channel EQs, inserts and sends, along with the new Loudness Meter. Elsewhere, there are times when I might wish to see all of the outputs from a virtual drum intrument such as BFD2, whereas at others I'll just want to see the group channel to which I've routed those tracks.
Cubase 7 incorporates a number of features that make this sort of flexibility possible. As before, there are three separate Mix Consoles available in each project, each of which can be set up differently. These are augmented by the new Mix Console Configurations, Workspaces and shortcut key commands that let you move freely between your different configurations.
Getting Started
 The Window Layout dialogue allows you to select which panes are shown in the Mix Console.
So, where do you start? By default, the Mix Console includes three separate panes: the Channel Selector down the left, the Fader pane along the bottom and the Channel Racks at the top. The height and width of any of these panes can be adjusted by grabbing their edges with the mouse and then dragging. Other panes automatically adjust to accommodate within the overall dimensions of the Mix Console window. The full Mix Console window itself is scalable vertically as well as horizontally, too — just click and drag at the bottom right-hand corner to resize.
The Window Layout selector button, located at the top left on the Toolbar, allows you to add other panes to this default Mix Console layout. Options include the Channel Overview, the Meter Bridge, channel EQ curves, Pictures and a Notepad. With the exception of the main Fader panel, each of these panes can be toggled on and off in the Window Layout dialogue box, so that you can focus solely on the controls you need to see at any given time.
Although you can't turn off the Fader pane, you can prevent individual channels appearing here and elsewhere using the Channel Selector pane at the left. The Visibility tab allows you to set which channels, or groups of channels, are included in the Mix Console, while the Zones tab allows you to lock certain channels to the left or right of the Mix Console display and have them always in view, regardless of what other left/right channel scrolling you might do.
You can also turn the Channel Selector display off using the Window Layout dialogue box. Given that the Mix Console Toolbar includes the Channel Types button, you can still adjust which channel types are visible on the fly and, as I find this to be an adequate level of control in most cases, I tend to prefer having an extra couple of channels visible all the time to having the Channel Selector pane itself displayed.
One Size Doesn't Fit All
 Although they are not assigned by default, you can set up keyboard shortcuts for almost any function in the mixer. Adding the Zoom palette to the toolbar can be useful, but there are also global keyboard shortcuts for this function, both in the Mix Console and the main project page.
Hand in hand with the ability to resize the Mix Console go its zoom tools, which enable you to expand or contract channels vertically or horizontally. If you want all these tools within clicking distance, right-click on a blank spot within the Mix Console Toolbar. This opens a pop-up menu where you can toggle on and off different subsets of Toolbar controls. By default, the Zoom palette is switched off: enable it, and buttons to control the vertical and horizontal zoom of the Mix Console channels will appear at the top of your mixer. In addition to the Channel Types and Rack buttons, I find the Zoom palette particularly useful for fine-tuning the display while I'm working. If you prefer to keep on-screen controls to a minimum, though, you can control the zoom functions using keyboard shortcuts. The 'G' and 'H' keys zoom in and out horizontally on their own, or vertically with Shift added. These are universal shortcuts and apply to the main project page also, not just the mixer.
For deeper control over the Mix Console alone, you'll need to go to the Key Commands window (via File/Key Commands...) and define your own custom shortcuts. Toggling channel types on and off, expanding and contracting elements within the Rack pane, and the zoom controls are all assignable as key commands, but there are plenty more useful options in the 'Mixer' section of the Key Commands window. For example, I stumbled across the Link Channels command in this way, and assigned that to Ctrl-Alt-L.
To return to the Mix Console Toolbar for a second, the Transport, Locators, Time Display and Markers palettes are also viewable Toolbar options. This means that mixing with the Mix Console in full-screen mode without being able to see the Project window or Transport Panel is now a viable option, so it might be worth experimenting with a full-screen Mix Console layout.
Total Recall
 Workspaces allow you to quickly access different Mix Console layouts, providing you make use of the three separate Mix Consoles.
Once you've configured the Mix Console's layout and dimensions to suit, Cubase can memorise your layouts for later recall. Locate the Mix Console Configurations palette (which is on by default and is located on the top-left corner of the mixer). Clicking on one of the four 'slots', and then clicking the asterisk button, allows you to save the current Mix Console layout as a Configuration. If you fill up the four default slots, further ones appear, up to a maximum of eight. You can quickly switch between Configurations by clicking on the numbered slots. Usefully, they are saved as part of a Project Template, and you can assign shortcut keys for speedy access to each configuration.
However, Configurations only reflect which channels and Racks are visible: they do not retain the overall size of the Mix Console window, the current zoom settings or the sizes of the various panes (Fader, Rack, Meter Bridge, and so on). Nor do they store settings configured in the Window Layout options, so if, for instance, you turn on the Meter Bridge in one Configuration, it will remain on regardless of which Configuration you then switch to.
 You can use the three independent Mix Consoles to define different combinations of pane layouts.If you want to switch between different sizes of the Mix Console window, you have a couple of options. One is to create Workspaces that incorporate differently sized Mix Console windows. You can then switch between Workspace presets to recall different sizes of Mix Console, while using Mix Console Configurations to switch between different channel and Rack visibility combinations. The catch is that Workspaces only retain the overall dimensions of the Mix Console, so when you recall a Workspace, the current size and layout of panes are simply adapted to fit the overall Mix Console dimensions. In most cases, the Fader pane retains its height, while the Rack pane gets squeezed to accommodate, which isn't ideal.
The final option is to make use of multiple Mix Consoles. There are three separate mixers to choose from, just as in previous versions of Cubase. They're available via the Devices menu, and you can assign shortcuts to open and close each one. Mixer 1 is opened/closed by F3 by default; I overrode other shortcuts to place the other two mixers on F4 and F5 respectively.
 If you have a dual-screen setup, you obviously have more space to play with, but the mixer is still complex, and you can still get an awful lot out of configuring the Mix Console(s) to taste.Each Console offers a completely independent view of the mixer functions in your project. If you wanted to, you could even have all three differently sized Mix Consoles on screen at the same time, each showing different combinations of panes, Racks and channels: the only thing they must all share is the top Toolbar layout. This, therefore, is the place to configure different Mix Console pane layouts and, as there are three Mix Console devices, you can make up to three configurations. The other useful element that these different console views also retain are vertical and horizontal zoom settings, which is great if you regularly want to flip quickly between channels that are wide/tall or narrow/short, or some other combination.
Multiple Mix Consoles can really speed up your work even through something as simple as making all your group and FX channels visible on one mixer, and all your audio channels on another, or having a drum submixer set up to avoid cluttering your main mixer with countless channels. Alternatively, you might want a dedicated mixer setup for recording and another for mixing.
Pulling Things Together
However you prefer to set up your mixer for different tasks, there's scope to do it in Cubase 7. If you combine the three Mix Consoles with different Workspaces, you can use the Workspaces you create to switch between views of the Mix Console that will retain not only the overall dimensions of the console, but also the selection and size of panes and the channel/Rack zoom level. Add this to the Mix Console Configuration buttons, throw in a few key commands and Project Templates, and navigating your projects via the new Mix Console should soon become second nature!
Published April 2013
Thursday, January 21, 2021
Wednesday, January 20, 2021
Bright Idea
Try out some '80s-style high-frequency enhancement by recreating the famous 'Dolby A' trick with Cubase's bundled plug-ins.
Back in the '70s, when the new 'high-fidelity' playback systems were revealing more detail to listeners, and increasingly complex production techniques led to a loss of high end (for example, through analogue tape generation loss) on many recordings, music-production facilities must have yearned for ways to enhance high-end detail in their records. It may be no coincidence that dedicated high-frequency enhancement tools with which we're all now familiar, such as the Aphex Aural Exciter — initially so secret in its workings that it was available only to rent — began to appear.
A rather more cost-effective way to lend signals extra shine and shimmer emerged from Dolby A noise-reduction, using only the encoding stage of a Dolby A unit (see the 'Dolby A Background' box). The effect sounds rather different from Aphex-style processing, and it can be as useful in a Cubase production as it was in the days of hardware.
Creating A Dolby-A Enhancer
Psychoacoustic processors usually add clarity and sparkle to the mix either by regenerating high-frequency harmonics or by combining dynamic equalisation and phase-shifting. This Dolby A setup uses the dynamic equalisation principle, by utilising a virtual multi-band splitter and different compression intensities. If the level of the audio signal rises above the threshold, the respective band's compressor applies gain.
This may sound like a conventional multi-band compressor, but the filters are configured slightly differently, and the first step is to create a four-band splitter using Group and FX channels. I've used a lead vocal for the examples, but you can use a signal of your choice.
1. Create channels. Create four FX channels and two group channels. Name one group channel 'Dolby A in' and the other 'Dolby A out'. Then label the FX channels 'DA lo', 'DA band', 'DA hi1' and 'DA hi2'. To keep your project tidy, you can move these all into one 'Dolby A' folder if you wish.
2. Signal routing. Route 'Dolby A in' to all four FX tracks, using send controls, but ensure that this channel's output is not routed anywhere. Route the output of each of the four FX tracks to the group channel 'Dolby A out'. Then, feed your lead vocal to the 'Dolby A in' channel via another send control.
3. Add gain. Finally, add 5dB of gain to the 'Dolby A out' channel using the input gain control (in the Pre section of the mixer). This is what your virtual Dolby A routing system should look like in Cubase 7.
You've now created the basic routing 'canvas', but you still need to set up the filters to complete the splitter. You can use Cubase's built-in EQ to set up the filters as described below:
1. DA Lo: An 80Hz low-pass filter.
2. DA Band: A band-pass filter from 80Hz to 3kHz (using both a low- and a high-pass filter to 'bracket' the band).
3. DA Hi1: A high-pass filter at 3kHz.
4. DA Hi2: Another high-pass filter, this time at 9kHz.
The overlapping zone of the two high-pass filters is what makes this different from a standard multi-band splitter. Make sure the slopes are set to 12dB per octave if you want to make this emulation sound as authentic as possible, though similar effects can be achieved using other slopes.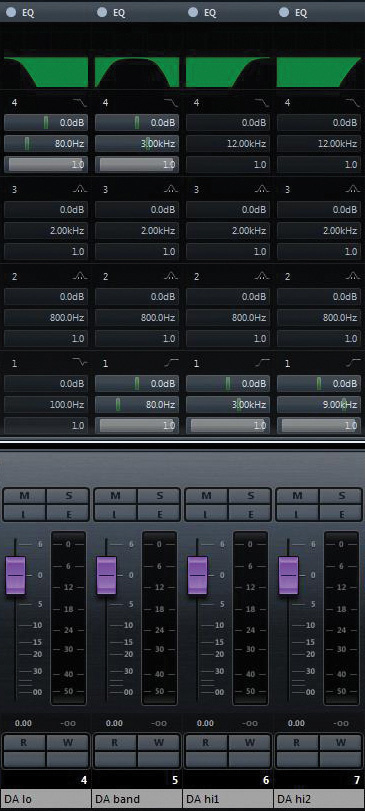 Creating the multi-band environment for the enhancer effect.
With this routing now complete, it's time to add compression. Insert an instance of Cubase's standard compressor on each of the band-pass and high-pass filtered channels, but not the low-pass one, ensuring that the compressors are inserted after the filters in the signal chain. If you're using insert plug-ins, you can drag the inserts into the desired position. If you're using the Strip section of Cubase 7's mixer, as in my example, you need to drag and drop the EQ Position placeholder in the Mix Console channel strip instead.
Select a 2:1 ratio for the first two compressors, and a less aggressive 1.5:1 ratio for the one on 'DA Hi2'. Set the attack times for all compressors to 1ms and their release times to around 10ms. Adjust the compressors' gain to +10dB on the first two channels, and +5dB on 'DA Hi 2', making sure that the automatic make-up gain is turned off. The carefully adjusted dynamics section of our virtual Dolby A setup.
Levels & Thresholds
If you've stumbled across descriptions of this technique previously, while trawling the Internet, it's possible that you've absorbed some well-intentioned misinformation, and with that in mind, I'd better put a few things straight!
For example, you may have read that you need to set the thresholds of your compressors to -40dB in relation to a fixed reference level. You can ignore that advice, because while this was the case when working with the hardware units, the reason for it was to ensure that the decoding side of the process worked correctly — and seeing as this effect only makes use of the encoding stage, it's not really relevant here. In any case, back in the day, the reality was that the drive level would vary as people routinely varied the actual level they recorded to tape. Recording 'hot to tape' would in effect lower the Dolby reference level threshold down by anything up to about 10dB (resulting in more HF compression).
But you do, of course, need to set the thresholds somewhere, so where? Well, professional engineers will usually work with plenty of headroom — with signals averaging around -20dBFS, and peaks will be somewhere around -10dBFS. In this scenario, you're going to need to work with compressor thresholds somewhere in the region of -60dB (ie. 40dB below -20dBFS) — which you'll find is the lowest setting available in the standard compressor in Cubase 7's new Strip section of the mix console.
It's not at all uncommon for levels on home-brew recordings to be rather higher than this, though (despite there being no real need or practical benefit — quite the opposite, in fact, but that's a discussion for another time!). Perhaps your signals are peaking at 0dBFS, with an average of -10, and if this is the case then you'll want to set the thresholds as high as -50dB to achieve the same amount of compression.
It's All Under Control
With your thresholds set, the effect is now ready to use — you just need to know how to use it. If you were working with the original hardware unit, you could only have changed the level structure by using your soldering iron, so if you want authenticity, leave the faders of the effect channels well alone. Clearly, though, this is the sort of effect over which you want full control — and this is why it's useful to set this up as a parallel process, as described above. This gives you independent control over the levels of the source (dry) sound and the processed (wet) signals.
The easiest way to operate this effect is to leave the source channel's send control at unity gain, and simply grab the fader of your virtual Dolby A output channel to adjust the amount of enhancement effect that you're adding. If you blend the source and parallel (ie. 'Dolbyfied') signals at a level ratio of about 1.5:1, you'll come close to the classic vocal sound of Journey — but you might prefer to experiment to find something less obviously bright!
Further Improvements
For the basic, authentic Dolby A enhancement effect, that's all there is to it. You should find it does far more than you could achieve by simply boosting harmonics with an EQ — and I'd encourage you to compare the two techniques using the same source material, so that you're able to discover and judge the differences yourself!
However, some of the early engineers developed adaptations of the trick, and you've probably heard at least one notable variation: the so-called 'John Lennon mod' (he didn't invent it, but the effect was used on his voice), in which the lower two filters of the Dolby A are disabled, so only the high-frequency portion of the signal is being compressed. If you're going for an 'old school' mastering approach instead, you could use all four bands of your virtual Dolby A setup on full mixes. Some producers use this variant on kick drum or snare channels, too.
Working in Cubase, though, you're not operating under the same constraints as those engineers, and you can easily experiment with tweaking other settings. Juggling the ratio and make-up gain controls of the compressor in the highest band, for instance, will allow you to emphasise the very top end rather more. I'm struggling to think where I'd want to do that, but you may find a use!
Proceed With Caution!
It's easy to get carried away when you learn a new trick, and when applying high-frequency enhancement of any sort you need to be on your guard: it can quickly result in ear fatigue, leading you to make poor mix judgements. So take regular breaks, keep handy some reference material that you know sounds good, and always do A/B comparisons to ensure you remain in the aural comfort zone. You'll find that you achieve the best results by waiting until the next day to double-check your enhancement, rather than rushing a potentially brittle-sounding mix off for feedback!
Also, bear in mind that this effect became popular in days when equipment and recording media (analogue tape) could sound rather dull by comparison with much of today's ultra-clean recording gear, which is far less 'forgiving' of harsh, brittle sounds. Because of this, you need to be picky about when to use the Dolby A trick. Nevertheless, there are plenty of occasions when it can be exactly what you need: for example, it's worth a try when mixing U47/U67-style mics, ribbon microphones or acoustic guitars with dead-sounding older strings. If you are going for an authentic sound, you could also try inserting a tape emulation run at 15ips to add some extra tape hiss, or to smooth the edges of your bright new top end.
No matter which application you choose, watch out for over-enhancement of certain elements of your sound. You don't want any high-frequency noise to be raised too far, for instance, and keep an ear out for what's happening to vocal sibilance — you can always use a de-esser before sending the vocal signal to your virtual Dolby A, but you may need to adjust settings in light of this effect.

Published May 2013