Friday, May 5, 2017

Thursday, May 4, 2017
Q: How do you connect a mixer to a PC?
Referring to your article in Q and A from SOS
January 2007, regarding a basic home recording setup, can you connect
the Yamaha MG102C, which you suggest, to a PC directly? If so, how?
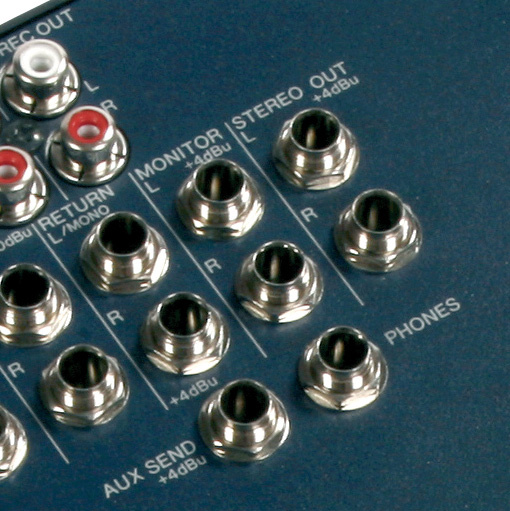
The output section of a mixer may have a number of different connectors (this Yamaha MG102 only uses jack sockets), so you'll need to have the correct cable to interface with the PC input. Via email
News Editor Chris Mayes–Wright replies: To get the audio from a mixer (or any source) directly into a computer, you'll need some kind of audio interface — also known as a soundcard. It's likely that your computer has an 'on–board' soundcard, and yours may have line and/or microphone inputs on mini-jack connections. If this is the case, you can simply plug the outputs of the mixer (in this case either the Stereo Out, Monitor, Rec Out or Aux Send) into the input of your on–board soundcard. You'll obviously need a cable with the relevant terminations. If connecting from the quarter–inch jacks of the MG102C to a mini–jack line input of your PC soundcard, you'll need two mono quarter–inch jacks on one end of the cable and a stereo mini–jack on the other. From here, almost any audio recording package should be able to 'see' the incoming audio.
An alternative would be to purchase an external audio interface, and you can get these from around £50. Not knowing your specific requirements, I can't really recommend one that will best suit your needs, so I suggest visiting our on–line Forum, www.soundonsound.com/forum, where you can post questions.
Published April 2008
Wednesday, May 3, 2017
Solve Latency Problems
The
focus this month is on checking and improving the performance of your
PC, with a new benchmark test just released and news of a useful tool
that could help you pin down the source of latency-related problems.
As
the majority of hi-tech musicians these days run lots of plug-in
effects, how many simultaneous plug-ins a particular PC can run is a
good indication of its limitations. A 'benchmark' test such as DAWbench (www.dawbench.com),
which started life as a real-world song and then ignored the
application's 'CPU meter' in favour of adding more and more plug-ins
across 40 audio tracks, until audio glitching was heard, is therefore a
good way to compare the relative performance of different PCs, or check
whether your PC performance is all it should be.While the original DAWbench Blofelds DSP40 test was for Cubase/Nuendo users only, this month sees the release of a new 'DAWbench DSP Universal' benchmark test that will be able to run on any multitrack audio application, and finally lets us compare the performance of different sequencers running the same plug-ins.
A Universal Benchmark?
The new test relied on finding a plug-in that was sufficiently taxing to fully load today's fastest PCs without requiring hundreds of instances to be launched, yet was freely available to all. Over the last six months or so, Vin Curigliano and other members of the DAWbench forum have evaluated various alternatives, including iZotope's freeware Vinyl and the 30-day demo version of Sonalksis' CQ1. However, the most suitable candidate proved to be ReaXcomp, the multi-band compressor bundled with Cockos' Reaper, which is now also available in a freeware VST plug-in version (www.reaper.fm/reaplugs).
The new DAWbench Universal benchmark not only lets you compare the audio performance of different PCs, but also of the same PC running different sequencer applications. These initial results are for three separate applications running on an Intel eight-core machine.
As I write this, the DAWbench DSP Universal benchmark is already downloadable as a song template for Cubase, Nuendo 4.1.2, Reaper 2.1 and Sonar 7.02, with more applications to follow. It comprises four stereo audio music tracks, one stereo sine-wave audio track with no effects, so you can easily hear the first signs of audio glitching, plus 40 stereo sine-wave audio tracks, loaded with a variable number of plug-ins, which you activate one by one until you hear audio spikes or break-up.
Initial tests with quad-core and octo-core systems suggest that Reaper is consistently in the lead, letting you load every available CPU core to almost 100 percent (as shown in Windows Task Manager) before audio glitching occurs, whereas the other applications don't manage to balance the load as evenly between cores, and therefore can run fewer identical plug-ins before glitching kicks in.
The differences between Nuendo and Reaper increase as buffer size reduces, but can be up to 10 percent at 64 samples and below with a quad-core system, and 20 percent with an 'octo'. The current version of Sonar is lagging behind the other two applications at the moment.
While sequencer feature sets may differ hugely, for the many musicians who judge performance by how many plug-ins they can run on a particular PC these results will be a revelation. Now that we can directly compare the performance limits of different applications running the same audio tracks and plug-ins it will be interesting to see how users react.
BIOS Updates Can Improve Audio Performance!
In SOS January 2008 I discussed multi-core processors, and in particular the benefits they might provide with audio applications. I also mentioned that Cubase 4 and Nuendo 4 didn't currently provide all the benefits they could at low latency with a dual quad-core system, and that Steinberg developers had already acknowledged the problem and promised to address it in the first maintenance updates after the release of Nuendo 4 and Cubase 4.1.Well, there's been an unexpected twist in this tale. Although plenty of musicians with cutting-edge octo-core systems experienced the low-latency limitations of both Cubase and Nuendo, one of the people who spent the most time and energy investigating these issues, using his DAWbench tests, was Vin Curigliano, who has also stumbled recently across a way to improve matters.
All he did was perform a routine BIOS update on his Dual Xeon quad-core 5355 PC (with eight cores running at 2.66GHz), and was flabbergasted to find he could run around 30 percent more plug-ins with a buffer size of 256 samples before his PC starting glitching, and a massive 130 percent more at 32 samples!
Although this BIOS update was specific to his particular motherboard, and the list of fixes in that update didn't mention anything that might suggest the source of these improvements, it's surmised that they are due to Intel 'microcode' updates — tweaks and bug-fixes for Intel chips that are installed by the BIOS (or the operating system) each time you boot your PC. Chip manufacturers sometimes send these out to motherboard manufacturers, and they then get discreetly bundled into the next BIOS update.
This supposition was strengthened when other users of octo-core systems featuring Intel's 5000X motherboard chipset (including Dell's Precision 690) discovered similar improvements after their own routine BIOS updates. Octo-core performance with other applications (including Sonar) also improved after these BIOS updates, but not by such a significant amount, perhaps due to the different ways in which each application splits the various audio tasks into multiple 'threads'. It will also be interesting to see if owners of eight-core Mac Pro computers featuring Intel Xeon 'Harpertown' processors experience similar improvements as a result of an EFI (Extensible Firmware Interface) update from Apple.
Spyware Doctor With Antivirus
So many musicians are now running audio software on PCs while connected to the Internet that I make no apology for returning to the subject of virus and spyware utilities and their impact on PC performance.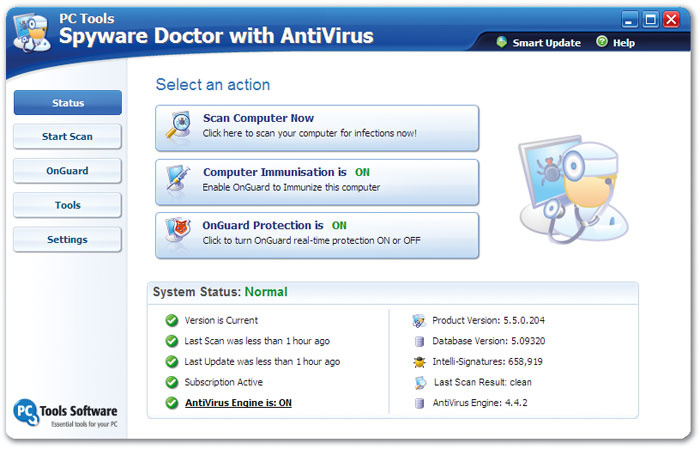
Why run separate spyware and anti-virus utilities on your PC for Internet protection, when you can run Spyware Doctor with Antivirus 5.5 as a single task, and potentially reduce operating system overheads?
In PC Notes October 2007 I discussed ways to adjust virus checkers to run on demand, rather than constantly in the background, thus minimising their effects on real-time audio performance. In my experience, virus attacks are becoming far less frequent, so I wasn't too concerned about offering this advice, but other 'malware', including spyware, auto-diallers, keyloggers and trojans, is still on the increase, and its components can reside in many different areas of your PC. So, if you insist on connecting your music PC to the Internet, I would recommend that you always leave a background spyware checker running while you're connected, since it's generally far better to stop nasties getting into your system in the first place than attempt to remove malware that's already infested your PC.
In June 2007's column I reviewed the excellent Spyware Doctor version 5.0 from PC Tools (www.pctools.com). I mentioned in that review that you could buy it with an optional upgrade to integrate the functions of the PC Tools Antivirus utility, and also that combining spyware and virus searches was likely to speed up scan times and reduce the potential for conflicts, compared with using two separate utilities.
When Spyware Doctor was recently upgraded to version 5.5, I decided to check out this integrated approach myself and see whether I found running Spyware Doctor with AntiVirus 5.5 better than running separate spyware and virus-checking utilities. Version 5.5 incorporates further advances in removing 'rootkits' (stealth programs that run at a 'lower' level than the user can see with normal software utilities) and protecting network Registry settings, and can identify potentially malicious threats earlier, for enhanced real-time protection. It also provides a simpler categorisation of threats and has a smaller RAM footprint.
Doctor's Orders
After installing Spyware Doctor with AntiVirus and accepting its offer to activate various OnGuard real-time protection routines, I disabled my previous real-time virus-checking utility (Avira's freeware AntiVir PersonalEdition Classic, from www.free-av.com), and let SDAV carry on as the sole spyware and anti-virus monitor. During the following weeks it caught every nasty I exposed it to, blocking downloads from suspicious web sites, preventing Windows Explorer from opening infected files or emails, preventing malicious changes to my browser, and so on.I experienced no noticeable extra overheads as a result (there's a 'Lower scan priority to reduce CPU usage' option that helps), but those who want to selectively disable real-time Internet security tasks while off-line, to squeeze the maximum performance from audio applications, can enable and disable the entire suite of OnGuard tasks using a single key-click. Make sure, also, that you remove the default Scheduled Task so that scans only occur when you ask for them.
As long as you always leave the OnGuard tasks running in the background while you're on-line, you shouldn't need to perform a more comprehensive scan of your hard drives very often. A full system scan using SDAV can take a long time, because it's relatively thorough, but for more general use the Intelli-Scan option will detect and disable active threats in just a few minutes.
You might ask why I was interested in investigating SDAV when I was already running a perfectly good freeware AV checker alongside the original Spyware Doctor. Well, the overall subscription for installation of SDAV on up to three computers, including new versions, unlimited smart updates and customer support for one year, is just £5 ($10) more than SD alone ($39.95 instead of $29.95), making the anti-virus components very good value for money. However, compared with running separate spyware and anti-virus utilities, the most practical day-to-day benefits for me were a speedier boot-up time for my PC and the time-saving aspect of only having to download updates for a single security tool instead of two.
Diagnose Drop-outs With DPC Latency Checker
Some musicians buy or build a new PC and achieve glitch-free, low-latency audio recording and playback fairly easily, while others experience occasional clicks and pops whose cause can be difficult to track down. I've devoted thousands of words to the many and varied causes of such interruptions (most notably in the SOS October 2006 PC Musician feature), but here's a handy tool that you can use to both check your system and investigate the causes of audio drop-outs.
If you find you can't run your audio interface at low latency, this DPC Latency tool may help you track down the cause of the problem.
Thesycon's DPC Latency Checker (www.thesycon.de/eng/latency_check.shtml) is a Windows utility that polls the DPC (Deferred Procedure Call) latency once every second and displays the results in a horizontally scrolling graph. Hardware drivers issue periodic interrupts, and Windows deals with these as soon as it can, on a first come, first served basis (the DPC).
Unfortunately, some hardware spends too long dealing with its DPC routine. Readings under 500 microseconds (the green zone) are fine; those between 500 and 1000 microseconds (or 1ms) are borderline; and those beyond (the red zone) may result in audio interruptions. The beauty of this tool is it lets you spot occasional spikes above the norm and see how often they occur, which can be a great help in tracking down the culprit.
My PC typically measured around 50 microseconds, with occasional peak values of about 100 microseconds, but other musicians have reported occasional peaks of over 2000 microseconds (network adaptor cards are often the worst culprits, and particularly wireless ones). If you measure occasional high peaks you won't be able to run your audio interface at such a low latency, and should disable individual devices one at a time in Device Manager to find out which one is causing the problem.
Published May 2008
Tuesday, May 2, 2017
Monday, May 1, 2017
Q. Sould I record my vocals with more than one microphone?
There seem to be instances where several mics are used to record an instrument, such as a guitar amp or drum kit, but I've never heard of this approach with vocals. Is there a reason for this? Does anyone have any experience of recording vocals with multiple mics at different distances from the singer?
SOS Forum Post

Some interesting effects can be achieved using multiple microphones on vocalists. As ever, experimentation is the key...
SOS contributor Mike Senior replies: There is one good reason why vocals aren't often recorded with multiple close mics, when guitar amps and drums kits regularly are: most singers move around a little (or a lot!) while they sing. These movements can change the relative distances between the singer and each of the microphones. If the microphones are both fairly close to the singer, it effectively means that you get two very similar recorded waveforms which keep shifting very slightly out of alignment with each other, resulting in a kind of subtle phasing effect.
If you get the mics close enough to each other you can restrict the effects of the phasing to the extreme high frequencies, but this can still pose a problem, given that high frequencies are usually so important to expensive-sounding recorded vocal sounds. It's not something you can easily correct by shifting the waveforms around in your sequencer, either, as the alignment of the recorded waveforms will constantly change as the performer moves.
That said, there are some famous recorded examples of vocals recorded with two fairly close mics combined. For example, John Hudson talked about recording Gary Glitter and Tina Turner using two close mics back in SOS May 2004 (www.soundonsound.com/sos/may04/articles/classictracks.htm), although he made it clear that he used the technique primarily to gain extra control over their extremely wide performance dynamics.
Supplementing a single close mic with an ambient mic or two, however, offers a bit more potential. If the ambient mic is at least a couple of metres away, its recorded waveform will be different enough from that of the close mic that the phasing effects will tend to be much less noticeable; it will pick up a much more complex signal combining the direct vocal sound with reflected sound from the room.
Probably the best-documented example of a recording where ambient vocal mics were used is David Bowie's 'Heroes', which Tony Visconti discussed in the SOS October 2004 Classic Tracks feature. A heavily compressed Neumann U47 close mic was joined by Neumann U87s further away, the latter being gated in such a way that they only opened to give a more reverberant sound when Bowie sang loud. Michael Stavrou also talks about using this kind of technique in his book 'Mixing With Your Mind', although he suggests controlling the levels of the ambient mics with mixer automation, which allows for a bit more precision at mixdown.
Jack Douglas, engineer for many of Aerosmith's most successful albums, has also mentioned that he often combined close and ambient mics for Steven Tyler's vocals. Unusually, though, he used a Shure SM57 dynamic up close and a heavily compressed Sennheiser shotgun mic about five feet away. The SM57 not only captured part of the final sound, but was also useful for giving Tyler something to focus on, keeping his position fairly consistent relative to the shotgun mic. For similar reasons, some engineers who only record a single vocal mic will still use a second mic as a prop to keep the vocalist rooted in the main mic's sweet spot, particularly where no pop shield is being used.
Published November 2007
Saturday, April 29, 2017
Friday, April 28, 2017
Q. What equipment is suitable for my 'sound installation'?
I'm
planning to write a piece of music for a sound installation using Logic
Pro. There would be 10 tracks, which I'm hoping to route from an audio
interface such as a MOTU 828 to 10 different active speakers, so that
there would be one speaker for each track of the piece. I'm quite new to
music technology, so I'd appreciate it if you could explain some things
to me. Firstly, would this setup actually work? Secondly, is a MOTU 828
a good device to use or would something else be better? Also, what
leads do I need, what active speakers would you recommend for use
outdoors, and how should I protect the speakers and other equipment from
getting wet, without compromising the sound?
I have around £1500 to spend on speakers, audio interface and leads, and I would really appreciate your help.
Anya Ustaszewski

This system diagram shows the plan of an eight-channel sound installation in a fairly large church. Each of the four CD players was sending a split-mono signal to dedicated amplifiers, which were connected via two-core mains cable to speakers around the building. The result was, well, spacious!
News Editor Chris Mayes-Wright replies: In response to your first question, the answer is yes, it will work; in fact, I've done a number of similar projects myself. The MOTU 828 that you mention would indeed be a suitable device, but it only has eight analogue outputs. Analogue outputs are the kind that you can connect directly to the line inputs on the back of an active speaker. So, basically, if you used the MOTU 828 on its own (without additional equipment), you would only be able to feed eight different signals to eight different speakers. If doing this, you should use quarter-inch balanced jacks to connect between the back of the MOTU 828 and the inputs to your active speakers.
If you really need 10 channels, you can use the MOTU 828's stereo S/PDIF output: this is a digital audio connection that needs converting to analogue before it can be plugged into the back of a speaker. You can buy digital-to-analogue (D-A) converters from most music technology equipment retailers, such as the ones that advertise in these pages, but they can be quite expensive. With your budget, I'd suggest aiming at the lower end of the market. Behringer manufacture a product called the Ultramatch Pro SRC2496, which has D-A functionality, as well as some other features. It costs £109 including VAT, so it shouldn't take up too much of your budget, but if you can make do with just eight speakers, I would suggest using the MOTU interface on its own.
You mentioned that you'd like to use active speakers. When I've done installations in the past, I've found that using passive speakers with separate power amplifiers was far easier (and safer). I'm a big fan of the JBL Control 1 speakers (they cost under £100 for a pair and are really rugged), which seem to work well with Samson Servo 170 amplifiers, although these seem to have been superseded by the Servo 200 model, which costs around £100.
The reason I suggest passive speakers coupled with amps is that if you are using active speakers and they're spread out over a wide space, you will need to distribute power to each of them, which is not a good idea over distance, especially outdoors. I would only suggest active speakers if you can guarantee that there will be a power socket next to each one.
If you use passive speakers powered with amplifiers, you can keep all the amplifiers (and therefore power) in one place, then run long lengths of speaker cable to each one. Mains electricity cable works well to carry the signal between the amplifier and speaker, as its per-metre cost is cheaper than 'proper' speaker cable, and it's tough enough to withstand a bit of trampling in grass or on concrete.
Remember that you only need one stereo amplifier for every two speakers, because a stereo amplifier has two separate inputs and outputs. As long as you feed a dual mono signal into the amp, you will get the necessary separation at the speakers.
You also mention that you are planning on running all of this from a laptop. If so, bear in mind the security aspect; it's probably not wise to leave a laptop unattended at a public event. Also, the fact that the audio would be running from a hard drive (which is not the most stable of media) may be a concern.
If these things worry you, and you're not too bothered about the sync of the material being ultra-tight, I would suggest using a bank of CD players; these can be located near the amplifiers to help keep the power supply in one place. I have used CD players for exactly this purpose in the past, and it is by far the easiest and most reliable way to play out sound for a long period of time.
Again, as with the amplifiers, you only need one stereo CD player for each two channels of your sound installation. But you'll need to bounce five stereo mixes (or four, if you're only using eight speakers) from Logic, then burn them onto CD. Previously, I've used the Tascam CD160, but any CD player with line outputs (usually red and white phono sockets) would be fine. The cabling for connecting the CD players to the amplifiers can be done using phono-to-jack connectors.
I found the Tascam player to be particularly good at this job: it can be rackmounted, it's pretty robust, and if you have a stack of them the infra-red remote control can be used to start them off simultaneously, to achieve a reasonably good sync between them! Of course, you could get a few of your friends to press the play buttons at the same time, but this approach is a little rudimentary.
As for your concerns about the weather, the most important thing is to run everything through a safety breaker circuit, so if you get a problem the power instantly cuts and everything is made safe.
To prevent the rain getting to your speakers, you can cover them with plastic refuse sacks. Also, make sure all electrical contacts are insulated with electrical tape, and if you are using a stack of power amps, ensure that these are well covered, while keeping vents, which require a constant airflow around them, clear. Make sure you lift the equipment off the ground, too (perhaps on a table or wooden pallet), and erect some kind of cover, such as a garden gazebo or large patio umbrella, over it all. Good luck!
Published December 2007
Subscribe to:
Posts (Atom)