Saturday, January 3, 2026

Friday, January 2, 2026
Cubase Pro: Workflow Benefits Of Melodyne With ARA 2
 ARA 2 integrates Melodyne much more deeply into the Cubase Pro editing environment.
With ARA 2, Melodyne can be just another part of Cubase...
When Cubase Pro 10 was released, Steinberg also announced that support for the Audio Random Access 2 (ARA 2) plug-in format would follow soon, and June 2019's free v10.0.30 update delivered it. A few plug-ins now support ARA (Celemony Melodyne, Synchro Arts Revoice Pro and Vocalign, and — recently acquired by Steinberg — SpectraLayers), but the format is Celemony's creation — so this month I'll consider how ARA 2 might improve the workflow of anyone using both Cubase Pro 10 and Melodyne.
Easy Access
Previously, Cubase users could already insert Melodyne as a VST plug-in, and you still can work that way. But that approach requires an initial 'transfer' of audio data into the Melodyne plug-in before you can make pitch/timing changes in Melodyne, and those changes aren't updated in the waveform in Cubase — so if you try to perform editing of said audio on the Cubase timeline, those changes are not made to the audio in Melodyne unless/until you repeat the transfer process. So it's essential with this VST approach that you adhere very carefully to a certain workflow.
ARA 2 overcomes these problems, and it all feels much more deeply integrated — which it is! To access this new ARA 2 connectivity, you'll need Melodyne v4.2.2 (or later) installed. Select the audio clip(s) you wish to process in Melodyne, go to Audio / Extensions on the main menu, and select Melodyne. (You can unload the Melodyne Extension in the same fashion.) Alternatively, depending on what details you've set Cubase to display in the main Project Window's Info Line, you can load/unload Melodyne via an Extensions option here. After some very brief behind-the-scenes analysis, Melodyne's editor opens in Cubase's Lower Zone — complete with its usual menus, editing options and note blobs ready for action.
Four things are worth noting at this stage. First, while the Melodyne Extension is active, you can't access the usual Cubase Sample Editor options (including VariAudio and AudioWarp). Second, the Extension (Melodyne in this instance) is pre any conventional VST insert plug-ins in the signal path. Third, as with any Lower Zone editor, you can float the Melodyne plug-in window if you prefer. Fourth, a Compare button on the left side of the Melodyne toolbar allows you to toggle between the original audio and the 'Melodyned' version, making it easy to check whether your changes are for the better.
Sing Something Simple
The actual editing tools available are the same as in the VST version of Melodyne. As we've reviewed Melodyne on a number of occasions (most recently v4 in SOS February 2016: https://sosm.ag/celemony-melodyne-4) I'll not describe all that here; instead, I'll focus on the significant workflow advantages that ARA 2 brings to the table.
A very welcome change is that Cubase and Melodyne now communicate with each other in a much more integrated way as you perform edits. For example, if you move, or adjust the length of, an audio clip on the Cubase timeline, those changes are immediately reflected in Melodyne. Equally welcome is that the cursor display in Melodyne doesn't just reflect the cursor position in Cubase's Project Window — it can be used to adjust the playback position of Cubase in real-time. It might seem a small behaviour difference, but it really does make working with Melodyne much more efficient.
 Melodyne editing is sync'ed between copies of the same audio clip (as in the first two clips shown here), but you can break that link if you want to perform clip-specific editing (as in the third clip, where the Melodyne Extension has been unloaded and then reloaded).
The Melodyne Extension can be used to process multiple clips on a single audio track simultaneously. Usefully, the Melodyne toolbar now includes buttons (located top-centre) to toggle between 'track mode' (the two–blob icon) or 'clip mode' (single–blob icon). In the former mode, Melodyne displays all clips on the current Cubase track which have the Extension applied, whereas in the latter it shows only the currently selected clip.
Copy That!
The handling of audio clips that have been copied is interesting. If, for example, you've copied a vocal performance from one chorus section to another and apply the Melodyne Extension to both, or duplicate a clip to which the Extension has already been applied, Melodyne editing for the two clips is linked — as you edit one clip, the edits automatically apply to any copies. You won't want exactly the same vocal performance in every chorus, of course, but this could be a big timesaver for some tasks — especially when working on elements such as oft-repeated backing vocals.
 All Melodyne's editing features are retained under ARA 2, including the option to display blobs for multiple tracks in the editor, for easy reference while editing.
If you use the Convert To Real Copy function on a duplicate audio clip in Cubase and then apply the Melodyne Extension to both clips, their editing won't be linked, so you can choose which way you'd like to work. And if you've already applied the Extension to a clip and its duplicate, but then remove the Extension from one of copy, Melodyne edits won't be linked.
After ARA
Should you decide you need to undo some of your changes, the Melodyne editor window includes the usual options for resetting any edits. And if you remove the Melodyne Extension from an audio clip, all of your Melodyne edits will disappear, returning your Cubase clip to its original state. If you want to lock your edits in place (for example, to unload Melodyne to save resources), a quick Render In Place prior to unloading the Extension will achieve that.
A further welcome change is in how Melodyne's data is handled by ARA 2: the data is now saved within your Cubase project. This is different from how the VST plug-in (which uses a dedicated folder elsewhere in your file system) behaves, and should make project transfer and archival much easier.
All Present & Correct
It's also worth noting that two of Melodyne's key features are present and correct via ARA 2 in Cubase. First, the option to overlay blobs from multiple tracks in the editor's display via the track list on the left side of the window. The blobs of the currently selected clip are shown in the usual orange, and others appear in grey. This provides an incredibly useful visual reference, particularly when editing things like vocal doubles or harmonies.
Second, assuming you have the full version of Melodyne, the audio miracle that is polyphonic audio editing is possible. Success with things like pitch adjustments in polyphonic audio is highly dependent on the nature of your audio source and its role within the mix. ARA 2 integration doesn't change that, but as with monophonic sources such as a lead vocal, it does streamline the editing process, thus allowing you to determine what's possible quickly and easily.
Are We There Yet?
So far, so good, but there are a few teething issues and limitations. First, it's worth mentioning one VariAudio feature that ARA 2 doesn't make possible via Melodyne: its note blobs cannot be made to 'follow' the Chord Track. (Well, at least not yet... how cool would that be?).
 Steinberg hope to improve their ARA 2 implementation in the next update, with support for clip-level fade/volume envelopes and Lane-based comping.
Currently, Cubase's ARA 2 implementation doesn't support comping via the Track Lanes system. You can activate the Melodyne Extension, but on playback you'll hear a mix of audio from all Lanes simultaneously, rather than just your comp. The simple workflow solution is to comp and render to a new track before applying Melodyne. But there are sometimes merits to pitch correcting while comping.
There's been some chatter on the Steinberg Forums concerning the occasional bit of odd behaviour. For example, users have reported problems when working with 64-bit audio, and with playback of 'Melodyned' audio losing sync with the project. On my own system, though, I didn't experience any obvious gremlins, though I did note that fades/volume adjustments applied to clips in Cubase's Project Window seem to be ignored while the Melodyne Extension is active.
But all that said, ARA 2 is already a huge step forward for regular users of Melodyne and Cubase Pro 10 — Melodyne now feels like part of the in-house Cubase editing system rather than a plug-in. And while the ARA 2 implementation might not yet be quite fully formed, Steinberg have indicated that there's more to come, and that the next update (v10.0.40) should resolve the Lanes workflow as well as some of the reported issues.
Steinberg Cubase Pro 10.5
 Cubase Pro 10.5 in all its glory. Note the new MultiTap Delay effect included with the Pro and Artist editions, and the coloured channel strips in the mixer.
There's something for everyone in the latest version of Steinberg's flagship music production package.
Christmas was coming, the goose was becoming rather overweight due to a lack of dietary restrictions, and Steinberg released what has become the now-traditional end-of-year update to Cubase. Given that the last release of the company's Advanced Music Production System was version 10, launched on November 14th 2018, Steinberg's past roadmap strongly suggested 2019 would be an x.5 year. And indeed, the company didn't disappoint, unveiling Cubase 10.5 almost a year to the day on November 13th with no shortage of new features and improvements.
Available in the usual Pro, Artist, and Elements editions, this review focuses primarily on Cubase Pro 10.5 — the inclusion (or lack thereof) of certain new functionality in other editions will be mentioned as necessary.
Exporting Video, Ten-Point-Fivenally!
One of the most requested features in Cubase has been the ability to export a video file containing both the audio mixdown and accompanying video from a Project. Long-time Cubase users might remember the Replace Audio in Video command, which allowed you to replace the audio within an existing video file, and which was dropped when Steinberg introduced a brand-new video engine in Cubase 9.0.30.
Despite some consternation, this new video engine was necessary — and arguably overdue — because Steinberg's previous cross-platform video engine utilised Apple's QuickTime technology. The Windows version of this had been withering on the vine for years, and was finally put out of its misery in 2016. The new engine was a huge step forward in terms of supporting modern containers and codecs for playback, but the capability to export video was, to paraphrase a Steinberg support article, pushed back as a planned development for future updates. It was promised for Nuendo 10, released in April 2019, but missed the initial 10.0 release, and eventually showed up in Nuendo 10.2 around six months later. Finally, it's now available to Cubase users too.
Unlike the original Replace Audio in Video command, which added audio to an existing video file, the new Export Video command offers much more flexibility by creating new video files based on the position of the locators. To export a video, simply set the required range using the left and right locators and select Video from the File / Export submenu. In the Export Video window, set a name and path for the video file to be created, choose the stereo output to use for the audio to be included in the video (and whether that audio should be rendered in real time or not) and click the Export Video button. Et voilà!
A new video file will be created in an MP4 container, using the H.264 codec to render HD (1920x1080) video (upscaling or downscaling the resolution as necessary from the source resolution) at the same frame rate as the imported video. For audio, the AAC codec is employed to compress audio at a 16-bit resolution using the Project's sample rate, although only 44.1 and 48 kHz sample rates are supported.
 The new Export Video window makes it easy to create a new video file with audio from the active Project.
I tested the Video Export command by importing a MOV file into a Project. The video was encoded with Apple ProRes 422 SD (1280x720) at a 23.976 frame rate, and the feature worked as advertised, which was great. However, I couldn't help but think I'd like to see more options for choosing additional containers and both video and audio codecs, with support for 24-bit resolutions and other sample rates. The lack of options on offer at export stands in sharp contrast to the wide array of video formats supported for import and playback. Perhaps we'll see more choice in future versions, although maybe I'm being picky: even in professional contexts, sending a file created using the current Export Video offering gives you something that can be played back by almost any system and will be more than acceptable to almost any client.
One additional thing that an be optionally included in a video exported from Cubase is a timecode burn-in based on the current Project time. This could be useful for reference, or if the source video doesn't include such a burn-in already, although there aren't too many options to define how the timecode appears on the video. Based on the Video Player settings in the Studio Setup window, you can set how the timecode is horizontally aligned, resulting in white numbers in a black box being displayed. Again, more options would be nice: since you can add burn-in to the video, why not offer size, font, colour, and vertical alignment options as well? Or take it a stage further and allow dates to be added, plus the source video file name and custom text if required?
For such a useful and advanced feature, it's perhaps surprising Steinberg decided to include Export Video not in just Cubase Pro, but Artist and Elements as well — although given the number of users who add audio to video clips these days, it probably makes sense, giving Cubase Elements even more allure for those looking for powerful features at a cheaper price point.
In Retrospect...
The seemingly innocuous Retrospective MIDI Record command has been both renamed and enhanced in Cubase 10.5. Previously, this relatively straightforward feature captured any incoming MIDI data while the sequencer's transport was either stationary or playing back, maintaining the timing data in both states. If you happened to play something unbelievably brilliant, rather than kick yourself for not being in record, you could simply select Retrospective MIDI Record, and a new MIDI part containing the captured sequence of Events would be created on the selected MIDI or instrument track. Easy. In fact, many people I know prefer to use this command rather than putting the sequencer into record, although I find myself being more old-fashioned in this respect.
MIDI Retrospective Record functionality is now accessed through several different commands, which are available in a few different places, starting with the Transport menu. There's now a MIDI Retrospective Record submenu, and the closest command to the original is called Insert from All MIDI Inputs, which is assigned the same default key command (Shift and the * key on the numeric keyboard) as before. This results in the captured Events being inserted on the selected track; but, where previously the command could only be used once, this is no longer the case. Now you can select the command as many times as you like, inserting the Events on the same track or different tracks, with the buffer only being reset if Cubase either begins receiving new Events or you select Empty All Buffers from the submenu.
 The new MIDI Retrospective Record commands can be accessed from a Transport submenu, or a new menu from the Basic Settings section in the inspector.
You'll notice the command is named Empty All Buffers and not Empty Buffer, and this is because — in addition to there being one overall buffer, as before — each MIDI and instrument track now has its own, independent buffer for retrospective recording. Using the new Insert as Linear Recording command you can insert Events played on the track selected at the time of capture, which is similar to Insert from All MIDI Inputs except that Events can only be inserted on the track that was selected when they were captured: if a different track is selected, Insert as Linear Recording is unavailable.
 To make this a bit more obvious without having to access the Transport menu, the Inspector's Basic Track Settings section now features a new Retrospective Recording pop-up menu at the bottom that provides access to the appropriate commands (sans Insert from All MIDI Inputs) for that track. This pop-up will be greyed out and inaccessible if there are no Events to specifically insert on that track. And, in addition to being able to insert a linear recording, if you were playing back a project in Cycle mode, MIDI Retrospective Recording can also insert the captured Events as a cycle recording, which is rather neat.
Overall, I think it's fair to say that if you use MIDI Retrospective Recording, Cubase 10.5 has got you covered — and, if you don't, this release might convert you.
Thursday, January 1, 2026
Wednesday, December 31, 2025
Cubase 10: Channel Settings Workflow
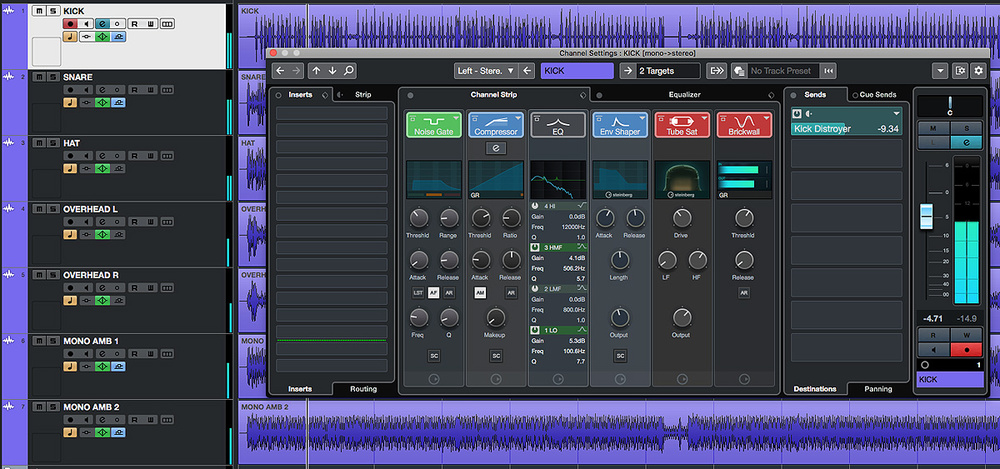 The Channel Settings window provides a flexible and efficient environment for many basic mix processing tasks.
Could Cubase 10's Channel Settings window become your go-to mixing tool?
Cubase's Channel Strip has the potential to make mixing much more efficient. Indeed, the same concept has translated fairly well from its hardware origins into most modern DAWs now. But when screen space is at a premium some implementations can require considerable screen real-estate — and while the collapsible Rack system in Cubase's MixConsole is brilliant in so many respects, accessing all the controls for each channel can entail a lot of opening/closing of Racks or scrolling up/down.
A small-screen-friendly alternative is to build your workflow around the Channel Settings window. Sure, you can only display controls for one channel at once, but this window makes the complete Channel Strip's controls available in a very easy-to-use format. And with the useful refinements Steinberg made to the operation of the Channel Settings window in Cubase 10, you really should consider putting it at the heart of your mixing workflow.
Channel Guide
The Channel Settings window can be opened for the currently selected track/channel by clicking on the 'e' button in the Project window's Track List or in the MixConsole, and it gives you access to the full control set that's found in the MixConsole — but in a larger, easier to use GUI.
As in previous versions, the contents of the MixConsole's EQ and Channel Strip Racks dominate the central portion of the display, but in v10 Steinberg made some worthwhile tweaks to what's possible here. For example, the UI was improved to offer better access to the core controls of each module, the visual feedback/metering was revamped and, while the EQ section could already be viewed in an expanded form via the Equalizer tab, you can now do that for the Compression section too (via a further 'e' button). The Channel Strip tab now includes a compact version of the EQ section in situ, and you can drag and drop to change the order of the various modules in the signal flow, which makes it much easier to see and configure your preferred processing chain.
The Sound Of Beating Drums
When considering what the Channel Settings approach might offer you, there are two key questions to ask. First, are the tools provided up to the job? Second, how can they facilitate a more efficient workflow? The first is a huge question, but by way of example let's briefly consider a common mixing task: submixing a multitrack drum recording. In the example shown in the first screen there are seven mic channels, with single kick, snare and hi-hat mics joined by pairs of overheads and room (ambience) mics. For all the shiny appeal of your third-party plug-ins, the stock Cubase plug-ins in the Channel Strip and EQ sections are more than capable enough for routine mix-processing tasks like this, so the bulk of your work can easily be done in the expanded Channel Strip display.
The exact settings required for each module across the various drum channels will obviously be project-specific, but it's worth exploring some cool features in the Channel Strip plug-ins. For example, the Noise Gate features a very useful input filter, and you can activate this via the AF button. You can then engage the LST (listen) function while you adjust the Freq and Q settings of the filter to focus the action of the gate within the dominant frequency of each sound source. In this drum mix, I used this on the kick, snare and hi-hat mics, and it allowed me to maximise the spill rejection from other drums into those mics.
 You can now access the full control set for your selected compressor within the Channel Settings window.It's also worth noting that all three compressor options (Standard, Tube or Vintage), which offer different characters of compression, also include Mix controls — making it possible to experiment with parallel compression on individual drum mics without leaving this window. And that, alongside the expected four-band EQ controls and an expanded display of the EQ curve, the Equalizer tab grants you access to controls from the MixConsole's Pre section. Most usefully, this includes a variable-slope low-cut filter for routine high-pass processing, and the Phase button (a polarity inverter), which is useful to optimise the phase relationships of multiple mics used on a single source. In this drum mix I used the low-cut filter to remove unwanted rumble to varying degrees on all the tracks (yes, even the kick), and set it higher for the two room mics, to prevent the kick being too ambient.
 The EQ tab includes full access to the four-band EQ but also the very useful high-cut and low-cut filters from the Pre Rack section.The Tools section offers a choice of the DeEsser (useful for vocal tracks, obviously, but drums too on occasion) and EnvelopeShaper. The latter is very useful for drums and a doddle to use. In this mix I use it to enhance the attack of the kick and snare, to help them punch through more clearly. Finally, I applied a subtle amount of saturation to all the channels (you can choose between Magneto II, Tape or Tube options) and limiting (Standard Limiter, Brickwall or Maximizer) just to control any really hot peaks.
I've provided a couple of audio examples, in which I compare my raw drum tracks to the drum 'mix', with processing configured solely in the Channel Settings window on each track. To my ears, the end result is clearer and has more punch — I achieved what I set out to achieve using only these tools. So whether or not you have access to third-party, channel strip-style plug-ins, I'd say the Cubase Channel Settings toolset could take you a long way along your mixing journey. For routine mix tasks, at least, I'd answer our first question with an emphatic 'yes'.
Command & Conquer
What about ease of use? Well, like the channel strips on a hardware console, a good dollop of that ease of use comes from the consistency of the control set for every channel. As you build up experience with the common control set, your familiarity will translate to much faster operation. But the other element that contributes to workflow efficiency is how quickly you can navigate the controls within the Channel Settings window itself. If you're fortunate enough to own Steinberg's CC121 hardware controller, that navigation will be very slick. But even for the rest of us, there are options and shortcuts that can speed things up.
As a starting point, for frequent use, I'd define a keyboard shortcut for the Edit Channel Settings option (you can create/edit shortcuts in the Edit section of the Key Commands dialogue) so you can quickly open and close the Channel Settings window; I've assigned the 'E' key to this, as it matches the on-screen button.
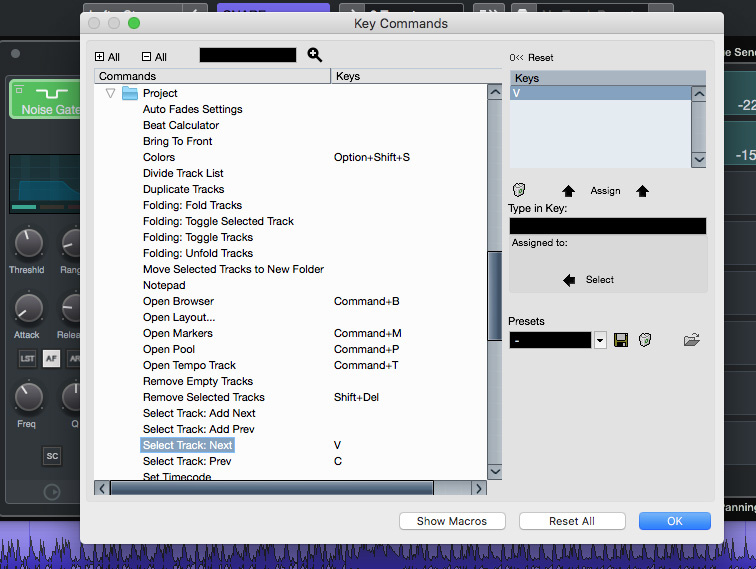 To get the most from the Channel Settings window, defining a few key commands will greatly enhance the workflow, including the ability to swiftly move between different tracks and channels.For the fastest workflow, two further options are worth enabling, and both are accessible from the pop-up menus in the top-right of the Channel Settings window. First, from the Toolbar menu, enable 'Always On Top'. This prevents the Channel Settings window from disappearing behind other windows as you work (once open, it's always accessible). Second, from the Function menu, enable 'Follow 'e' buttons or selection changes', so that when you select a different track/channel in the Project window or MixConsole, the Channel Settings window will update to display the newly selected track/channel's settings.
Given that the Channel Settings window only displays settings for the currently selected channel/track, the other thing we must be able to do is move efficiently between tracks. There are buttons for this in the Channel Settings window itself but key commands can speed up navigation, and it's well worth defining keys for the 'Select Track: Next' and 'Select Track: Prev' commands (which are found in the Key Commands window's Project section). As you navigate with these keys, the Channel Settings window will automatically refresh to reflect the selected track/channel. It's very slick and well worth a tick in the 'ease of use' box.
For Better Or Worse
To finish, one further Channel Strip/EQ workflow tip is worth mentioning. When editing multiple channels, such as the drum kit recording in the example, I often find it useful to toggle all my Channel Strip and EQ settings off, for an A/B reality check as to whether my processing is actually making things better or worse! In practice, this can be a bit of a pain, as in the MixConsole you have to bypass both the Channel Strip and EQ Racks individually for every channel involved to do this. Now you could, I suppose, go to town and design a macro to solve that... but a simpler approach is to quickly select multiple channels and then press and hold Alt+Shift to temporarily 'Quick Link' them. Then, when you click on the bypass buttons on any of the selected EQ or Channel Strip sections, those Rack sections will be bypassed for all selected channels simultaneously.