Cubase 14 introduces a wide selection of new features while refining old ones.
Last year’s Cubase 13 release was, in many ways, an opportunity for Steinberg’s developers to refresh and polish the foundations. Because while there were many headline‑worthy additions — such as the Channel Zone, improved editing with the Visibility Zone, Track Display, multi‑part editing and the ability for the Region Selection tool to be used in certain editors — many of the giant leaps forward were perhaps less obvious. MIDI 2.0 support was added, along with Direct2D for hardware‑accelerated graphics on Windows, and a streamlined, more cohesive user interface emerged. And who could forget the long overdue redesign of the Key Commands window?
But for all these improvements, there was something about the upgrade that left me feeling a little flat. Everything in Cubase 13 was better, no question. It was sleeker, smoother, and working with it felt undeniably more productive. But when demonstrating that new version to fellow musicians, I couldn’t really point to any one feature that truly ignited excitement. A year on, though, and my view of the latest Cubase release couldn’t be more different.
Cubase 14 sees the return of a Drum Track to the application, and if you’re thinking to yourself: ‘Hold on, Cubase has never had a Drum Track!’, you’d only be half right. The very first versions of Cubase — before the program’s rebirth as Cubase SX in 2002 — did in fact offer a Drum Track Class, although its purpose was rather pedestrian. Drum Tracks functioned like MIDI tracks, but with two key differences. Drum maps could be assigned to the tracks, enabling the Drum Editor to display drum names, and MIDI parts located on a Drum Track would open in the Drum Editor by default.
Cubase 14’s Drum Track is significantly more sophisticated. Instead of triggering an external drum machine or a VST instrument like Groove Agent, Drum Tracks include a new, dedicated Drum Machine instrument. This mirrors the way in which Sampler Tracks employ a built‑in Sampler instrument. And even though both the Sampler and Drum Machine instruments are technically VST plug‑ins, they’re designed to be used exclusively with the Sampler and Drum Tracks respectively.
With a Drum Track selected, Drum Machine’s interface appears in a new page in the Lower Zone; although it’s puzzling why Steinberg didn’t consolidate the Drum Machine and Sampler Control pages into a single page, given that a Track can’t contain both instruments simultaneously. Similarly, while Drum Machine’s interface, like Sampler Control, can be opened in a separate floating window, a Drum Track’s ‘Open/Close Drum Machine’ button always opens the Drum Machine in the Lower Zone. Frustratingly, there’s no modifier or command to open it directly in a separate window, which is particularly irksome since it’s useful to have Drum Machine in a dedicated window, especially once you start editing patterns.
One of the differences between Groove Agent SE and Drum Machine is that the former is designed for sample‑based playback, whereas the latter offers a hybrid of both sample and synth‑based sound generators known as Modules. The Sample Module is straightforward, offering pitch, filter and amplifier components — each with its own envelope. You can adjust the start and end points, fade‑in and ‑out times, and reverse the sample’s playback. However, the Synth Modules are where the fun really begins.
Organised into seven categories covering the most common kit drums and some simple percussion, there are 38 sonically superb Synth Modules from which to choose. The percussion category includes a single‑operator FM generator, two noise oscillators, and two indispensable cowbell Modules! Cowbell 1 is perfect for those Whitney Houston‑inspired ’80s tracks, while Cowbell 2 is most definitely the one to deploy when more cowbell is required.
A Drum Machine Kit contains 128 pads organised into eight pad banks, and the pad area displays one pad bank at a time using the familiar 4x4 grid of 16 Pads. Each pad consists of four Layers and each Layer can host a single Module, which means each pad can trigger up to four Modules simultaneously. This is great when extra weight is needed to enhance a sampled kick drum, for example, since you can easily layer a Sample Module with a kick Synth Module, adjusting the volume of each Layer to taste. The only small complaint I have when assigning Synth Modules to Layers is that there’s no way to preview a default sound from a Module without first adding it to a Layer.
Drum Machine’s interface is divided into pages, including the main Instrument page where Modules are assigned and their playback parameters adjusted. Each page has settings relevant to the currently selected pad, except for the Group page that contains a row of configuration parameters for each pad within the selected pad bank. These parameters include the note range that triggers a pad, whether it belongs to one of up to 32 Exclusive Groups (useful for having a closed hi‑hat ‘choke’ an open one), and the output to use for a pad’s playback. Each instance has a master stereo output, along with 31 additional outputs, which should be enough for most purposes.
However, you may find you don’t need to separate the outputs of different pads too widely, since each pad has its own independent effects chain that’s accessed via the Pad FX page. Each pad offers an effects chain with four effects — Bit Crusher, Distortion, Filter and EQ — which can be individually toggled on or off and re‑ordered by simply dragging an effect to a new position within the chain. Of these effects, Bit Crusher is the most interesting since it offers options beyond simply setting the resultant bit depth, with controls to separately adjust how the upper and lower bits are manipulated.
Each of the four Layers has its own independent dry and wet mix controls for the Pad FX chain, which is a nifty touch, and each pad has send levels to delay and reverb effects that are applied to the overall kit. The output from these send effects is always sent to Drum Machine’s master output, although it would be useful if this routing was freely assignable.
Drum Machine is empty by default, but Steinberg include 40 kits as Track Presets that can be recalled by clicking the Load Track Preset button (in the Drum Machine’s toolbar) and navigating the Media Bay.
Complementing the new Drum Track and its integrated Drum Machine is the Pattern Editor, which presents a step‑based approach to drum programming. Unlike Cubase’s other editors, the Pattern Editor can be opened for immediate use without having to first select something to edit. Therefore, with a suitable track selected, such as a new Drum Track, you can open the Pattern Editor from the MIDI menu. Provided that track is empty, the ‘Play with Project’ button will be enabled on the Pattern Editor’s toolbar, allowing the contents of the Pattern Editor to play and loop with the project. This is particularly neat, since it’s easier to program a new drum pattern whilst hearing the project playing.
A pattern is programmed by toggling steps on different lanes in the editor area, although sadly there’s no Acoustic Feedback mode. While each lane has a preview button to audition the assigned sound, there’s no audible confirmation when you activate a step. If the editor is opened with a Drum Track selected, a set of lanes based on the current Drum Machine kit is automatically created, although it’s easy to add and remove lanes as required. However, unless I’m missing something unbelievably obvious, there doesn’t seem to be a way to resize the height of the lanes or re‑order them.
The length of the current pattern, along with its step resolution and play direction, can be set via the Pattern Editor’s toolbar or on a per‑lane basis. This makes it easy to have a one‑bar pattern of 16th notes where the hi‑hat lane is playing an eighth‑note triplet rhythm, as an example.
Selecting a lane in the Pattern Editor automatically selects the corresponding pad in Drum Machine, which is handy if you have both the Pattern Editor and Drum Machine interfaces open simultaneously. Additional controls for the selected lane, including some neat options for generating steps, are accessible in the Lane Inspector. Taking our bar of 16th notes again: if you have a bass drum lane selected and want to activate a step on every quarter‑note beat, you can program this very quickly by clicking the ‘Add Every 4th Step’ button. There’s even a Euclidean mode, enabling you to set the number of pulses and rotation to determine which steps are activated according to a Euclidean distribution.
At the bottom of the Pattern Editor is a dedicated Parameter Lane where step parameters — Velocity, Repeats, Offset (±30 ticks), Probability, Velocity Variance and Gate — can be adjusted for the currently selected lane. Additional parameters like Skip (to skip over a step) and Tie (to merge adjacent steps) would have been welcome, although you can add extra parameters for automation assignments made in Drum Machine or any MIDI controller.
The Pattern Management controls on the toolbar assist in managing the collection of patterns associated with the track that was selected when you opened the Editor. The state of a pattern being edited is automatically preserved, but you can duplicate the current pattern if you’d like to experiment with a variation, as well as starting a new pattern, removing one, or renaming. And once you have a pattern you’d like to use in a project, you can drag it onto the corresponding track via the aptly named ‘Drag Pattern to Project’ button to create a Pattern Event on that track.
However, a Pattern Event on the project window isn’t a copy of the pattern itself; it’s an Event that tells the track what pattern to play. Which is why Pattern Events contain a small number in their top‑left corner that refers to the pattern number the Event will trigger. If you create another Pattern Event on the same track by using the Draw tool, you won’t be creating an empty pattern as you would an empty MIDI part. Instead, you’ll be creating an Event that triggers the pattern referenced by the number (and any custom name) shown.
This means that if you update a pattern by double‑clicking the Pattern Event to open the Pattern Editor, the current state of that pattern will be reflected by all Pattern Events set to that pattern. Usefully, if you have a Pattern Event referencing a one‑bar pattern, resizing that Event will fill its length by looping the pattern as needed. And if you want to change the pattern that’s triggered by an Event, you can click the pattern identified in the top left and select a different pattern from the available list.
The down side to this somewhat idiosyncratic approach, aside from being slightly confusing at first, is that Pattern Events — unlike MIDI parts — can’t be moved freely between tracks. This is due to the fact patterns are tied to the tracks on which they were created — a pattern that exists on one track doesn’t uniquely exist on any other track. Which explains why there’s no option to convert MIDI parts into Pattern Events, despite being able to do the reverse and convert Pattern Events into MIDI parts.
Overall, the Pattern Editor is a welcome addition to Cubase, although it’s hard to avoid feeling the paint might still be wet in a few places. In addition to the quibbles mentioned, most editing actions carried out in the Pattern Editor aren’t added to the undo stack, meaning you can’t undo steps (or steps), which is rather unsettling. And you wonder if Steinberg haven’t been victims of their own conceptual cleverness to some extent, especially when even the Operation Manual appears noticeably sparse in demystifying the subject at hand.
If you’ve ever found yourself creatively stymied by the capabilities of automation, Cubase 14 likely has the answer for you with a new feature called Modulators. And while Cubase isn’t the first music creation application to leverage modular‑synth‑style components to control parameters on the mixer or within plug‑ins, it can be tricky to strike the right balance between flexibility and usability.
Audio‑based tracks now feature eight modulation slots that can each be assigned to one of six Modulator types. Three of these are the bread‑and‑butter modulation sources you might expect — an LFO, Shaper (or envelope generator) and a Step Modulator — which can output a modulation signal that’s either synchronised to the project start, left to run freely (ignoring the transport state), or is retriggered by a MIDI note.
The remaining three Modulator types are something of a mixed bag, starting with the humble Macro Knob that can be used to modulate multiple parameters via a single knob. Envelope Follower takes the audio output of the track on which it’s used (or a side‑chain input) and translates the amplitude of the input into a modulation signal. And, finally, ModScripter, as the name implies, makes it possible to write your own Modulators using JavaScript. This does require a little coding experience, although several examples are included for study purposes or just to be used as additional Modulators. One such script is Intensity, which features a single knob to scale an input signal.
The Modulators page is accessible in either the Lower Zone or a separate window, with both options provided as key commands — making it even more annoying similar key commands aren’t available for the Drum Machine or Sampler Control pages! Modulators can also be conveniently accessed in a new, appropriately named section in the Inspector.
Once a Modulator has been assigned to a slot, it can be connected to a destination by clicking that slot’s Add Connection button. Up to eight connections can be established per slot, although only four such connections are visible at a time because they’re split across two pages. And despite the availability of displays with generous horizontal dimensions, there isn’t an option to extend the number of connections shown in a single page. Also, I couldn’t help thinking it might be useful if one could assign a background colour to help distinguish on slot from another.
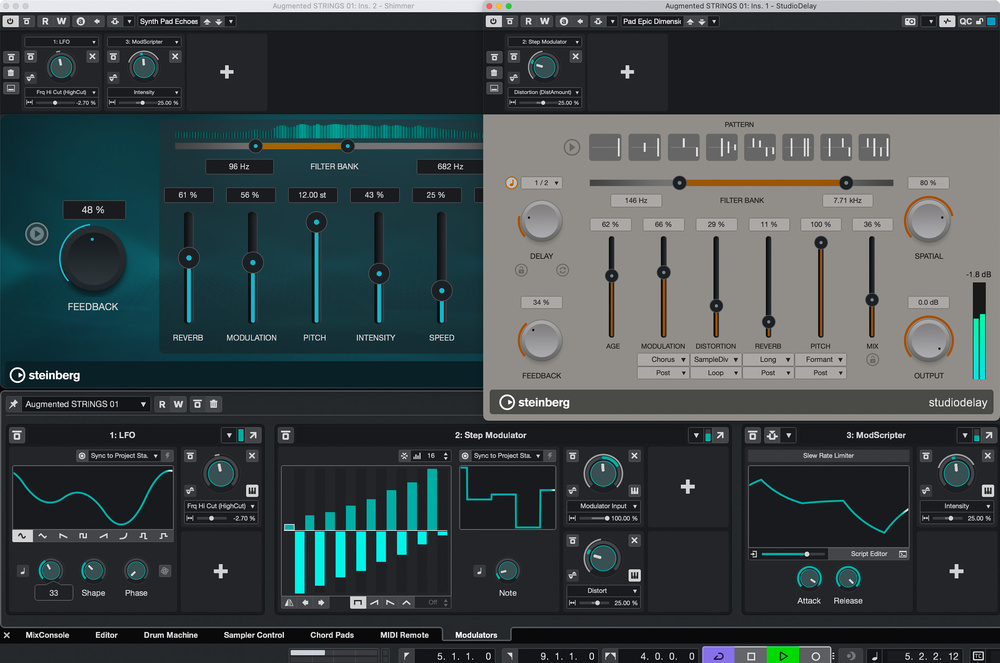
Once a connection has been added, a destination can be chosen by either activating the Learn button and clicking a parameter or selecting the parameter manually from a pop‑up directory. After the connection has been established, you can set the value of the destination parameter, the modulation depth, and whether the polarity of the signal is unipolar (0 to +1) or bipolar (‑1 to +1). For an idea of how you might get started with Modulators, consider the example shown in the screenshot.
Three Modulators have been added to an instrument track featuring two inserts, Shimmer and Studio Delay (see image above). The output signal of the first Modulator — an LFO — modulates the High Frequency Cutoff parameter in Shimmer, while the output signal from the third Modulator — ModScripter (which is behaving as a Slew Rate Limiter thanks to an included preset) — is connected to the Intensity parameter of the same plug‑in.
It’s important to note that a slew rate limiter doesn’t generate a signal, it merely smooths out an incoming signal; and in this example the input signal is coming from the second Modulator — Step Modulator — which is connected to ModShifter’s Modulation Input parameter.
To make things interesting, the Step Modulator has a second connection, routing its output signal directly (without passing through the slew rate limiter) to Studio Delay’s Distortion parameter. What’s particularly neat, though, is that the Modulator Connections assigned to plug‑ins can be displayed above the plug‑in’s interface by enabling the Show Modulation Connections button on that window’s toolbar. This makes it much clearer to understand what’s going on.
There are of course some obvious limitations in this first iteration of Modulators, such as the feature being absent from MIDI tracks. It’s also impossible for a Modulator on one track to modulate a parameter on another track — although, depending on what you’re trying to accomplish, sometimes you can find a workaround by side‑chaining audio from another track to use as a modulation source. Overall, I think the Modulators feature ended up becoming my favourite new addition in Cubase 14.
Cubase 14 is an incredibly ambitious release that debuts three major new areas of functionality: Drum Tracks (including the Pattern Editor and Drum Machine), Modulators and a new Score Editor.
Cubase 14 is an incredibly ambitious release that debuts three major new areas of functionality: Drum Tracks (including the Pattern Editor and Drum Machine), Modulators and a new Score Editor. And while you could criticise this direction as being emulous, since many of these features are similar to those found in comparable music creation software — notably Logic Pro and Bitwig — it’s not as though these applications were the first to invent, say, step sequencers or modular synths.
What’s most important, of course, is that any new features are implemented in a manner that makes sense for Cubase and its users. And, to their credit, Steinberg’s developers are often relentless when incorporating new functionality, covering practically every conceivable usage case for almost any workflow. Such dedication makes it all the more surprising when you notice what seem like obvious omissions in, say, the Pattern Editor, since it lends an unfinished quality to something that evidently has a great deal of potential.
Indeed, if there’s a criticism one could make, it’s that Steinberg’s goals for Cubase 14 were possibly too ambitious, and, as a result, there are perhaps a few more creases than usual to be gradually ironed out. Although, if being too ambitious is the most negative remark I can muster about an update that’s generally brimming with creativity and musicality, perhaps it’s not really a criticism at all.
Cubase 14 introduces a brand‑new Score Editor built with technology from Dorico, Steinberg’s publishing‑grade music notation system, replacing what was previously referred to as the ‘advanced’ score editor. However, rather than attempting to Frankenstein Dorico directly into Cubase, Steinberg’s developers have decided to start with a mostly blank piece of paper.
Perhaps the biggest problem with integrated notation is that production and notation are very different approaches to music creation; and history has shown how being a really good solution for one of these approaches moves you further away from being a really good solution for the other. Therefore, Steinberg have decided to side‑step this problem by refocusing the new Score Editor on the scoring tasks most Cubase users really need, rather than providing a full scoring solution within Cubase that is an unwitting and less good alternative to Dorico.
However, the down side to this change in focus, combined with the fact the Score Editor has been rewritten, means there are fewer features and capabilities than before. It also means, perhaps obviously, that scores created with earlier versions won’t look the same, so you’ll probably want to keep your existing version of Cubase installed alongside if you need to open such projects. But the advantages to this new approach are numerous. Cubase 14’s Dorico‑inspired Score Editor is easier to use, produces higher‑quality results more efficiently, and does a better job at interpreting the musical events of a Cubase project into readable notation. And for most users, this will be enough.
For situations where a greater level of sophistication is required than the new Score Editor can provide, you can now export a Dorico project directly from Cubase that can be opened natively in the other application. And although Steinberg plan to extend the new Score Editor’s functionality, the seamless handing over of a project from Cubase to Dorico is by design, since the intention is for the Score Editor and Dorico to be considered as a complete workflow solution.
As you might imagine, Cubase 14’s modern approach to integrated notation is a big subject, requiring more space than this review can afford to do it justice. Even the manual covering the new Score Editor contains over 100 pages, which should convey something about the depth of its abilities! Look out for a more in‑depth dive into the new Score Editor and its relationship to Dorico in a forthcoming issue.
Every collection of new plug‑ins added to each successive Cubase release presents a new user interface design, and the latest batch included with Cubase 14 is no different. Although, to be fair, Steinberg’s latest plug‑in veneer features a pleasing aesthetic with interfaces that scale proportionately if the plug‑in’s window is resized. Which is really, really useful — except for the fact it highlights how Cubase’s older plug‑ins lack this functionality.
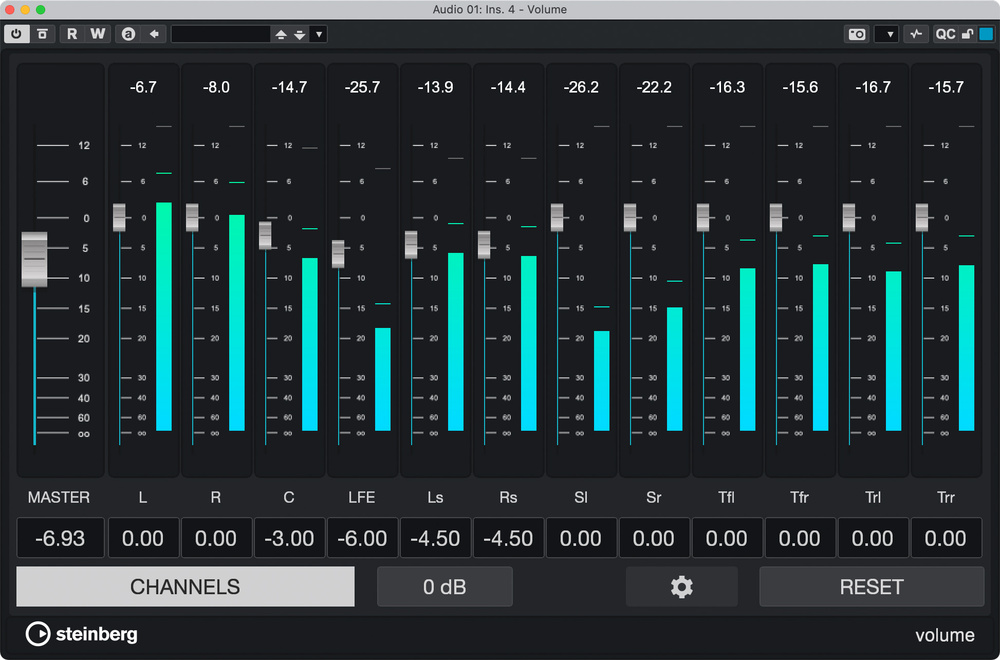
Five new effects are included, two of which are tools. Underwater uses a low‑pass filter to make audio sound as if it’s being played, well, underwater; and while it may have musical uses, it seems designed more for audio post‑production, creating that muffled, indoor sound when a scene is set outdoors. Volume is — and I hope you’re sitting down for this — a gain adjustment tool, although it’s surprisingly versatile since it can be used with any configuration. A single fader controls the overall level, as you would expect, and individual channel faders are also available, which is handy for trimming levels in a 7.1.2 configuration and highlights the usefulness of resizeable interfaces.
Shimmer takes inspiration from Eventide’s ShimmerVerb, emulating an instantly recognisable sonorous effulgence of the early 1980s. Traditionally, this effect was achieved by deploying Eventide’s pitch‑shifting hardware in conjunction with popular digital reverbs. Steinberg describe the effect as a reverb and pitch‑shifter in a delay loop; I’d refer to it as the Mr Sheen of reverbs.
Studio Delay is a bit like a Roland Space Delay on digital steroids and is therefore considerably more exciting than its somewhat pedestrian name suggests. A choice of eight delay patterns is available, each described by an icon representing the number of repeats, relative volumes and pan positions. Four integrated effects — modulation, distortion, reverb, and pitch — add some extra sonic character alongside a few pleasing extras, such as an Age control to simulate older, analogue tape machines. Combined with Shimmer, every sound can be instantly and effortlessly transformed into a pad.
Last but not least, Auto Filter is a playful way to modulate the cutoff frequency of a filter via either its input or side‑chain signals. If you’ve ever used Soundtoys’ FilterFreak, you’ll know what to expect, although this effect is far simpler.
The enduring popularity of VST2 has caused something of an ‘Innovator’s Dilemma’ for Steinberg; after all, it’s easy to forget the company have been trying to phase it out in favour of VST3 for 16 years! However, while Steinberg have mostly continued to support VST2 plug‑ins in the company’s own applications, it’s worth remembering a 2022 statement where Steinberg announced VST2 had been discontinued. For Mac‑based Cubase users, this meant the Apple‑Silicon‑native version of Cubase 12 would be VST3‑only; but Steinberg are now actively nudging Windows and Intel Mac users in the same direction.
In Cubase 14, VST2 support is disabled by default, although rather than forcing you to use Cubase 13 for those VST2 plug‑ins you can’t quite let go of just yet, support can be re‑enabled in the VST Plug‑in Manager window. In the bottom right of the window, simply click the ‘Enable VST2 Plug‑ins’ button, and you’ll notice that, in addition to your VST2 plug‑ins becoming available, the ‘VST2 Plug‑in Path Settings’ button also reappears. However, I would consider this change a final warning. Don’t be surprised if the next major version of Cubase jettisons VST2 altogether.
As usual, Cubase 14 includes numerous workflow improvements that will make life immeasurably better for existing Cubase users. For example, it’s finally possible to re‑order channels in the MixConsole windows directly. And just this one seemingly small feature has caused most die‑hard Cubase users I’ve told to retort: “This is not a small feature!”
A smaller but no less welcome enhancement is the ability to create new MIDI parts (or Pattern Events) anywhere on a track by double‑clicking the appropriate spot in the Event Display. Previously, the Pencil tool was required to do this, or you could only double‑click to create a part between the Left and Right Locators.
Moving along to Audio Events, these no longer contain a Volume Handle to adjust the gain of an event. Instead, in a manner not dissimilar to Pro Tools, the bottom left of each Audio Event now contains a small volume icon. Clicking this displays a mini‑fader to adjust the volume, which no longer changes the selection status of the Audio Event, and the static gain offset value is displayed next to the icon. Previously, Volume Handles could only indicate gain decreases, so this is definitely an improvement; and you can now Shift‑drag the mini‑fader to make fine adjustments or Command‑click the icon to reset the Event’s gain to 0dB.
Pros
- The Pattern Editor brings integrated step sequencing to Cubase.
- Modulators are great for complex, performance‑oriented parameter manoeuvres that would be tedious — if not impossible — to create using automation.
- Channels can be easily re‑ordered in MixConsole — finally!
- The new, Dorico‑inspired Score Editor reimagines integrated notation for the 21st Century.
Cons
- The relationship between MIDI parts and Pattern Events can be confusing.
- A few features you’d hope to find in the Pattern Editor aren’t fully realised yet.
- Modulators can’t be used with MIDI tracks.
Summary
Cubase 14 adds both impressive new features and time‑saving workflow enhancements to Steinberg’s Advanced Music Production System, making this one of the most musically creative Cubase releases for new and existing users alike.
Information
Cubase 14 Pro $579.99, Artist $329.99, Elements $99.99. Upgrade pricing available.
www.steinberg.net
 The VST Plug‑in Manager, with its multi‑panel layout, lets you create custom collections of both VST Effects and VST Instruments to streamline your workflow within Cubase.
 The drop‑down menu located top right lets you create new plug‑in collections and instantly switch between any of the existing collections.
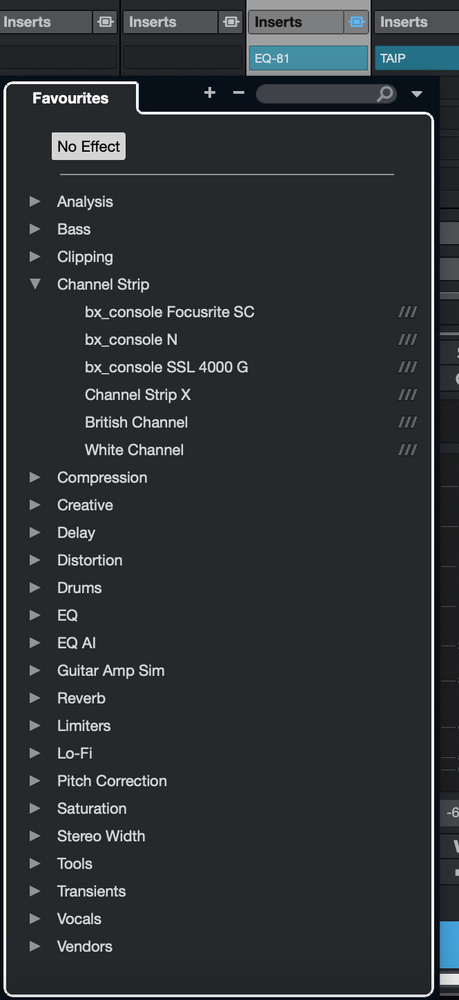 With its custom folder structure and just a few ‘go‑to’ plug‑ins within each category, a ‘favourites’ VST Effects plug‑in collection lets you quickly pick what you need and get on with your mix.By default, our new ‘favourites’ VST Effects collection will contain folders based on Vendor. I prefer to organise my go‑to plug‑in options by type, though, so a useful second step is simply to create a new folder (just click on the New Folder button located top right), name this folder ‘Vendors’, and drag and drop all the individual Vendor folders into this one. This folder will serve as a useful catch‑all category in any collection; while it hides them in a subfolder, if your current ‘favourite’ selections don’t offer you quite what you need for a specific task then you can still easily seek something out here.