Tuesday, July 8, 2025

Monday, July 7, 2025
Cubase 9's Sampler Track
By John Walden
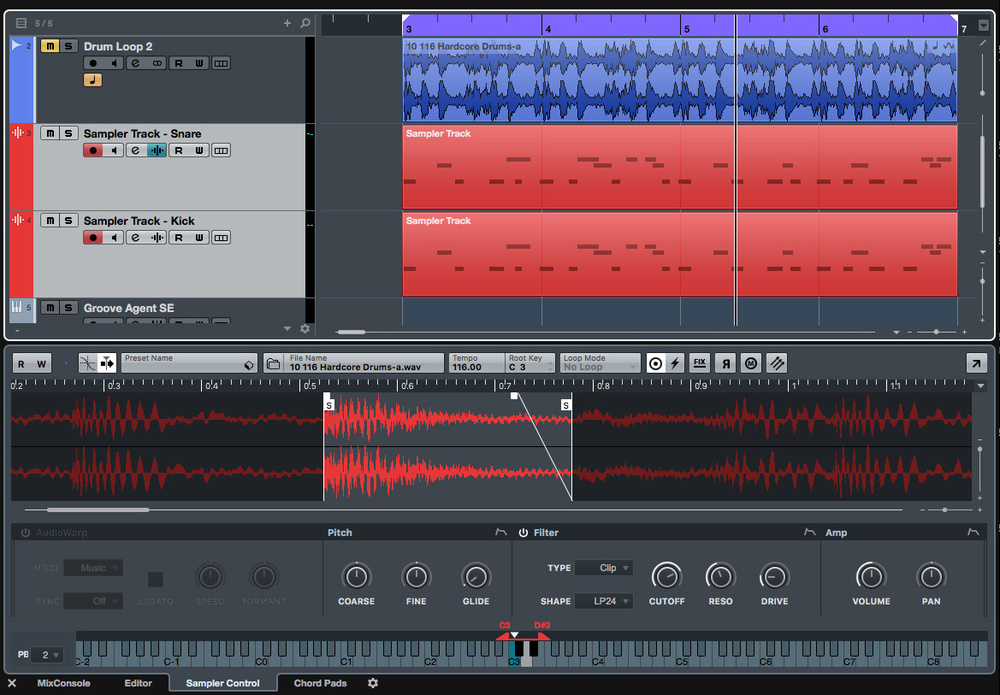 The new Sampler Track and Sampler Control panel. (The reason for the two identical MIDI clips is explained in the main text.)
Amongst Cubase 9’s new features is a whole new track type dedicated to quick and easy sampling.
One of Cubase 9’s big headline new features is the Sampler Track, and it’s available in all three versions of Cubase (Pro, Artist and Elements). Compared with Steinberg’s HALion, or any ‘full-fat’ third-party sampler plug-in, the new Sampler Track is a little modest in terms of its actual sampling functionality, but it scores highly in terms of speed and ease of use, and its deep integration into your Cubase projects.
To explore some of the pros and cons in this first iteration of the Sampler Track, I’ll focus on one example: extracting hits from an audio drum loop. Cubase already offers plenty of scope for experimenting with pre-recorded drum loops — the Sample Editor, AudioWarp, HitPoints and Groove Agent SE features combine to form a powerful toolkit. So, in terms of creative workflow, let’s also consider what the Sampler Track brings to the party.
When A Drag Isn’t A Drag
In the new multi-pane, single-window layout of Cubase 9, one of the four tabs in the Lower Zone is Sampler Control. The easiest way to create a new Sampler Track is to drag and drop an audio sample into the (initially empty) Sampler Control zone from an existing audio track, the MediaBay or even from the Finder/File Explorer of your host OS. This process will automatically create a Sampler Track and map your sample across a default C3 to C6 key range ready to be played via MIDI — it’s super-easy!
The Sampler Control zone is split into four key sections. The waveform display allows you to define the loop and sustain regions for your source sample, while the keyboard display allows you to constrain the MIDI note-mapping range. The key control in the top-most toolbar strip is the Loop Mode. There are various options here, but for our drum-hits example selecting ‘No Loop’ and enabling the One Shot button (the icon looks like a circular target) is a good start.
Creating A Hit
In No Loop mode, all you need do in the waveform display is set the start and end points of the drum hit by dragging the two white ‘S’ markers to the desired locations. Zoom controls (located bottom right of the waveform display) allow more precise control. The markers also include fade options and setting a short fade out can be useful to avoid glitches on playback. That said, you get more control over the amplitude of the sample’s playback by visiting the Amp envelope...
The tiny envelope icon (top-right of the Amp section) replaces the waveform display with a flexible envelope editor, where you can add multiple nodes to create precisely the shape you require. For the example, I’ve chosen the ‘One Shot’ envelope mode and emphasised the attack portion of the drum hit for a bit more impact.
 For our drum-hit example, the Amp envelope is set to One Shot mode and I’ve emphasised the attack portion of the sound. The Pitch and Filter panels offer similar envelope editing.
Similar envelope editors are available for the Pitch and Filter sections, and you can get creative by adding just a little bit of pitch variation and tonal changes via the filter. The different filter types allow gentle overdrive through to more extreme bit crushing. Again, for use with isolated drum hits, setting the pitch and filter envelopes to One Shot mode is best and you can control the degree of envelope modulation via the AMT slider located far-left in each envelope editor panel.
In terms of crafting your drum hit, some other interesting options in the Sampler Control panel are worth exploring — the reverse (backwards ‘R’ icon) button, for example. However, for isolating an individual drum sound from your loop and then tweaking its character, this really is a super-simple process.
Time To Play?
So, we’ve our isolated hit, but what next? For this example application at least, this is perhaps where the ‘first iteration’ of the Sampler Track feature becomes a little more obvious. I’ll focus on what’s possible within Cubase itself (HALion owners may have more options) and, in particular, how you might approach the most common situation, where you wish to extract several different individual drum sounds (eg. kick, snare, hi-hat, tom and crash) from a loop in order to build a basic ‘kit’ that can then be triggered via MIDI. Let’s look at the two most obvious possibilities, both of which work but have an element of clunkiness.
Method 1: Going Groovy
The Sampler Control Toolbar features a very interesting button called ‘Transfer to New Instrument’. Having defined your drum hit, click this to see options to export your selected sample (with all its settings) to a different virtual instrument plug-in. If you select Groove Agent (full version or SE) then, hey presto, a new instrument track is created for you, and your carefully crafted drum hit is inserted on an empty drum pad ready to play.
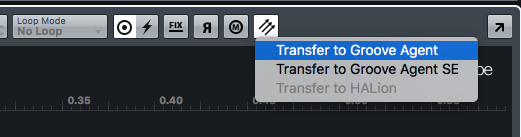 The Transfer to Groove Agent option creates a new instrument track and exports your sample configuration to a new instance of Groove Agent.
Great as this is for your first drum hit, though, if you go back to the Sampler Control section to define a second drum hit, when you repeat the Transfer to New Instrument process it’s placed in a second instance of Groove Agent. Currently, there’s no option to ‘add to existing instrument’ — one for the future, perhaps. That’s a bit of a shame from a workflow perspective, but a simple workaround is to drag and drop this second sample from the pad in your second Groove Agent instance onto an empty pad in your first, and then delete the superfluous Groove Agent Instrument Track. Yes, this a bit clunky, but it works and, importantly, it takes only a few seconds. Repeat as many times as required and you’ll soon have a Groove Agent ‘kit’ ready to play. While Groove Agent already includes similar sample editing features for creating individual hits from within a drum loop, I find the Sampler Control environment a much more inviting place to do this sort of quick-and-simple sample editing.
Method 2: Multi-track Drums
Another option is to create multiple Sampler Tracks (one for each drum hit/sound that’s required) based on different edits from the same original drum loop. This is easy to do but, again, a little clunky. First, note that you have to select all of the Sampler Tracks, and record-enable them, when you want to ‘play’ this kit from a single MIDI keyboard. Second, you’ll need to constrain the MIDI note mapping for each of your Sample Tracks so that each sound only responds to a unique range of MIDI pitches. This is easy to do via the keyboard display in the Sampler Control section for each track, though, and it does mean you can actually define each drum sound to be triggered by two or three keys. (An upside is that using multiple keys per sound can make playing rolls or fast hi-hat patterns much easier!)
 Groove Agent offers similar options to Sampler Control but, to me at least, the latter offers an easier working environment for basic sample editing.
Depending on how you set up the pitch behaviour (for example, if you don’t engage the Fix option, which causes all keys to trigger the sample at the same pitch), the fairly subtle shifts in pitch between adjacent notes can also be used to add useful variation to your performance. You end up with multiple Sampler Tracks to manage, of course, and, when you record your MIDI performances, you’ll create multiple (identical) MIDI parts. But if that bothers you, just hide all these tracks within a Folder Track.
Could Do Better?
There are a couple more general Sample Track ‘gotchas’ it’s worth being aware of. First, if you drag a new sample to an existing Sampler Control zone, the default behaviour is for it simply to replace the existing sample, so any existing (careful) editing will be lost — and there doesn’t appear to be an ‘are you sure?’ warning.
Second, note that any samples you drag and drop from outside the current project are not automatically added to your Project folder. Played on the same host system, these samples will be recalled when you reload your project but, if you want to move the project to another system, you will need to ensure you take these samples with you. The easiest way to do this is to execute the Media/Prepare Archive function as this will gather all the files referenced by the project and ensure they are placed in the project folder.
So, while there’s clearly scope for further development, the Sampler Track is already a very promising new feature and Steinberg deserve a big pat on the back for it — it’s a hugely creative feature that’s easy to get your head around, and allows you to work fast.
Saturday, July 5, 2025
Friday, July 4, 2025
Cubase 9: Retrologue 2's Audio Input
By John Walden
 In this initial configuration, Retrologue’s side-chain input has been activated, the side-chain audio input level set to 7 and all Retrologue’s internal oscillators have been disabled.
Cubase 9 makes side-chain audio inputs possible for VST 3 instruments, the first being Retrologue 2.
Cubase has offered side-chain inputs for insert effects since v4.1, but not for VST instruments. With Cubase 9, though, plug-in designers were given the ability to create instruments with audio inputs. VST is Steinberg’s own technology, so it’s no surprise that the first instrument to exploit this feature is one of theirs: Cubase’s Retrologue 2. The new feature presents a number of creative options which, in essence, all boil down to the ability to apply Retrologue’s filter, effects, arpeggiator and modulation to an audio signal.
To start, you’ll need two tracks. The first, an Instrument Track, hosts an instance of Retrologue. The second contains the audio you wish to route into Retrologue — it could be a WAV file, or another VSTi. If you just want to hear your side-chain audio without any of Retrologue’s own oscillators, configure Retrologue as shown in the first screen (above). Three key things to ensure are that: (a) the Retrologue side-chain input is activated (the orange button on the control strip); (b) all Retrologue’s oscillator modules are off; and (c) the Audio Input knob, which appears only when the side-chain button is engaged, must be set above zero.
 The Pad Audio source track has a pre-fader send to Retrologue’s side-chain input and, with its own fader set to zero, you don’t hear any of the ‘dry’ sample.There are a couple of ways to send audio to the Retrologue side-chain input, the most flexible of which is to use a send from the source audio track. From the Send slot, you can select Retrologue’s side-chain input as a destination. Setting the Send as pre-fader is a good idea, as this allows you both to use the Send level to control the amount of signal going to Retrologue, and to control the level of ‘dry’ signal independently using the source track’s channel fader. Set the latter to full attenuation, and you hear only the audio routed, via the Send, to Retrologue. Hitting playback might confuse you: you’ll hear nothing! But as soon as Retrologue receives a MIDI note, you’ll hear your audio source processed by Retrologue.
Getting Creative
What can you do with your audio in Retrologue? Well, all sorts of creative things: you have access to all the synth’s filter, effects, arpeggiator and modulation features! You can also blend this signal with the dry, unprocessed, version of the audio source (by using the source track’s fader), and/or Retrologue’s three oscillators, its sub-oscillator, noise generator or ring modulation. I covered the basics of Retrologue’s sound engine back in SOS May/June 2016, so I’ll not go over the same ground here. Instead, I’ll take you through a couple of examples to illustrate the potential of the new audio-in feature: an audio drum/rhythmic loop sample, and a sustained pad sample.
Retrologue’s filter, perhaps with some tempo-sync’ed modulation of both the filter and the distortion level, can add a really nice edge to drums — transforming a ‘vanilla’ drum loop into hi-tech electronica in an instant. You can blend (and automate) the wet and dry sounds to taste too. Similarly, with a synth or vocal pad, if you configure the volume to be modulated by a square-wave LFO, you can add a cool rhythmic character to the part, and control its depth and tempo-sync via the modulation settings and LFO Frequency setting. There are, of course, many other, more adventurous, possibilities, but hopefully this illustrates where you can take things.
 In this example, Retrologue’s Modulation Matrix is using LFO2 (itself set to a square waveform) to apply volume modulation to a vocal pad sound source and create a rhythmic effect.
Still, I’ll add a couple of further practical points. First, as mentioned earlier, you only hear this Retrologue-processed sound while Retrologue is receiving a MIDI note, so you can add further rhythmic elements to the sound based on how you trigger the MIDI notes. Second, if you trigger multiple MIDI notes, you hear multiple ‘streams’ of the audio input. This can sound great on a drum loop, especially if you’ve configured the filter or distortion settings to respond to the MIDI velocity or note — each note will yield somewhat different tonality. In both examples, you can also add Retrologue’s arpeggiator/pattern sequencer, one of the synth’s most impressive features; there are loads of excellent pattern presets. Whether your original audio source is a rhythmic drum loop or a sustained pad, engaging the arpeggiator can provide some excellent rhythmic effects.
Pitch Perfect
Something that the configuration described so far doesn’t do, which you might expect it to, is offer any option for real-time ‘key following’ of pitch — once processed, the pitch of the incoming audio remains the same on output regardless of which MIDI notes you use to trigger Retrologue. If you want to ‘play’ your carefully created sound in a melodic fashion, this is somewhat limiting, but there is a simple, albeit slightly clunky, workaround...
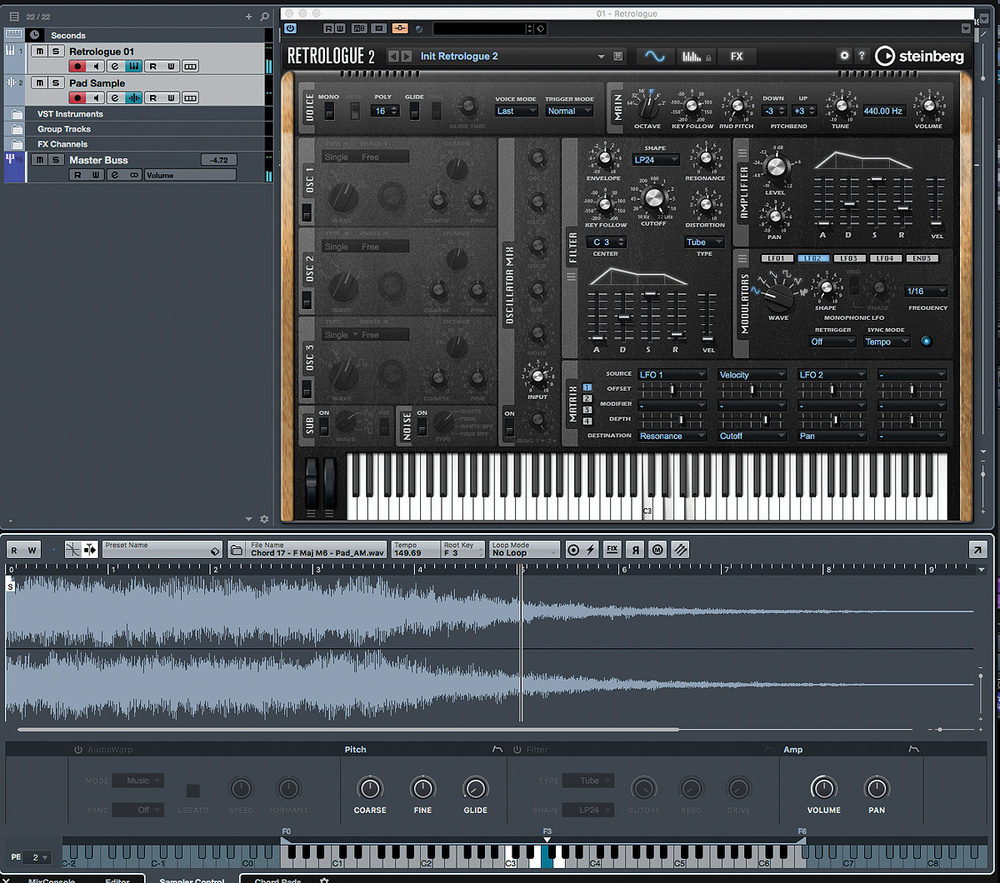 By combining the Sampler Track with Retrologue’s side-chain input, you end up with some considerable potential for DIY sound creation.In last month’s workshop, we took a first look at the new Sampler Track feature. This allows you to take any audio sample (a drum loop or sustained vocal/synth pad sound would suit) and create an ‘instant’ sample-based instrument; the Sampler Track feature can map that sample across the keyboard and, with appropriate settings, re-pitch the sample in real time on playback. In essence, you can quickly create a playable ‘melodic’ instrument from any single audio sample.
Alas, the Sampler Track is, at present, limited in terms of the sound modulation options it offers. But if you combine the Sampler Track with Retrologue’s side-chain input, giving you access to the filter, effects and modulation technology, then you have the best of both.
To do this, simply place the required sample in a Sampler Track and configure this track as the audio-in source for the Retrologue side-chain input. The ‘clunky’ element of all this is that you have to select, and record enable, both the Sampler Track and the Retrologue Track at the same time so they both receive the same MIDI note data from your MIDI keyboard. That aside, this works really well and, whether by accident or design, when you combine Retrologue’s audio input with the Sampler Track, you create a very powerful, creative and easy-to-use sample-based instrument.
For example, try it with a sample taken from your lead vocal — you’ll get instant EDM vocal ear-candy for your breakdown! In addition, once you have melodic parts coming into Retrologue’s side-chain, the arpeggiator features really come into their own. And, of course, you can still blend in Retrologue’s own oscillator sound sources with your side-chain audio for even more options. I’ve no idea if Steinberg have plans to merge or blend these separate features at some point — I hope so! — but in the meantime, this workaround gives you plenty of potential for instant, yet original-sounding, fun!
Thursday, July 3, 2025
Wednesday, July 2, 2025
Cubase Pro: Frequency EQ
 Frequency EQ: eight bands, with flexible filter choices, mid-sides and left-right options in each band, and very useful visual and audio-based feedback.
Cubase 9 Pro’s Frequency EQ plug-in can do everything from gentle tone shaping to delicate mid-sides surgery.
One of the excellent new features Steinberg introduced in Cubase Pro 9 is a brand-new EQ plug-in called Frequency EQ. All the previous EQ options are retained but Frequency EQ is a powerful plug-in, which represents a considerable step up. There are eight available frequency bands and you have the choice, on a per-band basis, of mid-sides or left-right EQ. So while Frequency EQ can most certainly be used for general tone-shaping duties, it’s also capable of much more surgical operations. And as we’ll see in a minute, the UI also includes some very neat features that can assist you in making your EQ decisions.
Setting The Tone
 Bands one and eight offer a selection of cut filters as well as the low-shelf, peak, high-shelf and notch options.In the lower half of the display, the eight EQ bands can be toggled on/off individually. All bands feature low-shelf, peak, high-shelf and notch options, while bands one and eight also offer cut filters, with slopes all the way up to a whopping 96dB per octave — that’s very handy if you want to filter off everything below/above a very specific frequency. The cut filters also benefit from a Q control, which can add resonance (an EQ hump) at the turnover frequency. This can be a great way to add a nice bit of heft to a bass/kick sound while rolling off unwanted rumbles lower down the spectrum.
If you’re working with a stereo source, all eight bands can be used in Stereo (the default), mid-sides or left-right modes. In the latter two modes, each band offers you two sets of controls to apply different EQ settings to each channel. They can also be switched on/off individually.
In the upper half of the display is a real-time spectrum curve (or histogram, if you prefer) with variable-time averaging and peak hold, and a colour-coded EQ curve for the active EQ bands is also displayed. So far, so standard, but as you move the cursor within the spectrum display, Frequency EQ also gives you real-time data: the frequency, gain and musical pitch of the current cursor position are all displayed, which can be very useful.
Frequency EQ also offers two further bits of ‘assistance’. First, if you click on the small keyboard icon (located mid-left), a piano keyboard graphic appears under the spectrum display. Notes that most closely match the centre frequency of a specific EQ band appear colour-coded; hover the mouse over these and you get both note pitch and frequency data in a small pop-up panel. And, if you want, you can drag an existing colour-coded note along the keyboard to change the band’s centre frequency.
Second, and really useful when you’re trying to identify a specific frequency to adjust, is the Auto Listen for Filters option (toggled on/off via the speaker icon, located top right). With this enabled, move any control or drag a frequency band node in the display, and Frequency EQ solos just that band. You can, therefore, really focus in to find a specific ‘problem’ frequency or hear what your shelf or cut filters are doing at the top/low end as you make adjustments. Ear training might not have been Steinberg’s first thought when designing Frequency EQ, but it is a useful bonus of the Auto Listen feature.
Notch it
Let’s look at some examples of applications for Frequency EQ, starting with something that’s simple but can, on occasion, be incredibly useful. As mentioned above, all frequency bands offer a ‘notch’ filter type, which is similar to the standard peak-cut filter but offers control over much narrower frequency ranges. If you have a noise issue within your audio at a very specific frequency — 60 or 50 Hz mains hum would be a good example — then a notch filter might allow you to kill it with minimal impact on the (wanted) frequencies around it. This is pretty surgical stuff; Notch is the narrowest EQ filter Cubase has ever offered.
Incidentally, when trying to locate a problem frequency to cut, it’s common practice to apply a healthy amount of boost and then sweep through the frequency range until you find the offending element. Obviously, the Auto Listen function really comes into its own here. However, once you’ve identified the frequency, Frequency EQ’s INV buttons (located beside each of the Gain knobs) can also instantly convert your boost into exactly the opposite amount of attenuation, which is neat!
Wide Boy
 Frequency EQ can be great for drum overheads. Here band one cuts the very low end while also giving the kick drum a lift. Band two is set to M-S mode and helps focus the low end in the centre of the stereo image, while band eight, also in M-S mode, adds a little extra to the sides at the high-mids/top-end for additional stereo width. All other bands have been switched off.Given the mid-sides and left-right options, one application of Frequency EQ is to manipulate the stereo image of a recording. There are lots of possibilities but two examples illustrate the potential. First, imagine you have recorded a stereo guitar track (perhaps it’s a two-amp electric guitar performance, with a mic on each cab). Come mix time, you find you need to EQ the left and right sides of the stereo file differently. Previously in Cubase, this would have required the stereo file to be split into two mono tracks. With Frequency EQ, though, you can just switch a band or two to L-R mode and tweak away to your heart’s content. This could be done for corrective or creative reasons — some gentle cuts and boosts in the mid/high-mid frequency ranges, but applied at slightly different centre frequencies, can usefully increase the apparent stereo separation of the two channels.
A second example is a stereo drum track and, more specifically, a stereo drum overhead recording. At the low end, you can set a band to M-S mode and apply a little cut to the sides signal, along with a little boost to the mids — this can help focus the kick drum into the centre of the stereo image more tightly, where that’s needed. At the same time, should you wish, you can push some of the higher-frequency drum resonances and cymbals a little wider in the stereo image by applying a high-frequency boost to the sides and cut to the mids. Mid-sides or left-right EQ can also be particularly useful for teasing out specific parts of the drum kit within the stereo overhead recordings, making it much easier to emphasis individual elements where desired.
Decluttering Reverbs
 Clean up your reverb return? As described in the main text, M-S EQ can help you ‘place’ your reverb to keep it audible while decluttering the centre of the stereo field.Another neat mid-sides EQ trick involves Cubase’s reverb FX Channels. In a busy mix, a bit of EQ can often be applied to the return from the reverb to roll off some of the low end and, for a warmer sound, some of the top end also. Frequency EQ’s cut filters can perform this role and stop the reverb cluttering up the mix.
However, you can take this a little bit further by applying a mid-sides peak filter. For example, you might apply some gain reduction in the low-mid frequency range to just the mid channel to ‘clear out’ the reverb from the (often overcrowded) centre of the stereo image. You might apply an opposite boost to the sides, either at the same frequency, or perhaps slightly higher, to place a little more of the reverb at the extremes of the stereo image where it might be competing less with other elements.
Master Tweaks
 EQ to ‘rescue’ a stereo mix needs to be subtle. Here I’ve tried to lift a vocal with a bit of mid-band-only gain at around 300Hz, while also taming a keyboard part on the left side of the stereo image at around 1kHz.Mid-sides and left-right EQ can also be very useful at the mastering stage, so here are two quick examples. First, mid-sides EQ can be used as a ‘sweetening’ tool on a stereo mix, in much the same way as described above for a drum bus, to focus the lower frequencies in the centre of the stereo image and to add a little extra stereo width at the top end. Second, imagine you have a stereo mix and you realise there’s a problem with a specific instrument, but you don’t have the option to go back to the mix to attend to it. This might be anything from the lead vocal needing a subtle volume adjustment, to the kick drum needing a little boost or the left-sided crash cymbal needing to be tamed a little. Because you can selectively apply EQ to the mid, sides, left or right channels, you can apply gain boost/cut at not just the dominant frequency of the problem instrument (which you could do with any EQ) but also focused on its spatial position in the mix. Yes, this might be a bit of a rescue job, but where the tweaks needed are modest it could be a life-saver — and with automation to target specific points in time, your surgery might be made less invasive still.
Frequency EQ is by far the most powerful, versatile and intuitive EQ plug-in ever bundled with Cubase — the above examples really just scratch the surface of what’s possible. Naturally, it is only available to ‘Pro’ users, but if you’ve been looking for an extra excuse to move to Cubase Pro 9, Frequency EQ might be it!